Thursday, August 13, 2020

Deploying an ASP.NET Core application that uses LocalDB to IIS on Windows 10

 LocalDB is intended as a light-weigh development version SQL Server and is not supposed to be used in production.  Similarly, it is not the best version of SQL Server to be used with a web app hosted on IIS. 

Having said that, there are circumstances when a developer may wish to run an ASP.NET Core web app that works with LocalDB on IIS. This post explains one way I got this to work. 

Assumptions: It is assumed the following is running on your Windows 10 computer:

  • git
  • Visual Studio 2019 (or later)
  • LocalDB
  • .NET Core 3.1
  •  dotnet-ef tool 
  • Internet Information Services (IIS)

In this tutorial we will deploy an ASP.NET 3.1 Web API application that uses LocalDB to IIS . As a starting point, you can clone a simple ASP.NET Core 3.1 web application from https://github.com/medhatelmasry/SchoolAPI-3.1.git.

To clone the above application, go to a suitable working directory in a terminal window and run the following command:

git clone https://github.com/medhatelmasry/SchoolAPI-3.1.git

You can then go into the newly created SchoolAPI-3.1 directory with:

cd SchoolAPI-3.1

Let us quickly test this application to make sure that it works. Type the following in a terminal window:

dotnet-ef database update

dotnet run

You should see the following when you point your browser to http://localhost:5000/api/students:

Hit CTRL C to stop the server.

There is a solution (.sln) file in the root directory of the web app. Open this solution in Visual Studio 2019. This can easily be done by typing the following in the terminal window:

SchoolAPI.sln

Once in Visual Studio, edit the appsettings.json file and have a peek at the connection string, which looks like this:

"DefaultConnection": "Server=(localdb)\\mssqllocaldb;Database=School;Trusted_Connection=True;MultipleActiveResultSets=true"

We will need to do a minor change to this connection string to make it work when our web app is hosted by IIS.

Since we are in Visual Studio 2019, let us run the web application by hitting CTRL F5. We should see the same result as we saw previously when we started the app from a terminal window. 

Install ASP.NET Core Hosting Bundle

For IIS to support ASP.NET Core, you will need to install the “ASP.NET Core Hosting Bundle”. Point your browser to https://dotnet.microsoft.com/download/dotnet-core/3.1. Click on the “Hosting Bundle” link.


A file named dotnet-hosting-3.1.6-win.exe gets downloaded to your computer. Go ahead and run this installer.

Publish web app to IIS

Let us now publish our application to IIS. Create a folder named SchoolAPI under c:\inetpub\wwwroot, which is the the root directory of IIS. 

Back in Visual Studio, right click on the SchoolAPI node in Solution Explorer and select Publish...

On the Publish dialog, select Folder, then click Next.

Use the Browse... button to select the c:\inetpub\wwwroot/SchoolAPI directory, then click on Finish.


Click on Publish.

Let us create a website in IIS. Start "Internet Information Services (IIS) Manager". Right-click on the Sites node then select "Add Website..."


Add a website as shown below.


Select the "Application Pools" node then double-click on the SchoolAPI pool in the center.

Select "No Managed Code" in the ".NET CLR version" selection list, then click OK.

Point your browser to http://localhost:8088/api/students. The web application will fail with an HTTP ERROR 500. Unfortunately, there is not enough information to tell us what the problem is. I will describe to you two simple ways of finding out what the problem is:

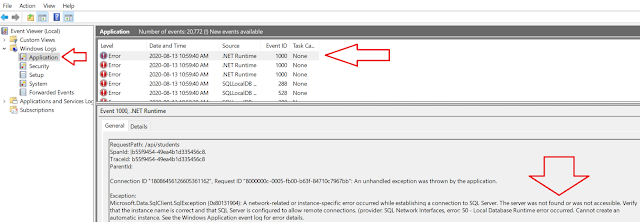
1) Start the Windows "Event Viewer". Select "Windows Logs" >> Application, then read the first couple of errors.


You will come across this error, which suggests that the app is unable to connect to SQL Server:

A network-related or instance-specific error occurred while establishing a connection to SQL Server. The server was not found or was not accessible. 

2) To see a more descriptive error message in your browser, you can also set the environment variable ASPNETCORE_ENVIRONMENT to Development. Add this to the C:\inetpub\wwwroot\SchoolAPI\web.config file inside the <aspNetCore … > section. Once you do so, your < aspNetCore…> block will look like this:

<aspNetCore processPath="dotnet" arguments=".\SchoolAPI.dll" 

  stdoutLogEnabled="false" stdoutLogFile=".\logs\stdout" hostingModel="inprocess" >

  <environmentVariables>

    <environmentVariable name="ASPNETCORE_ENVIRONMENT" value="Development" />

  </environmentVariables>

</aspNetCore>

Save the web.config file, then refresh the page in your browser. A more detailed error message will display.

One way to fix the database connectivity problem

I have one solution to this problem so that IIS can communicate with LocalDB. I welcome any other suggestions. 

From within a terminal window, execute the following commands:

sqllocaldb start MSSQLLocalDB
sqllocaldb info MSSQLLocalDB
You should experience output similar to the following:

C:\>sqllocaldb start MSSQLLocalDB
LocalDB instance "mssqllocaldb" started.

C:\>sqllocaldb info MSSQLLocalDB
Name:               mssqllocaldb
Version:            13.1.4001.0
Shared name:
Owner:              bingo
Auto-create:        Yes
State:              Running
Last start time:    2020-08-13 11:33:00 AM
Instance pipe name: np:\\.\pipe\LOCALDB#1961D8A7\tsql\query

We can use the "Instance pipe name" as the name of the server in the database connection string. Copy the value of the "Instance pipe name" without 'np:'. In the above example it would be '\\.\pipe\LOCALDB#1961D8A7\tsql\query'. Go to Visual Studio 2019, open appsettings.json and paste contents of your clipboard instead of '(localdb)\\mssqllocaldb' in the connection string. In my case, the connection string looked like this:

"DefaultConnection": "Server=\\\\.\\pipe\\LOCALDB#1961D8A7\\tsql\\query;Database=School;Trusted_Connection=True;MultipleActiveResultSets=true"

NOTE: When you pasted the name pipe, all \ are escaped to \\. This is OK and do not be alarmed.

If you run the web application in Visual Studio, it should be working as expected:

Now, let us do the same change to C:\inetpub\wwwroot\SchoolAPI\appsettings.json. You can simply replace the connection string in C:\inetpub\wwwroot\SchoolAPI\appsettings.json with the connection string from appsettings.json in Visual Studio 2019.

Thereafter, point your browser to http://localhost:8088/api/students. This time, we will get a different error:

SqlException: Login failed for user 'IIS APPPOOL\SchoolAPI'.

This error suggests that, although the database was found, IIS failed to login to the database using account 'IIS APPPOOL\SchoolAPI'. To fix this problem, we will get IIS to use a different account. Select the SchoolAPI application pool, then click on 'Advanced Settings..." on the right-side.


Click on the ... beside Identity.


Change the "Built-in account:" to LocalSystem, then click on OK followed by OK again.
By changing the account to LocalSystem, IIS will try and login to our database using a built-in account named 'NT AUTHORITY\SYSTEM'. We need to give this account access to our School database in LocalDB. 

Download and install SQL Server Management Studio (SSMS) from https://docs.microsoft.com/en-us/sql/ssms/download-sql-server-management-studio-ssms.

Start SSMS. Use "Windows Authentication" to login into server name "(localdb)\MSSQLLocalDB".


Right-click on Security >> Logins and select "New Login...".
Click on Search...

Enter 'system'.

Click on "Check Names". When the account is found, you will see SYSTEM in uppercase and underlined.

Click on OK. Next, select the "User Mapping" node on the left side, check the School database, then check db_owner at the bottom.


Click on OK to close the Login - New dialog.

Browser to http://localhost:8088/api/students. The page should display data as expected.

NOTE: If you receive an error suggesting that the database cannot be found, then run these command again in a terminal window and update the "Instance pipe name" in the appsettings.json connection string.

sqllocaldb start MSSQLLocalDB
sqllocaldb info MSSQLLocalDB

As I said before, this is really an academic exercise and that LocalDB should never be used in production. SQL Express is a much better option.

Sunday, August 9, 2020

Deploy client-side Blazor & Web API to IIS on Windows 10

Not all website deployment destinations are in the cloud. There are still on-premises scenarios when there is a need to deploy our modern apps to IIS. In this tutorial I show how you would go about running a client-side Blazor web app, together with an API endpoint, under IIS (Internet Information Services) on a Windows 10 development machine. The steps are very similar to doing the same thing on Windows Server. 

Prerequisites:

The following are assumed:

  • You are working on a Windows 10 computer. The version I used for this article is version 2004. You have Visual Studio 2019 installed on your computer. The exact version of Visual Studio 2019 used for this tutorial is 16.7.0
  • You have .NET Core 3.1 (or later) installed on your computer. At the time of writing this post, I have version .NET Core version 3.1.400 installed on my computer.

Create a hosted client-side Blazor application

Let us create a simple Blazor solution that consists of the following projects:
  1. A server-side API backend ASP.NET application
  2. A client-side Blazor application
The quickest way to create the above projects is to execute the following command from a terminal window in a working directory on your hard drive:

dotnet new blazorwasm -o BlazorIIS --hosted --no-https

The above command will create solution in a new directory named BlazorIIS without support for SSL. The solution will consist of the following three projects:
  • A client-side blazor application
  • A server-side API application
  • A shared .NET Standard 2.1 class library project
We will make some changes to the the first two application so that we prepare them for deployment to IIS.

Start Visual Studio 2019 and open the solution file named BlazorIIS.sln in the BlazorIIS folder.

Changes to the server-side API application

Make the following changes to the server-side API application.:

1) Edit the Properties/launchSettings.json file in the server-side API application. Around line 6, change the port number on the applicationUrl setting to 55555. Therefore, the setting will look like this:

"applicationUrl": "http://localhost:55555"

2) We need to enable CORS on the server-side API application. This is done by making these changes to Startup.cs:

Add the following code to the ConfigureServices() method:

services.AddCors(options => {
  options.AddPolicy("ApiPolicy",
      builder => builder
  .AllowAnyHeader()
  .AllowAnyOrigin()
  .AllowAnyMethod()); ;
});

Add this line of code in the Configure() method between app.UseRouting() and app.UseEndpoints():

app.UseCors("ApiPolicy");

Finally, add this annotation to the Controllers/WeatherForecastController.cs file just above the class declaration:

[EnableCors("ApiPolicy")]

The WeatherForecaseController class declaration should look like this:

[ApiController]
    [Route("api/[controller]")]
    [EnableCors("ApiPolicy")]
    public class WeatherForecastController : ControllerBase

Changes to the client-side blazor application

1) Edit the Properties/launchSettings.json file in the client-side Blazor application. Also, around line 6, change the port number on the applicationUrl setting to 44444. Therefore, the setting will look like this:

"applicationUrl": http://localhost:44444

2) To make the Blazor app run under IIS, I disabled integrity check by adding a BlazorCacheBootResources tag in the app’s .csproj file inside the <PropertyGroup> section:

<BlazorCacheBootResources>false</BlazorCacheBootResources>

3) The WeatherForecast API service is being called from the Blazor app from the Pages/FetchData.razor page. Open this file in the Visual Studio editor, go to the bottom of the file and change the single line of code inside the OnInitializedAsync() method so that it makes a proper request to the service on the server. The method should look like this:

protected override async Task OnInitializedAsync() {
    forecasts = await Http.GetFromJsonAsync<WeatherForecast[]>("http://localhost:55555/WeatherForecast");
}

Test the application in Visual Studio 2019

Let us make sure the application works in Visual Studio 2019 before we attempt to deploy it into IIS. In ‘Solution Explorer’ right-click on the solution node and select Properties.


Under tab “Common Properties” >> “Startup Project”, click on the “Multiple startup projects” radio button.


Move the server project so that it is above the client project:


Next, change the Action for both the server and client projects to Start.


Click on both the Apply and OK buttons respectively. Now, run the solution by hitting F5 on your keyboard. If you click on “Fetch data” on the left side navigation you should see data is read from the API service.


Publishing our server and client apps

Go into a terminal window inside the root directory of the API server project and execute the following command that produces a release version of your server-side application inside a folder named published:

dotnet publish -c Release -o published

Execute the same command in the root of the client-side Blazor project.

Enabling the IIS feature in Windows 10

We can now start the process of deploying both server-side and client-side application to IIS. If you have not done so yet, you will need to install the IIS (Internet Information Services) feature on your Windows 10 computer. Right-click on the start button the select “Apps and Features” at the very top of the list.


On the right-side, click on “Programs and Features”.


Click on “Turn Windows features on or off” on the left-side.


NOTE: A quicker way to arrive at the same above window is: Run >> optionalfeatures

Expand “Internet Information Services” and “World Wide Web Services”, then enable these features:
  • Common HTTP Features
  • Health and Diagnostics
  • Performance Features
  • Security

Similarly, enable “IIS Management Console” under “Internet Information Services” >> “Web Management Tools”. This will provide us with the IIS Management console that we will use to create websites.


Once you click on OK, these features will be installed on your computer. Upon completion, navigate to c:\initpub\wwwroot and you will find these default files. 

The iisstart.htm file will be served when you point your browser to http://localhost:


NOTE: It is advisable to reboot your computer at this point.

Adding .dat and .wasm MIME types to IIS

By default, IIS is not aware of two MIME types that are important Blazor artifacts. Therefore, we need to add these MIME types to IIS. Start “Internet Information Services (IIS) Manager”. Click on the root node on the left-side, which displays your computer name, then double-click on “MIME Types”:


Click on Add on the right-side, then add the following MIME types:

File name extension

MIME Type

.dat

application/octet-stream

.wasm

application/wasm


Install ASP.NET Core Hosting Bundle

For IIS to support ASP.NET Core, you will need to install the “ASP.NET Core Hosting Bundle”. Point your browser to https://dotnet.microsoft.com/download/dotnet-core/3.1. Click on the “Hosting Bundle” link.


A file named dotnet-hosting-3.1.6-win.exe gets downloaded to your computer. Go ahead and run this installer.

Deploying the server-side ASP.NET API application

In “File Explorer”, create a folder named weather-api under c:\inetpub\wwwroot. Copy the files in your published folder under your server-side API project into this newly created directory.

Inside “IIS Manager”, right-click on the Sites node the select “Add Website…”. 


Set the various values as shown below:


Click on the left-side “Application Pools” node.

In the middle of the windows, double click on weather-api.


In the “Edit Application Pool” dialog, set “.NET CLR version” to “No Managed Code”:


Click on OK. Navigate to http://localhost:55555/weatherforecast and you should experience the following:


This means that our API is deployed to IIS and works as expected.

Deploying the client-side Blazor application

In “File Explorer”, create another folder named blazor-weather-client under c:\inetpub\wwwroot. Copy the files in your published/wwwroot folder under your Blazor client-side project into c:\inetpub\wwwroot\blazor-weather-client

Just like you did before, inside IIS, create a website for the Blazor client-side application named blazor-weather-client as follows:


Just as you previously did with the API application, edit the Application Pool named blazor-weather-client and change the “.NET CLR version” to “No Managed Code”.

Point your browser to http://localhost:44444/, the client-side Blazor application should show up:


The real test is when you click on ‘Fetch data’. Click on it on the left-side and you should see that data is being read from the other server-side API application also being hosted by IIS but at another website.


These same principles should help you with more production ready scenarios like deployment to IIS on Windows Server and deployment of a Web API application that talks to a database.

Happy coding