Showing posts with label MVC. Show all posts

Monday, December 11, 2023

Mix Blazor with ASP.NET Core MVC

In this tutorial I will show you how you can inject Blazor components into your regular ASP.NET Core MVC web application. We will integrate the free QuickGrid Blazor components into our MVC application. 

Source code: https://github.com/medhatelmasry/MvcWithBlazor

Companion video: https://youtu.be/dsoGW59Vtpk

Prerequisites

It is assumed that you have installed the following on your computer:
  • .NET 8.0
  • Visual Studio Code editor

Getting Started

In a suitable working directory, create an ASP.NET MVC 8.0 web application with the following terminal window command:

dotnet new mvc -f net8.0 --name MvcWithBlazor

Change into the new directory with:

cd MvcWithBlazor

Add the following Blazor QuickGrid package with this terminal window command:

dotnet add package Microsoft.AspNetCore.Components.QuickGrid -v 8.0.0

Start Visual Studio Code with:

code .

To keep it simple, we will create some hard-coded student data. Create a Student.cs class file inside the Models folder with the following code:

namespace MvcWithBlazor.Models;
public class Student
{
    required public int? Id { get; set; }
    required public string FirstName { get; set; }
    required public string LastName { get; set; }
    required public string School { get; set; }
    public static IQueryable<Student> GetStudents()
    {
        int ndx = 0;
        List<Student> students = new List<Student>() {
            new Student() { Id = ++ndx, FirstName="Max", LastName="Pao", School="Science" },
            new Student() { Id = ++ndx, FirstName="Tom", LastName="Fay", School="Mining" },
            new Student() { Id = ++ndx, FirstName="Ann", LastName="Sun", School="Nursing" },
            new Student() { Id = ++ndx, FirstName="Joe", LastName="Fox", School="Computing" },
            new Student() { Id = ++ndx, FirstName="Sue", LastName="Mai", School="Mining" },
            new Student() { Id = ++ndx, FirstName="Ben", LastName="Lau", School="Business" },
            new Student() { Id = ++ndx, FirstName="Zoe", LastName="Ray", School="Mining" },
            new Student() { Id = ++ndx, FirstName="Sam", LastName="Ash", School="Medicine" },
            new Student() { Id = ++ndx, FirstName="Dan", LastName="Lee", School="Computing" },
            new Student() { Id = ++ndx, FirstName="Pat", LastName="Day", School="Science" },
            new Student() { Id = ++ndx, FirstName="Kim", LastName="Rex", School="Computing" },
            new Student() { Id = ++ndx, FirstName="Tim", LastName="Ram", School="Business" },
            new Student() { Id = ++ndx, FirstName="Rob", LastName="Wei", School="Mining" },
            new Student() { Id = ++ndx, FirstName="Jan", LastName="Tex", School="Science" },
            new Student() { Id = ++ndx, FirstName="Jim", LastName="Kid", School="Business" },
            new Student() { Id = ++ndx, FirstName="Ben", LastName="Chu", School="Medicine" },
            new Student() { Id = ++ndx, FirstName="Mia", LastName="Tao", School="Computing" },
            new Student() { Id = ++ndx, FirstName="Ted", LastName="Day", School="Business" },
            new Student() { Id = ++ndx, FirstName="Amy", LastName="Roy", School="Science" },
            new Student() { Id = ++ndx, FirstName="Ian", LastName="Kit", School="Nursing" },
            new Student() { Id = ++ndx, FirstName="Liz", LastName="Tan", School="Medicine" },
            new Student() { Id = ++ndx, FirstName="Mat", LastName="Roy", School="Tourism" },
            new Student() { Id = ++ndx, FirstName="Deb", LastName="Luo", School="Medicine" },
            new Student() { Id = ++ndx, FirstName="Ana", LastName="Poe", School="Computing" },
            new Student() { Id = ++ndx, FirstName="Lyn", LastName="Raj", School="Science" },
            new Student() { Id = ++ndx, FirstName="Amy", LastName="Ash", School="Tourism" },
            new Student() { Id = ++ndx, FirstName="Kim", LastName="Kid", School="Mining" },
            new Student() { Id = ++ndx, FirstName="Bec", LastName="Fry", School="Nursing" },
            new Student() { Id = ++ndx, FirstName="Eva", LastName="Lap", School="Computing" },
            new Student() { Id = ++ndx, FirstName="Eli", LastName="Yim", School="Business" },
            new Student() { Id = ++ndx, FirstName="Sam", LastName="Hui", School="Science" },
            new Student() { Id = ++ndx, FirstName="Joe", LastName="Jin", School="Mining" },
            new Student() { Id = ++ndx, FirstName="Liz", LastName="Kuo", School="Agriculture" },
            new Student() { Id = ++ndx, FirstName="Ric", LastName="Mak", School="Tourism" },
            new Student() { Id = ++ndx, FirstName="Pam", LastName="Day", School="Computing" },
            new Student() { Id = ++ndx, FirstName="Stu", LastName="Gad", School="Business" },
            new Student() { Id = ++ndx, FirstName="Tom", LastName="Bee", School="Tourism" },
            new Student() { Id = ++ndx, FirstName="Bob", LastName="Lam", School="Agriculture" },
            new Student() { Id = ++ndx, FirstName="Jim", LastName="Ots", School="Medicine" },
            new Student() { Id = ++ndx, FirstName="Tom", LastName="Mag", School="Mining" },
            new Student() { Id = ++ndx, FirstName="Hal", LastName="Doe", School="Agriculture" },
            new Student() { Id = ++ndx, FirstName="Roy", LastName="Kim", School="Nursing" },
            new Student() { Id = ++ndx, FirstName="Vis", LastName="Cox", School="Science" },
            new Student() { Id = ++ndx, FirstName="Kay", LastName="Aga", School="Tourism" },
            new Student() { Id = ++ndx, FirstName="Reo", LastName="Hui", School="Business" },
            new Student() { Id = ++ndx, FirstName="Bob", LastName="Roe", School="Medicine" },
        };
        return students.AsQueryable();
    }
}

Create a Components folder and add to it the following files with their respective contents:

_Imports.razor

@using System.Net.Http
@using System.Net.Http.Json
@using Microsoft.AspNetCore.Components.Forms
@using Microsoft.AspNetCore.Components.Routing
@using Microsoft.AspNetCore.Components.Web
@using static Microsoft.AspNetCore.Components.Web.RenderMode
@using Microsoft.AspNetCore.Components.Web.Virtualization
@using Microsoft.JSInterop
@using MvcWithBlazor
@using MvcWithBlazor.Components 
@using Microsoft.AspNetCore.Components.QuickGrid
@using MvcWithBlazor.Models

Routes.razor

<Router AppAssembly="@typeof(Program).Assembly">
    <Found Context="routeData">
        <RouteView RouteData="@routeData" />
        <FocusOnNavigate RouteData="@routeData" Selector="h1" />
    </Found>
</Router>

App.razor

<!DOCTYPE html>
<html lang="en">
<head>
    <meta charset="utf-8" />
    <meta name="viewport" content="width=device-width, initial-scale=1.0" />
    <base href="/" />
    <link rel="stylesheet" href="MvcWithBlazor.styles.css" />
    <HeadOutlet />
</head>
<body>
    <Routes />
    <script src="_framework/blazor.web.js"></script>
</body>
</html>

Note that you need adjust the above highlighted text with your application name.

Inside the Components folder, add a sub-folder named Pages. Inside the Components/Pages folder add a Students.razor component file with this code:

@page "/students"
@rendermode InteractiveServer
<PageTitle>Students</PageTitle>
<h1>Students</h1>
<QuickGrid Items="@students" Pagination="@pagination">
    <PropertyColumn Property="@(_ => _.Id)" Sortable="true" />
    <TemplateColumn Title="Name" SortBy="@sortByName">
        <div class="flex items-center">
            <nobr>
                <strong>@context.FirstName @context.LastName</strong>
            </nobr>
        </div>
    </TemplateColumn>
    <PropertyColumn Property="@(_ => _.School)" Sortable="true" />
</QuickGrid>
<Paginator State="@pagination" />

@code {
    IQueryable<Student> students = Student.GetStudents();
    PaginationState pagination = new PaginationState { ItemsPerPage = 10 };
    GridSort<Student> sortByName = GridSort<Student>
    .ByAscending(_ => _.FirstName).ThenAscending(_ => _.LastName);
}

Adding appropriate services and middleware to Program.cs

Add the following using statement at the top of Program.cs:

using MvcWithBlazor.Components;

Add the following razor component services before the line that calls builder.Build():

builder.Services
.AddRazorComponents()
.AddInteractiveServerComponents()
.AddCircuitOptions(options => options.DetailedErrors = true); // for debugging razor components

Add this anti-forgery middleware right after 'app.UseRouting();':

app.UseAntiforgery();

Place this code before the line that calls app.Run():

app.MapRazorComponents<App>()
.AddInteractiveServerRenderMode();

Try it out

Run the application with the following terminal window command:

dotnet watch

When the home page loads in your browser, try the /students page. You should see a page that looks like this:


You can sort any column by clicking on the column title and the paging should also work. We have succeeded in mixing Blazor with ASP.NET MVC. 

Injecting Blazor components into MVC views

We can inject Blazor components directly into MVC .cshtml views. We must first make the appropriate namespaces visible to the environment for the MVC views. Add the following using statements to Views/_ViewImports.cshtml:

@using MvcWithBlazor.Components
@using MvcWithBlazor.Components.Pages

Note that you must adjust the above highlighted text with the appropriate name of your application.

Add the following <base> tag and Component Tag Helper for a HeadOutlet component to the <head> markup of Views/Shared/_Layout.cshtml:

<base href="~/" />
<component type="typeof(Microsoft.AspNetCore.Components.Web.HeadOutlet)" 
    render-mode="ServerPrerendered" />

The HeadOutlet component is used to render head (<head>) content for page titles (PageTitle component) and other head elements (HeadContent component) set by Razor components.

Also, in the same Views/Shared/_Layout.cshtml file, add a <script> tag for the blazor.web.js script immediately before the Scripts render section (@await RenderSectionAsync(...)):

<script src="_framework/blazor.web.js"></script>

Next, add the following tag to the bottom of home page Views/Home/Index.cshtml:

<component type="typeof(Students)" render-mode="ServerPrerendered" />

Point your browser to the home page of the ASP.NET Core MVC app. You should experience a page that has the Students component embedded inside it.

Paging and sorting work as expected.

Conclusion

You can do the same with ASP.NET Core Razor Pages.

I hope you found this article useful.

Monday, September 25, 2023

Code First development with ASP.NET MVC

 In this tutorial, you will develop a data driven web application using ASP.NET MVC, SQL Server, and Entity Framework. We shall use Visual Studio Code for our editor. The data model will be based on a Team/Player relationship in sports. We will use SQL Server running in a Docker Container.

Source code: https://github.com/medhatelmasry/TeamPlayersMvc

Assumptions

It is assumed that you have the following installed on your computer:

  • Visual Studio Code
  • .NET 7.0 SDK
  • Docker Desktop

Visual Studio Code Extension

Add this Visual Studio Code Extension if you do not have it already:

The Data Model

We will use the following class to represent a Team:

public class Team {
    [Key]
    public string? TeamName { get; set; }
    public string? City { get; set; }
    public string? Province { get; set; }
    public string? Country { get; set; }

    public List<Player>? Players { get; set; }
}

The primary key is the TeamName and a team has many players.

The following class represents a Player:

public class Player {
    public int PlayerId { get; set; }
    public string? FirstName { get; set; }
    public string? LastName { get; set; }
    public string?  Position { get; set; }

    public string? TeamName { get; set; }

    [ForeignKey("TeamName")]
    public Team? Team { get; set; }
}

The primary key is PlayerId and each player must belong to a team.

Getting started

In a working directory, run the following command in a terminal window to create a Razor Pages web application in a folder names TeamPlayers:

dotnet new mvc -f net7.0 -o TeamPlayersMvc

Change to the newly created folder with terminal command:

cd TeamPlayersMvc

For the application to work with SQL Server, we will need to add some packages by running the following commands:

dotnet add package Microsoft.EntityFrameworkCore
dotnet add package Microsoft.EntityFrameworkCore.SqlServer
dotnet add package Microsoft.EntityFrameworkCore.Tools
dotnet add package Microsoft.EntityFrameworkCore.Design
 
We will use code generation to scaffold MVC controllers & views. For that purpose, you will also need to add this package:

dotnet add package Microsoft.VisualStudio.Web.CodeGeneration.Design

If you have not done so already, you will need to globally install the following tools for Entity Framework and Code Generation respectively:

dotnet tool install -g dotnet-aspnet-codegenerator
dotnet tool install -g dotnet-ef

NOTE: If these tools are already installed, run the above commands while replacing ‘install’ with ‘update’ to get the latest version of the tool.

Creating the model classes

Open your app in Visual Studio Code with this command:

code .

Add to the Models Teamclasses Team & Player mentioned under title “The Data Model” above.

The Context Class

We will need to create a database context class to work with relational databases using Entity Framework. To this end, create a Data folder. Inside the Data folder, create a class named ApplicationDbContext with the following code:
public class ApplicationDbContext : DbContext {
    public ApplicationDbContext(DbContextOptions<ApplicationDbContext> options)
        : base(options) {}


    public DbSet<Team>? Teams { get; set; }
    public DbSet<Player>? Players { get; set; }
}

Seeding the database with sample data

It is always useful to have some sample data to visualize what the app does. Therefore, we will create a class dedicated to seeding data. In the Data folder, create a static class named SeedData and add to it the following code that contains sample data for teams and players:

public static class SeedData {
    // this is an extension method to the ModelBuilder class
    public static void Seed(this ModelBuilder modelBuilder) {
        modelBuilder.Entity<Team>().HasData(
            GetTeams()
        );
        modelBuilder.Entity<Player>().HasData(
            GetPlayers()
        );
    }
    public static List<Team> GetTeams() {
        List<Team> teams = new List<Team>() {
            new Team() {    // 1
                TeamName="Canucks",
                City="Vancouver",
                Province="BC",
                Country="Canada",
            },
            new Team() {    //2
                TeamName="Sharks",
                City="San Jose",
                Province="CA",
                Country="USA",
            },
            new Team() {    // 3
                TeamName="Oilers",
                City="Edmonton",
                Province="AB",
                Country="Canada",
            },
            new Team() {    // 4
                TeamName="Flames",
                City="Calgary",
                Province="AB",
                Country="Canada",
            },
            new Team() {    // 5
                TeamName="Leafs",
                City="Toronto",
                Province="ON",
                Country="Canada",
            },
            new Team() {    // 6
                TeamName="Ducks",
                City="Anaheim",
                Province="CA",
                Country="USA",
            },
            new Team() {    // 7
                TeamName="Lightening",
                City="Tampa Bay",
                Province="FL",
                Country="USA",
            },
            new Team() {    // 8
                TeamName="Blackhawks",
                City="Chicago",
                Province="IL",
                Country="USA",
            },
        };

        return teams;
    }

    public static List<Player> GetPlayers() {
        List<Player> players = new List<Player>() {
            new Player {
                PlayerId = 1,
                FirstName = "Sven",
                LastName = "Baertschi",
                TeamName = "Canucks",
                Position = "Forward"
            },
            new Player {
                PlayerId = 2,
                FirstName = "Hendrik",
                LastName = "Sedin",
                TeamName = "Canucks",
                Position = "Left Wing"
            },
            new Player {
                PlayerId = 3,
                FirstName = "John",
                LastName = "Rooster",
                TeamName = "Flames",
                Position = "Right Wing"
            },
            new Player {
                PlayerId = 4,
                FirstName = "Bob",
                LastName = "Plumber",
                TeamName = "Oilers",
                Position = "Defense"
            },
        };

        return players;
    }
}

Note that the SeedData class is static because it contains an extension method named Seed() to ModelBuilder.

The Seed() method needs to be called from somewhere. The most appropriate place is the ApplicationDbContext class. Add the following OnModelCreating() method to the ApplicationDbContext class:

protected override void OnModelCreating(ModelBuilder builder)
{
    base.OnModelCreating(builder);
    builder.Entity<Player>().Property(m => m.TeamName).IsRequired();

    builder.Entity<Team>().Property(p => p.TeamName).HasMaxLength(30);

    builder.Entity<Team>().ToTable("Team");
    builder.Entity<Player>().ToTable("Player");

    builder.Seed();

In addition to seeding data, the above code ensures the following:
  • TeamName is required
  • The maximum length of TeamName is 30 characters
  • The names of the tables that get created in the database are Team & Player. Otherwise, the names get created as Teams & Players.

The database

You can use any SQL Server database you wish. In my case, so that this app works on Linux, Windows, Mac Intel, and Mac M1, I will run SQL Server in a Docker container. To run SQL Server in a Docker container, run the following command:

docker run --cap-add SYS_PTRACE -e ACCEPT_EULA=1 -e MSSQL_SA_PASSWORD=SqlPassword! -p 1444:1433 --name azsql -d mcr.microsoft.com/azure-sql-edge

The connection string to the database is setup in the appsettings.json (or appsetting.Development.json) file. Edit this file and make the following highlighted updates to it:

{
  "Logging": {
    "LogLevel": {
      "Default": "Information",
      "Microsoft.AspNetCore": "Warning"
    }
  },
  "AllowedHosts": "*",
  "ConnectionStrings": {
    "DefaultConnection": "Server=tcp:127.0.0.1,1444;Database=TeamPlayersDB;UID=sa;PWD=SqlPassword!;TrustServerCertificate=True;"
  }
}
 

To make our app work with SQL Server, you will need to add the following code to Program.cs just before “var app = builder.Build();”: 

string connStr = builder.Configuration.GetConnectionString("DefaultConnection")!;
builder.Services.AddDbContext<ApplicationDbContext>(
    options => options.UseSqlServer(connStr)
);

Migrations

We can now create a migration named m1 with:

dotnet ef migrations add M1 -o Data/Migrations

This creates a migrations file in Data/Migrations folder. To execute the migrations and create the database and seed data, run the following command:

dotnet ef database update

If all goes well and no errors are generated, we can assume that a database named TeamPlayersDB was created, and data is seeded into tables Team & Player.

NOTE: If you wish to drop the database for whatever reason, you can run command: dotnet ef database drop
 
This is what the tables in the database look like:

Scaffolding Teams & Players controller and views

To incorporate pages into our app that allow us to manage Team & Player data, we will scaffold the necessary controller & views using the aspnet-codegenerator utility. Run the following command from a terminal window in the root of the project to generate files pertaining to teams and players respectively:

dotnet aspnet-codegenerator controller -name TeamsController -outDir Controllers -m Team -dc ApplicationDbContext -udl -scripts

dotnet aspnet-codegenerator controller -name PlayersController -outDir Controllers -m Player -dc ApplicationDbContext -udl -scripts

This produces controllers in the Controllers folder and fiews files in folders Views/Teams & Views/Players respectively. To add menu items on the home page that point to Team & Player pages, edit Views/Shared/_Layout.cshtml and add the following HTML to the <ul> block around line 28:

<li class="nav-item">
    <a class="nav-link text-dark" asp-area="" asp-controller="Teams" asp-action="Index">Teams</a>
</li>

<li class="nav-item">
    <a class="nav-link text-dark" asp-area="" asp-controller="Players" asp-action="Index">Players</a>
</li>

The final product

Run the web app and notice the main menu:


Click on Teams:


Click on Players:


Conclusion

You just learned how to use the code-first database approach with ASP.NET MVC. The same priciples work with ASP.NET Razor Pages. 

Saturday, March 12, 2022

Localizing ASP.NET 6.0 MVC web apps

Localizing your ASP.NET 6.0 MVC web app involves making it work in more than one language. This gives you access to more worldwide markets. In this article, I will show you some technical approaches in achieving this objective. 

Source code : https://github.com/medhatelmasry/GlobalWeb6.git

Prerequisites

  • .NET 6.0
  • Visual Studio Code
  • You have familiarity with ASP.NET MVC
  • Install the following extension to your Visual Studio Code:

 .resx files

Files with .resx extensions play a leading role in localizing ASP.NET applications. They are essentially XML documents that rely on placement and a consistent naming convention. Here is what a typical .resx file may look like:

<?xml version="1.0" encoding="utf-8"?>
<root>
<resheader name="resmimetype">
<value>text/microsoft-resx</value>
</resheader>
<resheader name="version">
<resheader name="reader">
<value>2.0</value>
</resheader>
<value>System.Resources.ResXResourceReader, System.Windows.Forms, Version=4.0.0.0, Culture=neutral, PublicKeyToken=b77a5c561934e089</value>
</resheader>
<resheader name="writer">
<value>System.Resources.ResXResourceWriter, System.Windows.Forms, Version=4.0.0.0, Culture=neutral, PublicKeyToken=b77a5c561934e089</value>
</resheader>

<data name="Press Release" xml:space="preserve">
<value>Communiqué de presse</value>
</data>

<data name="Welcome" xml:space="preserve">
<value>Bienvenue</value>
</data>
</root>

Only the highlighted text above is customized to target a specific language. Note the following localization as specified in the above .resx file pertaining to english to french localization:

English Key French Translation
Press Release Communiqué de presse
Welcome Bienvenue

Getting Started

We will first create a simple ASP.NET 6.0 MVC app. This is accomplished by entering the following commands from within a terminal window is a working directory:

dotnet new mvc -o GlobalWeb
cd GlobalWeb

Create the following additional directories inside your application:

Resources
       |
       |
       ----------- Controllers
       |
       |
       ----------- Views
       |                  |
       |                  |
       |                  ----------- Home
       |
       |
       ----------- Models

Add the following to Program.cs right before var app = builder.Build():

builder.Services.AddLocalization(options => options.ResourcesPath = "Resources");

Also, add the following to Program.cs right after var app = builder.Build():

var supportedCultures = new[] {
    "en","en-US","fr","fr-FR","ar", "ko"
};

var localizationOptions = new RequestLocalizationOptions().SetDefaultCulture(supportedCultures[1])
    .AddSupportedCultures(supportedCultures)
    .AddSupportedUICultures(supportedCultures);

localizationOptions.ApplyCurrentCultureToResponseHeaders = true;

app.UseRequestLocalization(localizationOptions);

The first statement above declares that we will be supporting the following languages and cultures:

en English language
en-US English language, US culture
fr French language
fr-FR French language, France culture
ar Arabic language
ko Korean language

The second statement declares en-US as the default culture and adds support for the various cultures to our app. The final statements adds localization support to our web app.

Using localization in your controller classes

Whenever you want to access a localized string in your services or controllers, you can inject an IStringLocalizer<T> and use its indexer property. Add the following instance variable to the HomeController class:

private readonly IStringLocalizer<HomeController> _localizer;

Inject an IStringLocalizer<T> into a HomeController constructor. Your HomeController constructor will look like this: 

public HomeController(ILogger<HomeController> logger, 
    IStringLocalizer<HomeController> localizer
)
{
    _logger = logger;
    _localizer = localizer;
}

Change the Index() action method in the HomeController so it looks like this:

public IActionResult Index() {
    ViewData["pressRelease"] = _localizer["Press Release"];
    ViewData["welcome"] = _localizer.GetString("Welcome").Value ?? "";
    return View();
}

Replace Views/Home/Index.cshtml with:

@{
    ViewData["Title"] = "Home Page";
}

<div class="text-center">
    <h1 class="display-4">@ViewData["welcome"]</h1>
    <p>@ViewData["pressRelease"]</p>
</div>

If we are currently using the fr culture, then the localizer will look for the following resource file:

Resources/Controllers/HomeController.fr.resx

In Visual Studio Code, create the above file. With the .resx extension installed in Visual Studio Code, your editor will immediately look like this:


Add the following name / value pairs:

Press ReleaseCommuniqué de presse
WelcomeBienvenue


Let's test our application. Run your application from within a terminal window with:

dotnet watch run

A quick way to try it out is to point your browser to /Home. This picks up the default value. However, if you point your browser to /Home?culture=fr, the value is read from the resource file.

Shared Resources

With shared resources you rely on a single file to have all the localization entries in it, so this file can be used among multiple controllers or other classes.

In the root of your application, create a blank class named SharesResource.cs with following content:

namespace GlobalWeb;
public class SharedResource {}

Copy Resources/Controllers/HomeController.fr.resx to Resources/SharedResource.fr.resx.

To keep it simple, inside HomeController.cs we will add shared resource entries. Add the following instance variable to HomeController.cs:

private readonly IStringLocalizer<SharedResource> _sharedLocalizer;

Modify the constructor so it looks like this:

public HomeController(ILogger<HomeController> logger, 
    IStringLocalizer<HomeController> localizer
    IStringLocalizer<SharedResource> sharedLocalizer
)
{
    _logger = logger;
    _localizer = localizer;
    _sharedLocalizer = sharedLocalizer;
}

Now, let us use the shared resource in the Privacy action method. Therefore, add these statements to the Privacy action method:

ViewData["pressRelease"] = _sharedLocalizer["Press Release"];
ViewData["welcome"] = _sharedLocalizer.GetString("Welcome").Value ?? "";

Replace Views/Home/Privacy.cshtml with:

@{
    ViewData["Title"] = "Privacy Policy";
}
<h3 class="display-4">@ViewData["welcome"]</h3>
<p>@ViewData["pressRelease"]</p>

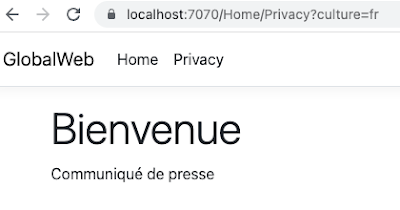
When you point your browser to /Home/Privacy?culture=fr, the values are read from the shared resource file:


Using localization in your views

In Program.cs, modify “builder.Services.AddControllersWithViews()” (around line 4) so it looks like this:

builder.Services
    .AddControllersWithViews()
    .AddViewLocalization();

We simply add ViewLocalization support as highlighted above.

We will localize strings in a single .cshtml file whereby you inject an IViewLocalizer into the view. IViewLocaliser uses the name of the view file to find the associated resources, so for the fr culture in HomeController's Privacy.cshtml view, the localizer will look for:

Resources/Views/Home/Privacy.fr.resx

Create a resource file Resources/Views/Home/Privacy.fr.resx and add to it the following localization string pair:

Privacy Policy / Politique de confidentialité


Back in Views/Home/Privacy.cshtml, add the following to the top of the file: 

@using Microsoft.AspNetCore.Mvc.Localization
@inject IViewLocalizer _localizer

Change the ViewData["Title"] . . . statement to:

ViewData["Title"] = _localizer["Privacy Policy"];

Add the following above the <h3>. . . . markup:

<h1>@ViewData["Title"]</h1>

The complete Views/Home/Privacy.cshtml looks like this:

@using Microsoft.AspNetCore.Mvc.Localization
@inject IViewLocalizer _localizer

@{
    ViewData["Title"] = _localizer["Privacy Policy"];
}
<h1>@ViewData["Title"]</h1>
<h3 class="display-4">@ViewData["welcome"]</h3>
<p>@ViewData["pressRelease"]</p>

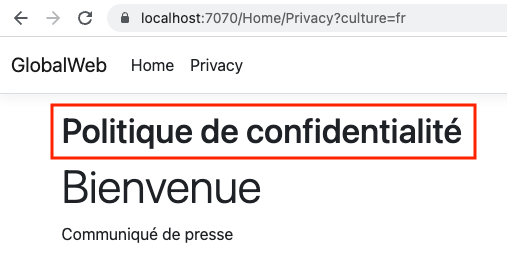
Once again, check out Home/Privacy and Home/Privacy?culture=fr

.   


Let's see how we can use a shared resource in views, Add the following localization string pair to Resources/SharedResource.fr.resx:

It's great to see you again.     /    C'est génial de te revoir.


To use the new shared resource string inViews/Home/Privacy.cshtml, Add the following to the top of the file:

@using Microsoft.Extensions.Localization
@inject IStringLocalizer<SharedResource> _sharedLocalizer

Thereafter, add this markup to the bottom of Views/Home/Privacy.cshtml:

<p>@_sharedLocalizer["It's great to see you again."]</p>

You will see this when you visit Home/Privacy?culture=fr in your browser:


Using localization with data annotations

You may wish to localize the string messages that exist in your data annotations. These may represent display names and error messages. In Program.cs, modify the “builder.Services.AddControllersWithViews()” statement (around line 4) so it looks like this:

builder.Services
    .AddControllersWithViews()
    .AddViewLocalization()
    .AddDataAnnotationsLocalization();

Simply add the highlighted code shown above.

Add a class named Contact to the Models folder with the following content:

public class Contact {
  [Required(ErrorMessage = "Email is required.")]
  [EmailAddress(ErrorMessage = "The Email field is not a valid email address.")]
  [Display(Name = "Your Email.")]
  public string? Email { get; set; }
}

The above Contact model class contains error messages and a display name that are good candidates for localization.

Add a resource file names Contact.fr.resx to the Resources/Models folder with the following localization string name / value pairs:

KeyValue
Email is required.Un e-mail est requis.
The Email field is not a valid email address. Le champ E-mail n'est pas une adresse e-mail valide.
Your Email.Votre e-mail.
SuccessSuccès


Let us add an action method that renders a contact form. Add the following action method to Controllers/HomeController.cs:

public IActionResult Contact() {
  return View();
}

This requires a view. Add a file Views/Home/Contact.cshtml with the following content: 

@model GlobalWeb.Models.Contact
<div class="row">
  <div class="col-md-8">
    <section>
      <form asp-controller="Home" asp-action="Contact" method="post" class="form-horizontal" novalidate>
        <h4>@(ViewData["Result"] == null ? "Enter details" : ViewData["Result"])</h4>
        <hr />
        <div class="form-group">
          <label asp-for="Email" class="col-md-2 control-label"></label>
          <div class="col-md-10">
            <input asp-for="Email" class="form-control" />
            <span asp-validation-for="Email" class="text-danger"></span>
          </div>
        </div>
        <div class="form-group">
          <div class="col-md-offset-2 col-md-10">
            <button type="submit" class="btn btn-success">Test</button>
          </div>
        </div>
      </form>
    </section>
  </div>
</div>

The above consists of a simple form with an email input field and a submit button. It submits to Contact action method in the HomeController. Therefore, add the following post action method to HomeController.cs

[HttpPost]
public IActionResult Contact(Contact model) {
  if (!ModelState.IsValid) {
    return View(model);
  }
  ViewData["Result"] = _localizer["Success!"]; 
  return View(model);
}

Point your browser to /Home/Contact?culture=fr. You should see that the display name for email is localized.


If you want an easy solution to using shared resources with data annotations, you can do the following:

Add the following localization name / value strings pair to Resources/SharedResource.fr.resx:

Your Email.    /   Votre e-mail.

Add the following to the top of Views/Home/Contact.cshtml:

@using Microsoft.Extensions.Localization
@inject IStringLocalizer<SharedResource> _sharedLocalizer

You can then use _sharedLocalizer in Views/Home/Contact.cshtml as shown below in the highlighted code:

@using Microsoft.Extensions.Localization
@inject IStringLocalizer<SharedResource> _sharedLocalizer

@model GlobalWeb.Models.Contact
<div class="row">
  <div class="col-md-8">
    <section>
      <form asp-controller="Home" asp-action="Contact" method="post" class="form-horizontal" novalidate>
        <h4>@(ViewData["Result"] == null ? "Enter details" : ViewData["Result"])</h4>
        <hr />
        <div class="form-group">
          <label class="col-md-2 control-label">
            @_sharedLocalizer[@Html.DisplayNameFor(model => model.Email)]
          </label>
          <div class="col-md-10">
            <input asp-for="Email" class="form-control" />
            <span asp-validation-for="Email" class="text-danger"></span>
          </div>
        </div>
        <div class="form-group">
          <div class="col-md-offset-2 col-md-10">
            <button type="submit" class="btn btn-success">Test</button>
          </div>
        </div>
      </form>
    </section>
  </div>
</div>

Conclusion

We have looked at a number of techniques for localizing ASP.NET 6.0 apps. This should serve as a decent starting point for you to consider making you web apps reach a wider worldwide audience.