Showing posts with label Visual Studio Code. Show all posts

Monday, January 13, 2025

Adding a UI to your WebAPI in ASP.NET 9.0

You may have noticed that when you create a WebAPI project in .NET 9.0, the default swagger UI is not there anymore by default. In this article, I will show you how to restore it back as the default UI. In addition, we will install an alternative UI to swagger named Scalar. The approach used applies to both minimal and controller-based WebAPI.

Companion Video: https://youtu.be/vsy-pIxKpYU
Source Code: https://github.com/medhatelmasry/WebApiDemo

Getting Started

Let us first create a minimal WebAPI project with the following terminal command:

dotnet new webapi -o WebApiDemo
cd WebApiDemo

Open the project in VS Code and note the following statements in Program.cs:

  • Around line 5 is this statement, which adds the OpenApi service:

builder.Services.AddOpenApi();

  • Also, around line 12 is this statement:

app.MapOpenApi();

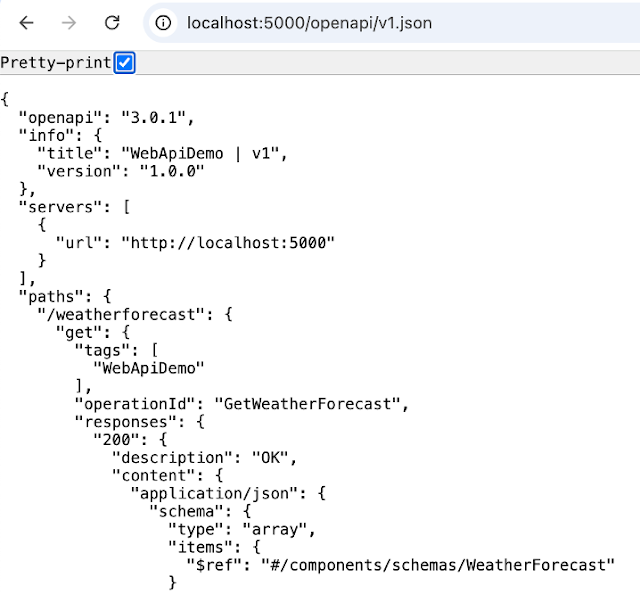
The above statements produce the following JSON endpoint file describing your API when you run your app:

/openapi/v1.json

This displays a page like the following in your browser:

Restoring Swagger UI

Note that swagger UI is nowhere to be found. It is quite straight forward to add a Swagger UI to your .NET 9.0 WebAPI project. Start by adding the following package to your project:

dotnet add package Swashbuckle.AspNetCore

You can now add the following statement right under app.MapOpenApi():

app.UseSwaggerUI(options =>  {
    options.SwaggerEndpoint("/openapi/v1.json", "My WebAPI");
});

Now, run the project and go to endpoint /swagger in your browser. You should see this UI:

NOTE: If you want the Swagger UI to be accessed at the / (root) endpoint, then you can add this option:

options.RoutePrefix = "";

Scalar: alternative to Swagger

There is a much better alternative to swagger named Scalar. It offers you an enhanced UI and some additional features. Let us explore Scalar

To use Scalar in an ASP.NET 9.0 WebAPI application, you must add the following package:

dotnet add package Scalar.AspNetCore

Comment out the following code in Program.cs:

// app.UseSwaggerUI(options => 
// {
//     options.SwaggerEndpoint("/openapi/v1.json", "My WebAPI");
// });

Replace the above commented-out code with this:

app.MapScalarApiReference();

That's all you need to do. Let’s see how the Scalar UI looks like. Run the project and point your browser to this endpoint:

/scalar/v1

Explore this UI. One interesting feature is that you can view client code in a variety of languages. Here is what it looks like if you choose C#:


You can further customize the UI by enabling and disabling various options. For example, replace the statement app.MapScalarApiReference() with:

app.MapScalarApiReference(options => {
    options
        .WithTitle("My WebAPI")
        .WithTheme(ScalarTheme.Moon)
        .WithDefaultHttpClient(ScalarTarget.CSharp, ScalarClient.HttpClient);
});

This results in a less dark theme and a default client code of C#.

Making Scalar UI the default page

To make the Scalar UI the default page when launching your WebAPI page with “dotnet watch”, edit the /Properties/launchSettings.json file and make the following changes:

1. In both http and https blocks, add this item:

"launchUrl": "scalar/v1"

2. Also, in both http and https blocks, change the value of launchBrowser to true.

Now when you restart your webAPI web app with “dotnet watch”, the Scalar UI is automatically loaded in your default browser.

Happy Coding!

Wednesday, November 20, 2024

Using Aspire with gRPC

We start with a simple gRPC application that involves a gRPC server and Blazor client. The gRPC server connects to a SQLite database. To test the sample solution, we must first start the gRPC server app, then start the client app. This is somewhat tedious. By introducing .NET Aspire into the mix, we only need to start one app to get the solution to work. .NET Aspire also gives us many more benefits.

Start source code: https://github.com/medhatelmasry/GrpcBlazorSolution
Companion Video: https://youtu.be/9048nfSvA9E

Prerequisites

In order to continue with this tutorial, you will need the following:

  • .NET 9.0
  • Visual Studio Code
  • 'C# Dev Kit' extension for Visual Studio Code

.NET Aspire Setup

In any terminal window folder, run the following command before you install .NET Aspire:

dotnet workload update 

To install the .NET Aspire workload from the .NET CLI, execute this command:

dotnet workload install aspire

Check your version of .NET Aspire, with this command:

dotnet workload list

Startup Application

We will start with a .NET 9.0 solution that involves a gRPC backend and a Blazor frontend. Clone the code from this GitHub site with:

git clone https://github.com/medhatelmasry/GrpcBlazorSolution.git

To run the solution, we must first start the backend, then start the frontend. To get a good sense of what the application does, follow these steps:

1) Inside the GrpcStudents folder, run the following command in a terminal window:

dotnet run

2) Next, start the frontend. Inside a terminal window in the BlazorGrpcClient folder, run this command:

dotnet watch


Try the application by adding, updating, and deleting data saved in a SQLit database on the gRPC server. However, it is a pain to have to start both projects to get the solution to work. This is where .NET Aspire comes to the rescue.

Converting solution to .NET Aspire

Close both terminal windows by hitting CTRL C in each.

To add the basic .NET Aspire projects to our solution by running the following command inside the root GrpcBlazorSolution folder:

dotnet new aspire --force

We use the --force switch because the above command will overwrite the .sln file with a new one that only includes two new projects: GrpcBlazorSolution.AppHost and GrpcBlazorSolution.ServiceDefaults.

NOTE: At the time of writing this article, the two .NET Aspire projects are created using .NET 8.0. This will likely change with the passage of time.

We will add our previous gRPC & Blazor projects to the newly created .sln file by executing the following commands inside the root SoccerFIFA folder:

dotnet sln add ./GrpcStudents/GrpcStudents.csproj
dotnet sln add ./BlazorGrpcClient/BlazorGrpcClient.csproj

Open the solution in Visual Studio Code.

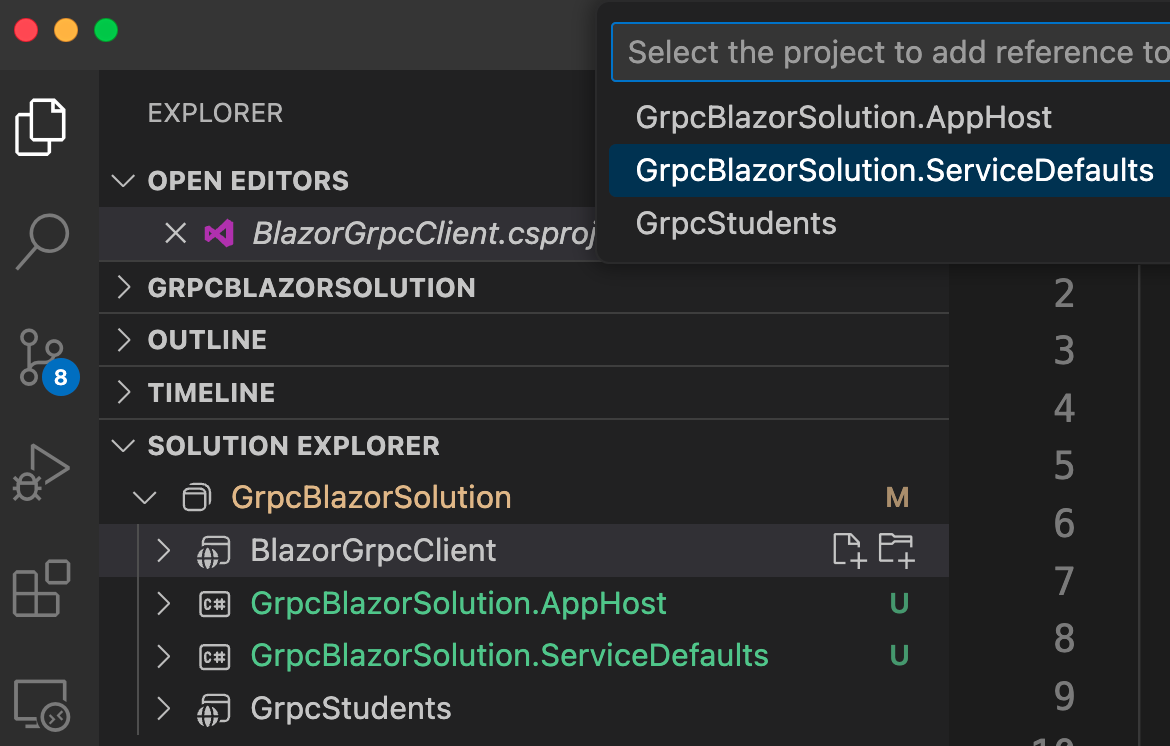
We will add references in the GrpcBlazorSolution.AppHost project to the GrpcStudents and BlazorGrpcClient projects. This can be done in the "Solution Explorer" tab in Visual Studio Code. 

Right-click on "GrpcBlazorSolution.AppHost" then select "Add Project Reference". 

 
Choose BlazorGrpcClient.


Similarly, do the same for the the "GrpcStudents" project. Right-click on "GrpcBlazorSolution.AppHost" then select "Add Project Reference". 

Choose BlazorStudents.

Also, both GrpcStudents and BlazorGrpcClient projects need to have references into GrpcBlazorSolution.ServiceDefaults.

Right-click on BlazorGrpcClient then select "Add Project Reference". 


Choose GrpcBlazorSolution.ServiceDefaults.


Similarly, add a reference to GrpcBlazorSolution.ServiceDefaults from GrpcStudents:

Right-click on GrpcStudents then select "Add Project Reference". 


Choose GrpcBlazorSolution.ServiceDefaults once again.

Then, in the Program.cs files of both GrpcStudents and BlazorGrpcClient projects, add this agent code right before "var app = builder.Build();":

// Add service defaults & Aspire components.
builder.AddServiceDefaults();

In the Program.cs file in GrpcBlazorSolution.AppHost, add this code right before “builder.Build().Run();”:

var grpc = builder.AddProject<Projects.GrpcStudents>("backend");
builder.AddProject<Projects.BlazorGrpcClient>("frontend")
    .WithReference(grpc);

The relative name for the gRPC app is “backend”. Therefore, edit Program.cs in the BlazorGrpcClient project. At around line 15, change the address from http://localhost:5099 to simply http://backend so that the statement looks like this:

builder.Services.AddGrpcClient<StudentRemote.StudentRemoteClient>(options =>
{
    options.Address = new Uri("http://backend");
});

Test .NET Aspire Solution

To test the solution,  start the application in the GrpcBlazorSolution.AppHost folder with:

dotnet watch

NOTE: If you are asked to enter a token, copy and paste it from the value in your terminal window:


This is what you should see in your browser:


Click on the app represented by the frontend link on the second row. You should experience the Blazor app:


.NET Aspire has orchestrated for us the connection between multiple projects and produced a single starting point in the Host project. 

Mission accomplished. We have achieved our objective by adding NET Aspire into the mix of projects and wiring up a couple of agents.

Sunday, November 3, 2024

Using Dependency Injection with Sematic Kernel in ASP.NET

Overview

In this video I will show you how you Dependency Inject can be used with Semantic Kernel in an ASP.NET Razor Pages application. The same principals can be used with MVC. We will use the Phi-3 model hosted on GitHub. Developers can use a multitude of AI models on GitHub for free.

Source Code: https://github.com/medhatelmasry/AspWithSkDI
Companion Video: https://youtu.be/fLIWCkxXaM8

Pre-requisites

This walkthrough was done using .NET 8.0.

Getting Started

There are many AI models at GitHub from a variety of vendors that you can choose from. The starting point is to visit https://github.com/marketplace/models. At the time of writing, these are a subset of the models available:


For this article, I will use the "Phi-3.5-mini instruct (128k)" model highlighted above. If you click on that model you will be taken to the model's landing page:


Click on the green "Get started" button.


The first thing we need to do is get a 'personal access token' by clicking on the indicated button above.


Choose 'Generate new token', which happens to be in beta at the time of writing.


Give your token a name, set the expiration, and optionally describe the purpose of the token. Thereafter, click on the green 'Generate token' button at the bottom of the page.


Copy the newly generated token and place it is a safe place because you cannot view this token again once you leave the above page. 

Let's use Semantic Kernel in ASP.NET Razor Pages

In a working directory, create a Razor Pages web app named AspWithSkDI inside a terminal window with the following command:

dotnet new razor -n AspWithSkDI

Change into the newly created directory GitHubAiModelSK with:

cd AspWithSkDI

Next, let's add the Sematic Kernel package to our application with:

dotnet add package Microsoft.SemanticKernel -v 1.25.0

Open the project in VS Code and add this directive to the .csproj file right below: <Nullable>enable</Nullable>:

<NoWarn>SKEXP0010</NoWarn>

Add the following to appsettings.json:


    "AI": {
      "Endpoint": "https://models.inference.ai.azure.com",
      "Model": "Phi-3.5-mini-instruct",
      "PAT": "fake-token"
    }

Replace "fake-token" with the personal access token that you got from GitHub. 

Adding Dependency Injection support

Next, open Program.cs in an editor. Add the following code right above the statement "var app = builder.Build();" :

var modelId = builder.Configuration["AI:Model"]!;
var uri = builder.Configuration["AI:Endpoint"]!;
var githubPAT = builder.Configuration["AI:PAT"]!;

var client = new OpenAIClient(new ApiKeyCredential(githubPAT), new OpenAIClientOptions { Endpoint = new Uri(uri) });

var kernel = builder.Services.AddKernel()
    .AddOpenAIChatCompletion(modelId, client);

It is the last statement above that is key to making Semantic Kernel available to all other classes through Dependency Injection.

ASP.NET Razor Pages

Pages/Index.cshtml.cs

Add the following instance variable and property to the code-behind file named Pages/Index.cshtml.cs:

private readonly Kernel _kernel;

[BindProperty]
public string? Reply { get; set; }

Replace the class constructor with the following:

public IndexModel(ILogger<IndexModel> logger, Kernel kernel) {
    _logger = logger;
    _kernel = kernel;
}

We can now get access to Semantic Kernel through the _kernel object.

Add the following OnPostAsync() method to the IndexModel class:

// action method that receives user prompt from the form
public async Task<IActionResult> OnPostAsync(string userPrompt) {
    // get a chat completion service
    var chatCompletionService = _kernel.GetRequiredService<IChatCompletionService>(); 
 
    // Create a new chat by specifying the assistant
    ChatHistory chat = new(@"
        You are an AI assistant that helps people find information about baking. 
        The baked item must be easy, tasty, and cheap. 
        I don't want to spend more than $10 on ingredients.
        I don't want to spend more than 30 minutes preparing.
        I don't want to spend more than 30 minutes baking."
    ); 
 
    chat.AddUserMessage(userPrompt); 
 
    var response = await chatCompletionService.GetChatMessageContentAsync(chat, kernel: _kernel); 
 
    Reply = response.Content!.Replace("\n", "<br>"); 
 
    return Page();
}

In the above OnPostAsync() method, the user prompt is received and passed on to the Phi-3 GPT SLM model. In this case our assistant specializes suggests easy, fast and cheap baking ideas.

Pages/Index.cshtml

The Index.cshtml file represents the view that the user sees when interacting with our web app. Replace the content of Index.cshtml with the following:

@page
@model IndexModel

@{
    ViewData["Title"] = "SK Dependency Injection in ASP.NET Razor Pages";
}

<div class="text-center">
    <h3 class="display-6">@ViewData["Title"]</h3>
    <form method="post" onsubmit="showPleaseWaitMessage()">
        <input type="text" name="userPrompt" size="80" 
            required placeholder="What do you want to bake today?"/>
        <input type="submit" value="Submit" />
    </form>
</div>

<p>&nbsp;</p>

<div id="please-wait-message" style="display:none;">
    <p class="alert alert-info">Please wait...</p>
</div>

<div id="response-message">
    @if (Model.Reply != null) {
        <p class="alert alert-success">@Html.Raw(Model.Reply)</p>
    }
</div>

@section Scripts {
    <script>
        function showPleaseWaitMessage() {
    document.getElementById('response-message').innerHTML = '';      
    document.getElementById('please-wait-message').style.display = 'block';   
    }
    </script>
}

There is some JavaScript that was added to the view to display a "Please wait ...." message while the user waits for the AI model to respond.

Run the application

In a terminal window in the root of the application, run the following command:

dotnet watch

The home page of the web app displays in your default browser and it looks like this:

I entered "Apple Pie" then clicked on Submit. A "Please wait ..." message appeared while the AI model processed my request.

After about 40 seconds the response came back.


Conclusion

It is easy and straight forward to use dependency injection to create a kernel.

Monday, September 30, 2024

Using Sematic Kernel with SLM AI models downloaded to your computer

In this walkthrough, I will demonstrate how you can download the Phi-3 AI SLM (small language model) from Hugging Face and use it in a C# application. 

What is Hugging Face?

Hugging Face (https://huggingface.co/) provides AI/ML researchers & developers with access to thousands of curated datasets, machine learning models, and AI-powered demo apps. We will download he Phi-3 SLM model in ONNX format onto our computers from https://huggingface.co/models.

What is ONNX?

ONNX is an open format built to represent machine learning models. Visit https://onnx.ai/ for more information.

Getting Started

We will download the Phi-3 Mini SLM for the ONNX runtime from Hugging Face. Run the following command from within a terminal window so that the destination is a location of your choice. In the below example the destination is a folder named phi-3-mini on a Windows C: drive.

git clone https://huggingface.co/microsoft/Phi-3-mini-4k-instruct-onnx C:/phi-3-mini


   NOTE:

   This example only works on the Windows Operating System.

Be patient as the download could take some time. On my Windows computer the size of the download is 30.1 GB comprising 97 files and 48 folders.

We will be using the files in the cpu_and_mobile folder. Inside that folder, navigate into the cpu-int4-rtn-block-32 folder where you will find this pair of files that contain the AI ONNX model:

phi3-mini-4k-instruct-cpu-int4-rtn-block-32.onnx

phi3-mini-4k-instruct-cpu-int4-rtn-block-32.onnx.data

Getting Started

In a working directory, create a C# console app named LocalAiModelSK inside a terminal window with the following command:

dotnet new console -n LocalAiModelSK 

Change into the newly created directory LocalAiModelSK with:

cd LocalAiModelSK

Next, let's add two packages to our console application with:

dotnet add package Microsoft.SemanticKernel -v 1.16.2

dotnet add package Microsoft.SemanticKernel.Connectors.Onnx -v 1.16.2-alpha

Open the project in VS Code and add this directive to the .csproj file right below: <Nullable>enable</Nullable>:

<NoWarn>SKEXP0070</NoWarn>

Replace the contents of Program.cs with the following C# code:

using Microsoft.SemanticKernel;
using Microsoft.SemanticKernel.ChatCompletion;
using Microsoft.SemanticKernel.Connectors.OpenAI; 
 
// PHI-3 local model location 
var modelPath = @"C:\phi-3-mini\cpu_and_mobile\cpu-int4-rtn-block-32"; 
 
// Load the model and services
var builder = Kernel.CreateBuilder();
builder.AddOnnxRuntimeGenAIChatCompletion("phi-3", modelPath); 
 
// Build Kernel
var kernel = builder.Build(); 
 
// Create services such as chatCompletionService and embeddingGeneration
var chatCompletionService = kernel.GetRequiredService<IChatCompletionService>(); 
 
// Start the conversation
while (true) {
    // Get user input
    Console.ForegroundColor = ConsoleColor.Yellow;
    Console.Write("User : ");
    var question = Console.ReadLine()!; 
    
    OpenAIPromptExecutionSettings openAIPromptExecutionSettings = new() {
        MaxTokens = 200
    }; 
 
    var response = kernel.InvokePromptStreamingAsync(
        promptTemplate: @"{{$input}}",
        arguments: new KernelArguments(openAIPromptExecutionSettings){
            { "input", question }
        });
    Console.ForegroundColor = ConsoleColor.Green;
    Console.Write("\nAssistant : ");
    string combinedResponse = string.Empty;
    await foreach (var message in response) {
        // Write the response to the console
        Console.Write(message);
        combinedResponse += message;
    }
    Console.WriteLine();
}

In the above code, make sure that modelPath points to the proper location of the model on your computer.

I asked the question: How long do mosquito live?

This is the response I received:


Conclusion

You can choose from a variety of  SLMs at Hugging Face. Of course, the penalty is that the actual ONNX model sizes are significant making it, in some circumstances, more desirable to use a model that resides online.


Saturday, September 28, 2024

Using Sematic Kernel with AI models hosted on GitHub

Overview

In this article I will show you how you can experiment with AI models hosted on GitHub. GitHub AI Models are intended for learning, experimentation and proof-of-concept activities. The feature is subject to various limits (including requests per minute, requests per day, tokens per request, and concurrent requests) and is not designed for production use cases.

Companion Video: https://youtu.be/jMQ_1eDKPlo

Getting Started

There are many AI models from a variety of vendors that you can choose from. The starting point is to visit https://github.com/marketplace/models. At the time of writing, these are a subset of the models available:


For this article, I will use the "Phi-3.5-mini instruct (128k)" model highlighted above. If you click on that model you will be taken to the model's landing page:


Click on the green "Get started" button.


The first thing we need to do is get a 'personal access token' by clicking on the indicated button above.


Choose 'Generate new token', which happens to be in beta at the time of writing.


Give your token a name, set the expiration, and optionally describe the purpose of the token. Thereafter, click on the green 'Generate token' button at the bottom of the page.


Copy the newly generated token and place it is a safe place because you cannot view this token again once you leave the above page. 

Let's use Semantic Kernel

In a working directory, create a C# console app named GitHubAiModelSK inside a terminal window with the following command:

dotnet new console -n GitHubAiModelSK

Change into the newly created directory GitHubAiModelSK with:

cd GitHubAiModelSK

Next, let's add two packages to our console application with:

dotnet add package Microsoft.SemanticKernel -v 1.25.0

dotnet add package Microsoft.Extensions.Configuration.Json

Open the project in VS Code and add this directive to the .csproj file right below: <Nullable>enable</Nullable>:

<NoWarn>SKEXP0010</NoWarn>

Create a file named appsettings.json. Add this to appsettings.json:

{
    "AI": {
      "Endpoint": "https://models.inference.ai.azure.com",
      "Model": "Phi-3.5-mini-instruct",
      "PAT": "fake-token"
    }
}

Replace "fake-token" with the personal access token that you got from GitHub.

Next, open Program.cs in an editor and delete all contents of the file. Add this code to Program.cs:

using Microsoft.SemanticKernel;
using System.Text;
using Microsoft.SemanticKernel.ChatCompletion;
using OpenAI;
using System.ClientModel;
using Microsoft.Extensions.Configuration;

var config = new ConfigurationBuilder()
    .SetBasePath(Directory.GetCurrentDirectory())
    .AddJsonFile("appsettings.json", optional: true, reloadOnChange: true)
    .Build();

var modelId = config["AI:Model"]!;
var uri = config["AI:Endpoint"]!;
var githubPAT = config["AI:PAT"]!;

var client = new OpenAIClient(new ApiKeyCredential(githubPAT), new OpenAIClientOptions { Endpoint = new Uri(uri) });

// Initialize the Semantic kernel
var builder = Kernel.CreateBuilder();

builder.AddOpenAIChatCompletion(modelId, client);
var kernel = builder.Build();

// get a chat completion service
var chatCompletionService = kernel.GetRequiredService<IChatCompletionService>();

// Create a new chat by specifying the assistant
ChatHistory chat = new(@"
    You are an AI assistant that helps people find information. 
    The response must be brief and should not exceed one paragraph.
    If you do not know the answer then simply say 'I do not know the answer'."
);

// Instantiate a StringBuilder
StringBuilder strBuilder = new();

// User question & answer loop
while (true)
{
    // Get the user's question
    Console.Write("Q: ");
    chat.AddUserMessage(Console.ReadLine()!);

    // Clear contents of the StringBuilder
    strBuilder.Clear();

    // Get the AI response streamed back to the console
    await foreach (var message in chatCompletionService.GetStreamingChatMessageContentsAsync(chat, kernel: kernel))
    {
        Console.Write(message);
        strBuilder.Append(message.Content);
    }
    Console.WriteLine();
    chat.AddAssistantMessage(strBuilder.ToString());

    Console.WriteLine();
}

Run the application:


I asked the question "How many pyramids are there in Egypt?" and the AI answered as shown above. 

Using a different model

How about we use a different AI model. For example, I will try the 'Meta-Llama-3.1-405B-Instruct' model. We need to get the model ID. Click on the model on the https://github.com/marketplace/models page.

Change Model in appsettings.json to "Meta-Llama-3.1-405B-Instruct".

Run the application again. This is what I experienced with the AI model meta-llama-3.1-405b-instruct:


Conclusion

GitHub AI models are easy to access. I hope you come up with great AI driven applications that make a difference to our world.


Thursday, September 19, 2024

Phi-3 Small Language Model (SLM) in a C# console application with Ollama and Sematic Kernel

What is small language model (SLM)?

A small language model (SLM) is a machine learning model typically based on a large language mode (LLM) but of greatly reduced size. An SLM retains much of the functionality of the LLM from which it is built but with far less complexity and computing resource demand.

What is Ollama?

Ollama is an application you can download onto your computer or server to run open source generative AI small-language-models (SLMs) such as Meta's Llama 3 and Microsoft's Phi-3. You can see the many models available at https://www.ollama.com/library.

What is Semantic Kernel

Semantic Kernel is a lightweight, open-source development kit that lets you easily build AI agents and integrate the latest AI models into your C#, Python, or Java codebase.

Overview

In this tutorial, we will see how easy it is to use the Phi-3 small language model in a C# application. The best part is that it is free and runs entirely on your local device. Ollama will be used to serve the Phi-3 small language model and Semantic Kernel will be the C# development kit we will use for code development. 

Companion Video: https://youtu.be/TMmOgGjmxA8

Getting Started

Download Ollama installer from https://www.ollama.com/download.

Once you have installed Ollama, run these commands from a terminal window:

ollama pull phi3:latest
ollama list
ollama show phi3:latest

In a working directory, create a C# console app named Phi3SK inside a terminal window with the following command:

dotnet new console -n SlmSK

Change into the newly created directory Phi3SK with:

cd SlmSK

Next, let's add the Semantic Kernel package to our console application with:

dotnet add package Microsoft.SemanticKernel -v 1.19.0

Open the project in VS Code and add this directive to the .csproj file right below: <Nullable>enable</Nullable>:

<NoWarn>SKEXP0010</NoWarn> 

The Code

Replace contents of Program.cs with the following code:

using Microsoft.SemanticKernel;
using System.Text;
using Microsoft.SemanticKernel.ChatCompletion;

// Initialize the Semantic kernel
var builder = Kernel.CreateBuilder();

// We will use Semantic Kernel OpenAI API
builder.Services.AddOpenAIChatCompletion(
        modelId: "phi3",
        apiKey: null,
        endpoint: new Uri("http://localhost:11434"));

var kernel = builder.Build();

// get a chat completion service
var chatCompletionService = kernel.GetRequiredService<IChatCompletionService>(); 

// Create a new chat by specifying the assistant
ChatHistory chat = new(@"
    You are an AI assistant that helps people find information. 
    The response must be brief and should not exceed one paragraph.
    If you do not know the answer then simply say 'I do not know the answer'."
);
 
// Instantiate a StringBuilder
StringBuilder strBuilder = new();

// User question & answer loop
while (true) {
    Console.Write("Q: "); 
 
// Get the user's question
    chat.AddUserMessage(Console.ReadLine()!);

    // Clear contents of the StringBuilder
strBuilder.Clear();

    // Get the AI response streamed back to the console
    await foreach (var message in chatCompletionService.GetStreamingChatMessageContentsAsync(chat, kernel: kernel))
    {
        Console.Write(message);
        strBuilder.Append(message.Content);
    }
    Console.WriteLine();
    chat.AddAssistantMessage(strBuilder.ToString());

    Console.WriteLine();

}

Running the app

Run the application with:

dotnet run

I entered this question: How long does a direct flight take from Los Angles to Frankfurt?

Then, I got the following response:

Use another SLM

How about we use another SLM. Let's try llama3.1 ( https://www.ollama.com/library/llama3.1 ). Pull the image with:

ollama pull llama3.1:latest

In the code, REPLACE modelId: "phi3" WITH modelId: "llama3.1". Run your application with the same question. This is what I got:


The response is quite similar to that received from Phi-3, even though it shows that the flight to Frankfurt takes longer.

Conclusion

We can package our applications with a local SLM. This makes our applications cheaper, faster, connection-free, and self contained.


Thursday, April 25, 2024

.NET Aspire with VS Code, SQLite & SQL Server

In this Tutorial, we will explore .NET Aspire. At first, we will use it with SQLite. Thereafter, we will modify the solution so that it uses a SQL Server Docker image instead of SQLite. All this is done in a terminal window with the help of VS Code. The objective is to serve those who do not use the higher end Visual Studio 2022 IDE.

Start source code: https://github.com/medhatelmasry/SoccerFIFA
End source code: https://github.com/medhatelmasry/SoccerAspire
Companion video: https://youtu.be/FDF04Lner5k

Prerequisites

In order to continue with this tutorial, you will need the following:

  • .NET 9.0
  • dotnet-ef tool - If you do not have this tool, you can install it with the terminal window command "dotnet tool install --global dotnet-ef"
  • Visual Studio Code
  • C# Dev Kit extension for Visual Studio Code
  • Docker Desktop
  • Azure Data Studio

.NET Aspire Setup

In any terminal window folder, run the following command before you install .NET Aspire:

dotnet workload update 

To install the .NET Aspire workload from the .NET CLI, execute this command:

dotnet workload install aspire

Check your version of .NET Aspire, with this command:

dotnet workload list

Startup Application

We will start with a .NET 9.0 application that involves a Minimal API backend and a Blazor frontend. Clone the code from this GitHub site with:

git clone https://github.com/medhatelmasry/SoccerFIFA

To get a good sense of what the application does, follow these steps:

1) Inside the WebApiFIFA folder, run the following command in a terminal window:

dotnet watch


Try out the GET /api/games endpoint, you should see the following output:


2) Next, let us try the frontend. Inside a terminal window in the BlazorFIFA folder, run this command:

dotnet watch


We know that the application works. However, it is a pain to have to start both projects to get the solution to work. This is where .NET Aspire will come to the rescue.

Converting solution to .NET Aspire

Close both terminal windows by hitting CTRL C in each.

To add the basic .NET Aspire projects to our solution, run the following command inside the root SoccerFIFA folder:

dotnet new aspire --force

This adds these artifacts:

  • SoccerFIFA.sln file (this replaces the previous .sln file because of the --force switch)
  • SoccerFIFA.AppHost folder
  • SoccerFIFA.ServiceDefaults folder

We will add our previous API & Blazor projects to the newly created .sln file by executing the following commands inside the root SoccerFIFA folder:

dotnet sln add ./BlazorFIFA/BlazorFIFA.csproj
dotnet sln add ./WebApiFIFA/WebApiFIFA.csproj
dotnet sln add ./LibraryFIFA/LibraryFIFA.csproj

Our cloned projects use .NET 9.0. Unfortunately, at the time of writing this article, the new ASPIRE projects are created for .NET 8.0. We must unify all the projects so that they all use .NET 9.0. Therefore, update the .csproj files for SoccerFIFA.AppHost and SoccerFIFA.ServiceDefaults with package versions as follows:

SoccerFIFA.AppHost.csproj

change .net8.0 to .net 9.0

Package Version
Aspire.Hosting.AppHost 9.1.0

SoccerFIFA.ServiceDefaults

change .net8.0 to .net 9.0

Package Version
Microsoft.Extensions.Http.Resilience 9.2.0
Microsoft.Extensions.ServiceDiscovery 9.1.0
OpenTelemetry.Exporter.OpenTelemetryProtocol 1.11.1
OpenTelemetry.Extensions.Hosting 1.11.1
OpenTelemetry.Instrumentation.AspNetCore/td> 1.11.0
OpenTelemetry.Instrumentation.Http 1.11.0
OpenTelemetry.Instrumentation.Runtime 1.11.0

Next, we need to add references in the SoccerFIFA.AppHost project to the BlazorFIFA and WebApiFIFA projects with these commands:

dotnet add ./SoccerFIFA.AppHost/SoccerFIFA.AppHost.csproj reference ./BlazorFIFA/BlazorFIFA.csproj
dotnet add ./SoccerFIFA.AppHost/SoccerFIFA.AppHost.csproj reference ./WebApiFIFA/WebApiFIFA.csproj

Also, both BlazorFIFA and WebApiFIFA projects need to have references into SoccerFIFA.ServiceDefaults with:

dotnet add ./BlazorFIFA/BlazorFIFA.csproj reference ./SoccerFIFA.ServiceDefaults/SoccerFIFA.ServiceDefaults.csproj

dotnet add ./WebApiFIFA/WebApiFIFA.csproj reference ./SoccerFIFA.ServiceDefaults/SoccerFIFA.ServiceDefaults.csproj

Inside the SoccerFIFA root folder, start VS Code with:

code .

In the root folder, let us build to make sure everything works properly. Therefore, run this command:

dotnet build

You will receive an error message that suggests that you add the following markup to thje the .csproj file that belongs to 

<Sdk Name="Aspire.AppHost.Sdk" Version="9.0.0" />

Add the following code to SoccerFIFA.AppHost.csproj just under the opening <Project ... > tag. Thereafter, the solution should build without any errors.


Then, in the Program.cs files of both BlazorFIFA and WebApiFIFA, add this code before "var app = builder.Build();":

// Add service defaults & Aspire components.
builder.AddServiceDefaults();

In the Program.cs file in SoccerFIFA.AppHost, add this code right before “builder.Build().Run();”:

var api = builder.AddProject<Projects.WebApiFIFA>("backend");
builder.AddProject<Projects.BlazorFIFA>("frontend")
    .WithReference(api)
    
.WaitFor(api);

Now, the relative name for the API app is “backend”. Therefore, we can change the base address to http://backend. Change Program.cs file in BlazorFIFA to:

client.BaseAddress = new Uri("http://backend/");

Test .NET Aspire Solution

To test the solution, in the SoccerFIFA.AppHost folder, start the application with:

dotnet watch

NOTE: If you are asked to enter a token, copy and paste it from the value in your terminal window:


This is what you should see in your browser:


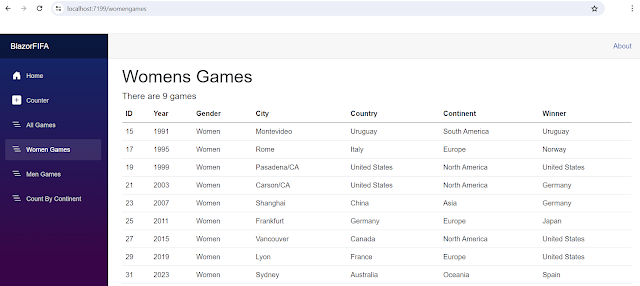
Click on the app represented by the frontend link on the second row. You should experience the Blazor app:


At this stage we get a sense of what .NET Aspire can do for us. It essentially orchestrates the connection between multiple projects and produces a single starting point in the Host project. Let us take this journey one step further by converting our backend API so it uses a SQL Server container instead of SQLite.

Using SQL Server instead of SQLite

Stop the running application by hitting CTRL C.

IMPORTANT: You will need to ensure that Docker Desktop is running on your computer because Aspire will start SQL Server in a container. Also, update your Docker Desktop to the  latest version.

Add this package to the WebApiFIFA project:

dotnet add package Aspire.Microsoft.EntityFrameworkCore.SqlServer

Also in WebApiFIFA project Program.cs file, comment out (or delete) this code:

var connectionString = builder.Configuration.GetConnectionString("DefaultConnection");
builder.Services.AddDbContext<ApplicationDbContext>(options =>
    options.UseSqlite(connectionString));

Place the below code just before builder.AddServiceDefaults():

builder.AddSqlServerDbContext<ApplicationDbContext>("sqldata");

Cleanup the backend API project (WebApiFIFA) from all traces of SQLite by doing the following:

  1. Delete SQLite files college.db, college.db-shm, and college.db-wal.
  2. In WebApiFIFA.csproj, delete: <PackageReference Include="Microsoft.EntityFrameworkCore.Sqlite" Version="9.0.2" />
  3. Delete the Data/Migrations folder.
  4. Delete the ConnectionStrings section in appsettings.json
We will create new migrations that work with SQL Server, instead of SQLite. Therefore, run the following command from within a terminal window inside folder WebApiFIFA.

dotnet ef migrations add M1 -o Data/Migrations

Configure AppHost to use SQL Server

The WebApiFIFA.AppHost project is the orchestrator for your app. It's responsible for connecting and configuring the different projects and services of your app. Add the .NET Aspire Entity Framework Core Sql Server library package to your SoccerFIFA.AppHost project with:

dotnet add package Aspire.Hosting.SqlServer

In the Program.cs file in SoccerFIFA.AppHost project comment out (or delete) the following code:

var api = builder.AddProject<Projects.WebApiFIFA>("backend");

Replace the above code with: 

var sql = builder.AddSqlServer("sql").AddDatabase("sqldata"); 

var api = builder.AddProject<Projects.WebApiFIFA>("backend")
    .WithReference(sql)
    .WaitFor(sql); 

The preceding code adds a SQL Server Container resource to your app and configures a connection to a database called sqldata. The Entity Framework classes you configured earlier will automatically use this connection when migrating and connecting to the database.

Run the solution

After ensuring that your Docker Desktop is running, execute this terminal window command inside the SoccerFIFA.AppHost folder:

dotnet watch

Your browser will look like this:


Click on the highlighted link above. Our application works just as it did before. The only difference is that this time we are using SQL Server running in a container:


I hope you found this useful and are able to see the possibilities of this new addition to .NET.