Showing posts with label gRPC. Show all posts

Wednesday, November 20, 2024

Using Aspire with gRPC

We start with a simple gRPC application that involves a gRPC server and Blazor client. The gRPC server connects to a SQLite database. To test the sample solution, we must first start the gRPC server app, then start the client app. This is somewhat tedious. By introducing .NET Aspire into the mix, we only need to start one app to get the solution to work. .NET Aspire also gives us many more benefits.

Start source code: https://github.com/medhatelmasry/GrpcBlazorSolution
Companion Video: https://youtu.be/9048nfSvA9E

Prerequisites

In order to continue with this tutorial, you will need the following:

  • .NET 9.0
  • Visual Studio Code
  • 'C# Dev Kit' extension for Visual Studio Code

.NET Aspire Setup

In any terminal window folder, run the following command before you install .NET Aspire:

dotnet workload update 

To install the .NET Aspire workload from the .NET CLI, execute this command:

dotnet workload install aspire

Check your version of .NET Aspire, with this command:

dotnet workload list

Startup Application

We will start with a .NET 9.0 solution that involves a gRPC backend and a Blazor frontend. Clone the code from this GitHub site with:

git clone https://github.com/medhatelmasry/GrpcBlazorSolution.git

To run the solution, we must first start the backend, then start the frontend. To get a good sense of what the application does, follow these steps:

1) Inside the GrpcStudents folder, run the following command in a terminal window:

dotnet run

2) Next, start the frontend. Inside a terminal window in the BlazorGrpcClient folder, run this command:

dotnet watch


Try the application by adding, updating, and deleting data saved in a SQLit database on the gRPC server. However, it is a pain to have to start both projects to get the solution to work. This is where .NET Aspire comes to the rescue.

Converting solution to .NET Aspire

Close both terminal windows by hitting CTRL C in each.

To add the basic .NET Aspire projects to our solution by running the following command inside the root GrpcBlazorSolution folder:

dotnet new aspire --force

We use the --force switch because the above command will overwrite the .sln file with a new one that only includes two new projects: GrpcBlazorSolution.AppHost and GrpcBlazorSolution.ServiceDefaults.

NOTE: At the time of writing this article, the two .NET Aspire projects are created using .NET 8.0. This will likely change with the passage of time.

We will add our previous gRPC & Blazor projects to the newly created .sln file by executing the following commands inside the root SoccerFIFA folder:

dotnet sln add ./GrpcStudents/GrpcStudents.csproj
dotnet sln add ./BlazorGrpcClient/BlazorGrpcClient.csproj

Open the solution in Visual Studio Code.

We will add references in the GrpcBlazorSolution.AppHost project to the GrpcStudents and BlazorGrpcClient projects. This can be done in the "Solution Explorer" tab in Visual Studio Code. 

Right-click on "GrpcBlazorSolution.AppHost" then select "Add Project Reference". 

 
Choose BlazorGrpcClient.


Similarly, do the same for the the "GrpcStudents" project. Right-click on "GrpcBlazorSolution.AppHost" then select "Add Project Reference". 

Choose BlazorStudents.

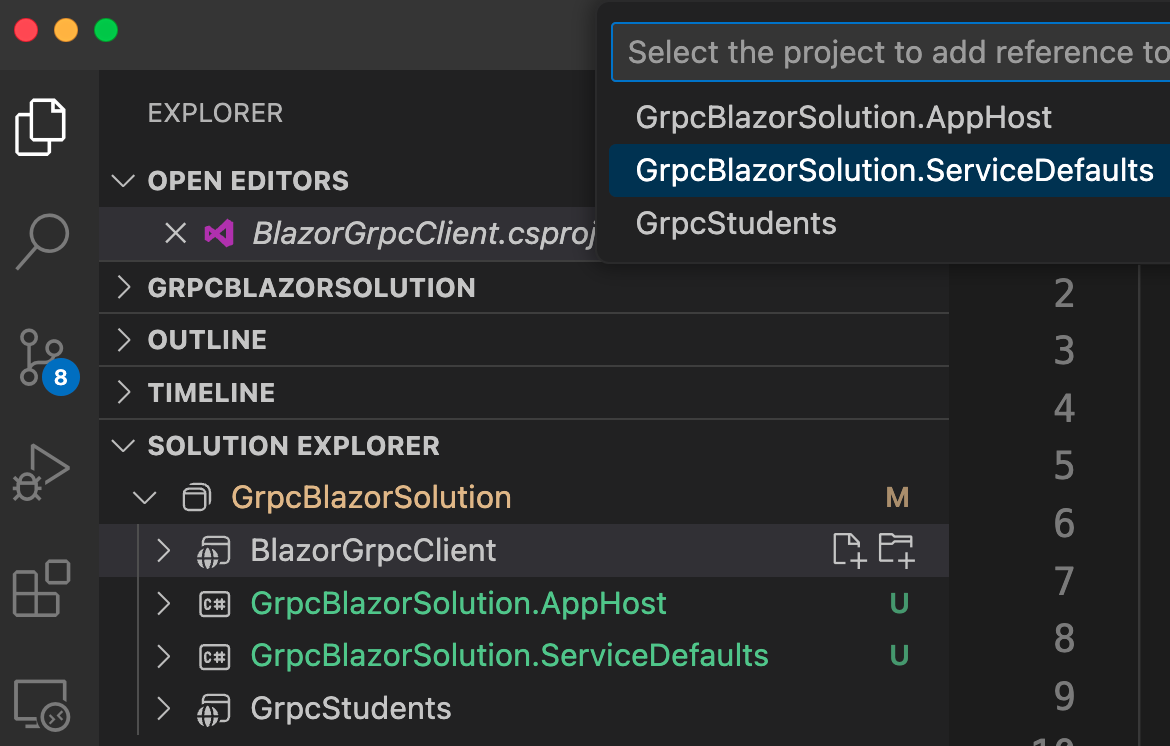
Also, both GrpcStudents and BlazorGrpcClient projects need to have references into GrpcBlazorSolution.ServiceDefaults.

Right-click on BlazorGrpcClient then select "Add Project Reference". 


Choose GrpcBlazorSolution.ServiceDefaults.


Similarly, add a reference to GrpcBlazorSolution.ServiceDefaults from GrpcStudents:

Right-click on GrpcStudents then select "Add Project Reference". 


Choose GrpcBlazorSolution.ServiceDefaults once again.

Then, in the Program.cs files of both GrpcStudents and BlazorGrpcClient projects, add this agent code right before "var app = builder.Build();":

// Add service defaults & Aspire components.
builder.AddServiceDefaults();

In the Program.cs file in GrpcBlazorSolution.AppHost, add this code right before “builder.Build().Run();”:

var grpc = builder.AddProject<Projects.GrpcStudents>("backend");
builder.AddProject<Projects.BlazorGrpcClient>("frontend")
    .WithReference(grpc);

The relative name for the gRPC app is “backend”. Therefore, edit Program.cs in the BlazorGrpcClient project. At around line 15, change the address from http://localhost:5099 to simply http://backend so that the statement looks like this:

builder.Services.AddGrpcClient<StudentRemote.StudentRemoteClient>(options =>
{
    options.Address = new Uri("http://backend");
});

Test .NET Aspire Solution

To test the solution,  start the application in the GrpcBlazorSolution.AppHost folder with:

dotnet watch

NOTE: If you are asked to enter a token, copy and paste it from the value in your terminal window:


This is what you should see in your browser:


Click on the app represented by the frontend link on the second row. You should experience the Blazor app:


.NET Aspire has orchestrated for us the connection between multiple projects and produced a single starting point in the Host project. 

Mission accomplished. We have achieved our objective by adding NET Aspire into the mix of projects and wiring up a couple of agents.

Monday, October 14, 2019

Produce & Consume a .NET Core 3.0 gRPC DB Driven Service

gRPC is a method of web communication like WCF. .NET Remoting, SOAP, etc. It is a standard created by Google and is widely used. It relies on known configuration shared between client and server. Contracts are called protocol buffers. 

gRPC was introduces to the world of .NET with .NET Core 3.0. In this tutorial we shall build a gRPC service that talks with LocalDB using Entity Framework.

Source Code: https://github.com/medhatelmasry/GrpcWorld.git

Video:  https://youtu.be/Xh47x_C-aMM

Let’s build a gRPC server then client.
You need .NET Core 3.0
Visual Studio 2019 >> Create New Project >> gRPC Service

Project Name: GrpcServer
Solution Name: GrpcRocks


Similar to Web API, this service sits and listens for calls.

The proto file defines the contract between the server and the client.

greet.proto

syntax = "proto3";
option csharp_namespace = "GrpcServer";
package Greet;
// The greeting service definition.
service Greeter {
  // Sends a greeting
  rpc SayHello (HelloRequest) returns (HelloReply);
}
// The request message containing the user's name.
message HelloRequest {
  string name = 1;
}
If you navigate to the definition of GreeterBase, you will find a generated file named GreetGrpc.cs where the abstract class is defined. This file is regenerated with every build. If you hit CTRL F5, this is what you will see:
info: Microsoft.Hosting.Lifetime[0]
      Now listening on: https://localhost:5001
info: Microsoft.Hosting.Lifetime[0]
      Application started. Press Ctrl+C to shut down.
info: Microsoft.Hosting.Lifetime[0]
      Hosting environment: Development
info: Microsoft.Hosting.Lifetime[0]
      Content root path: E:\play\gRPC\GrpcDemo\GrpcServer
When you point your browser to https://localhost:5001, this is what appears:

Communication with gRPC endpoints must be made through a gRPC client. 
To learn how to create a client, visit: https://go.microsoft.com/fwlink/?linkid=2086909 
This tells us that we need to create a client.

Add a console App to the solution.

Name the project GrpcClient.

Add the following three packages to GrpcClient project:
dotnet add package Google.Protobuf
dotnet add package Grpc.Net.Client
dotnet add package Grpc.Tools
Copy the Protos folder from the server project to the client project.

Edit the GrpcClient.csproj file.

Change : <Protobuf Include="Protos\greet.proto" GrpcServices="Server" />
To: <Protobuf Include="Protos\greet.proto" GrpcServices="Client" />

Rebuild the CLIENT app.

Replace the Main() method in Program.cs with this code:
static async Task Main(string[] args) {
  var input = new HelloRequest { Name = "Jane Bond" };
  var channel = GrpcChannel.ForAddress("https://localhost:5001");
  var client = new Greeter.GreeterClient(channel);
  var reply = await client.SayHelloAsync(input);
  Console.WriteLine(reply.Message);
  Console.ReadLine();
}
Right-click on solution >> Properties.

Select “Multiple startup projects”.

Choose Start for both projects, but make GrpcServer start before GrpcClient.


CTRL F5. This is the output:

Student Database Model

Add the following packages to the GrpcService project:
dotnet add package Microsoft.EntityFrameworkCore.Design
dotnet add package Microsoft.EntityFrameworkCore.SqlServer
dotnet add package Microsoft.EntityFrameworkCore.SqlServer.Design
dotnet add package Microsoft.EntityFrameworkCore.Tools
dotnet add package Grpc.Tools
Add this connection string to the appsettings.json file:
"ConnectionStrings": {
  "DefaultConnection": "Server=(localdb)\\mssqllocaldb;Database=School;Trusted_Connection=True;MultipleActiveResultSets=true"
},
Create Data & Models folders.

Add the following Student class to the Models folder:
 public class Student {
  public int StudentId { get; set; }
  public string FirstName { get; set; }
  public string LastName { get; set; }
  public string School { get; set; }
}
Add the following database context class named SchoolDbContext to the Data folder:
public class SchoolDbContext  : DbContext {
  public SchoolDbContext (DbContextOptions options) : base(options) { }
  protected override void OnModelCreating(ModelBuilder builder) {
    builder.Entity<Student>().HasData(
      GetStudents()
    );
  }
  public DbSet<Student> Students { get; set; }
  private static List<Student> GetStudents() {
    List<Student> students = new List<Student>() {
      new Student() {    // 1
        StudentId=11,
        FirstName="Ann",
        LastName="Fox",
        School="Nursing",                
      },
      new Student() {    // 2
        StudentId=22,
        FirstName="Sam",
        LastName="Doe",
        School="Mining",                
      },
      new Student() {    // 3
        StudentId=33,
        FirstName="Sue",
        LastName="Cox",
        School="Business",                
      },
      new Student() {    // 4
        StudentId=44,
        FirstName="Tim",
        LastName="Lee",
        School="Computing",                
      },
      new Student() {    // 5
        StudentId=55,
        FirstName="Jan",
        LastName="Ray",
        School="Computing",                
      },
    };
    return students;
  }
}
We will need access to the Configuration object in Startup class. Therefore add this instance variable and constructor to Startup.cs:
private IConfiguration _configuration { get; }
public Startup(IConfiguration configuration) {
  _configuration = configuration;
}
Add the following code to ConfigureServices() method in the Startup.cs file:
services.AddDbContext<SchoolDbContext>(options =>
  options.UseSqlServer(_configuration.GetConnectionString("DefaultConnection")));

Rebuild the SERVER app.

Now we can add migrations. Execute the following commands from within a terminal window in the GrpcServer folder:
dotnet-ef migrations add InitialCreate –o Data/Migrations
dotnet-ef database update
Check the database to make sure that tables and data were created:

Students Service

Let us setup our own gRPC service. Comment out the content of the Main() method on the client side Program.cs.

Inside the Protos folder in GrpcServer project, add a new file named students.proto.


The content of students.proto is:
syntax = "proto3";
option csharp_namespace = "GrpcServer.Protos";
// The student service definition.
service RemoteStudent {
  rpc GetStudentInfo (StudentLookupModel) returns (StudentModel);
}
// The request message 
message StudentLookupModel {
  int32 studentId = 1;
}
// The response message 
message StudentModel {
  string studentId = 1;  
  string firstName = 2;
  string lastName = 3;
  string school = 4;
}
Right-click on students.proto >> Properties.

Set “Build Action” value to “Protobuf compiler”. Note: if you do not see this option then you are missing the Grpc.Tools package.

Set “gRPC Stub Classes” value to “Server only”.

Rebuild the SERVER app.

Add a class named StudentsService into the Services folder. Contents of StudentsService.cs are:
public class StudentsService : RemoteStudent.RemoteStudentBase {
  private readonly ILogger<StudentsService> _logger;
  private readonly SchoolDbContext _context;
  public StudentsService(ILogger<StudentsService> logger, SchoolDbContext context) {
    _logger = logger;
    _context = context;
  }

  public override Task<StudentModel> GetStudentInfo(StudentLookupModel request, ServerCallContext context)
  {
    StudentModel output = new StudentModel();
    var student = _context.Students.Find(request.StudentId);
    _logger.LogInformation("Sending Student response");
    if (student != null) {
      output.StudentId = student.StudentId;
      output.FirstName = student.FirstName;
      output.LastName = student.LastName;
      output.School = student.School;
    }
    return Task.FromResult(output);
  }
}
On the server-side GrpcServer project, in Startup.cs file’s Configure() method, add the following endpoint mapping:
endpoints.MapGrpcService<StudentsService>();

Rebuild the SERVER app.

Copy students.proto from GrpcServer project to GrpcClient project.

In the GrpcClient.csproj file, change Server to Client for Protos\students.proto.

Rebuild the SERVER & CLIENT apps.

Except for the Console.ReadLine() statement, comment previous code in Main() method on client-side Program.cs and, instead, add this code:
var channel = GrpcChannel.ForAddress("https://localhost:5001");
var studentClient = new RemoteStudent.RemoteStudentClient(channel);
var studentInput = new StudentLookupModel { StudentId = 33 };
var studentReply = await studentClient.GetStudentInfoAsync(studentInput);
Console.WriteLine($"{studentReply.FirstName} {studentReply.LastName}");
Run application. You should see this result: