Let's learn how to use the .NET Aspire Azure OpenAI client. We will familiarize ourselves with the Aspire.Azure.AI.OpenAI library, which is used to register an OpenAIClient in the dependency injection (DI) container for consuming Azure OpenAI or OpenAI functionality. In addition, it enables corresponding logging and telemetry.
Companion Video: https://youtu.be/UuLnCRdYvEI
Final Solution Code: https://github.com/medhatelmasry/AspireAI_Final
Pre-requisites:
- .NET 9.0
- Visual Studio Code
- .NET Aspire Workload
- "C# Dev Kit" extension for VS Code
Getting Started
We will start by cloning a simple C# solution that contains two projects that use Semantic Kernel - namely a console project (ConsoleAI) and a razor-pages project (RazorPagesAI). Clone the project in a working directory on your computer by executing these commands in a terminal window:
git clone https://github.com/medhatelmasry/AspireAI.git
cd AspireAI
The cloned solution contains a console application (ConsoleAI) and a razor-pages application (RazorPagesAI). They both do pretty much do the same thing. The objective of today’s exercise is to:
- use .NET Aspire so that both projects get started from one place
- pass environment variables to the console and razor-pages web apps from the .AppHost project that belongs to .NET Aspire
Open the solution in VS Code and update the values in the following appsettings.json files with your access parameters for Azure OpenAI and/or OpenAI:
ConsoleAI/appsettings.jsonRazorPagesAI/appsettings.json
The most important settings are the connection strings. They are identical in both projects:
"ConnectionStrings": {"azureOpenAi": "Endpoint=Azure-OpenAI-Endpoint-Here;Key=Azure-OpenAI-Key-Here;","openAi": "Key=OpenAI-Key-Here"}
After you update your access parameters, try each application separately to see what it does:
Here is my experience using the console application (ConsoleAI) with AzureOrOpenAI set to “OpenAI”:
cd ConsoleAIdotnet run

I then changed the AzureOrOpenAI setting to “Azure” and ran the console application (ConsoleAI) again:

Next, try the razor pages web application (RazorPagesAI) with AzureOrOpenAI set to “OpenAI”:
cd ../RazorPagesAIdotnet watch

In the RazorPagesAI web app’s appsettings.json file, I changed AzureOrOpenAI to “Azure”, resulting in a similar experience.

In the root folder, add .NET Aspire to the solution:
cd ..dotnet new aspire --force
Add the previous projects to the newly created .sln file with:
dotnet sln add ./AiLibrary/AiLibrary.csprojdotnet sln add ./RazorPagesAI/RazorPagesAI.csprojdotnet sln add ./ConsoleAI/ConsoleAI.csproj
Add the following .NET Aspire agent packages to the client ConsoleAI and RazorPagesAI projects with:
dotnet add ./ConsoleAI/ConsoleAI.csproj package Aspire.Azure.AI.OpenAI --prereleasedotnet add ./RazorPagesAI/RazorPagesAI.csproj package Aspire.Azure.AI.OpenAI --prerelease
To add Azure hosting support to your IDistributedApplicationBuilder, install the 📦 Aspire.Hosting.Azure.CognitiveServices NuGet package in the .AppHost project:
dotnet add ./AspireAI.AppHost/AspireAI.AppHost.csproj package Aspire.Hosting.Azure.CognitiveServices
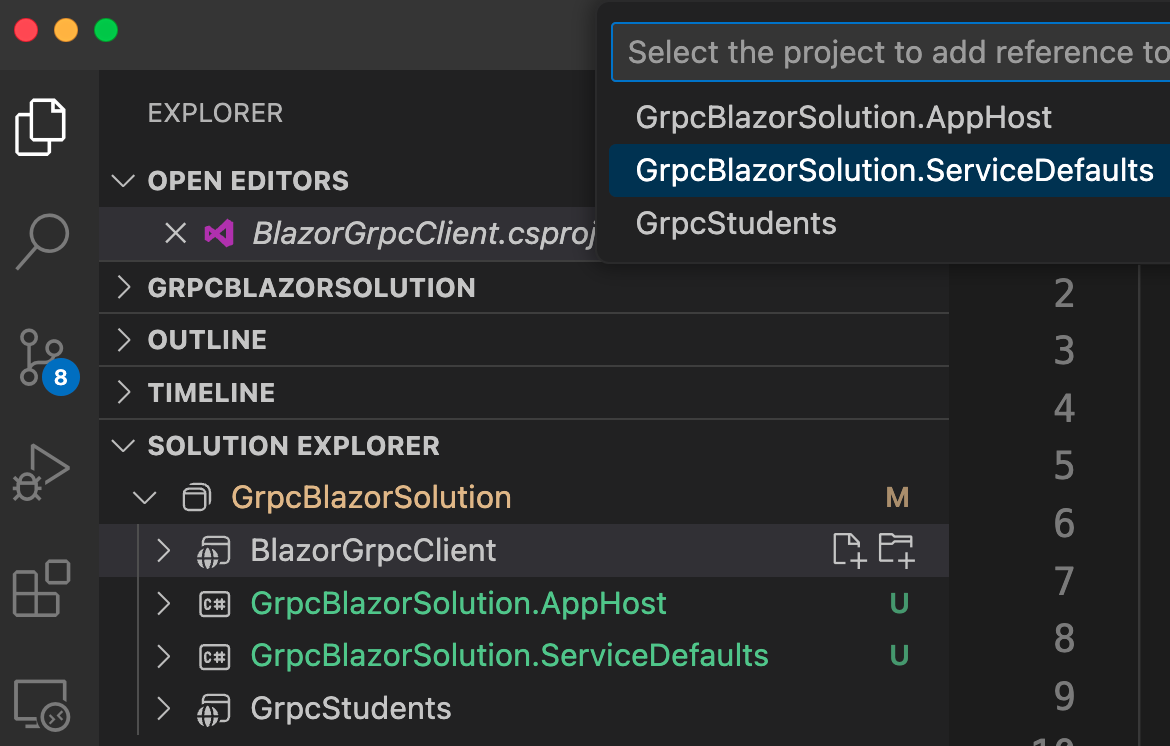
In VS Code, add the following references:
- Add a reference from the .AppHost project into ConsoleAI project.
- Add a reference from the .AppHost project into RazorPagesAI project.
- Add a reference from the ConsoleAI project into .ServiceDefaults project.
- Add a reference from the RazorPagesAI project into .ServiceDefaults project.
Copy the AI and ConnectionStrings blocks from either the console (ConsoleAI) or web app (RazorPagesAI) appsettings.json file into the appsettings.json file of the .AppHost project. The appsettings.json file in the .AppHost project will look similar to this:
"AI": {"AzureOrOpenAI": "OpenAI","OpenAiChatModel": "gpt-3.5-turbo","AzureChatDeploymentName": "gpt-35-turbo"},"ConnectionStrings": {"azureOpenAi": "Endpoint=Azure-OpenAI-Endpoint-Here;Key=Azure-OpenAI-Key-Here;","openAi": "Key=OpenAI-Key-Here"}
Add the following code to the Program.cs file in the .AppHost project just before builder.Build().Run():
IResourceBuilder<IResourceWithConnectionString> openai;var AzureOrOpenAI = builder.Configuration["AI:AzureOrOpenAI"] ?? "Azure"; ;var chatDeploymentName = builder.Configuration["AI:AzureChatDeploymentName"];var openAiChatModel = builder.Configuration["AI:OpenAiChatModel"];
// Register an Azure OpenAI resource.
// The AddAzureAIOpenAI method reads connection information
// from the app host's configuration
if (AzureOrOpenAI.ToLower() == "azure") {openai = builder.ExecutionContext.IsPublishMode? builder.AddAzureOpenAI("azureOpenAi"): builder.AddConnectionString("azureOpenAi");} else {openai = builder.ExecutionContext.IsPublishMode? builder.AddAzureOpenAI("openAi"): builder.AddConnectionString("openAi");}
// Register the RazorPagesAI project and pass to it environment variables.
// WithReference method passes connection info to client project
builder.AddProject<Projects.RazorPagesAI>("razor").WithReference(openai).WithEnvironment("AI__AzureChatDeploymentName", chatDeploymentName).WithEnvironment("AI__AzureOrOpenAI", AzureOrOpenAI).WithEnvironment("AI_OpenAiChatModel", openAiChatModel);
// register the ConsoleAI project and pass to it environment variables
builder.AddProject<Projects.ConsoleAI>("console").WithReference(openai).WithEnvironment("AI__AzureChatDeploymentName", chatDeploymentName).WithEnvironment("AI__AzureOrOpenAI", AzureOrOpenAI).WithEnvironment("AI_OpenAiChatModel", openAiChatModel);
We need to add .NET Aspire agents in both our console and web apps. Let us start with the web app. Add this code to the Program.cs file in the RazorPagesAI project right before “var app = builder.Build()”:
builder.AddServiceDefaults();
In the same Program.cs of the web app (RazorPagesAI), comment out the if (azureOrOpenAi.ToLower() == "openai") { …. } else { ….. } block and replace it with this code:
if (azureOrOpenAi.ToLower() == "openai") {builder.AddOpenAIClient("openAi");builder.Services.AddKernel().AddOpenAIChatCompletion(openAiChatModel);} else {builder.AddAzureOpenAIClient("azureOpenAi");builder.Services.AddKernel().AddAzureOpenAIChatCompletion(azureChatDeploymentName);}
In the above code, we call the extension method to register an OpenAIClient for use via the dependency injection container. The method takes a connection name parameter. Also, register Semantic Kernel with the DI.
Also, in the Program.cs file in the ConsoleAI project, add this code right below the using statements:
var hostBuilder = Host.CreateApplicationBuilder();hostBuilder.AddServiceDefaults();
In the same Program.cs of the console app (ConsoleAI), comment out the if (azureOrOpenAi.ToLower() == "azure") { …. } else { ….. } block and replace it with this code:
if (azureOrOpenAI.ToLower() == "azure") {var azureChatDeploymentName = config["AI:AzureChatDeploymentName"] ?? "gpt-35-turbo";hostBuilder.AddAzureOpenAIClient("azureOpenAi");hostBuilder.Services.AddKernel().AddAzureOpenAIChatCompletion(azureChatDeploymentName);} else {var openAiChatModel = config["AI:OpenAiChatModel"] ?? "gpt-3.5-turbo";hostBuilder.AddOpenAIClient("openAi");hostBuilder.Services.AddKernel().AddOpenAIChatCompletion(openAiChatModel);}var app = hostBuilder.Build();
Replace “var kernel = builder.Build();” with this code:
var kernel = app.Services.GetRequiredService<Kernel>();app.Start();
You can now test that the .NET Aspire orchestration of both the Console and Web apps. Stop all applications, then, in a terminal window, go to the .AppHost project and run the following command:
dotnet watch
You will see the .NET Aspire dashboard:

Click on Views under the Logs column. You will see this output indicating that the console application ran successfully:

Click on the link for the web app under the Endpoints column. It opens the razor pages web app in another tab in your browser. Test it out and verify that it works as expected.

Stop the .AppHost application, then comment out the AI and ConneectionStrings blocks in the appsettings.json files in both the console and web apps. If you run the .AppHost project again, you will discover that it works equally well because the environment variables are being passed from the .AppHost project into the console and web apps respectively.
One last refinement we can do to the console application is do away with the ConfigurationBuilder because we can get a configuration object from the ApplicationBuilder. Therefore, comment out the following code in the console application:
var config = new ConfigurationBuilder().SetBasePath(Directory.GetCurrentDirectory()).AddJsonFile("appsettings.json", optional: true, reloadOnChange: true).Build();
Replace the above code with the following:
var config = hostBuilder.Configuration;
You can delete the following package from the ConsoleAI.csproj file:
<PackageReference Include="Microsoft.Extensions.Configuration.Json" Version="9.0.0" />
Everything works just as it did before.