Showing posts with label frontend. Show all posts

Wednesday, November 20, 2024

Using Aspire with gRPC

We start with a simple gRPC application that involves a gRPC server and Blazor client. The gRPC server connects to a SQLite database. To test the sample solution, we must first start the gRPC server app, then start the client app. This is somewhat tedious. By introducing .NET Aspire into the mix, we only need to start one app to get the solution to work. .NET Aspire also gives us many more benefits.

Start source code: https://github.com/medhatelmasry/GrpcBlazorSolution
Companion Video: https://youtu.be/9048nfSvA9E

Prerequisites

In order to continue with this tutorial, you will need the following:

  • .NET 9.0
  • Visual Studio Code
  • 'C# Dev Kit' extension for Visual Studio Code

.NET Aspire Setup

In any terminal window folder, run the following command before you install .NET Aspire:

dotnet workload update 

To install the .NET Aspire workload from the .NET CLI, execute this command:

dotnet workload install aspire

Check your version of .NET Aspire, with this command:

dotnet workload list

Startup Application

We will start with a .NET 9.0 solution that involves a gRPC backend and a Blazor frontend. Clone the code from this GitHub site with:

git clone https://github.com/medhatelmasry/GrpcBlazorSolution.git

To run the solution, we must first start the backend, then start the frontend. To get a good sense of what the application does, follow these steps:

1) Inside the GrpcStudents folder, run the following command in a terminal window:

dotnet run

2) Next, start the frontend. Inside a terminal window in the BlazorGrpcClient folder, run this command:

dotnet watch


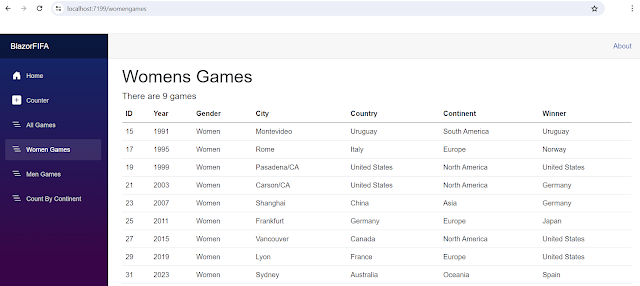
Try the application by adding, updating, and deleting data saved in a SQLit database on the gRPC server. However, it is a pain to have to start both projects to get the solution to work. This is where .NET Aspire comes to the rescue.

Converting solution to .NET Aspire

Close both terminal windows by hitting CTRL C in each.

To add the basic .NET Aspire projects to our solution by running the following command inside the root GrpcBlazorSolution folder:

dotnet new aspire --force

We use the --force switch because the above command will overwrite the .sln file with a new one that only includes two new projects: GrpcBlazorSolution.AppHost and GrpcBlazorSolution.ServiceDefaults.

NOTE: At the time of writing this article, the two .NET Aspire projects are created using .NET 8.0. This will likely change with the passage of time.

We will add our previous gRPC & Blazor projects to the newly created .sln file by executing the following commands inside the root SoccerFIFA folder:

dotnet sln add ./GrpcStudents/GrpcStudents.csproj
dotnet sln add ./BlazorGrpcClient/BlazorGrpcClient.csproj

Open the solution in Visual Studio Code.

We will add references in the GrpcBlazorSolution.AppHost project to the GrpcStudents and BlazorGrpcClient projects. This can be done in the "Solution Explorer" tab in Visual Studio Code. 

Right-click on "GrpcBlazorSolution.AppHost" then select "Add Project Reference". 

 
Choose BlazorGrpcClient.


Similarly, do the same for the the "GrpcStudents" project. Right-click on "GrpcBlazorSolution.AppHost" then select "Add Project Reference". 

Choose BlazorStudents.

Also, both GrpcStudents and BlazorGrpcClient projects need to have references into GrpcBlazorSolution.ServiceDefaults.

Right-click on BlazorGrpcClient then select "Add Project Reference". 


Choose GrpcBlazorSolution.ServiceDefaults.


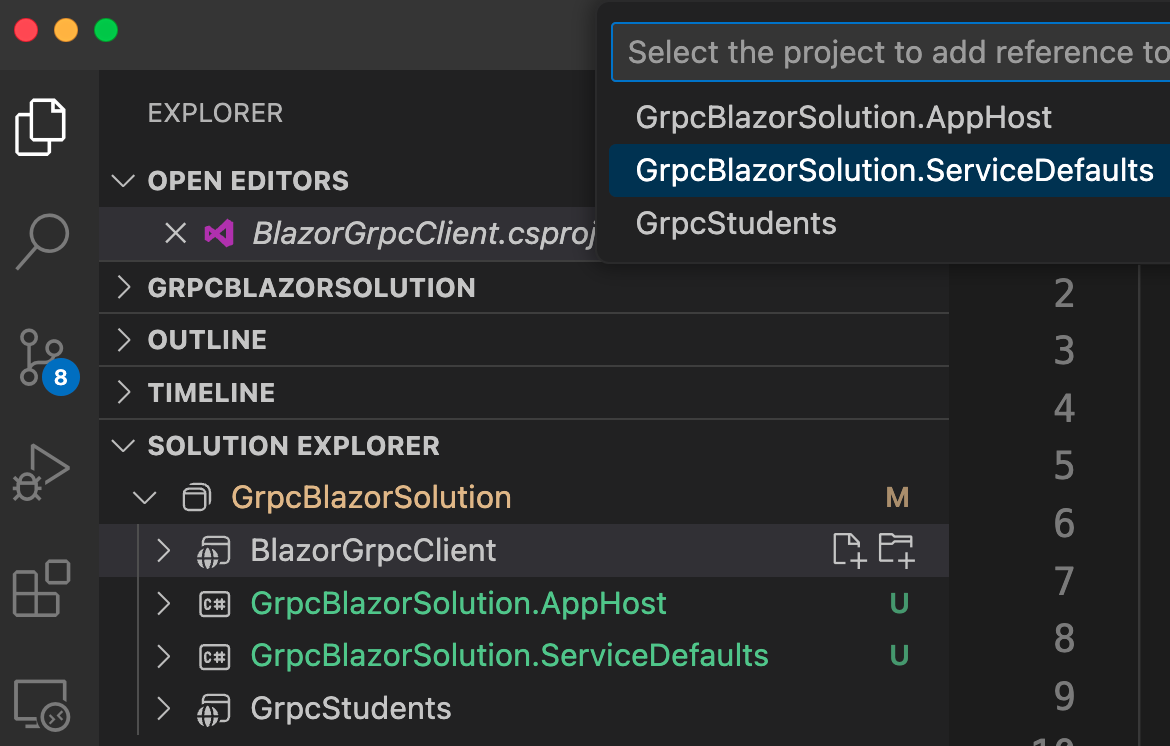
Similarly, add a reference to GrpcBlazorSolution.ServiceDefaults from GrpcStudents:

Right-click on GrpcStudents then select "Add Project Reference". 


Choose GrpcBlazorSolution.ServiceDefaults once again.

Then, in the Program.cs files of both GrpcStudents and BlazorGrpcClient projects, add this agent code right before "var app = builder.Build();":

// Add service defaults & Aspire components.
builder.AddServiceDefaults();

In the Program.cs file in GrpcBlazorSolution.AppHost, add this code right before “builder.Build().Run();”:

var grpc = builder.AddProject<Projects.GrpcStudents>("backend");
builder.AddProject<Projects.BlazorGrpcClient>("frontend")
    .WithReference(grpc);

The relative name for the gRPC app is “backend”. Therefore, edit Program.cs in the BlazorGrpcClient project. At around line 15, change the address from http://localhost:5099 to simply http://backend so that the statement looks like this:

builder.Services.AddGrpcClient<StudentRemote.StudentRemoteClient>(options =>
{
    options.Address = new Uri("http://backend");
});

Test .NET Aspire Solution

To test the solution,  start the application in the GrpcBlazorSolution.AppHost folder with:

dotnet watch

NOTE: If you are asked to enter a token, copy and paste it from the value in your terminal window:


This is what you should see in your browser:


Click on the app represented by the frontend link on the second row. You should experience the Blazor app:


.NET Aspire has orchestrated for us the connection between multiple projects and produced a single starting point in the Host project. 

Mission accomplished. We have achieved our objective by adding NET Aspire into the mix of projects and wiring up a couple of agents.

Thursday, April 25, 2024

.NET Aspire with VS Code, SQLite & SQL Server

In this Tutorial, we will explore .NET Aspire. At first, we will use it with SQLite. Thereafter, we will modify the solution so that it uses a SQL Server Docker image instead of SQLite. All this is done in a terminal window with the help of VS Code. The objective is to serve those who do not use the higher end Visual Studio 2022 IDE.

Start source code: https://github.com/medhatelmasry/SoccerFIFA
End source code: https://github.com/medhatelmasry/SoccerAspire
Companion video: https://youtu.be/FDF04Lner5k

Prerequisites

In order to continue with this tutorial, you will need the following:

  • .NET 9.0
  • dotnet-ef tool - If you do not have this tool, you can install it with the terminal window command "dotnet tool install --global dotnet-ef"
  • Visual Studio Code
  • C# Dev Kit extension for Visual Studio Code
  • Docker Desktop
  • Azure Data Studio

.NET Aspire Setup

In any terminal window folder, run the following command before you install .NET Aspire:

dotnet workload update 

To install the .NET Aspire workload from the .NET CLI, execute this command:

dotnet workload install aspire

Check your version of .NET Aspire, with this command:

dotnet workload list

Startup Application

We will start with a .NET 9.0 application that involves a Minimal API backend and a Blazor frontend. Clone the code from this GitHub site with:

git clone https://github.com/medhatelmasry/SoccerFIFA

To get a good sense of what the application does, follow these steps:

1) Inside the WebApiFIFA folder, run the following command in a terminal window:

dotnet watch


Try out the GET /api/games endpoint, you should see the following output:


2) Next, let us try the frontend. Inside a terminal window in the BlazorFIFA folder, run this command:

dotnet watch


We know that the application works. However, it is a pain to have to start both projects to get the solution to work. This is where .NET Aspire will come to the rescue.

Converting solution to .NET Aspire

Close both terminal windows by hitting CTRL C in each.

To add the basic .NET Aspire projects to our solution, run the following command inside the root SoccerFIFA folder:

dotnet new aspire --force

This adds these artifacts:

  • SoccerFIFA.sln file (this replaces the previous .sln file because of the --force switch)
  • SoccerFIFA.AppHost folder
  • SoccerFIFA.ServiceDefaults folder

We will add our previous API & Blazor projects to the newly created .sln file by executing the following commands inside the root SoccerFIFA folder:

dotnet sln add ./BlazorFIFA/BlazorFIFA.csproj
dotnet sln add ./WebApiFIFA/WebApiFIFA.csproj
dotnet sln add ./LibraryFIFA/LibraryFIFA.csproj

Our cloned projects use .NET 9.0. Unfortunately, at the time of writing this article, the new ASPIRE projects are created for .NET 8.0. We must unify all the projects so that they all use .NET 9.0. Therefore, update the .csproj files for SoccerFIFA.AppHost and SoccerFIFA.ServiceDefaults with package versions as follows:

SoccerFIFA.AppHost.csproj

change .net8.0 to .net 9.0

Package Version
Aspire.Hosting.AppHost 9.1.0

SoccerFIFA.ServiceDefaults

change .net8.0 to .net 9.0

Package Version
Microsoft.Extensions.Http.Resilience 9.2.0
Microsoft.Extensions.ServiceDiscovery 9.1.0
OpenTelemetry.Exporter.OpenTelemetryProtocol 1.11.1
OpenTelemetry.Extensions.Hosting 1.11.1
OpenTelemetry.Instrumentation.AspNetCore/td> 1.11.0
OpenTelemetry.Instrumentation.Http 1.11.0
OpenTelemetry.Instrumentation.Runtime 1.11.0

Next, we need to add references in the SoccerFIFA.AppHost project to the BlazorFIFA and WebApiFIFA projects with these commands:

dotnet add ./SoccerFIFA.AppHost/SoccerFIFA.AppHost.csproj reference ./BlazorFIFA/BlazorFIFA.csproj
dotnet add ./SoccerFIFA.AppHost/SoccerFIFA.AppHost.csproj reference ./WebApiFIFA/WebApiFIFA.csproj

Also, both BlazorFIFA and WebApiFIFA projects need to have references into SoccerFIFA.ServiceDefaults with:

dotnet add ./BlazorFIFA/BlazorFIFA.csproj reference ./SoccerFIFA.ServiceDefaults/SoccerFIFA.ServiceDefaults.csproj

dotnet add ./WebApiFIFA/WebApiFIFA.csproj reference ./SoccerFIFA.ServiceDefaults/SoccerFIFA.ServiceDefaults.csproj

Inside the SoccerFIFA root folder, start VS Code with:

code .

In the root folder, let us build to make sure everything works properly. Therefore, run this command:

dotnet build

You will receive an error message that suggests that you add the following markup to thje the .csproj file that belongs to 

<Sdk Name="Aspire.AppHost.Sdk" Version="9.0.0" />

Add the following code to SoccerFIFA.AppHost.csproj just under the opening <Project ... > tag. Thereafter, the solution should build without any errors.


Then, in the Program.cs files of both BlazorFIFA and WebApiFIFA, add this code before "var app = builder.Build();":

// Add service defaults & Aspire components.
builder.AddServiceDefaults();

In the Program.cs file in SoccerFIFA.AppHost, add this code right before “builder.Build().Run();”:

var api = builder.AddProject<Projects.WebApiFIFA>("backend");
builder.AddProject<Projects.BlazorFIFA>("frontend")
    .WithReference(api)
    
.WaitFor(api);

Now, the relative name for the API app is “backend”. Therefore, we can change the base address to http://backend. Change Program.cs file in BlazorFIFA to:

client.BaseAddress = new Uri("http://backend/");

Test .NET Aspire Solution

To test the solution, in the SoccerFIFA.AppHost folder, start the application with:

dotnet watch

NOTE: If you are asked to enter a token, copy and paste it from the value in your terminal window:


This is what you should see in your browser:


Click on the app represented by the frontend link on the second row. You should experience the Blazor app:


At this stage we get a sense of what .NET Aspire can do for us. It essentially orchestrates the connection between multiple projects and produces a single starting point in the Host project. Let us take this journey one step further by converting our backend API so it uses a SQL Server container instead of SQLite.

Using SQL Server instead of SQLite

Stop the running application by hitting CTRL C.

IMPORTANT: You will need to ensure that Docker Desktop is running on your computer because Aspire will start SQL Server in a container. Also, update your Docker Desktop to the  latest version.

Add this package to the WebApiFIFA project:

dotnet add package Aspire.Microsoft.EntityFrameworkCore.SqlServer

Also in WebApiFIFA project Program.cs file, comment out (or delete) this code:

var connectionString = builder.Configuration.GetConnectionString("DefaultConnection");
builder.Services.AddDbContext<ApplicationDbContext>(options =>
    options.UseSqlite(connectionString));

Place the below code just before builder.AddServiceDefaults():

builder.AddSqlServerDbContext<ApplicationDbContext>("sqldata");

Cleanup the backend API project (WebApiFIFA) from all traces of SQLite by doing the following:

  1. Delete SQLite files college.db, college.db-shm, and college.db-wal.
  2. In WebApiFIFA.csproj, delete: <PackageReference Include="Microsoft.EntityFrameworkCore.Sqlite" Version="9.0.2" />
  3. Delete the Data/Migrations folder.
  4. Delete the ConnectionStrings section in appsettings.json
We will create new migrations that work with SQL Server, instead of SQLite. Therefore, run the following command from within a terminal window inside folder WebApiFIFA.

dotnet ef migrations add M1 -o Data/Migrations

Configure AppHost to use SQL Server

The WebApiFIFA.AppHost project is the orchestrator for your app. It's responsible for connecting and configuring the different projects and services of your app. Add the .NET Aspire Entity Framework Core Sql Server library package to your SoccerFIFA.AppHost project with:

dotnet add package Aspire.Hosting.SqlServer

In the Program.cs file in SoccerFIFA.AppHost project comment out (or delete) the following code:

var api = builder.AddProject<Projects.WebApiFIFA>("backend");

Replace the above code with: 

var sql = builder.AddSqlServer("sql").AddDatabase("sqldata"); 

var api = builder.AddProject<Projects.WebApiFIFA>("backend")
    .WithReference(sql)
    .WaitFor(sql); 

The preceding code adds a SQL Server Container resource to your app and configures a connection to a database called sqldata. The Entity Framework classes you configured earlier will automatically use this connection when migrating and connecting to the database.

Run the solution

After ensuring that your Docker Desktop is running, execute this terminal window command inside the SoccerFIFA.AppHost folder:

dotnet watch

Your browser will look like this:


Click on the highlighted link above. Our application works just as it did before. The only difference is that this time we are using SQL Server running in a container:


I hope you found this useful and are able to see the possibilities of this new addition to .NET.