Showing posts with label WebAPI. Show all posts

Tuesday, January 28, 2025

Built-in token authentication with ASP.NET Core 9.0 Minimal WebAPI

In this tutorial I will showcase the built-in WebApi token authentication. To keep it simple, we shall persist our data in the lightweight SQLite database.

Prerequisites

It is assumed that you have installed the following on your computer:
  • .NET 9.0
  • Visual Studio Code editor

Getting Started

In a suitable working directory, create a new WebApi application using the following terminal window command:

dotnet new webapi --name WebApiTokenAuth

Change directory with:

cd WebApiTokenAuth

We will need to add some packages. Also in the same terminal window, run the following commands:

dotnet add package Microsoft.AspNetCore.Identity.EntityFrameworkCore

dotnet add package Microsoft.EntityFrameworkCore.Sqlite

dotnet add package Microsoft.EntityFrameworkCore.Tools

dotnet add package Microsoft.EntityFrameworkCore.Design

dotnet add package Swashbuckle.AspNetCore

The above packages allow us to use SQLite and Entity Framework. The last package (Swashbuckle.AspNetCore) will be used to provide a default Swagger UI.

Make sure you have the dotnet-ef tool. If you do not, you can globally install it with:

dotnet tool install --global dotnet-ef

If you already have the dotnet-ef, update your version to the latest with:

dotnet tool update --global dotnet-ef

Let us first add Swagger UI to our WebAPI application so that we can easily test our API endpoints. Open your source code with Visual Studio Code by executing the following statement from a terminal window inside the root folder of the application:

code .

You can now add the following statement right under app.MapOpenApi():

app.UseSwaggerUI(options =>  {
    options.SwaggerEndpoint("/openapi/v1.json", "My WebAPI");
});

Edit file Properties/launchSettings.json. In both http and https blocks, change the value of launchBrowser to true.

Also, in both http & https blocks, add the following setting:

"launchUrl": "swagger"

Let us run our web app and see what it does. Run the web app with:

dotnet watch

This gets loaded into your default browser:


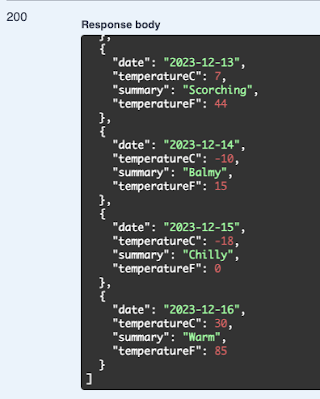
Click on GET >> Try it out >> Execute. This will produce the following output:


Database context class

Since we will be using Entity Framework to talk to the SQLite database, we will need a database context class. Add a folder named Data, then add to it a class named ApplicationDbContext that derives from IdentityDbContext<IdentityUser> with the following code:

public class ApplicationDbContext: IdentityDbContext<IdentityUser> {
    public ApplicationDbContext(DbContextOptions<ApplicationDbContext> options) : base(options)
    {}
}

Add the following connection string to appsettings.json:

"ConnectionStrings": {
  "DefaultConnection": "Data Source=webapi-auth.db;"
}

Next, we must register ApplicationDbContext with our app by adding the following code into Program.cs right before 'var app = builder.Build();':

// Configure identity database access via EF Core
var connectionString = builder.Configuration.GetConnectionString("DefaultConnection") ?? throw new InvalidOperationException("Connection string 'DefaultConnection' not found.");
builder.Services.AddDbContext<ApplicationDbContext>(options =>
    options.UseSqlite(connectionString));

Other required services

Add the following code right after the above code:

// Authorization
builder.Services.AddAuthorization();

// Activate identity APIs. By default, both cookies and proprietary tokens
// are activated. Cookies will be issued based on the 'useCookies' querystring
// parameter in the login endpoint
builder.Services.AddIdentityApiEndpoints<IdentityUser>()
    .AddEntityFrameworkStores<ApplicationDbContext>();

We need to add authorization and authentication middleware with the following code right after 'app.UseHttpsRedirection();':

app.UseAuthentication(); 
app.UseAuthorization(); 

Let us secure the /weatherforecast endpoint by forcing authentication. Chain the following to the endpoint by adding this code right under '.WithOpenApi()':

.RequireAuthorization();

The full app.MapGet() code will look like this:

app.MapGet("/weatherforecast", () =>
{
    var forecast =  Enumerable.Range(1, 5).Select(index =>
        new WeatherForecast
        (
            DateOnly.FromDateTime(DateTime.Now.AddDays(index)),
            Random.Shared.Next(-20, 55),
            summaries[Random.Shared.Next(summaries.Length)]
        ))
        .ToArray();
    return forecast;
})
.WithName("GetWeatherForecast")
.WithOpenApi()
.RequireAuthorization();

Adding Identity API endpoints

Add the identity endpoints to your app by calling MapIdentityApi<IdentityUser>(). Add the following code to Program.cs right before 'app.Run();':

app.MapIdentityApi<IdentityUser>();

Migrations

Since our app uses EF Core, we will create a migration in the Data folder and update the database. Run the following terminal commands:

dotnet ef migrations add M1 -o Data/Migrations

dotnet ef database update

You will notice that a SQLite database file is created named webapi-auth.db.

Try it out

Let us test our application to see whether or not we have indeed succeeded in securing our API endpoint. Start your app with:

dotnet watch

You will see a variety of identity related endpoints when the following page gets loaded into your default browser:


Try to hit the /weatherforecast endpoint and see the data. You will encounter a 401 (unauthorized) error:

Let us register a user. Click on the /register endpoint then click on the "Try it out" button. Update the JSON object so it looks like this:

{
  "email": "a@a.a",
  "password": "P@$$w0rd"
}

Click on the Execute button. You will get a Code 200 response representing success:


Next, let us login with the credentials we created. Click on the /login endpoint, then click on the "Try it out" button.


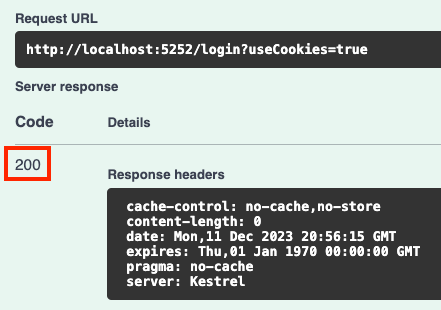
Choose true for useCookies and update the JSON object so it only has the credentials we had previously created. Thereafter, click on the Execute button. You should get a code 200 response:

Now let's try getting the data using the GET /weatherforecast endpoint. It should be a relief that we can now see the weather forecast information.

Conclusion

With ASP.NET Core 9.0 we need to follow these steps:
  • restore Swagger UI
  • configure our WebAPI application with the built in ,NET token authentication capability

Monday, January 13, 2025

Adding a UI to your WebAPI in ASP.NET 9.0

You may have noticed that when you create a WebAPI project in .NET 9.0, the default swagger UI is not there anymore by default. In this article, I will show you how to restore it back as the default UI. In addition, we will install an alternative UI to swagger named Scalar. The approach used applies to both minimal and controller-based WebAPI.

Companion Video: https://youtu.be/vsy-pIxKpYU
Source Code: https://github.com/medhatelmasry/WebApiDemo

Getting Started

Let us first create a minimal WebAPI project with the following terminal command:

dotnet new webapi -o WebApiDemo
cd WebApiDemo

Open the project in VS Code and note the following statements in Program.cs:

  • Around line 5 is this statement, which adds the OpenApi service:

builder.Services.AddOpenApi();

  • Also, around line 12 is this statement:

app.MapOpenApi();

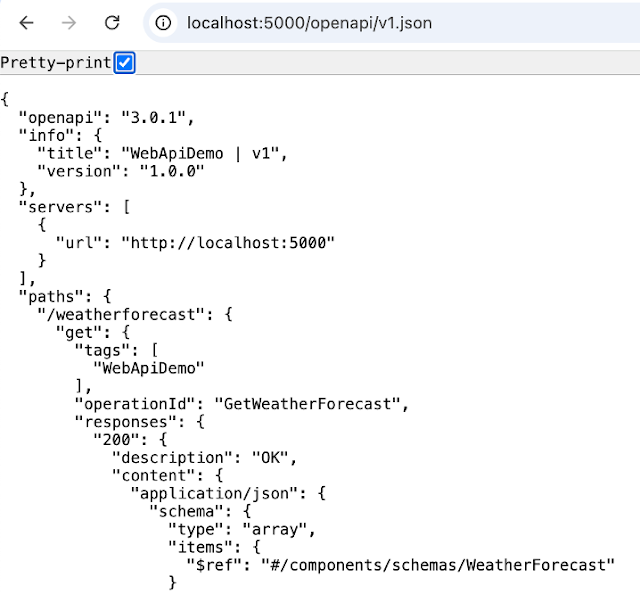
The above statements produce the following JSON endpoint file describing your API when you run your app:

/openapi/v1.json

This displays a page like the following in your browser:

Restoring Swagger UI

Note that swagger UI is nowhere to be found. It is quite straight forward to add a Swagger UI to your .NET 9.0 WebAPI project. Start by adding the following package to your project:

dotnet add package Swashbuckle.AspNetCore

You can now add the following statement right under app.MapOpenApi():

app.UseSwaggerUI(options =>  {
    options.SwaggerEndpoint("/openapi/v1.json", "My WebAPI");
});

Now, run the project and go to endpoint /swagger in your browser. You should see this UI:

NOTE: If you want the Swagger UI to be accessed at the / (root) endpoint, then you can add this option:

options.RoutePrefix = "";

Scalar: alternative to Swagger

There is a much better alternative to swagger named Scalar. It offers you an enhanced UI and some additional features. Let us explore Scalar

To use Scalar in an ASP.NET 9.0 WebAPI application, you must add the following package:

dotnet add package Scalar.AspNetCore

Comment out the following code in Program.cs:

// app.UseSwaggerUI(options => 
// {
//     options.SwaggerEndpoint("/openapi/v1.json", "My WebAPI");
// });

Replace the above commented-out code with this:

app.MapScalarApiReference();

That's all you need to do. Let’s see how the Scalar UI looks like. Run the project and point your browser to this endpoint:

/scalar/v1

Explore this UI. One interesting feature is that you can view client code in a variety of languages. Here is what it looks like if you choose C#:


You can further customize the UI by enabling and disabling various options. For example, replace the statement app.MapScalarApiReference() with:

app.MapScalarApiReference(options => {
    options
        .WithTitle("My WebAPI")
        .WithTheme(ScalarTheme.Moon)
        .WithDefaultHttpClient(ScalarTarget.CSharp, ScalarClient.HttpClient);
});

This results in a less dark theme and a default client code of C#.

Making Scalar UI the default page

To make the Scalar UI the default page when launching your WebAPI page with “dotnet watch”, edit the /Properties/launchSettings.json file and make the following changes:

1. In both http and https blocks, add this item:

"launchUrl": "scalar/v1"

2. Also, in both http and https blocks, change the value of launchBrowser to true.

Now when you restart your webAPI web app with “dotnet watch”, the Scalar UI is automatically loaded in your default browser.

Happy Coding!

Monday, December 11, 2023

Built-in authentication with ASP.NET Core .NET 8.0 Minimal WebAPI

In this tutorial I will showcase the built-in WebApi authentication that was introduced with ASP.NET Core 8.0. To keep it simple, we shall persist our data in the lightweight SQLite database.

Source Code: https://github.com/medhatelmasry/WebApiAuth

Companion Video: https://youtu.be/SSLSNWRQJiA

Prerequisites

It is assumed that you have installed the following on your computer:
  • .NET 8.0
  • Visual Studio Code editor

Getting Started

In a suitable working directory, create a new WebApi application using the following terminal window command:

dotnet new webapi -f net8.0 --name WebApiAuth

Change directory with:

cd WebApiAuth

We will need to add some packages. Also in the same terminal window, run the following commands:

dotnet add package Microsoft.AspNetCore.Identity.EntityFrameworkCore -v 8.0.0
dotnet add package Microsoft.EntityFrameworkCore.Sqlite -v 8.0.0
dotnet add package Microsoft.EntityFrameworkCore.Tools -v 8.0.0
dotnet add package Microsoft.EntityFrameworkCore.Design -v 8.0.0

The above packages allow us to use SQLite and Entity Framework.

Make sure you have the dotnet-ef tool. If you do not, you can globally install it with:

dotnet tool install --global dotnet-ef

If you already have the dotnet-ef, update your version to the latest with:

dotnet tool update --global dotnet-ef

Let us run our web app and have a peek at what it does. Run the web app with:

dotnet watch

This gets loaded into your default browser:


Click on GET >> Try it out >> Execute. This will produce the following output:


It is time for us to peek into the code. Stop the server with CTRL C, then start Visual Studio Code with the following terminal command:

code .

Database context class

Since we will be using Entity Framework to talk to the SQLite database, we will need a database context class. Add a folder named Data, then add to it a class named ApplicationDbContext that derives from IdentityDbContext<IdentityUser> with the following code:

using Microsoft.AspNetCore.Identity;
using Microsoft.AspNetCore.Identity.EntityFrameworkCore;
using Microsoft.EntityFrameworkCore;

namespace WebApiAuth.Data;

public class ApplicationDbContext: IdentityDbContext<IdentityUser> {
    public ApplicationDbContext(DbContextOptions<ApplicationDbContext> options) : base(options)
    {}
}

Add the following connection string to appsettings.json:

"ConnectionStrings": {
  "DefaultConnection": "Data Source=webapi-auth.db;"
}

Next, we must register ApplicationDbContext with our app by adding the following code into Program.cs right before 'var app = builder.Build();':

// Configure identity database access via EF Core
var connectionString = builder.Configuration.GetConnectionString("DefaultConnection") ?? throw new InvalidOperationException("Connection string 'DefaultConnection' not found.");
builder.Services.AddDbContext<ApplicationDbContext>(options =>
    options.UseSqlite(connectionString));

Other required services

Add the following code right after the above code:

// Authorization
builder.Services.AddAuthorization();

// Activate identity APIs. By default, both cookies and proprietary tokens
// are activated. Cookies will be issued based on the 'useCookies' querystring
// parameter in the login endpoint
builder.Services.AddIdentityApiEndpoints<IdentityUser>()
    .AddEntityFrameworkStores<ApplicationDbContext>();

We need to add authorization and authentication middleware with the following code right after 'app.UseHttpsRedirection();':

app.UseAuthentication(); 
app.UseAuthorization(); 

Let us secure the /weatherforecast endpoint by forcing authentication. Chain the following to the endpoint by add ing this code right under '.WithOpenApi()':

.RequireAuthorization();

The full app.MapGet() code will look like this:

app.MapGet("/weatherforecast", () =>
{
    var forecast =  Enumerable.Range(1, 5).Select(index =>
        new WeatherForecast
        (
            DateOnly.FromDateTime(DateTime.Now.AddDays(index)),
            Random.Shared.Next(-20, 55),
            summaries[Random.Shared.Next(summaries.Length)]
        ))
        .ToArray();
    return forecast;
})
.WithName("GetWeatherForecast")
.WithOpenApi()
.RequireAuthorization();

Adding Identity API endpoints

Add the identity endpoints to your app by calling MapIdentityApi<IdentityUser>(). Add the following code to Program.cs right before 'app.Run();':

app.MapIdentityApi<IdentityUser>();

Migrations

Since our app uses EF Core, we will create a migration in the Data folder and update the database. Run the following terminal commands:

dotnet ef migrations add M1 -o Data/Migrations

dotnet ef database update

You will notice that a SQLite database file is created named webapi-auth.db.

Try it out

Let us test our application to see whether or not we have indeed succeeded in securing our API endpoint. Start your app with:

dotnet watch

You will see a variety of identity related endpoints when the following gets loaded into your default browser:


Try to hit the /weatherforecast endpoint and see the data. You will encounter a 401 (unauthorized) error:

Let us register a user. Click on the /register endpoint then click on the "Try it out" button. Update the JSON object so it looks like this:

{
  "email": "a@a.a",
  "password": "P@$$w0rd"
}

Click on the Execute button. You will get a Code 200 response representing success:


Next, let us login with the credentials we created. Click on the /login endpoint, then click on the "Try it out" button.


Choose true for useCookies and update the JSON object so it only has the credentials we had previously created. Thereafter, click on the Execute button. You should get a code 200 response:

Now let's try getting the data using the GET /weatherforecast endpoint. It should be a relief that we can now see the data.


With ASP.NET Core 8.0 came an easier way for securing WebAPI. 

Sunday, January 29, 2023

ASP.NET 7 Minimal Web API with SQLite

This tutorial is about using ASP.NET 6.0 Minimal WebAPI. We will build a simple application that uses SQLite to save students data. We will then consume the API from an HTML page. 

Source Code: https://github.com/medhatelmasry/StudentsApi Companion Video: https://youtu.be/JG2TeGBs8MU

VS Code extensions needed:

  • C#
  • C# Extensions

In a suitable working directory, create a Web API web application with:

dotnet new webapi -f net7.0 --no-https --use-minimal-apis -o StudentsMinimalApi 
 
cd StudentsMinimalApi  

 code .

dotnet watch

The app will display in your browser, and you will see this:


Look at API code in Program.cs:

app.MapGet("/weatherforecast", () =>
{
    var forecast =  Enumerable.Range(1, 5).Select(index =>
        new WeatherForecast
        (
            DateTime.Now.AddDays(index),
            Random.Shared.Next(-20, 55),
            summaries[Random.Shared.Next(summaries.Length)]
        ))
        .ToArray();
    return forecast;
})
.WithName("GetWeatherForecast"); 
.WithOpenApi();

Add this tool if you do not already have it: 

dotnet tool install --global dotnet-ef 

 Let us add these packages that provide support for SQLite and reading a CSV file: 

dotnet add package Microsoft.EntityFrameworkCore.Design
dotnet add package Microsoft.EntityFrameworkCore.Tools
dotnet add package Microsoft.EntityFrameworkCore
dotnet add package Microsoft.EntityFrameworkCore.SQLite
dotnet add package Microsoft.EntityFrameworkCore.SQLite.Design
dotnet add package CsvHelper

Create three folders: wwwroot, Data & Models.

Inside the Models folder, add the following Student class: 

public class Student {
        public int StudentId { get; set; }
        public string? LastName { get; set; }
        public string? FirstName { get; set; }
        public string? School { get; set; }
}

Developers prefer having sample data when building data driven applications. Therefore, we will create some sample data to ensure that our application behaves as expected. Copy the following data from https://gist.github.com/medhatelmasry/bd83812406665cd7584bb994f6e7704e and save it in a text file wwwroot/students.csv.

Add the following connection string to appsettings.json:

"ConnectionStrings": {
  "DefaultConnection": "DataSource=school.db;cache=shared"
},

Next, we need to add an Entity Framework context class. Inside the Data folder, add a class file named SchoolContext with the following content: 

public class SchoolDbContext : DbContext {
    public DbSet<Student> Students => Set<Student>();

    public SchoolDbContext(DbContextOptions<SchoolDbContext> options)
            : base(options) { }

    protected override void OnModelCreating(ModelBuilder modelBuilder) {
        base.OnModelCreating(modelBuilder);
        modelBuilder.Entity<Student>().HasData(GetStudents());
    }

    private static IEnumerable<Student> GetStudents() {
        string[] p = { Directory.GetCurrentDirectory(), "wwwroot", "students.csv" };
        var csvFilePath = Path.Combine(p);

        var config = new CsvConfiguration(CultureInfo.InvariantCulture) {
            PrepareHeaderForMatch = args => args.Header.ToLower(),
        };

        var data = new List<Student>().AsEnumerable();
        using (var reader = new StreamReader(csvFilePath)) {
            using (var csvReader = new CsvReader(reader, config)) {
                data = csvReader.GetRecords<Student>().ToList();
            }
        }

        return data;
    }

}

In the above code, student data is being seeded in the OnModelCreating() method by reading contents of students.csv file.

We need to register the context class (SchoolDbContext) with dependency injection in Program.cs. Add the following code right before “var app = builder.Build();” in Program.cs

var connStr = builder.Configuration.GetConnectionString("DefaultConnection") 
    ?? throw new InvalidOperationException("Connection string 'DefaultConnection' not found.");
builder.Services.AddDbContext<SchoolDbContext>(option => option.UseSqlite(connStr));

Let us add a migration and subsequently update the database. Execute the following CLI commands in a terminal window.

dotnet ef migrations add M1 -o Data/Migrations
dotnet ef database update

At this point the database and tables are created.

Students API

Let us add API endpoints that:
  • Read all the students
  • Read students that belong to a particular school
  • Read student data by id
  • Add student data
  • Update student data
  • Delete student data
Therefore, add the following code to Program.cs just before the final statement “app.Run();”:

app.MapGet("/api/students", async (SchoolDbContext db) =>
    await db.Students.ToListAsync());

app.MapGet("/api/students/school/{school}", async (string school, SchoolDbContext db) =>
    await db.Students.Where(t => t.School!.ToLower() == school.ToLower()).ToListAsync());

app.MapGet("/api/students/{id}", async (int id, SchoolDbContext db) =>
    await db.Students.FindAsync(id)
        is Student student ? Results.Ok(student) : Results.NotFound());

app.MapPost("/api/students", async (Student student, SchoolDbContext db) =>
{
    db.Students.Add(student);
    await db.SaveChangesAsync();

    return Results.Created($"/students/{student.StudentId}", student);
});

app.MapPut("/api/students/{id}", async (int id, Student inputStudent, SchoolDbContext db) =>
{
    var student = await db.Students.FindAsync(id);

    if (student is null) return Results.NotFound();

    student.FirstName = inputStudent.FirstName;
    student.LastName = inputStudent.LastName;
    student.School = inputStudent.School;

    await db.SaveChangesAsync();

    return Results.NoContent();
});

app.MapDelete("/api/students/{id}", async (int id, SchoolDbContext db) =>
{
    if (await db.Students.FindAsync(id) is Student student)
    {
        db.Students.Remove(student);
        await db.SaveChangesAsync();
        return Results.Ok(student);
    }

    return Results.NotFound();
});

Run the app and point your browser to /api/students. You should see the following results:


Try endpoint /api/students/22


Try endpoint /api/students/school/medicine:


OPTIONAL: If you want migrations to be applied automatically, add the following code to Program.cs right before the last “app.Run()” statement

using (var scope = app.Services.CreateScope()) {
    var services = scope.ServiceProvider;

    var context = services.GetRequiredService<SchoolDbContext>();    
    context.Database.Migrate();
}

CORS (Cross-Origin Resource Sharing)

In wwwroot folder, create a file named show.html and add to it this HTML/JavaScript code:

<!DOCTYPE html>
<html>
  <html>
    <head>
      <meta charset="utf-8" />
      <title>Test API</title>
    </head>
    <body>
      <h3>Test API</h3>
      <button id="btnGetData">Get Data</button>
      <pre id="preOutput"></pre>
      <script>
        const url = "PUT-API-URL-HERE";

        var showResponse = function (object) {
          document.querySelector("#preOutput").innerHTML = JSON.stringify(
            object,
            null,
            4
          );
        };

        const button = document.querySelector("#btnGetData");
        button.addEventListener("click", (e) => {
          getData();
        });

        var getData = async function () {
          await fetch(url)
            .then((response) => {
              return response.json();
            })
            .then((data) => {
              showResponse(data);
            });

          return false;
        };
      </script>
    </body>
  </html>
</html>

Replace PUT-API-URL-HERE with the URL that gets all the students (Example: http://localhost:5143/api/students). 

From the file system, double-click on the wwwroot/show.html file. You will see the following page:

When you click on the “Get Data” button, nothing will appear because there is a JavaScript error. To understand where this error is coming from, hit F12 in your browser and check the console. This error will appear:


We need to enable CORS on the API project. This is done by adding the following code in Program.cs just before “var app = builder.Build();”:
 
// Add Cors
builder.Services.AddCors(o => o.AddPolicy("Policy", builder => {
  builder.AllowAnyOrigin()
    .AllowAnyMethod()
    .AllowAnyHeader();
}));

Also, in the same Program.cs file, add this code just after “var app = builder.Build();”: 

app.UseCors("Policy");

Save your code then make a new request for data from show.html. This time you should be successful:

Declutter Program.cs (optional)

Program.cs can get too cluttered. How about we move all the business logic into a separate class?

Create a Services/StudentService.cs class with the following content:

public class StudentService {
    public static async Task<IResult> GetAllStudents(SchoolDbContext db) {
        return TypedResults.Ok(await db.Students.ToListAsync());
    }

    public static async Task<IResult> GetStudentsBySchool(string school, SchoolDbContext db) {
        var students = await db.Students.Where(t => t.School!.ToLower() == school.ToLower()).ToListAsync();
        return TypedResults.Ok(students);
    }

    public static async Task<IResult> GetStudent(int id, SchoolDbContext db) {
        return await db.Students.FindAsync(id)
        is Student student
            ? Results.Ok(student)
            : Results.NotFound();
    }

    public static async Task<IResult> CreateSttudent(Student student, SchoolDbContext db) {
        db.Students.Add(student);
        await db.SaveChangesAsync();

        return Results.Created($"/students/{student.StudentId}", student);
    }

    public static async Task<IResult> UpdateStudent(int id, Student inputStudent, SchoolDbContext db) {
        var student = await db.Students.FindAsync(id);

        if (student is null) return Results.NotFound();

        student.FirstName = inputStudent.FirstName;
        student.LastName = inputStudent.LastName;
        student.School = inputStudent.School;

        await db.SaveChangesAsync();

        return Results.NoContent();
    }

    public static async Task<IResult> DeleteStudent(int id, SchoolDbContext db) {
        if (await db.Students.FindAsync(id) is Student student)
        {
            db.Students.Remove(student);
            await db.SaveChangesAsync();
            return TypedResults.Ok(student);
        }

        return TypedResults.NotFound();
    }
}

Also, change all the Map??? in Program.cs to:

    var route = app.MapGroup("/api/students");

route.MapGet("/", StudentService.GetAllStudents);
route.MapGet("/school/{school}", StudentService.GetStudentsBySchool);
route.MapGet("/{id}", StudentService.GetStudent);
route.MapPost("/", StudentService.CreateSttudent);
route.MapPut("/{id}", StudentService.UpdateStudent);
route.MapDelete("/{id}", StudentService.DeleteStudent);

The application should work as expected.

Congrats for coming this far.