In this tutorial we will configure VS Code to use an MCP Server that connects to a SQLite database. In a similar manner, you can also connect to PostgreSQL, MySQL, and SQL Server. This is a very compelling proposition because it allows developers to use AI to assist in generating code that dynamically interacts with data in a relational database.
Prerequisites
You will need to install the following software to proceed:
- Visual Studio Code with the GitHub Copilot Chat extension
- Docker Desktop
- Latest versions of node.js, npm, and npx
The Database MCP Server
We will be using the MCP Server from the mcp-database-server GitHub Repo. Visit https://github.com/executeautomation/mcp-database-server for more details
Install and configure the SQLite MCP server
In a suitable working directory, clone the repo, then build, and publish the code by executing these commands in a terminal window:
git clone https://github.com/executeautomation/mcp-database-server.git
cd mcp-database-server
npm install
npm run build
We will next install the MCP server globally with:
npm install -g @executeautomation/database-server
We will run an SQLite using a sample Northwind database.
- Download the database file from http://medhat.ca/blog/northwind-sqlite.db.zip.
- Extract northwind-sqlite.db from the zip file and place it in the current working directory.
To use the MCP server with our SQLite database, run the following terminal window command:
node dist/src/index.js ./northwind-sqlite.db

Keep the above terminal window open and running.
Configuring VS Code
Open VS Code. Click on the settings gear in the bottom-left corner, followed by Settings.

In the search field, enter MCP, then click on "Edit in settings.json".

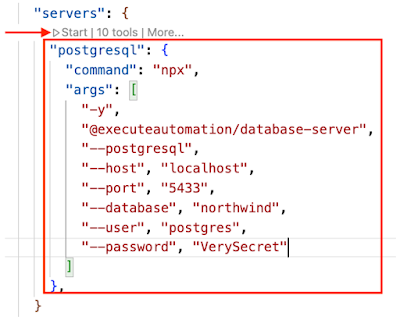
Under the mcp >> servers section, add the following MCP server settings:
"sqlite": {
  "command": "npx",
  "args": [
    "-y",
    "@executeautomation/database-server",
    "/path/to/your/northwind-sqlite.db"
  ]
},
Click on Start:

Open the GitHub Copilot Chat panel:

In the GitHub Copilot Chat panel, choose any Claude model followed by Agent Mode.

Click on the tools icon in the prompt window.

You will see a list of commands that the MCP server can carry out with SQLite.

We can now start querying the database using natural language. Start with this prompt:
You have access to the Northwind database through an MCP server. What are the tables in the database?

It detects that it can use the list_tables command.

Click on Continue. I got the following output:

Similarly, you can ask another question like:
Display the contents of the suppliers table.

Yet, another question:
What are the products supplied by "Exotic Liquids"?