Wednesday, March 16, 2022

Build & publish Azure Functions app that uses a budget SQLite database & .NET 6.0

In this tutorial I will build a Web API application using Azure Functions & SQLite. Although it is not typical to use SQLite with Azure Functions, this is a decent option if you want to have a cheap storage solution. I will later deploy the SQLite enabled Azure Function. This tutorial was done on a Windows 11 computer with VS Code.

Source code: https://github.com/medhatelmasry/SQLiteFunction.git

Prerequisites

Create a folder named SQLiteFunction on your hard drive at the location where your project will reside. 

Under the Functions tab in VS Code, create a new Azure Functions project.


Navigate to the location on your hard drive that you have designated as your workspace folder for this project. You will next be asked to select a programming language. Choose C#.


You will then be asked to choose the .NET runtime, choose .NET 6:


You will be asked to choose a template for your project's first function. Note that you can have more than one function in your project. Choose HttpTrigger.


Give your function a name. I named my function HttpApi.


Hit Enter after you give your function a name. Give your class a namespace. The namespace I used is SQLiteFunction. I then hit Enter.


Choose Anonymous for AccessRights.

When asked about how you would like to open your project, choose "Open in current window".


If a popup window appears asking if you wish to restore unresolved dependencies, click the Restore button.

Let us see what the app does. Hit CTRL F5 on the keyboard. The built-in VS Code terminal window will eventually display a URL that uses port number 7071:


NOTE: You can start your function app with the terminal command: func start

Copy and paste the URL into a browser or hit CTRL Click on the link. You will see the following output in your browser:


The message in your browser suggests that you should pass a name query string. I appended the following to the URL: ?name=Superman and got the following result:


We will need to add some NuGet packages. Execute the following dotnet commands from a terminal window in the root directory of your project:

dotnet add package Microsoft.Azure.Functions.Extensions
dotnet add package Microsoft.EntityFrameworkCore.SQLite
dotnet add package Microsoft.EntityFrameworkCore.SQLite.Design
dotnet add package Microsoft.EntityFrameworkCore.Tools

Let us make a few minor enhancements to our application.

1) Our SQLite database will be named school.db. Add the following to the project's .csproj file so that the SQLite database is copied to the output directory when the app gets built:

<ItemGroup>
 <None Update="school.db">
   <CopyToOutputDirectory>PreserveNewest</CopyToOutputDirectory>
 </None>  
</ItemGroup>
2) Change the signature of the HttpAPI class so that it does not have the static keyword. Therefore, the signature of the class will look like this:

public class HttpApi

3) Create a Models folder and add to it a simple Student.cs class file with the following content:

using System.ComponentModel.DataAnnotations;

namespace SQLiteFunction.Models;

public class Student {
    public int StudentId { get; set; }
    [Required]
    public string FirstName { get; set; }
    [Required]
    public string LastName { get; set; }
    [Required]
    public string School { get; set; }
}

4) We will deploy our Azure Functions app to a Windows server on Azure. When the school.db SQLite database file is published to Azure, it will reside in directory d:\home\site\wwwroot. Therefore, we shall create a helper class that will locate for us the SQLite database file in both development and deployment environments. Create a file named Utils.cs in the Models folder and add to it the following code:

using System;

namespace SQLiteFunction.Models;

public class Utils
{
    public static string GetSQLiteConnectionString()
    {
        var home = Environment.GetEnvironmentVariable("HOME") ?? "";
        Console.WriteLine($"home: {home}");
        if (!string.IsNullOrEmpty(home))
        {
            home = System.IO.Path.Combine(home, "site", "wwwroot");
        }
        var databasePath = System.IO.Path.Combine(home, "school.db");
        var connStr = $"Data Source={databasePath}";

        return connStr;
    }
}

The above helper class provides us with a static method Utils.GetSQLiteConnectionString() that returns the fully qualified location of the SQLite database file named school.db.

5) Add an Entity Framework DbContext class to the Models folder. In our case, we will add a class file named ApplicationDbContext.cs with the following content:

using Microsoft.EntityFrameworkCore;
using System;

namespace SQLiteFunction.Models;

public class ApplicationDbContext : DbContext
{
    public ApplicationDbContext() { }
    public ApplicationDbContext(DbContextOptions<ApplicationDbContext> options) : base(options) { }
    public DbSet<Student> Students { get; set; }

    protected override void OnConfiguring(DbContextOptionsBuilder optionsBuilder)
    {
        if (!optionsBuilder.IsConfigured)
        {
             optionsBuilder.UseSqlite(Utils.GetSQLiteConnectionString());
        }
    }

    protected override void OnModelCreating(ModelBuilder builder)
    {
        base.OnModelCreating(builder);

        builder.Entity<Student>().HasData(
          new
          {
              StudentId = 1,
              FirstName = "Jane",
              LastName = "Smith",
              School = "Medicine"
          }, new
          {
              StudentId = 2,
              FirstName = "John",
              LastName = "Fisher",
              School = "Engineering"
          }, new
          {
              StudentId = 3,
              FirstName = "Pamela",
              LastName = "Baker",
              School = "Food Science"
          }, new
          {
              StudentId = 4,
              FirstName = "Peter",
              LastName = "Taylor",
              School = "Mining"
          }
        );
    }
}

The above context class seeds some sample data pertaining to four students.

6) To register a service like ApplicationDbContext, create a class file named Startup.cs in the root of your application. The Startup class implements FunctionStartup. This class will look like this:

using Microsoft.EntityFrameworkCore;
using Microsoft.Extensions.DependencyInjection;
using Microsoft.Azure.Functions.Extensions.DependencyInjection;
using SQLiteFunction.Models;

[assembly: FunctionsStartup(typeof(SQLiteFunction.StartUp))]
namespace SQLiteFunction
{
    public class StartUp : FunctionsStartup
    {
        public override void Configure(IFunctionsHostBuilder builder)
        {
            builder.Services.AddDbContext<ApplicationDbContext>(options =>
            {
                options.UseSqlite(Utils.GetSQLiteConnectionString());
            });
        }

        public override void ConfigureAppConfiguration(IFunctionsConfigurationBuilder builder)
        {
            base.ConfigureAppConfiguration(builder);
        }

    }
}

7) Inject the ApplicationDbContext class that is needed by your function class. Open HttpApi.cs in the editor and add the following instance variables and constructor at the top of the class:

private readonly ApplicationDbContext _context;
 
public HttpApi(ApplicationDbContext context) {
   _context = context;
}

8) The next step is to apply Entity Framework migrations. Open a terminal window in the root of your application and execute the following EF migration command inside the same terminal window:

dotnet-ef migrations add m1 -o Data/Migrations

This produces a Data/Migrations folder in your project.


9) The next step is to create the database and tables. Execute the following command in the same terminal window as above:

dotnet-ef database update

If all goes well, you will receive a message that looks like this:

Applying migration '20220314204919_m1'.
Done.

10) Let us now create an endpoint in our Azure function that returns all the students as an API. Add the following method to the Azure functions file named HttpApi.cs:

[FunctionName("students")]
public IActionResult GetStudents(
   [HttpTrigger(AuthorizationLevel.Anonymous, "get", Route = "students")] HttpRequest req,
   ILogger log) {
   
   log.LogInformation("C# HTTP GET trigger function processed api/students request.");

   var studentsArray = _context.Students.ToArray();

   return new OkObjectResult(studentsArray);
}

All that is left for us to do is test out our application and make sure it returns our students data. Run the application by hitting CTRL F5 on the keyboard. You will see the following output in a VS Code terminal window:


Copy and paste the /api/students endpoint into a browser. Alternatively, you can simply hit CTRL Click on the link. The result will look like this:

Deployment to Azure

Click on the "Deploy to Function App ..." icon.


Select your subscription.


Choose "+ Create new Function App in Azure ...".


Enter a globally unique name for your function app then hit Enter.


Select .NET 6 for runtime stack:


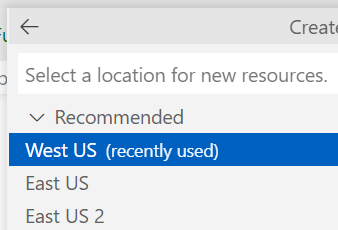
Choose a preferred data center.


The deployment process starts. Be patient as it could take 3-4 minutes. When deployment is complete you will see the following message:


If you click on the "View output" you will see the two endpoints. 


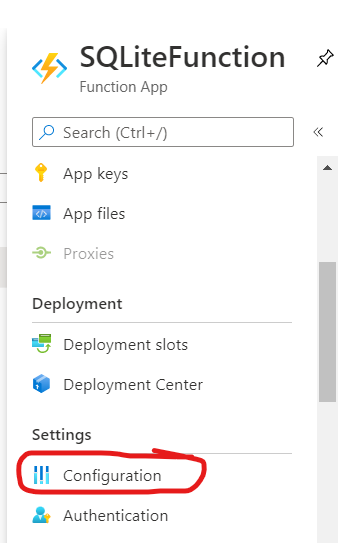
Although the first endpoint works, the second does not. To fix this problem, login into the azure portal https://portal.azure.com. In the filter field, enter func then choose "Function App".


Click on the function that was created.


Select Configuration on the left navigation.


Click on WEBSITE_RUN_FROM_PACKAGE.


Change the value from 1 to 0 then click on OK.


Remember to Save at the top.


Back in VS Code, publish your functions app again.


Click on Deploy to confirm.


This time, deployment will not take as long as the last time. Once deployment is completed, try the /api/students on the deployed endpoint and you should find it working to your satisfaction.


Conclusion

It is easy to create Azure Functions with the SQLite. Also, creating an API with Azure Functions is much more cheaper than doing it with an ASP.NET Core Web API application because you pay a fraction of a cent for every request and the app does not need to be constantly running. It is also worth mentioning that using SQLite makes it even cheaper as you do not need to pay extra for hosting your relational database.

Saturday, March 12, 2022

Localizing ASP.NET 6.0 MVC web apps

Localizing your ASP.NET 6.0 MVC web app involves making it work in more than one language. This gives you access to more worldwide markets. In this article, I will show you some technical approaches in achieving this objective. 

Source code : https://github.com/medhatelmasry/GlobalWeb6.git

Prerequisites

  • .NET 6.0
  • Visual Studio Code
  • You have familiarity with ASP.NET MVC
  • Install the following extension to your Visual Studio Code:

 .resx files

Files with .resx extensions play a leading role in localizing ASP.NET applications. They are essentially XML documents that rely on placement and a consistent naming convention. Here is what a typical .resx file may look like:

<?xml version="1.0" encoding="utf-8"?>
<root>
<resheader name="resmimetype">
<value>text/microsoft-resx</value>
</resheader>
<resheader name="version">
<resheader name="reader">
<value>2.0</value>
</resheader>
<value>System.Resources.ResXResourceReader, System.Windows.Forms, Version=4.0.0.0, Culture=neutral, PublicKeyToken=b77a5c561934e089</value>
</resheader>
<resheader name="writer">
<value>System.Resources.ResXResourceWriter, System.Windows.Forms, Version=4.0.0.0, Culture=neutral, PublicKeyToken=b77a5c561934e089</value>
</resheader>

<data name="Press Release" xml:space="preserve">
<value>Communiqué de presse</value>
</data>

<data name="Welcome" xml:space="preserve">
<value>Bienvenue</value>
</data>
</root>

Only the highlighted text above is customized to target a specific language. Note the following localization as specified in the above .resx file pertaining to english to french localization:

English Key French Translation
Press Release Communiqué de presse
Welcome Bienvenue

Getting Started

We will first create a simple ASP.NET 6.0 MVC app. This is accomplished by entering the following commands from within a terminal window is a working directory:

dotnet new mvc -o GlobalWeb
cd GlobalWeb

Create the following additional directories inside your application:

Resources
       |
       |
       ----------- Controllers
       |
       |
       ----------- Views
       |                  |
       |                  |
       |                  ----------- Home
       |
       |
       ----------- Models

Add the following to Program.cs right before var app = builder.Build():

builder.Services.AddLocalization(options => options.ResourcesPath = "Resources");

Also, add the following to Program.cs right after var app = builder.Build():

var supportedCultures = new[] {
    "en","en-US","fr","fr-FR","ar", "ko"
};

var localizationOptions = new RequestLocalizationOptions().SetDefaultCulture(supportedCultures[1])
    .AddSupportedCultures(supportedCultures)
    .AddSupportedUICultures(supportedCultures);

localizationOptions.ApplyCurrentCultureToResponseHeaders = true;

app.UseRequestLocalization(localizationOptions);

The first statement above declares that we will be supporting the following languages and cultures:

en English language
en-US English language, US culture
fr French language
fr-FR French language, France culture
ar Arabic language
ko Korean language

The second statement declares en-US as the default culture and adds support for the various cultures to our app. The final statements adds localization support to our web app.

Using localization in your controller classes

Whenever you want to access a localized string in your services or controllers, you can inject an IStringLocalizer<T> and use its indexer property. Add the following instance variable to the HomeController class:

private readonly IStringLocalizer<HomeController> _localizer;

Inject an IStringLocalizer<T> into a HomeController constructor. Your HomeController constructor will look like this: 

public HomeController(ILogger<HomeController> logger, 
    IStringLocalizer<HomeController> localizer
)
{
    _logger = logger;
    _localizer = localizer;
}

Change the Index() action method in the HomeController so it looks like this:

public IActionResult Index() {
    ViewData["pressRelease"] = _localizer["Press Release"];
    ViewData["welcome"] = _localizer.GetString("Welcome").Value ?? "";
    return View();
}

Replace Views/Home/Index.cshtml with:

@{
    ViewData["Title"] = "Home Page";
}

<div class="text-center">
    <h1 class="display-4">@ViewData["welcome"]</h1>
    <p>@ViewData["pressRelease"]</p>
</div>

If we are currently using the fr culture, then the localizer will look for the following resource file:

Resources/Controllers/HomeController.fr.resx

In Visual Studio Code, create the above file. With the .resx extension installed in Visual Studio Code, your editor will immediately look like this:


Add the following name / value pairs:

Press ReleaseCommuniqué de presse
WelcomeBienvenue


Let's test our application. Run your application from within a terminal window with:

dotnet watch run

A quick way to try it out is to point your browser to /Home. This picks up the default value. However, if you point your browser to /Home?culture=fr, the value is read from the resource file.

Shared Resources

With shared resources you rely on a single file to have all the localization entries in it, so this file can be used among multiple controllers or other classes.

In the root of your application, create a blank class named SharesResource.cs with following content:

namespace GlobalWeb;
public class SharedResource {}

Copy Resources/Controllers/HomeController.fr.resx to Resources/SharedResource.fr.resx.

To keep it simple, inside HomeController.cs we will add shared resource entries. Add the following instance variable to HomeController.cs:

private readonly IStringLocalizer<SharedResource> _sharedLocalizer;

Modify the constructor so it looks like this:

public HomeController(ILogger<HomeController> logger, 
    IStringLocalizer<HomeController> localizer
    IStringLocalizer<SharedResource> sharedLocalizer
)
{
    _logger = logger;
    _localizer = localizer;
    _sharedLocalizer = sharedLocalizer;
}

Now, let us use the shared resource in the Privacy action method. Therefore, add these statements to the Privacy action method:

ViewData["pressRelease"] = _sharedLocalizer["Press Release"];
ViewData["welcome"] = _sharedLocalizer.GetString("Welcome").Value ?? "";

Replace Views/Home/Privacy.cshtml with:

@{
    ViewData["Title"] = "Privacy Policy";
}
<h3 class="display-4">@ViewData["welcome"]</h3>
<p>@ViewData["pressRelease"]</p>

When you point your browser to /Home/Privacy?culture=fr, the values are read from the shared resource file:


Using localization in your views

In Program.cs, modify “builder.Services.AddControllersWithViews()” (around line 4) so it looks like this:

builder.Services
    .AddControllersWithViews()
    .AddViewLocalization();

We simply add ViewLocalization support as highlighted above.

We will localize strings in a single .cshtml file whereby you inject an IViewLocalizer into the view. IViewLocaliser uses the name of the view file to find the associated resources, so for the fr culture in HomeController's Privacy.cshtml view, the localizer will look for:

Resources/Views/Home/Privacy.fr.resx

Create a resource file Resources/Views/Home/Privacy.fr.resx and add to it the following localization string pair:

Privacy Policy / Politique de confidentialité


Back in Views/Home/Privacy.cshtml, add the following to the top of the file: 

@using Microsoft.AspNetCore.Mvc.Localization
@inject IViewLocalizer _localizer

Change the ViewData["Title"] . . . statement to:

ViewData["Title"] = _localizer["Privacy Policy"];

Add the following above the <h3>. . . . markup:

<h1>@ViewData["Title"]</h1>

The complete Views/Home/Privacy.cshtml looks like this:

@using Microsoft.AspNetCore.Mvc.Localization
@inject IViewLocalizer _localizer

@{
    ViewData["Title"] = _localizer["Privacy Policy"];
}
<h1>@ViewData["Title"]</h1>
<h3 class="display-4">@ViewData["welcome"]</h3>
<p>@ViewData["pressRelease"]</p>

Once again, check out Home/Privacy and Home/Privacy?culture=fr

.   


Let's see how we can use a shared resource in views, Add the following localization string pair to Resources/SharedResource.fr.resx:

It's great to see you again.     /    C'est génial de te revoir.


To use the new shared resource string inViews/Home/Privacy.cshtml, Add the following to the top of the file:

@using Microsoft.Extensions.Localization
@inject IStringLocalizer<SharedResource> _sharedLocalizer

Thereafter, add this markup to the bottom of Views/Home/Privacy.cshtml:

<p>@_sharedLocalizer["It's great to see you again."]</p>

You will see this when you visit Home/Privacy?culture=fr in your browser:


Using localization with data annotations

You may wish to localize the string messages that exist in your data annotations. These may represent display names and error messages. In Program.cs, modify the “builder.Services.AddControllersWithViews()” statement (around line 4) so it looks like this:

builder.Services
    .AddControllersWithViews()
    .AddViewLocalization()
    .AddDataAnnotationsLocalization();

Simply add the highlighted code shown above.

Add a class named Contact to the Models folder with the following content:

public class Contact {
  [Required(ErrorMessage = "Email is required.")]
  [EmailAddress(ErrorMessage = "The Email field is not a valid email address.")]
  [Display(Name = "Your Email.")]
  public string? Email { get; set; }
}

The above Contact model class contains error messages and a display name that are good candidates for localization.

Add a resource file names Contact.fr.resx to the Resources/Models folder with the following localization string name / value pairs:

KeyValue
Email is required.Un e-mail est requis.
The Email field is not a valid email address. Le champ E-mail n'est pas une adresse e-mail valide.
Your Email.Votre e-mail.
SuccessSuccès


Let us add an action method that renders a contact form. Add the following action method to Controllers/HomeController.cs:

public IActionResult Contact() {
  return View();
}

This requires a view. Add a file Views/Home/Contact.cshtml with the following content: 

@model GlobalWeb.Models.Contact
<div class="row">
  <div class="col-md-8">
    <section>
      <form asp-controller="Home" asp-action="Contact" method="post" class="form-horizontal" novalidate>
        <h4>@(ViewData["Result"] == null ? "Enter details" : ViewData["Result"])</h4>
        <hr />
        <div class="form-group">
          <label asp-for="Email" class="col-md-2 control-label"></label>
          <div class="col-md-10">
            <input asp-for="Email" class="form-control" />
            <span asp-validation-for="Email" class="text-danger"></span>
          </div>
        </div>
        <div class="form-group">
          <div class="col-md-offset-2 col-md-10">
            <button type="submit" class="btn btn-success">Test</button>
          </div>
        </div>
      </form>
    </section>
  </div>
</div>

The above consists of a simple form with an email input field and a submit button. It submits to Contact action method in the HomeController. Therefore, add the following post action method to HomeController.cs

[HttpPost]
public IActionResult Contact(Contact model) {
  if (!ModelState.IsValid) {
    return View(model);
  }
  ViewData["Result"] = _localizer["Success!"]; 
  return View(model);
}

Point your browser to /Home/Contact?culture=fr. You should see that the display name for email is localized.


If you want an easy solution to using shared resources with data annotations, you can do the following:

Add the following localization name / value strings pair to Resources/SharedResource.fr.resx:

Your Email.    /   Votre e-mail.

Add the following to the top of Views/Home/Contact.cshtml:

@using Microsoft.Extensions.Localization
@inject IStringLocalizer<SharedResource> _sharedLocalizer

You can then use _sharedLocalizer in Views/Home/Contact.cshtml as shown below in the highlighted code:

@using Microsoft.Extensions.Localization
@inject IStringLocalizer<SharedResource> _sharedLocalizer

@model GlobalWeb.Models.Contact
<div class="row">
  <div class="col-md-8">
    <section>
      <form asp-controller="Home" asp-action="Contact" method="post" class="form-horizontal" novalidate>
        <h4>@(ViewData["Result"] == null ? "Enter details" : ViewData["Result"])</h4>
        <hr />
        <div class="form-group">
          <label class="col-md-2 control-label">
            @_sharedLocalizer[@Html.DisplayNameFor(model => model.Email)]
          </label>
          <div class="col-md-10">
            <input asp-for="Email" class="form-control" />
            <span asp-validation-for="Email" class="text-danger"></span>
          </div>
        </div>
        <div class="form-group">
          <div class="col-md-offset-2 col-md-10">
            <button type="submit" class="btn btn-success">Test</button>
          </div>
        </div>
      </form>
    </section>
  </div>
</div>

Conclusion

We have looked at a number of techniques for localizing ASP.NET 6.0 apps. This should serve as a decent starting point for you to consider making you web apps reach a wider worldwide audience.