Although the current version of ASP.NET is 6.0, I discovered that the official MySQL EF Core driver for .NET 6.0, at this time, does not work very well. Therefore, I decided to write this article for ASP.NET 5.0 Core. The NuGet package is MySql.EntityFrameworkCore Nuget located at https://www.nuget.org/packages/MySql.EntityFrameworkCore/.
Source code: https://github.com/medhatelmasry/MySqlWeb
Instead of installing and running a MySQL instance on my computer, I will run MySQL in a docker container for simplicity.
This article assumes the following:
- You have .NET 5.0 installed on your computer.
- You have Docker installed on your computer.
Setting up the MySQL 8.0.0 container
To download the MySQL version 8.0.0 image from Docker Hub and run it on your local computer, type the following command from within a terminal window:
docker run -p 3333:3306 --name db -e MYSQL_ROOT_PASSWORD=secret -d mysql:8.0.0
Note: if you are using macOS with the M1 chip, you can use this docker image instead:
docker run -d -p 3333:3306 --name db -e MYSQL_ROOT_PASSWORD=secret -e MYSQL_ROOT_HOST=% mysql/mysql-server:latest-aarch64
This starts a container named 'db' that listens on port 3333 on your local computer. The root password is 'secret'.
To ensure that the MySQL container is running, type the following from within a terminal window:
docker ps
You will see a message similar to the following:
CONTAINER ID IMAGE COMMAND CREATED STATUS PORTS NAMES
53e55f4991df mysql:8.0.0 "docker-entrypoint.s…" 45 hours ago Up 45 hours 0.0.0.0:3333->3306/tcp db
Creating an ASP.NET 5.0 Core MVC web app
In a working directory, run the following command to create an ASP.NET MVC application named MySqlWeb using .NET 5.0:
dotnet new mvc -f net5.0 --auth individual -o MySqlWeb
This creates a web application that uses the SQLite database for individual authentication. Instead of SQLite, we will use MySQL instead.
Change directory to the newly created folder with:
cd MySqlWeb
Firstly, let us remove support for SQLite by removing the appropriate package with this command:
dotnet remove package Microsoft.EntityFrameworkCore.Sqlite
Next, let us add two packages that will provide us with MySQL support using the Connector/NET for Entity Framework driver:
dotnet add package Microsoft.EntityFrameworkCore.Design -v 5.0.14
dotnet add package MySql.EntityFrameworkCore -v 5.0.10
Replace the connection string value for DefaultConnection in appsettings.json to the following pertaining to our MySQL database:
server=localhost;database=library;user=root;port=3333;password=secret;SslMode=none;
Open Startup.cs in an editor and change 'options.UseSqlite' to 'options.UseMySQL' around line 31.
Entity Framework Migrations
The migration files that were created in the /Data/Migrations folder contain commands for creating SQLite artifacts. These are not valid in our situation because we will be using MySQL and not SQLite. Therefore, delete the Migrations folder under /Data and create new migrations with the following command:
dotnet-ef migrations add m1 -o Data/Migrations
Next, let us apply these migrations to the database with:
dotnet-ef database update
Test our app
Now, let us test our web app and see whether or not it is able to talk to the containerized MySQL database server.
Run the web application with the following terminal command:
dotnet run
If all goes well, you will see a message that indicates that the web server is listening on port numbers 5000 and 5001 (SSL). Point your browser to https://localhost:5001. Click on the Register link on the top right-side.

Enter an email address, password and confirm password then click on the Register button:

The website then displays the following page that requires that you confirm the email address:
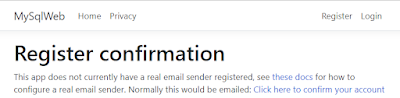
Click on the “Click here to confirm your account” link. This leads you to a confirmation page:

Login with the email address and password that you registered with. You will see a welcome message in the top right-side indicating that you are logged-in.
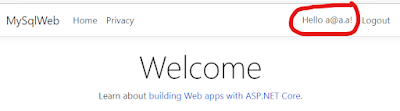
This proves that your email and password was saved and that the connection to the MySQL database works as expected.
Happy coding.