Showing posts with label Code. Show all posts

Friday, August 15, 2025

Using the timer MCP Server in Visual Studio Code

In a previous article, I discussed “Getting started with MCP Server in Visual Studio Code”. I decided to update this article because the process has become much easier with the latest version of VS Code.

In this tutorial, you will learn how to enable and use MCP servers in Visual Studio Code. The simple example we will use is the Timer MCP Server.

Companion Video: https://youtu.be/H14yMdHuyM4

What is MCP?

Model Context Protocol (MCP) is an open standard developed by Anthropic, the company behind Claude models. 

MCP is an open protocol that enables seamless integration between AI apps & agents and your tools & data sources.

Prerequisites

  • Visual Studio Code
  • GitHub account
  • Github Copilot Chat extension
  • Docker Desktop

NOTE:  This article uses Visual Studio Code version 1.103.1 as shown below:

Later versions of Visual Studio Code will likely have minor UI changes that may look different from the screen captures in this article.

Getting Started

We will setup an MCP Server that provides current time information. This will be done in a local workspace, as opposed to making it globally available in VS Code. Also, the MCP server will run in Docker.

Start Docker Desktop.

Create a working directory named time-mcp-server and open VS Code in that directory with:

mkdir time-mcp-server
cd time-mcp-server
code .

In VS Code, click on the GitHub Copilot Chat icon and select “Open Chat”.

In the chat window that opens, choose Agent mode and the latest Claude model. A tools button appears.

When you click on the tools button, a pop-up window will display the tools used by VS-Code GitHub Copilot Chat.

Click on OK to close the pop-up window.

In Visual Studio Code, click on the gear in the bottom-left, then choose settings:

In the filter field, type MCP.

Note that Discovery is enabled. These are early days, so some Mcp features are in Experimental mode.

Click on 'Edit in settings.json'. 

The file will open in the editor. Note that chat.mcp.discovery.enabled is set to true.

You can close the settings.json file in the editor.

Find a suitable MCP Server

Go to https://github.com/modelcontextprotocol/servers. Search for Time under Reference Servers.

Click on the Time link. Then fing Configuration >> Configure for Claude App >> Unsing docker.

Take note of the name of the docker image mcp/time.

Setup a timer MCP Server

In Visual Studio Code, click on View >> Command Palette….

Choose “MCP: Add Server…”.

Choose “Docker Image Install from a Docker image”.

For "Docker Image Name", enter “mcp/time”.

Next, choose Allow.

Accept the default Server ID.

Choose “Workspace Available in this workspace, runs locally”.

When prompted to trust and run the MCP server time, click on Trust.

A file named mcp.json gets created in a folder named .vscode inside your workspace with content:

{
"servers": {
"time": {
"command": "docker",
"args": [
"run",
"-i",
"--rm",
"mcp/time"
],
"type": "stdio"
}
},
"inputs": []
}

If the MCP server is not yet started, click on Start.

This will start the mcp/time server in Docker.

In the GitHub Copilot Chat window, enter: What is the current time?

 VS Code detects the running MCP server which knows how to handle requests for current time:

Click on Continue and you will get a response like this:

You can ask it to convert the time to another time zone with: What is that in pacific time zone?

Again, it should resort to the time MCP server for assistance.

Click on Continue to get your answer.

You can even ask the time in another country. Example: What time is it in Cairo, Egypt?

Again, it uses our MCP time server:

Click on Continue.

Finally, let us ask it to refresh the current time, with: Refresh the time in Egypt.

Conclusion

The ecosystem for MCP servers is growing rapidly. There are already many servers that you can explore at https://github.com/modelcontextprotocol/servers. 

Friday, June 20, 2025

MCP server that connects VS Code to SQLite Database

In this tutorial we will configure VS Code to use an MCP Server that connects to a SQLite database. In a similar manner, you can also connect to PostgreSQL, MySQL, and SQL Server. This is a very compelling proposition because it allows developers to use AI to assist in generating code that dynamically interacts with data in a relational database.

Prerequisites

You will need to install the following software to proceed:

  • Visual Studio Code with the GitHub Copilot Chat extension
  • Docker Desktop
  • Latest versions of node.js, npm, and npx

The Database MCP Server

We will be using the MCP Server from the mcp-database-server GitHub Repo. Visit https://github.com/executeautomation/mcp-database-server for more details

Install and configure the SQLite MCP server

In a suitable working directory, clone the repo, then build, and publish the code by executing these commands in a terminal window:

git clone https://github.com/executeautomation/mcp-database-server.git
cd mcp-database-server
npm install
npm run build

We will next install the MCP server globally with:

npm install -g @executeautomation/database-server

We will run an SQLite using a sample Northwind database.

To use the MCP server with our SQLite database, run the following terminal window command:

node dist/src/index.js ./northwind-sqlite.db

Keep the above terminal window open and running.

Configuring VS Code

Open VS Code. Click on the settings gear in the bottom-left corner, followed by Settings.

In the search field, enter MCP, then click on "Edit in settings.json".

Under the mcp >> servers section, add the following MCP server settings:

"sqlite": {
  "command": "npx",
  "args": [
    "-y",
    "@executeautomation/database-server",
    "/path/to/your/northwind-sqlite.db"
  ]
},

Click on Start:

Open the GitHub Copilot Chat panel:

In the GitHub Copilot Chat panel, choose any Claude model followed by Agent Mode.

Click on the tools icon in the prompt window.

You will see a list of commands that the MCP server can carry out with SQLite.

We can now start querying the database using natural language. Start with this prompt:


You have access to the Northwind database through an MCP server. What are the tables in the database?

It detects that it can use the list_tables command.

Click on Continue. I got the following output:

Similarly, you can ask another question like: 

Display the contents of the suppliers table.

Yet, another question:

What are the products supplied by "Exotic Liquids"?

Conclusion

It is very easy to connect VS Code with a relational database MCP server. In addition, you can similarly connect MCP Servers any client C# application. MCP Servers open a ton of possibilities for AI aided software development.

MCP server that connects VS Code to PostgreSQL Database

In this tutorial we will configure VS Code to use an MCP Server that connects to a PostgreSQL database. In a similar manner, you can also connect to SQLite, MySQL, and SQL Server. This is a very compelling proposition because it allows developers to use AI to assist in generating code that dynamically interacts with data in a relational database.

Prerequisites

You will need to install the following software to proceed:

  • Visual Studio Code with the GitHub Copilot Chat extension
  • Docker Desktop
  • Latest versions of node.js, npm, and npx

The Database

We will run a PostgreSQL database with a sample Northwind database in a Docker container. Therefore:

  • Start Docker Desktop on your computer
  • Run a PostgreSQL container by executing this command in a terminal window:


docker run --name psqlnw -e POSTGRES_PASSWORD=VerySecret -p 5433:5432 -d melmasry/nw-psql:1.0.0

The Database MCP Server

We will be using the MCP Server from the mcp-database-server GitHub Repo. Visit https://github.com/executeautomation/mcp-database-server for more details.

Install and configure the PostgreSQL MCP server

In a suitable working directory, clone the repo, then build, and publish the code by executing these commands in a terminal window:


git clone https://github.com/executeautomation/mcp-database-server.git
cd mcp-database-server
npm install
npm run build

We will next install the MCP server globally with:


npm install -g @executeautomation/database-server

To use the MCP server with our MySQL database, run the following terminal window command:


node dist/src/index.js --postgresql --host localhost --port 5433 --database northwind --user postgres --password VerySecret

Keep the above terminal window open and running.

Configuring VS Code

Open VS Code. Click on the settings gear in the bottom-left corner, followed by Settings.

In the search field, enter MCP, then click on "Edit in settings.json".

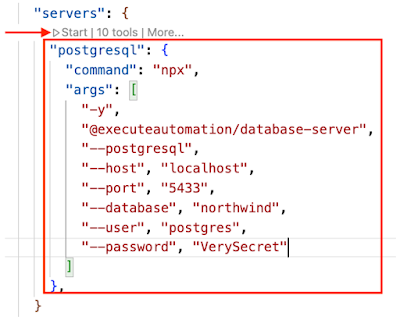
Under the mcp >> servers section, add the following MCP server settings:

"postgresql": {
  "command": "npx",
  "args": [
    "-y",
    "@executeautomation/database-server",
    "--postgresql",
    "--host", "localhost",
    "--port", "5433",
    "--database", "northwind",
    "--user", "postgres",
    "--password", "VerySecret"
  ]
},

Click on Start:

Open the GitHub Copilot Chat panel:

In the GitHub Copilot Chat panel, choose any Claude model followed by Agent Mode.

Click on the tools icon in the prompt window.

You will see a list of commands that the MCP server can carry out with PostgreSQL.

We can now start querying the database using natural language. Start with this prompt:


You have access to the Northwind database through an MCP server. What are the tables in the database?

It detects that it can use the list_tables command.

Click on Continue. I got the following output:

Similarly, you can ask another question like: 

 
Display the contents of the suppliers table.

Yet, another question:

     
What are the products supplied by "Exotic Liquids"?

Conclusion

It is very easy to connect VS Code with a relational database MCP server. In addition, you can similarly connect MCP Servers any client C# application. MCP Servers open a ton of possibilities for AI aided software development.