Wednesday, November 20, 2024

Using Aspire with gRPC

We start with a simple gRPC application that involves a gRPC server and Blazor client. The gRPC server connects to a SQLite database. To test the sample solution, we must first start the gRPC server app, then start the client app. This is somewhat tedious. By introducing .NET Aspire into the mix, we only need to start one app to get the solution to work. .NET Aspire also gives us many more benefits.

Start source code: https://github.com/medhatelmasry/GrpcBlazorSolution

Prerequisites

In order to continue with this tutorial, you will need the following:

  • .NET 9.0
  • Visual Studio Code
  • 'C# Dev Kit' extension for Visual Studio Code

.NET Aspire Setup

In any terminal window folder, run the following command before you install .NET Aspire:

dotnet workload update 

To install the .NET Aspire workload from the .NET CLI, execute this command:

dotnet workload install aspire

Check your version of .NET Aspire, with this command:

dotnet workload list

Startup Application

We will start with a .NET 9.0 solution that involves a gRPC backend and a Blazor frontend. Clone the code from this GitHub site with:

git clone https://github.com/medhatelmasry/GrpcBlazorSolution.git

To run the solution, we must first start the backend, then start the frontend. To get a good sense of what the application does, follow these steps:

1) Inside the GrpcStudents folder, run the following command in a terminal window:

dotnet run

2) Next, start the frontend. Inside a terminal window in the BlazorGrpcClient folder, run this command:

dotnet watch


Try the application by adding, updating, and deleting data saved in a SQLit database on the gRPC server. However, it is a pain to have to start both projects to get the solution to work. This is where .NET Aspire comes to the rescue.

Converting solution to .NET Aspire

Close both terminal windows by hitting CTRL C in each.

To add the basic .NET Aspire projects to our solution by running the following command inside the root GrpcBlazorSolution folder:

dotnet new aspire --force

We use the --force switch because the above command will overwrite the .sln file with a new one that only includes two new projects: GrpcBlazorSolution.AppHost and GrpcBlazorSolution.ServiceDefaults.

NOTE: At the time of writing this article, the two .NET Aspire projects are created using .NET 8.0. This will likely change with the passage of time.

We will add our previous gRPC & Blazor projects to the newly created .sln file by executing the following commands inside the root SoccerFIFA folder:

dotnet sln add ./GrpcStudents/GrpcStudents.csproj
dotnet sln add ./BlazorGrpcClient/BlazorGrpcClient.csproj

Open the solution in Visual Studio Code.

We will add references in the GrpcBlazorSolution.AppHost project to the GrpcStudents and BlazorGrpcClient projects. This can be done in the "Solution Explorer" tab in Visual Studio Code. 

Right-click on "GrpcBlazorSolution.AppHost" then select "Add Project Reference". 

 
Choose BlazorGrpcClient.


Similarly, do the same for the the "GrpcStudents" project. Right-click on "GrpcBlazorSolution.AppHost" then select "Add Project Reference". 

Choose BlazorStudents.

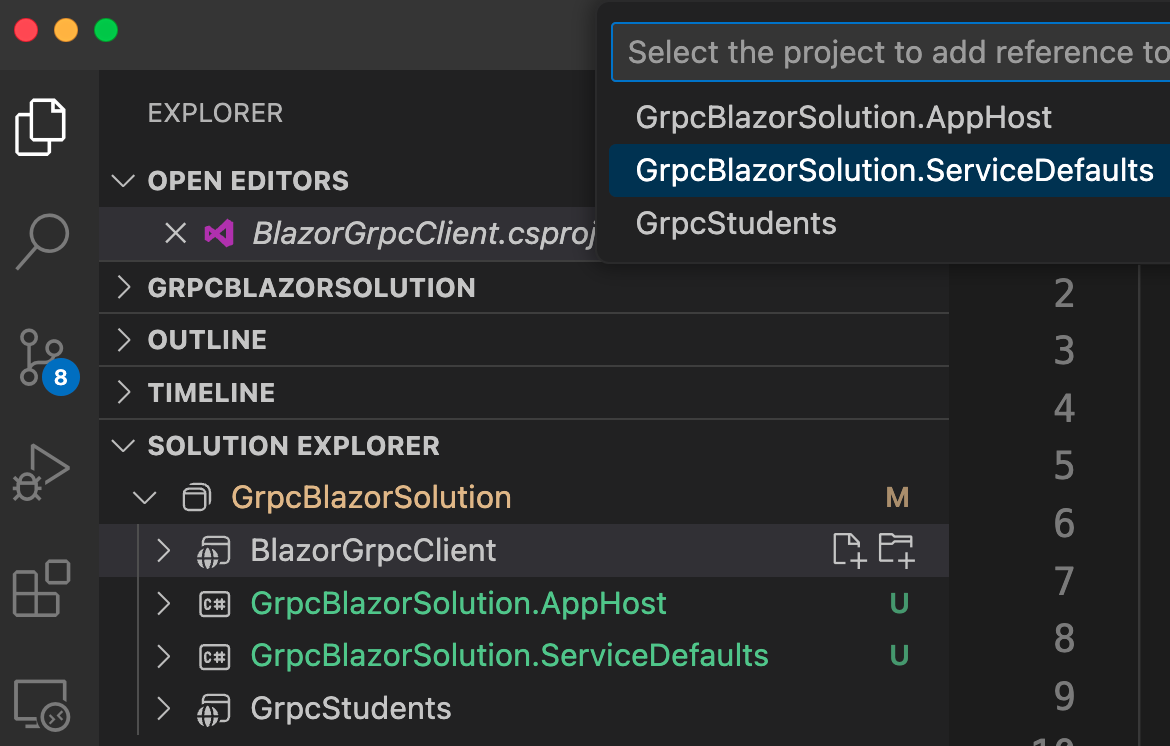
Also, both GrpcStudents and BlazorGrpcClient projects need to have references into GrpcBlazorSolution.ServiceDefaults.

Right-click on BlazorGrpcClient then select "Add Project Reference". 


Choose GrpcBlazorSolution.ServiceDefaults.


Similarly, add a reference to GrpcBlazorSolution.ServiceDefaults from GrpcStudents:

Right-click on GrpcStudents then select "Add Project Reference". 


Choose GrpcBlazorSolution.ServiceDefaults once again.

Then, in the Program.cs files of both GrpcStudents and BlazorGrpcClient projects, add this agent code right before "var app = builder.Build();":

// Add service defaults & Aspire components.
builder.AddServiceDefaults();

In the Program.cs file in GrpcBlazorSolution.AppHost, add this code right before “builder.Build().Run();”:

var grpc = builder.AddProject<Projects.GrpcStudents>("backend");
builder.AddProject<Projects.BlazorGrpcClient>("frontend")
    .WithReference(grpc);

The relative name for the gRPC app is “backend”. Therefore, edit Program.cs in the BlazorGrpcClient project. At around line 15, change the address from http://localhost:5099 to simply http://backend so that the statement looks like this:

builder.Services.AddGrpcClient<StudentRemote.StudentRemoteClient>(options =>
{
    options.Address = new Uri("http://backend");
});

Test .NET Aspire Solution

To test the solution,  start the application in the GrpcBlazorSolution.AppHost folder with:

dotnet watch

NOTE: If you are asked to enter a token, copy and paste it from the value in your terminal window:


This is what you should see in your browser:


Click on the app represented by the frontend link on the second row. You should experience the Blazor app:


.NET Aspire has orchestrated for us the connection between multiple projects and produced a single starting point in the Host project. 

Mission accomplished. We have achieved our objective by adding NET Aspire into the mix of projects and wiring up a couple of agents.

Sunday, November 3, 2024

Using Dependency Injection with Sematic Kernel in ASP.NET

Overview

In this video I will show you how you Dependency Inject can be used with Semantic Kernel in an ASP.NET Razor Pages application. The same principals can be used with MVC. We will use the Phi-3 model hosted on GitHub. Developers can use a multitude of AI models on GitHub for free.

Source Code: https://github.com/medhatelmasry/AspWithSkDI
Companion Video: https://youtu.be/fLIWCkxXaM8

Pre-requisites

This walkthrough was done using .NET 8.0.

Getting Started

There are many AI models at GitHub from a variety of vendors that you can choose from. The starting point is to visit https://github.com/marketplace/models. At the time of writing, these are a subset of the models available:


For this article, I will use the "Phi-3.5-mini instruct (128k)" model highlighted above. If you click on that model you will be taken to the model's landing page:


Click on the green "Get started" button.


The first thing we need to do is get a 'personal access token' by clicking on the indicated button above.


Choose 'Generate new token', which happens to be in beta at the time of writing.


Give your token a name, set the expiration, and optionally describe the purpose of the token. Thereafter, click on the green 'Generate token' button at the bottom of the page.


Copy the newly generated token and place it is a safe place because you cannot view this token again once you leave the above page. 

Let's use Semantic Kernel in ASP.NET Razor Pages

In a working directory, create a Razor Pages web app named AspWithSkDI inside a terminal window with the following command:

dotnet new razor -n AspWithSkDI

Change into the newly created directory GitHubAiModelSK with:

cd AspWithSkDI

Next, let's add the Sematic Kernel package to our application with:

dotnet add package Microsoft.SemanticKernel -v 1.25.0

Open the project in VS Code and add this directive to the .csproj file right below: <Nullable>enable</Nullable>:

<NoWarn>SKEXP0010</NoWarn>

Add the following to appsettings.json:


    "AI": {
      "Endpoint": "https://models.inference.ai.azure.com",
      "Model": "Phi-3.5-mini-instruct",
      "PAT": "fake-token"
    }

Replace "fake-token" with the personal access token that you got from GitHub. 

Adding Dependency Injection support

Next, open Program.cs in an editor. Add the following code right above the statement "var app = builder.Build();" :

var modelId = builder.Configuration["AI:Model"]!;
var uri = builder.Configuration["AI:Endpoint"]!;
var githubPAT = builder.Configuration["AI:PAT"]!;

var client = new OpenAIClient(new ApiKeyCredential(githubPAT), new OpenAIClientOptions { Endpoint = new Uri(uri) });

var kernel = builder.Services.AddKernel()
    .AddOpenAIChatCompletion(modelId, client);

It is the last statement above that is key to making Semantic Kernel available to all other classes through Dependency Injection.

ASP.NET Razor Pages

Pages/Index.cshtml.cs

Add the following instance variable and property to the code-behind file named Pages/Index.cshtml.cs:

private readonly Kernel _kernel;

[BindProperty]
public string? Reply { get; set; }

Replace the class constructor with the following:

public IndexModel(ILogger<IndexModel> logger, Kernel kernel) {
    _logger = logger;
    _kernel = kernel;
}

We can now get access to Semantic Kernel through the _kernel object.

Add the following OnPostAsync() method to the IndexModel class:

// action method that receives user prompt from the form
public async Task<IActionResult> OnPostAsync(string userPrompt) {
    // get a chat completion service
    var chatCompletionService = _kernel.GetRequiredService<IChatCompletionService>(); 
 
    // Create a new chat by specifying the assistant
    ChatHistory chat = new(@"
        You are an AI assistant that helps people find information about baking. 
        The baked item must be easy, tasty, and cheap. 
        I don't want to spend more than $10 on ingredients.
        I don't want to spend more than 30 minutes preparing.
        I don't want to spend more than 30 minutes baking."
    ); 
 
    chat.AddUserMessage(userPrompt); 
 
    var response = await chatCompletionService.GetChatMessageContentAsync(chat, kernel: _kernel); 
 
    Reply = response.Content!.Replace("\n", "<br>"); 
 
    return Page();
}

In the above OnPostAsync() method, the user prompt is received and passed on to the Phi-3 GPT SLM model. In this case our assistant specializes suggests easy, fast and cheap baking ideas.

Pages/Index.cshtml

The Index.cshtml file represents the view that the user sees when interacting with our web app. Replace the content of Index.cshtml with the following:

@page
@model IndexModel

@{
    ViewData["Title"] = "SK Dependency Injection in ASP.NET Razor Pages";
}

<div class="text-center">
    <h3 class="display-6">@ViewData["Title"]</h3>
    <form method="post" onsubmit="showPleaseWaitMessage()">
        <input type="text" name="userPrompt" size="80" 
            required placeholder="What do you want to bake today?"/>
        <input type="submit" value="Submit" />
    </form>
</div>

<p>&nbsp;</p>

<div id="please-wait-message" style="display:none;">
    <p class="alert alert-info">Please wait...</p>
</div>

<div id="response-message">
    @if (Model.Reply != null) {
        <p class="alert alert-success">@Html.Raw(Model.Reply)</p>
    }
</div>

@section Scripts {
    <script>
        function showPleaseWaitMessage() {
    document.getElementById('response-message').innerHTML = '';      
    document.getElementById('please-wait-message').style.display = 'block';   
    }
    </script>
}

There is some JavaScript that was added to the view to display a "Please wait ...." message while the user waits for the AI model to respond.

Run the application

In a terminal window in the root of the application, run the following command:

dotnet watch

The home page of the web app displays in your default browser and it looks like this:

I entered "Apple Pie" then clicked on Submit. A "Please wait ..." message appeared while the AI model processed my request.

After about 40 seconds the response came back.


Conclusion

It is easy and straight forward to use dependency injection to create a kernel.