Showing posts with label Example. Show all posts

Wednesday, February 25, 2026

Explore A2A protocol with .NET and GitHub Models

Let's explore the Agent-to-Agent (A2A) protocol using .NET. The A2A protocol standardizes communication between agents. It allows agents built with different frameworks and technologies to seamlesssly communicate with one-another.

What's A2A?

A2A is a standardized protocol that supports:

  • Agent discovery through agent cards
  • Message-based communication between agents
  • Long-running agentic processes via tasks
  • Cross-platform interoperability between different agent frameworks

The A2A protocol was developed by Google and later donated to the Linux Foundation.For more information, visit A2A protocol specification.

Source Code: https://github.com/medhatelmasry/A2Aapi

Get Started

In the following example, we will learn how to expose an agent with A2A. The example uses an AI model hosted on GitHub. In addition, we will use Swagger to simplify testing.

In a working directory on your computer, create an ASP.NET Minimal API project named A2Aapi with the following terminal window command:

dotnet new webapi -o A2Aapi
cd A2Aapi
dotnet new gitignore

Install the following NuGet packages:

# Hosting.A2A.AspNetCore for A2A protocol integration
dotnet add package Microsoft.Agents.AI.Hosting.A2A.AspNetCore -v 1.0.0-preview.260219.1

# Libraries to connect to GitHub AI models
dotnet add package Azure.Identity
dotnet add package Microsoft.Extensions.AI.OpenAI

# Swagger to test app
dotnet add package Microsoft.AspNetCore.OpenApi
dotnet add package Swashbuckle.AspNetCore


Configure connection to GitHub AI Models

You will need to get a Personal Access Token from GitHub. If this is the first time, follow this tutorial.

Add the following JSON to appsettings.Development.json file:

"GitHub": {
    "Token": "put-your-github-personal-access-token-here",
    "ApiEndpoint": "https://models.github.ai/inference",
    "Model": "openai/gpt-4o-mini"
}

NOTE: Replace put-your-github-personal-access-token-here with your GitHub Personal Access Token.

Edit the .gitignore file in the A2Aapi folder and add to it appsettings.Development.json so that your secrets do not find their way into source control by mistake.

Replace contents of Program.cs with the following code:

using OpenAI;
using Microsoft.Agents.AI.Hosting;
using Microsoft.Extensions.AI;
using Azure;
using OpenAI.Chat;

var builder = WebApplication.CreateBuilder(args);

builder.Services.AddOpenApi();
builder.Services.AddSwaggerGen();

string githubToken = builder.Configuration["GitHub:Token"]
    ?? throw new InvalidOperationException("GitHub:Token is not set.");
string apiEndpoint = builder.Configuration["GitHub:ApiEndpoint"]
    ?? throw new InvalidOperationException("GitHub:ApiEndpoint is not set.");
string model = builder.Configuration["GitHub:Model"]
    ?? throw new InvalidOperationException("GitHub:Model is not set.");

// Register the chat client
IChatClient chatClient = new ChatClient(
    model,
    new AzureKeyCredential(githubToken),
    new OpenAIClientOptions
    {
        Endpoint = new Uri(apiEndpoint)
    }
)
.AsIChatClient();

builder.Services.AddSingleton(chatClient);

// Register agents
var pirateAgent = builder.AddAIAgent("pirate", instructions: "You are a pirate. Speak like a pirate.");

var app = builder.Build();

app.MapOpenApi();
app.UseSwagger();
app.UseSwaggerUI();

// Expose the agent via A2A protocol. You can also customize the agentCard
app.MapA2A(pirateAgent, path: "/a2a/pirate", agentCard: new()
{
    Name = "Pirate Agent",
    Description = "An agent that speaks like a pirate.",
    Version = "1.0"
});

app.Run();


Test Agent

Run the web app with:

dotnet run

We have two options to test our agent: we can either use Swagger by pointing our browser to the /swagger endpoint, or we can use the A2Aapi.http REST Client that is built into the ASP.NET Minimal API template.

Option 1 - using Swagger

Point your browser to the URL displayed the the terminal window with /swagger. In my case it would be http://localhost:5112/swagger. You will see an interface similar to this:

Cloose the POST /a2a/pirate/v1/message:stream endpoint.

Click on the "Try it out" 

Enter the following JSON request then click on the Execute button:
{
  "message": {
    "kind": "message",
    "role": "user",
    "parts": [
      {
        "kind": "text",
        "text": "Hey pirate! Tell me where have you been",
        "metadata": {}
      }
    ],
    "messageId": null,
    "contextId": "foo"
  }
}

The server response looks like this:

This is the prompt we sent to the agent:

Hey pirate! Tell me where have you been

This is the response from the agent:

Ahoy, matey! I've been sailin' the seven seas, searchin' fer treasure and chasin' down the fiercest storms!

From the shores of Tortuga to the depths of Davy Jones' locker, me heart be filled with tales of adventure. And where be ye anchorin" yer ship, eh?

The response includes the contextId (conversation identifier), messageId (message identifier), and the actual content from the pirate agent.

Option 2 - using .http REST Client

If you are using VS Code, install the following VS Code extension:


Edit the A2Aapi.http in your project and add this request:
###
# Send A2A request to the pirate agent
POST {{A2Aapi_HostAddress}}/a2a/pirate/v1/message:stream
Accept: application/json
Content-Type: application/json

{
  "message": {
    "kind": "message",
    "role": "user",
    "parts": [
      {
        "kind": "text",
        "text": "Hey pirate! Tell me where have you been",
        "metadata": {}
      }
    ],
    "messageId": null,
    "contextId": "foo"
  }
}

Click on the "Send Request" link as shown below:

The response will show in a separate panel like this:

AgentCard Configuration

The AgentCard provides metadata about your agent for discovery and integration:

app.MapA2A(agent, "/a2a/my-agent", agentCard: new() {
   Name = "My Agent",
   Description = "A helpful agent that assists with tasks.",
   Version = "1.0",
});

The agent card can be accessed by sending this request:

# Send A2A request to the pirate agent
GET {{baseAddress}}/a2a/pirate/v1/card


Properties of the Agent Card

NameDisplay name of the agent
DescriptionBrief description of the agent
VersionVersion string for the agent
UrlEndpoint URL (automatically assigned if not specified)
CapabilitiesOptional metadata about streaming, push notifications, and other features


Exposing More Agents

You can expose multiple agents in a single application, as long as their endpoints don't collide. Here's an example:

Add the following code to Program.cs right under the "// Register agents" comment line:

var mathAgent = builder.AddAIAgent("math", instructions: "You are a math expert.");
var scienceAgent = builder.AddAIAgent("science", instructions: "You are a science expert.");

Similarly, add these endpoint mappings to Program.cs right above the last "app.Run();" statement:

app.MapA2A(mathAgent, "/a2a/math");
app.MapA2A(scienceAgent, "/a2a/science");

You can test the math agent and science agents with these respective requests:

Test math agent

###
# Send A2A request to the math agent
POST {{A2Aapi_HostAddress}}/a2a/math/v1/message:stream
Accept: application/json
Content-Type: application/json

{
  "message": {
    "kind": "message",
    "role": "user",
    "parts": [
      {
        "kind": "text",
        "text": "add 2 and 7",
        "metadata": {}
      }
    ],
    "messageId": null,
    "contextId": null
  }
}


Test science agent

###
# Send A2A request to the science agent
POST {{A2Aapi_HostAddress}}/a2a/science/v1/message:stream
Accept: application/json
Content-Type: application/json

{
  "message": {
    "kind": "message",
    "role": "user",
    "parts": [
      {
        "kind": "text",
        "text": "how far is saturn from earth?",
        "metadata": {}
      }
    ],
    "messageId": null,
    "contextId": null
  }
}


Conclusion

Therea re many emerging protocols that are giving us an insight into the future landscapte of the Agentic AI world o the future. This is one amone others. I trust that is article gives you in insight into the significance of the A2A protocol.

References

A2A Integration

Agent2Agent (A2A) Protocol

Sunday, October 19, 2025

Small Language Models with AI Toolkit Extension in VS Code

In this article, we will see how we can work with small language models (SLM) from the AI Toolkit extension in VS Code. Though the toolkit can do other things, our focus is to consume an ONNX SLM hosted on Visual Studio Code from a C# application. We will first look at an example that is based on OpenAI packages. We will later use a similar example based on the Sematic Kernal approach.

Companion Video: https://youtu.be/V_eWAM2fxJg

Prerequisites

You will need:

  • The latest version of VS Code
  • .NET version 9.0 or higher

What are small language models (SLMs)?

Small Language Models (SLMs) are compact versions of large language models (LLMs), designed to deliver strong performance in natural language tasks while using significantly fewer computational resources.

What is the AI Toolkit Extension in VS Code?

The AI Toolkit Extension for Visual Studio Code is a powerful, all-in-one environment for building, testing, and deploying generative AI applications—especially useful for developers working with small language models (SLMs).

Getting Started

Install the following Visual Studio Code extension:


Click on the three dots (...) in the left navigation of VS Code, and choose "AI Toolkit".

Click on "Model Catalog".

Scroll down down the list until you find “Local Models” >> ONNX >> Minstral 7B – (CPU – Small, Standard) >> + Add Model.

Once the model is fully downloaded, it will appear under Models >> ONNX.

Right-click on the model and select “Copy Model Name”.

I copied the following name for the "Minstral 7B" model: 

mistral-7b-v02-int4-cpu

Using OpenAI packages

Create a C# console application named AIToolkitOpenAI and add to it required packages with the following terminal window commands:

dotnet new console -n AIToolkitOpenAI
cd AIToolkitOpenAI
dotnet add package OpenAI

Start VS Code with:

code .

Click on the "AI Toolkit" tab in VS Code and make sure that the "Minstral 7B" model is running.

Replace content of Program.cs with this code:

using OpenAI;
using OpenAI.Chat;
using System.ClientModel;
using System.Text;

var model = "mistral-7b-v02-int4-cpu";
var baseUrl = "http://localhost:5272/v1/"; // root URL for local OpenAI-like server
var apikey = "unused";

OpenAIClientOptions options = new OpenAIClientOptions();
options.Endpoint = new Uri(baseUrl);
ApiKeyCredential credential = new ApiKeyCredential(apikey);
ChatClient client = new OpenAIClient(credential, options).GetChatClient(model);

// Build the prompt
StringBuilder prompt = new StringBuilder();
prompt.AppendLine("You will analyze the sentiment of the following product reviews.");
prompt.AppendLine("Each line is its own review. Output the sentiment of each review in");
prompt.AppendLine("a bulleted list and then provide a general sentiment of all reviews.");
prompt.AppendLine();
prompt.AppendLine("I bought this product and it's amazing. I love it!");
prompt.AppendLine("This product is terrible. I hate it.");
prompt.AppendLine("I'm not sure about this product. It's okay.");
prompt.AppendLine("I found this product based on the other reviews. It worked");

// send the prompt to the model and wait for the text completion
var response = await client.CompleteChatAsync(prompt.ToString());
// display the response
Console.WriteLine(response.Value.Content[0].Text);

Run the application with:

dotnet run

The application does sentiment analysis on what customers think of the product.

This is a sample of the output:

* I bought this product and it's amazing. I love it!: Positive sentiment
* This product is terrible. I hate it.: Negative sentiment
* I'm not sure about this product. It's okay.: Neutral sentiment
* I found this product based on the other reviews. It worked for me.: Positive sentiment

General sentiment: The reviews contain both positive and negative sentiments. Some customers expressed their love for the product, while others expressed their dislike. Neutral sentiment was also expressed by one customer. Overall, the reviews suggest that the product has the potential to elicit strong feelings from customers, both positive and negative.

Sematic Kernel packages

Create a C# console application named AIToolkitSK and add to it required packages with the following terminal window commands:

dotnet new console -n AIToolkitSK
cd AIToolkitSK
dotnet add package Microsoft.SemanticKernel

Start VS Code with:

code .

Click on the "AI Toolkit" tab in VS Code and make sure that the "Minstral 7B" model is running.

Replace content of Program.cs with this code:

using System.Text;
using Microsoft.SemanticKernel;
using Microsoft.SemanticKernel.ChatCompletion;
using Microsoft.SemanticKernel.Connectors.OpenAI;

var model = "mistral-7b-v02-int4-cpu";
var baseUrl = "http://localhost:5272/v1/";
var apikey = "unused";

// Create a chat completion service
var kernel = Kernel.CreateBuilder()
    .AddOpenAIChatCompletion(modelId: model, apiKey: apikey, endpoint: new Uri(baseUrl))
    .Build();
var chat = kernel.GetRequiredService<IChatCompletionService>();
var history = new ChatHistory();
history.AddSystemMessage("You are a useful chatbot. Always reply in a funny way with short answers.");
var settings = new OpenAIPromptExecutionSettings
{
    MaxTokens = 500,
    Temperature = 1,
};

while (true)
{
    Console.Write("\nUser: ");
    var userInput = Console.ReadLine();
    if (string.IsNullOrWhiteSpace(userInput)) break;

    history.AddUserMessage(userInput);

    var responseBuilder = new StringBuilder();
    Console.Write("\nAI: ");
    await foreach (var message in chat.GetStreamingChatMessageContentsAsync(userInput, settings, kernel))
    {
        responseBuilder.Append(message);
        Console.Write(message);
    }
}

This is a simple chat completion app.

Run the application with:

dotnet run

My prompt was:

Red or white wine with beef steak?

The response was:

AI:  Both red and white wines can pair well with beef steak, but a red wine is generally the more traditional choice. Red wines, such as Cabernet Sauvignon, Merlot, or Pinot Noir, have flavors that complement the rich and savory flavors of beef. However, if you prefer a lighter taste, a white wine such as Pinot Noir or Chardonnay can also work well with beef steak. Ultimately, it comes down to personal preference.

Conclusion

We have seen how to use SLMs hosted by VS Code through the AI Toolkit extension. We were able to communicate with the model from these two C# applications: (1) a app the uses OpenAI packages, and (2) an app that uses Sematic Kernel.

Sunday, February 2, 2025

Using PHP with AI models hosted on GitHub

Overview

In this article I will show you how you can experiment with AI models hosted on GitHub in a simple PHP web app. GitHub AI Models are intended for learning, experimentation and proof-of-concept activities. The feature is subject to various limits (including requests per minute, requests per day, tokens per request, and concurrent requests) and is not designed for production use cases.

Prerequisites

To proceed, you will need the following:

  • PHP - You need to have PHP version 8.3 (or higher) installed on your computer. You can download the latest version from https://www.php.net/downloads.php.
  • Composer – If you do not have Composer yet, download and install it for your operating system from https://getcomposer.org/download/.

Getting Started

There are many AI models from a variety of vendors that you can choose from. The starting point is to visit https://github.com/marketplace/models. At the time of writing, these are a subset of the models available:


For this article, I will use the "DeepSeek-R1" beside the red arrow above. If you click on that model, you will be taken to the model's landing page:

Click on the green "Get API key" button.


The first thing we need to do is get a 'personal access token' by clicking on the “Get developer key” button.

Choose 'Generate new token', which happens to be in beta at the time of writing.


Give your token a name, set the expiration, and optionally describe the purpose of the token. Thereafter, click on the green 'Generate token' button at the bottom of the page.


Copy the newly generated token and place it is a safe place because you cannot view this token again once you leave the above page.

Let's do some PHP coding

In a working directory, create a sub-directory named PHP-GitHub-AI inside a terminal window with the following command:

mkdir PHP-GitHub-AI

Change into the newly created directory named PHP-GitHub-AI with:

cd PHP-GitHub-AI

In the PHP-GitHub-AI folder, create a file named index.php and add to it the following code:

<?php

// Set your Azure API key and endpoint
$apiKey = 'PUT-YOUR-PERSONAL-ACCESS-TOKEN-FROM-GITHUB-HERE';
$endpoint = 'https://models.inference.ai.azure.com';

// Define the API endpoint
$url = $endpoint . '/chat/completions';

// Set up the data for the API request
$data = [
    'messages' => [
        [
            'role' => 'system',
            'content' => 'you are an expert in astronomy'
        ],
        [
            'role' => 'user',
            'content' => 'which is the furthest planet to earth?'
        ]
    ],
    'model' => 'DeepSeek-R1',    // gpt-4o   DeepSeek-R1
    'temperature' => 1,
    'max_tokens' => 4096,
    'top_p' => 1
];
// Initialize cURL
$ch = curl_init($url);

// Set cURL options
curl_setopt($ch, CURLOPT_RETURNTRANSFER, true);
curl_setopt($ch, CURLOPT_HTTPHEADER, [
    'Content-Type: application/json',
    'Authorization: ' . $apiKey,
]);

curl_setopt($ch, CURLOPT_POST, true);
curl_setopt($ch, CURLOPT_POSTFIELDS, json_encode($data));

// Execute the API request
$response = curl_exec($ch);

// Check for errors
if ($response === false) {
    echo 'Error: ' . curl_error($ch);
} else {

    // Decode the response
    $result = json_decode($response, true);

    // Print the entire response for debugging
    /*
    echo '<pre>';
    print_r($result);
    echo '</pre>';
    */
    // Check if the 'choices' key exists in the response
    if (isset($result['choices'][0]['message']['content'])) {
        echo '<h3>Generated Text by ' . $result['model'] .':</h3>';
        // Print the generated text
        echo "<p>" . $result['choices'][0]['message']['content'] . "</p>";
    } else {
        if (isset($result['error'])) {
            echo 'Error: ' . $result['error']['message'];
        } else {
            echo 'Error: Unable to retrieve generated text.';
        }
    }
}

// Close cURL

curl_close($ch);
?>

In the above code:

  • Set the value of $apiKey to be the personal access token from GitHub
  • The system prompt is: 'you are an expert in astronomy'.
  • The user prompt is: 'which is the furthest planet to earth?'
  • We will be using the ‘DeepSeek-R1’ model

You can start the PHP web server in the PHP-GitHub-AI folder with this terminal window command:

php -S localhost:8888

Point your browser to http://localhost:8888. The output would look like this:


The output is in markdown format. We will need a library that converts from markdown to HTML. To that end, stop the web server and install the erusev/parsedown package into your application with this terminal window command:

composer require erusev/parsedown

Back in the code, make the following changes:
  • Add this code to the first line of your PHP code:
// composer require erusev/parsedown
require_once 'vendor/autoload.php';

  • Replace the following statement:

echo "<p>" . $result['choices'][0]['message']['content'] . "</p>";

WITH

error_reporting(E_ALL ^ E_DEPRECATED);
$Parsedown = new Parsedown();
$text =  $Parsedown->text($result['choices'][0]['message']['content']);
echo "<p>$text</p>";

Restart the web server with “php -S localhost:8888”. The page now shows a much better looking output:

You can change the AI model from DeepSeek-R1 to any other model (like gpt-4o) and will get similar results.

Monday, January 20, 2025

Phi-3 Small Language Model (SLM) in a PHP app with Ollama and LLPhant framework

Overview

In this tutorial, we will see how easy it is to use the Phi-3 small language model in a PHP application. The best part is that it is free and runs entirely on your local device. Ollama is used to serve the Phi-3 small language model and LLPhant is the PHP framework for communicating with the AI model. 

Prerequisites

To proceed, you will need the following:

What is small language model (SLM)?

A small language model (SLM) is a machine learning model typically based on a large language model (LLM) but of greatly reduced size. An SLM retains much of the functionality of the LLM from which it is built but with far less complexity and computing resource demand.

What is Ollama?

Ollama is an application you can download onto your computer or server to run open-source generative AI small-language-models (SLMs) such as Meta's Llama 3 and Microsoft's Phi-3. You can see the many models available at https://www.ollama.com/library.

What is LLPhant

LLPhant is an open-source PHP Generative AI Framework at https://github.com/LLPhant/LLPhant

Getting Started

Download the Ollama installer from https://www.ollama.com/download.

Once you have installed Ollama, run these commands from a terminal window:

ollama pull phi3:latest
ollama list
ollama show phi3:latest

In a suitable working directory, create a folder named PhpAI with the following terminal window command:

mkdir PhpAI

Change into the newly created folder with:

cd PhpAI

Using Composer, install the theodo-group/llphant package by running this command:

composer require theodo-group/llphant

Let's get coding

Create a file named index.php with the following content:

<?php

require_once 'vendor/autoload.php';

use LLPhant\OllamaConfig;
use LLPhant\Chat\OllamaChat;  
 
$config = new OllamaConfig();
$config->model = 'phi3'; 
 
$chat = new OllamaChat($config); 
 
$chat->setSystemMessage('You are a helpful assistant who knows about world geography.'); 
 
$response = $chat->generateText('what is the capital of france?');  
 
echo $response;
?>

Running the app

To run the app, start the PHP web server to listen on port number 8888 with the following command in the PhpAI folder.

php -S localhost:8888

You can view the output by pointing your browser to the following URL:

http://localhost:8888/

This is what I experienced:

Conclusion

We can package our applications with a local SLM. This makes our applications cheaper, faster, connection-free, and self-contained.

Wednesday, November 20, 2024

Using Aspire with gRPC

We start with a simple gRPC application that involves a gRPC server and Blazor client. The gRPC server connects to a SQLite database. To test the sample solution, we must first start the gRPC server app, then start the client app. This is somewhat tedious. By introducing .NET Aspire into the mix, we only need to start one app to get the solution to work. .NET Aspire also gives us many more benefits.

Start source code: https://github.com/medhatelmasry/GrpcBlazorSolution
Companion Video: https://youtu.be/9048nfSvA9E

Prerequisites

In order to continue with this tutorial, you will need the following:

  • .NET 9.0
  • Visual Studio Code
  • 'C# Dev Kit' extension for Visual Studio Code

.NET Aspire Setup

In any terminal window folder, run the following command before you install .NET Aspire:

dotnet workload update 

To install the .NET Aspire workload from the .NET CLI, execute this command:

dotnet workload install aspire

Check your version of .NET Aspire, with this command:

dotnet workload list

Startup Application

We will start with a .NET 9.0 solution that involves a gRPC backend and a Blazor frontend. Clone the code from this GitHub site with:

git clone https://github.com/medhatelmasry/GrpcBlazorSolution.git

To run the solution, we must first start the backend, then start the frontend. To get a good sense of what the application does, follow these steps:

1) Inside the GrpcStudents folder, run the following command in a terminal window:

dotnet run

2) Next, start the frontend. Inside a terminal window in the BlazorGrpcClient folder, run this command:

dotnet watch


Try the application by adding, updating, and deleting data saved in a SQLit database on the gRPC server. However, it is a pain to have to start both projects to get the solution to work. This is where .NET Aspire comes to the rescue.

Converting solution to .NET Aspire

Close both terminal windows by hitting CTRL C in each.

To add the basic .NET Aspire projects to our solution by running the following command inside the root GrpcBlazorSolution folder:

dotnet new aspire --force

We use the --force switch because the above command will overwrite the .sln file with a new one that only includes two new projects: GrpcBlazorSolution.AppHost and GrpcBlazorSolution.ServiceDefaults.

NOTE: At the time of writing this article, the two .NET Aspire projects are created using .NET 8.0. This will likely change with the passage of time.

We will add our previous gRPC & Blazor projects to the newly created .sln file by executing the following commands inside the root SoccerFIFA folder:

dotnet sln add ./GrpcStudents/GrpcStudents.csproj
dotnet sln add ./BlazorGrpcClient/BlazorGrpcClient.csproj

Open the solution in Visual Studio Code.

We will add references in the GrpcBlazorSolution.AppHost project to the GrpcStudents and BlazorGrpcClient projects. This can be done in the "Solution Explorer" tab in Visual Studio Code. 

Right-click on "GrpcBlazorSolution.AppHost" then select "Add Project Reference". 

 
Choose BlazorGrpcClient.


Similarly, do the same for the the "GrpcStudents" project. Right-click on "GrpcBlazorSolution.AppHost" then select "Add Project Reference". 

Choose BlazorStudents.

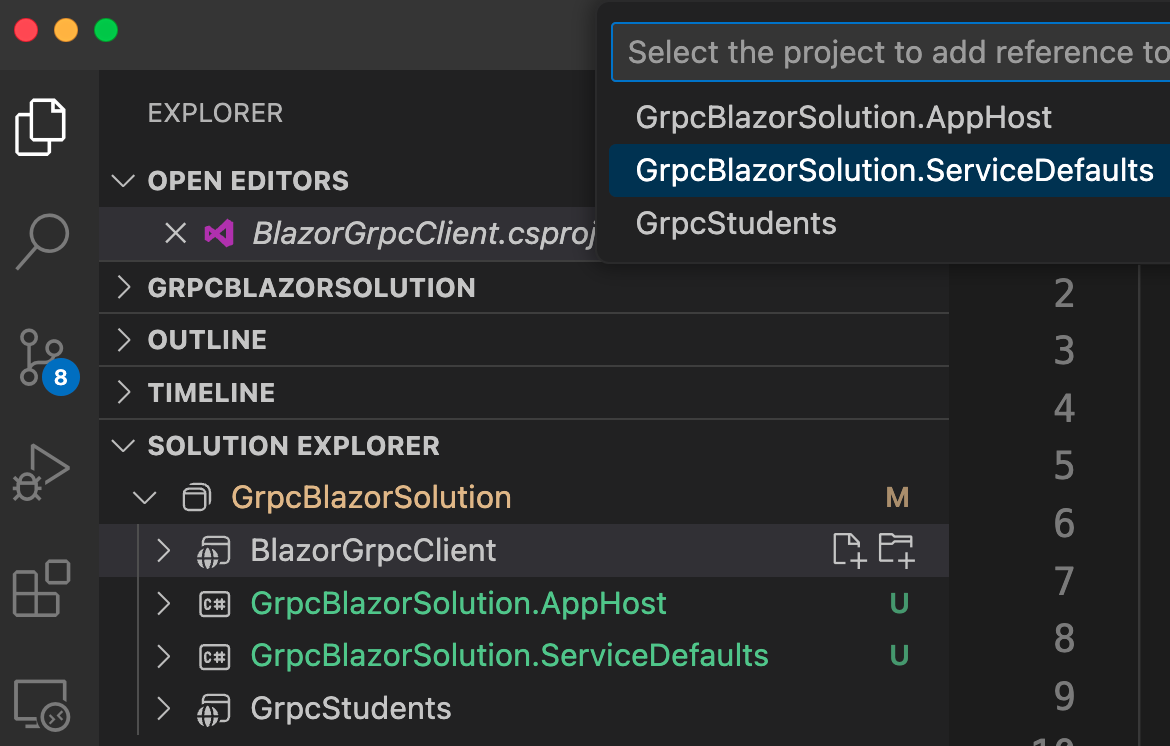
Also, both GrpcStudents and BlazorGrpcClient projects need to have references into GrpcBlazorSolution.ServiceDefaults.

Right-click on BlazorGrpcClient then select "Add Project Reference". 


Choose GrpcBlazorSolution.ServiceDefaults.


Similarly, add a reference to GrpcBlazorSolution.ServiceDefaults from GrpcStudents:

Right-click on GrpcStudents then select "Add Project Reference". 


Choose GrpcBlazorSolution.ServiceDefaults once again.

Then, in the Program.cs files of both GrpcStudents and BlazorGrpcClient projects, add this agent code right before "var app = builder.Build();":

// Add service defaults & Aspire components.
builder.AddServiceDefaults();

In the Program.cs file in GrpcBlazorSolution.AppHost, add this code right before “builder.Build().Run();”:

var grpc = builder.AddProject<Projects.GrpcStudents>("backend");
builder.AddProject<Projects.BlazorGrpcClient>("frontend")
    .WithReference(grpc);

The relative name for the gRPC app is “backend”. Therefore, edit Program.cs in the BlazorGrpcClient project. At around line 15, change the address from http://localhost:5099 to simply http://backend so that the statement looks like this:

builder.Services.AddGrpcClient<StudentRemote.StudentRemoteClient>(options =>
{
    options.Address = new Uri("http://backend");
});

Test .NET Aspire Solution

To test the solution,  start the application in the GrpcBlazorSolution.AppHost folder with:

dotnet watch

NOTE: If you are asked to enter a token, copy and paste it from the value in your terminal window:


This is what you should see in your browser:


Click on the app represented by the frontend link on the second row. You should experience the Blazor app:


.NET Aspire has orchestrated for us the connection between multiple projects and produced a single starting point in the Host project. 

Mission accomplished. We have achieved our objective by adding NET Aspire into the mix of projects and wiring up a couple of agents.

Sunday, November 3, 2024

Using Dependency Injection with Sematic Kernel in ASP.NET

Overview

In this video I will show you how you Dependency Inject can be used with Semantic Kernel in an ASP.NET Razor Pages application. The same principals can be used with MVC. We will use the Phi-3 model hosted on GitHub. Developers can use a multitude of AI models on GitHub for free.

Source Code: https://github.com/medhatelmasry/AspWithSkDI
Companion Video: https://youtu.be/fLIWCkxXaM8

Pre-requisites

This walkthrough was done using .NET 8.0.

Getting Started

There are many AI models at GitHub from a variety of vendors that you can choose from. The starting point is to visit https://github.com/marketplace/models. At the time of writing, these are a subset of the models available:


For this article, I will use the "Phi-3.5-mini instruct (128k)" model highlighted above. If you click on that model you will be taken to the model's landing page:


Click on the green "Get started" button.


The first thing we need to do is get a 'personal access token' by clicking on the indicated button above.


Choose 'Generate new token', which happens to be in beta at the time of writing.


Give your token a name, set the expiration, and optionally describe the purpose of the token. Thereafter, click on the green 'Generate token' button at the bottom of the page.


Copy the newly generated token and place it is a safe place because you cannot view this token again once you leave the above page. 

Let's use Semantic Kernel in ASP.NET Razor Pages

In a working directory, create a Razor Pages web app named AspWithSkDI inside a terminal window with the following command:

dotnet new razor -n AspWithSkDI

Change into the newly created directory GitHubAiModelSK with:

cd AspWithSkDI

Next, let's add the Sematic Kernel package to our application with:

dotnet add package Microsoft.SemanticKernel -v 1.25.0

Open the project in VS Code and add this directive to the .csproj file right below: <Nullable>enable</Nullable>:

<NoWarn>SKEXP0010</NoWarn>

Add the following to appsettings.json:


    "AI": {
      "Endpoint": "https://models.inference.ai.azure.com",
      "Model": "Phi-3.5-mini-instruct",
      "PAT": "fake-token"
    }

Replace "fake-token" with the personal access token that you got from GitHub. 

Adding Dependency Injection support

Next, open Program.cs in an editor. Add the following code right above the statement "var app = builder.Build();" :

var modelId = builder.Configuration["AI:Model"]!;
var uri = builder.Configuration["AI:Endpoint"]!;
var githubPAT = builder.Configuration["AI:PAT"]!;

var client = new OpenAIClient(new ApiKeyCredential(githubPAT), new OpenAIClientOptions { Endpoint = new Uri(uri) });

var kernel = builder.Services.AddKernel()
    .AddOpenAIChatCompletion(modelId, client);

It is the last statement above that is key to making Semantic Kernel available to all other classes through Dependency Injection.

ASP.NET Razor Pages

Pages/Index.cshtml.cs

Add the following instance variable and property to the code-behind file named Pages/Index.cshtml.cs:

private readonly Kernel _kernel;

[BindProperty]
public string? Reply { get; set; }

Replace the class constructor with the following:

public IndexModel(ILogger<IndexModel> logger, Kernel kernel) {
    _logger = logger;
    _kernel = kernel;
}

We can now get access to Semantic Kernel through the _kernel object.

Add the following OnPostAsync() method to the IndexModel class:

// action method that receives user prompt from the form
public async Task<IActionResult> OnPostAsync(string userPrompt) {
    // get a chat completion service
    var chatCompletionService = _kernel.GetRequiredService<IChatCompletionService>(); 
 
    // Create a new chat by specifying the assistant
    ChatHistory chat = new(@"
        You are an AI assistant that helps people find information about baking. 
        The baked item must be easy, tasty, and cheap. 
        I don't want to spend more than $10 on ingredients.
        I don't want to spend more than 30 minutes preparing.
        I don't want to spend more than 30 minutes baking."
    ); 
 
    chat.AddUserMessage(userPrompt); 
 
    var response = await chatCompletionService.GetChatMessageContentAsync(chat, kernel: _kernel); 
 
    Reply = response.Content!.Replace("\n", "<br>"); 
 
    return Page();
}

In the above OnPostAsync() method, the user prompt is received and passed on to the Phi-3 GPT SLM model. In this case our assistant specializes suggests easy, fast and cheap baking ideas.

Pages/Index.cshtml

The Index.cshtml file represents the view that the user sees when interacting with our web app. Replace the content of Index.cshtml with the following:

@page
@model IndexModel

@{
    ViewData["Title"] = "SK Dependency Injection in ASP.NET Razor Pages";
}

<div class="text-center">
    <h3 class="display-6">@ViewData["Title"]</h3>
    <form method="post" onsubmit="showPleaseWaitMessage()">
        <input type="text" name="userPrompt" size="80" 
            required placeholder="What do you want to bake today?"/>
        <input type="submit" value="Submit" />
    </form>
</div>

<p>&nbsp;</p>

<div id="please-wait-message" style="display:none;">
    <p class="alert alert-info">Please wait...</p>
</div>

<div id="response-message">
    @if (Model.Reply != null) {
        <p class="alert alert-success">@Html.Raw(Model.Reply)</p>
    }
</div>

@section Scripts {
    <script>
        function showPleaseWaitMessage() {
    document.getElementById('response-message').innerHTML = '';      
    document.getElementById('please-wait-message').style.display = 'block';   
    }
    </script>
}

There is some JavaScript that was added to the view to display a "Please wait ...." message while the user waits for the AI model to respond.

Run the application

In a terminal window in the root of the application, run the following command:

dotnet watch

The home page of the web app displays in your default browser and it looks like this:

I entered "Apple Pie" then clicked on Submit. A "Please wait ..." message appeared while the AI model processed my request.

After about 40 seconds the response came back.


Conclusion

It is easy and straight forward to use dependency injection to create a kernel.