Showing posts with label Swagger. Show all posts

Wednesday, February 25, 2026

Explore A2A protocol with .NET and GitHub Models

Let's explore the Agent-to-Agent (A2A) protocol using .NET. The A2A protocol standardizes communication between agents. It allows agents built with different frameworks and technologies to seamlesssly communicate with one-another.

What's A2A?

A2A is a standardized protocol that supports:

  • Agent discovery through agent cards
  • Message-based communication between agents
  • Long-running agentic processes via tasks
  • Cross-platform interoperability between different agent frameworks

The A2A protocol was developed by Google and later donated to the Linux Foundation.For more information, visit A2A protocol specification.

Source Code: https://github.com/medhatelmasry/A2Aapi

Get Started

In the following example, we will learn how to expose an agent with A2A. The example uses an AI model hosted on GitHub. In addition, we will use Swagger to simplify testing.

In a working directory on your computer, create an ASP.NET Minimal API project named A2Aapi with the following terminal window command:

dotnet new webapi -o A2Aapi
cd A2Aapi
dotnet new gitignore

Install the following NuGet packages:

# Hosting.A2A.AspNetCore for A2A protocol integration
dotnet add package Microsoft.Agents.AI.Hosting.A2A.AspNetCore -v 1.0.0-preview.260219.1

# Libraries to connect to GitHub AI models
dotnet add package Azure.Identity
dotnet add package Microsoft.Extensions.AI.OpenAI

# Swagger to test app
dotnet add package Microsoft.AspNetCore.OpenApi
dotnet add package Swashbuckle.AspNetCore


Configure connection to GitHub AI Models

You will need to get a Personal Access Token from GitHub. If this is the first time, follow this tutorial.

Add the following JSON to appsettings.Development.json file:

"GitHub": {
    "Token": "put-your-github-personal-access-token-here",
    "ApiEndpoint": "https://models.github.ai/inference",
    "Model": "openai/gpt-4o-mini"
}

NOTE: Replace put-your-github-personal-access-token-here with your GitHub Personal Access Token.

Edit the .gitignore file in the A2Aapi folder and add to it appsettings.Development.json so that your secrets do not find their way into source control by mistake.

Replace contents of Program.cs with the following code:

using OpenAI;
using Microsoft.Agents.AI.Hosting;
using Microsoft.Extensions.AI;
using Azure;
using OpenAI.Chat;

var builder = WebApplication.CreateBuilder(args);

builder.Services.AddOpenApi();
builder.Services.AddSwaggerGen();

string githubToken = builder.Configuration["GitHub:Token"]
    ?? throw new InvalidOperationException("GitHub:Token is not set.");
string apiEndpoint = builder.Configuration["GitHub:ApiEndpoint"]
    ?? throw new InvalidOperationException("GitHub:ApiEndpoint is not set.");
string model = builder.Configuration["GitHub:Model"]
    ?? throw new InvalidOperationException("GitHub:Model is not set.");

// Register the chat client
IChatClient chatClient = new ChatClient(
    model,
    new AzureKeyCredential(githubToken),
    new OpenAIClientOptions
    {
        Endpoint = new Uri(apiEndpoint)
    }
)
.AsIChatClient();

builder.Services.AddSingleton(chatClient);

// Register agents
var pirateAgent = builder.AddAIAgent("pirate", instructions: "You are a pirate. Speak like a pirate.");

var app = builder.Build();

app.MapOpenApi();
app.UseSwagger();
app.UseSwaggerUI();

// Expose the agent via A2A protocol. You can also customize the agentCard
app.MapA2A(pirateAgent, path: "/a2a/pirate", agentCard: new()
{
    Name = "Pirate Agent",
    Description = "An agent that speaks like a pirate.",
    Version = "1.0"
});

app.Run();


Test Agent

Run the web app with:

dotnet run

We have two options to test our agent: we can either use Swagger by pointing our browser to the /swagger endpoint, or we can use the A2Aapi.http REST Client that is built into the ASP.NET Minimal API template.

Option 1 - using Swagger

Point your browser to the URL displayed the the terminal window with /swagger. In my case it would be http://localhost:5112/swagger. You will see an interface similar to this:

Cloose the POST /a2a/pirate/v1/message:stream endpoint.

Click on the "Try it out" 

Enter the following JSON request then click on the Execute button:
{
  "message": {
    "kind": "message",
    "role": "user",
    "parts": [
      {
        "kind": "text",
        "text": "Hey pirate! Tell me where have you been",
        "metadata": {}
      }
    ],
    "messageId": null,
    "contextId": "foo"
  }
}

The server response looks like this:

This is the prompt we sent to the agent:

Hey pirate! Tell me where have you been

This is the response from the agent:

Ahoy, matey! I've been sailin' the seven seas, searchin' fer treasure and chasin' down the fiercest storms!

From the shores of Tortuga to the depths of Davy Jones' locker, me heart be filled with tales of adventure. And where be ye anchorin" yer ship, eh?

The response includes the contextId (conversation identifier), messageId (message identifier), and the actual content from the pirate agent.

Option 2 - using .http REST Client

If you are using VS Code, install the following VS Code extension:


Edit the A2Aapi.http in your project and add this request:
###
# Send A2A request to the pirate agent
POST {{A2Aapi_HostAddress}}/a2a/pirate/v1/message:stream
Accept: application/json
Content-Type: application/json

{
  "message": {
    "kind": "message",
    "role": "user",
    "parts": [
      {
        "kind": "text",
        "text": "Hey pirate! Tell me where have you been",
        "metadata": {}
      }
    ],
    "messageId": null,
    "contextId": "foo"
  }
}

Click on the "Send Request" link as shown below:

The response will show in a separate panel like this:

AgentCard Configuration

The AgentCard provides metadata about your agent for discovery and integration:

app.MapA2A(agent, "/a2a/my-agent", agentCard: new() {
   Name = "My Agent",
   Description = "A helpful agent that assists with tasks.",
   Version = "1.0",
});

The agent card can be accessed by sending this request:

# Send A2A request to the pirate agent
GET {{baseAddress}}/a2a/pirate/v1/card


Properties of the Agent Card

NameDisplay name of the agent
DescriptionBrief description of the agent
VersionVersion string for the agent
UrlEndpoint URL (automatically assigned if not specified)
CapabilitiesOptional metadata about streaming, push notifications, and other features


Exposing More Agents

You can expose multiple agents in a single application, as long as their endpoints don't collide. Here's an example:

Add the following code to Program.cs right under the "// Register agents" comment line:

var mathAgent = builder.AddAIAgent("math", instructions: "You are a math expert.");
var scienceAgent = builder.AddAIAgent("science", instructions: "You are a science expert.");

Similarly, add these endpoint mappings to Program.cs right above the last "app.Run();" statement:

app.MapA2A(mathAgent, "/a2a/math");
app.MapA2A(scienceAgent, "/a2a/science");

You can test the math agent and science agents with these respective requests:

Test math agent

###
# Send A2A request to the math agent
POST {{A2Aapi_HostAddress}}/a2a/math/v1/message:stream
Accept: application/json
Content-Type: application/json

{
  "message": {
    "kind": "message",
    "role": "user",
    "parts": [
      {
        "kind": "text",
        "text": "add 2 and 7",
        "metadata": {}
      }
    ],
    "messageId": null,
    "contextId": null
  }
}


Test science agent

###
# Send A2A request to the science agent
POST {{A2Aapi_HostAddress}}/a2a/science/v1/message:stream
Accept: application/json
Content-Type: application/json

{
  "message": {
    "kind": "message",
    "role": "user",
    "parts": [
      {
        "kind": "text",
        "text": "how far is saturn from earth?",
        "metadata": {}
      }
    ],
    "messageId": null,
    "contextId": null
  }
}


Conclusion

Therea re many emerging protocols that are giving us an insight into the future landscapte of the Agentic AI world o the future. This is one amone others. I trust that is article gives you in insight into the significance of the A2A protocol.

References

A2A Integration

Agent2Agent (A2A) Protocol

Tuesday, January 28, 2025

Built-in token authentication with ASP.NET Core 9.0 Minimal WebAPI

In this tutorial I will showcase the built-in WebApi token authentication. To keep it simple, we shall persist our data in the lightweight SQLite database.

Prerequisites

It is assumed that you have installed the following on your computer:
  • .NET 9.0
  • Visual Studio Code editor

Getting Started

In a suitable working directory, create a new WebApi application using the following terminal window command:

dotnet new webapi --name WebApiTokenAuth

Change directory with:

cd WebApiTokenAuth

We will need to add some packages. Also in the same terminal window, run the following commands:

dotnet add package Microsoft.AspNetCore.Identity.EntityFrameworkCore

dotnet add package Microsoft.EntityFrameworkCore.Sqlite

dotnet add package Microsoft.EntityFrameworkCore.Tools

dotnet add package Microsoft.EntityFrameworkCore.Design

dotnet add package Swashbuckle.AspNetCore

The above packages allow us to use SQLite and Entity Framework. The last package (Swashbuckle.AspNetCore) will be used to provide a default Swagger UI.

Make sure you have the dotnet-ef tool. If you do not, you can globally install it with:

dotnet tool install --global dotnet-ef

If you already have the dotnet-ef, update your version to the latest with:

dotnet tool update --global dotnet-ef

Let us first add Swagger UI to our WebAPI application so that we can easily test our API endpoints. Open your source code with Visual Studio Code by executing the following statement from a terminal window inside the root folder of the application:

code .

You can now add the following statement right under app.MapOpenApi():

app.UseSwaggerUI(options =>  {
    options.SwaggerEndpoint("/openapi/v1.json", "My WebAPI");
});

Edit file Properties/launchSettings.json. In both http and https blocks, change the value of launchBrowser to true.

Also, in both http & https blocks, add the following setting:

"launchUrl": "swagger"

Let us run our web app and see what it does. Run the web app with:

dotnet watch

This gets loaded into your default browser:


Click on GET >> Try it out >> Execute. This will produce the following output:


Database context class

Since we will be using Entity Framework to talk to the SQLite database, we will need a database context class. Add a folder named Data, then add to it a class named ApplicationDbContext that derives from IdentityDbContext<IdentityUser> with the following code:

public class ApplicationDbContext: IdentityDbContext<IdentityUser> {
    public ApplicationDbContext(DbContextOptions<ApplicationDbContext> options) : base(options)
    {}
}

Add the following connection string to appsettings.json:

"ConnectionStrings": {
  "DefaultConnection": "Data Source=webapi-auth.db;"
}

Next, we must register ApplicationDbContext with our app by adding the following code into Program.cs right before 'var app = builder.Build();':

// Configure identity database access via EF Core
var connectionString = builder.Configuration.GetConnectionString("DefaultConnection") ?? throw new InvalidOperationException("Connection string 'DefaultConnection' not found.");
builder.Services.AddDbContext<ApplicationDbContext>(options =>
    options.UseSqlite(connectionString));

Other required services

Add the following code right after the above code:

// Authorization
builder.Services.AddAuthorization();

// Activate identity APIs. By default, both cookies and proprietary tokens
// are activated. Cookies will be issued based on the 'useCookies' querystring
// parameter in the login endpoint
builder.Services.AddIdentityApiEndpoints<IdentityUser>()
    .AddEntityFrameworkStores<ApplicationDbContext>();

We need to add authorization and authentication middleware with the following code right after 'app.UseHttpsRedirection();':

app.UseAuthentication(); 
app.UseAuthorization(); 

Let us secure the /weatherforecast endpoint by forcing authentication. Chain the following to the endpoint by adding this code right under '.WithOpenApi()':

.RequireAuthorization();

The full app.MapGet() code will look like this:

app.MapGet("/weatherforecast", () =>
{
    var forecast =  Enumerable.Range(1, 5).Select(index =>
        new WeatherForecast
        (
            DateOnly.FromDateTime(DateTime.Now.AddDays(index)),
            Random.Shared.Next(-20, 55),
            summaries[Random.Shared.Next(summaries.Length)]
        ))
        .ToArray();
    return forecast;
})
.WithName("GetWeatherForecast")
.WithOpenApi()
.RequireAuthorization();

Adding Identity API endpoints

Add the identity endpoints to your app by calling MapIdentityApi<IdentityUser>(). Add the following code to Program.cs right before 'app.Run();':

app.MapIdentityApi<IdentityUser>();

Migrations

Since our app uses EF Core, we will create a migration in the Data folder and update the database. Run the following terminal commands:

dotnet ef migrations add M1 -o Data/Migrations

dotnet ef database update

You will notice that a SQLite database file is created named webapi-auth.db.

Try it out

Let us test our application to see whether or not we have indeed succeeded in securing our API endpoint. Start your app with:

dotnet watch

You will see a variety of identity related endpoints when the following page gets loaded into your default browser:


Try to hit the /weatherforecast endpoint and see the data. You will encounter a 401 (unauthorized) error:

Let us register a user. Click on the /register endpoint then click on the "Try it out" button. Update the JSON object so it looks like this:

{
  "email": "a@a.a",
  "password": "P@$$w0rd"
}

Click on the Execute button. You will get a Code 200 response representing success:


Next, let us login with the credentials we created. Click on the /login endpoint, then click on the "Try it out" button.


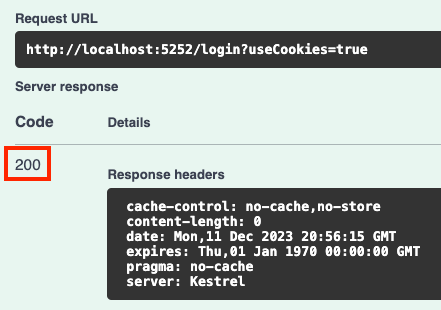
Choose true for useCookies and update the JSON object so it only has the credentials we had previously created. Thereafter, click on the Execute button. You should get a code 200 response:

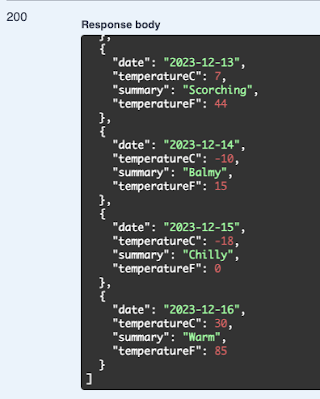
Now let's try getting the data using the GET /weatherforecast endpoint. It should be a relief that we can now see the weather forecast information.

Conclusion

With ASP.NET Core 9.0 we need to follow these steps:
  • restore Swagger UI
  • configure our WebAPI application with the built in ,NET token authentication capability

Monday, December 11, 2023

Built-in authentication with ASP.NET Core .NET 8.0 Minimal WebAPI

In this tutorial I will showcase the built-in WebApi authentication that was introduced with ASP.NET Core 8.0. To keep it simple, we shall persist our data in the lightweight SQLite database.

Source Code: https://github.com/medhatelmasry/WebApiAuth

Companion Video: https://youtu.be/SSLSNWRQJiA

Prerequisites

It is assumed that you have installed the following on your computer:
  • .NET 8.0
  • Visual Studio Code editor

Getting Started

In a suitable working directory, create a new WebApi application using the following terminal window command:

dotnet new webapi -f net8.0 --name WebApiAuth

Change directory with:

cd WebApiAuth

We will need to add some packages. Also in the same terminal window, run the following commands:

dotnet add package Microsoft.AspNetCore.Identity.EntityFrameworkCore -v 8.0.0
dotnet add package Microsoft.EntityFrameworkCore.Sqlite -v 8.0.0
dotnet add package Microsoft.EntityFrameworkCore.Tools -v 8.0.0
dotnet add package Microsoft.EntityFrameworkCore.Design -v 8.0.0

The above packages allow us to use SQLite and Entity Framework.

Make sure you have the dotnet-ef tool. If you do not, you can globally install it with:

dotnet tool install --global dotnet-ef

If you already have the dotnet-ef, update your version to the latest with:

dotnet tool update --global dotnet-ef

Let us run our web app and have a peek at what it does. Run the web app with:

dotnet watch

This gets loaded into your default browser:


Click on GET >> Try it out >> Execute. This will produce the following output:


It is time for us to peek into the code. Stop the server with CTRL C, then start Visual Studio Code with the following terminal command:

code .

Database context class

Since we will be using Entity Framework to talk to the SQLite database, we will need a database context class. Add a folder named Data, then add to it a class named ApplicationDbContext that derives from IdentityDbContext<IdentityUser> with the following code:

using Microsoft.AspNetCore.Identity;
using Microsoft.AspNetCore.Identity.EntityFrameworkCore;
using Microsoft.EntityFrameworkCore;

namespace WebApiAuth.Data;

public class ApplicationDbContext: IdentityDbContext<IdentityUser> {
    public ApplicationDbContext(DbContextOptions<ApplicationDbContext> options) : base(options)
    {}
}

Add the following connection string to appsettings.json:

"ConnectionStrings": {
  "DefaultConnection": "Data Source=webapi-auth.db;"
}

Next, we must register ApplicationDbContext with our app by adding the following code into Program.cs right before 'var app = builder.Build();':

// Configure identity database access via EF Core
var connectionString = builder.Configuration.GetConnectionString("DefaultConnection") ?? throw new InvalidOperationException("Connection string 'DefaultConnection' not found.");
builder.Services.AddDbContext<ApplicationDbContext>(options =>
    options.UseSqlite(connectionString));

Other required services

Add the following code right after the above code:

// Authorization
builder.Services.AddAuthorization();

// Activate identity APIs. By default, both cookies and proprietary tokens
// are activated. Cookies will be issued based on the 'useCookies' querystring
// parameter in the login endpoint
builder.Services.AddIdentityApiEndpoints<IdentityUser>()
    .AddEntityFrameworkStores<ApplicationDbContext>();

We need to add authorization and authentication middleware with the following code right after 'app.UseHttpsRedirection();':

app.UseAuthentication(); 
app.UseAuthorization(); 

Let us secure the /weatherforecast endpoint by forcing authentication. Chain the following to the endpoint by add ing this code right under '.WithOpenApi()':

.RequireAuthorization();

The full app.MapGet() code will look like this:

app.MapGet("/weatherforecast", () =>
{
    var forecast =  Enumerable.Range(1, 5).Select(index =>
        new WeatherForecast
        (
            DateOnly.FromDateTime(DateTime.Now.AddDays(index)),
            Random.Shared.Next(-20, 55),
            summaries[Random.Shared.Next(summaries.Length)]
        ))
        .ToArray();
    return forecast;
})
.WithName("GetWeatherForecast")
.WithOpenApi()
.RequireAuthorization();

Adding Identity API endpoints

Add the identity endpoints to your app by calling MapIdentityApi<IdentityUser>(). Add the following code to Program.cs right before 'app.Run();':

app.MapIdentityApi<IdentityUser>();

Migrations

Since our app uses EF Core, we will create a migration in the Data folder and update the database. Run the following terminal commands:

dotnet ef migrations add M1 -o Data/Migrations

dotnet ef database update

You will notice that a SQLite database file is created named webapi-auth.db.

Try it out

Let us test our application to see whether or not we have indeed succeeded in securing our API endpoint. Start your app with:

dotnet watch

You will see a variety of identity related endpoints when the following gets loaded into your default browser:


Try to hit the /weatherforecast endpoint and see the data. You will encounter a 401 (unauthorized) error:

Let us register a user. Click on the /register endpoint then click on the "Try it out" button. Update the JSON object so it looks like this:

{
  "email": "a@a.a",
  "password": "P@$$w0rd"
}

Click on the Execute button. You will get a Code 200 response representing success:


Next, let us login with the credentials we created. Click on the /login endpoint, then click on the "Try it out" button.


Choose true for useCookies and update the JSON object so it only has the credentials we had previously created. Thereafter, click on the Execute button. You should get a code 200 response:

Now let's try getting the data using the GET /weatherforecast endpoint. It should be a relief that we can now see the data.


With ASP.NET Core 8.0 came an easier way for securing WebAPI. 

Friday, December 11, 2020

HttpRepl essentials

HttpRepl is a light-weight utility from Microsoft used to test REST APIs and view their results. It can run on any O/S that .NET Core (or .NET 5 and later) runs on. HttpRepl is an open-source project on GitHub at https://github.com/dotnet/HttpRepl. It is an alternative to Postman.

Companion video: https://youtu.be/RLdnXN4OAPg

To install the HttpRepl, run the following command from within a terminal window:

dotnet tool install -g Microsoft.dotnet-httprepl

To update HttpRepl to the latest version, enter the following command:

dotnet tool update -g Microsoft.dotnet-httprepl

On Windows, this tool gets installed at:

%USERPROFILE%\.dotnet\tools\httprepl.exe

Let us test  HttpRepl with a REST API service located at https://api4all.azurewebsites.net. From within a terminal window, enter the following command:

httprepl https://api4all.azurewebsites.net

HttpRepl

You are advised to associate the HttpRepl utility with a text editor so that you can compose your POST & PUT requests. The below terminal window command will associate Notepad.exe (in Windows) with HttpRepl:

pref set editor.command.default "C:\Windows\system32\notepad.exe"

pref set editor.command.default

Enter dir (or ls) :

HttpRepl allows you to navigate through your API tree. In our current service, all services are under /api. Therefore, change directory to api then check the contents with:

cd api
dir
dir

Now, let’s checkout Students. Therefore, change to the Students location and inspect what is available there with:

cd Students
dir

dir

NOTE: HttpRepl is case-sensitive. This means that “cd students” will generate an error.

This shows us that we can do GET, POST, PUT and DELETE. Entering the id is necessary for DELETE, PUT and retrieving one Student (GET by id).

Let us retrieve all Students data by entering GET:

GET

How about we try POST. Just enter POST and the editor we configured earlier on pops up with a JSON template:
POST

Enter some data then simply save & close your editor. I entered the following then saved & closed the editor. 
POST

This was the output I got:

POST
Enter GET to ensure that data was indeed inserted:
GET

Let’s do a GET by id by entering the following:

GET A00555555

This is the result:
GET by id

How about we do an update. Enter:

PUT A00555555

This opens the editor again. However, the existing data is not displayed. This is what I got:
PUT

I entered data as follows, using the same ID as before, and changing only school to nursing. I then saved the document before closing it:


PUT

This is the output I received:

PUT result

I then did a GET to see all students:

GET all result

Finally, let us delete our student by entering:

DELETE A00555555

You should see the following response:

DELETE by id

Now when we do a GET, there will be no student with ID = A00555555:
GET all

To exit out of HttpRepl, simply type exit.

I hope you found HttpRepl a useful utility.


Monday, February 26, 2018

Adding Swagger to an ASP.NET Core 2.0 app

Swagger is an API specification framework. It reminds me of WSDL in the SOAP days. In this article I will guide you in add Swagger documentation to an ASP.NET Core Web API app.

There are three components that we need to buckle-up in our Web API application. These are, not surprisingly, called Swashbuckle:
  1. Swashbuckle.AspNetCore.SwaggerGen : builds SwaggerDocument objects from your router, controllers and models.
  2. Swashbuckle.SwaggerUI : embedded version of Swagger UI tool which uses the above documents for a rich customizable experience for describing the Web API functionality and includes built in test harness capabilities for the public methods.
  3. Swashbuckle.AspNetCore.Swagger: Swagger object model and middleware to expose SwaggerDocument objects as JSON endpoints.
For starters, add package Swashbuckle to your project. This can be done in two ways:

1) If you are using Visual Studio 2017, execute the following command from the Package Manager Console:

install-package --version 2.1.0 Swashbuckle.AspNetCore

You can find the Package Manager Console in Visual Studio 2017 at Tools >>  NuGet Package Manager >> Package Manager Console.

2) From a terminal window in the main project folder, enter the following command:

dotnet add package Swashbuckle.AspNetCore -Version 2.1.0

Add the following using statement at the top of your Startup.cs file:

using Swashbuckle.AspNetCore.Swagger;

Next, add the Swagger generator to bottom of the ConfigureServices() method in Startup.cs:

// Register the Swagger generator, defining one or more Swagger 
// documents
services.AddSwaggerGen(c => {
  c.SwaggerDoc("v1", new Info { Title = "My API", Version = "v1" });
});

Add the following two lines of code to the Cofigure() method in Startup.cs just before app.UseMvc():

// Enable middleware to serve generated Swagger as JSON endpoint
app.UseSwagger();

// Enable middleware to serve swagger-ui (HTML, JS, CSS, etc.)
// specifying the Swagger JSON endpoint.
app.UseSwaggerUI(c =>
{
  c.SwaggerEndpoint("/swagger/v1/swagger.json", "My API V1");
});

NOTE: You can exclude the service generated by an API controller by annotating the controller class with: [ApiExplorerSettings(IgnoreApi = true)]

Run your application with CTRL + F5.

Point your browser to http://localhost:{port number}/swagger/v1/swagger.json and you will see a JSON document that describes the endpoints of your service.

image

You can also see the Swagger UI at URL http://localhost{port number}/swagger.

image

In the above example the API service is Studentapi. Your service will be under API V1. Click on it and you will see something similar to the following:

image

To test out GET, click on the first blue GET button and the section will expand describing to you the structure of your object:

image

Click on the “Try it out!” button to view the data coming back from the service for all items in the collection:

image

Click on the first blue GET button again to collapse the section. Now, click on the second blue GET button to test retrieval of an item by id.

image

Enter a value for ‘id’ then click the “Try it out!” button. It should get for you the item for that id.

image

In a similar manner, go ahead and test out all the other POST, DELETE, and PUT buttons.

The official Swagger website at http://swagger.io/. You can generate a Swagger client for most programming languages at http://editor.swagger.io/.

Saturday, January 28, 2017

Adding Swagger to an ASP.NET Web API 2 app that uses .NET Framework 4.5.2

Swagger is an API specification framework. It reminds me of WSDL in the SOAP days. In this article I will guide you in add Swagger documentation to an ASP.NET Core Web API app.

I will show you how to add Swagger documentation to an ASP.NET Web API 2 application that is running under .NET Framework 4.5.2.

Create a simple Web API application using Visual Studio 2015.

1. File >> New >> Project

2. Templates >> Visual C# >> Web

3. Choose “ASP.NET Web Application (.NET Framework) Visual C#”

4. Give your application a name like “WebApi2Swagger” then click on OK.


image

5. On the next dialog, choose Web API, uncheck “Host in the cloud”, then click OK.

image

6. Once the application template is created, open the Controllers/ValuesControllers.cs file and delete the [Authorize] annotation over the class declaration line.

7. Run the application by hitting CTRL + F5 on your keyboard. Add /api/values to the address line to see the sample API that is created by this template. It should look like this:

image

8. Run the following command in the “Package Manager Console” in Visual Studio:

Install-Package Swashbuckle

9. The next step is to enable XML documentation in your web application. Right-click on the web app project node in Solution Explorer and choose Properties.

image

10. In the Build tab, enable “XML documentation file” in the Output section.

image

Copy the XML filename and paste it in a text editor so that you can use it later. In the above case, the filename is bin\WebAPI2Swagger.XML.

11. Open App_Start/SwaggerConfig.cs. Make the following change:

Find “//c.IncludeXmlComments(GetXmlCommentsPath());” around line 100. Right after this line, add the following code:

c.IncludeXmlComments(string.Format(@"{0}\bin\WebAPI2Swagger.XML",
        System.AppDomain.CurrentDomain.BaseDirectory));

Note that the filename is what you had previously pasted in a text editor.

12. Build and run your application. Add /swagger to the URL address. You should see a page that looks like this:

image

Testing it out

Click on Values.

image

Click on the “GET” button.

Click on the “Try it out!” button. You should see the Curl command, Response Body, Response Code, and Response Headers.


Conclusion


Although this tutorial is very simplistic, the steps  we went through equally applies to more complicated API objects.