Saturday, June 10, 2023

Using ChatGPT Chat Completion API with ASP.NET Blazor Web Assembly

In this tutorial you will create a very simple Blazor Web Assembly application that interacts with ChatGPT.

Prerequisites

You will need the following:

  • .NET 7.0 or higher
  • Visual Studio Code
  • A ChatGPT account with https://openai.com

Get an ChatGPT API key from openai.com

Visit https://openai.com and create an account. The login page looks like this:


Click on your profile and select “View API keys”. On the next page, click on the “+ Create new secret key” button.


Give your key a name, then click on “Generate secret key”.


An API key is generated. You must save this key somewhere because this is your only chance to view it as it cannot be viewed again. Click on the copy button and paste it is a safe place.

Creating ASP.NET Blazor Web Assembly App

We will create a very simple Chat Completion client-side blazor app that discusses topics relating to the National Basketball Association (NBA).

In a working folder, execute the following terminal window commands to create an ASP.NET Blazor Web Assembly application named ChatGPTBlazorWasm:

dotnet new blazorwasm -n ChatGPTBlazorWasm
cd ChatGPTBlazorWasm

Open the blazor application in VS Code with:

code .

Replace contents of Pages/Index.razor with the following code:

@page "/"
@inject HttpClient httpClient

<h1>ChatGPT with Blazor WebAssembly (NBA)</h1>
<textarea @bind="dialog" cols="100" rows="15"></textarea>
<br />
<button @onclick="GetOpenAIChatCompletions" class="btn btn-success">Call Completion</button>

@code {
    private string? dialog;

    protected override void OnInitialized()
    {
        const string? apiKey = "fake-chatgpt-api-key";
        httpClient.DefaultRequestHeaders.Add("Authorization", $"Bearer {apiKey}");

        Message[] messages = new Message[] {
            new Message { Role = "system", Content = "You are a helpful assistant." },
            new Message { Role = "user", Content = "Who won the NBA in 2020?" },
            new Message { Role = "assistant", Content = "The Los Angeles Lakers won the NBA in 2020." },
            new Message { Role = "user", Content = "Where was it played?" },
        };

        dialog = "";
        foreach (var message in messages)
        {
            dialog += $"role: {message.Role}\ncontent: {message.Content}\n\n";
        }
    }

    private async Task GetOpenAIChatCompletions()
    {
        string? text = this.dialog;

        // remove any * in text
        text = text!.Replace("*", "");

        var lines = text.Split('\n');

        // delete empty items in lines array
        for (var i = 0; i < lines.Length; i++)
        {
            if (lines[i] == "")
            {
                lines = lines.Take(i).Concat(lines.Skip(i + 1)).ToArray();
                i--;
            }
        }

        var result = new List<Message>();

        for (var i = 0; i < lines.Length; i += 2)
        {
            if (lines[i] == "")
            {
                continue;
            }
            var r = lines[i].Split(": ")[1];
            var c = lines[i + 1].Split(": ")[1];
            result.Add(new Message { Role = r, Content = c });
        }

        var response = await httpClient.PostAsJsonAsync("https://api.openai.com/v1/chat/completions", new
        {
            max_tokens = 50,
            n = 1,
            stop = "\n",
            model = "gpt-3.5-turbo",
            temperature = 0.5,
            messages = result
        });

        var data = await response.Content.ReadFromJsonAsync<OpenAIResponse>();

        Message? message = data!.choices![0].message;
        var content = message!.Content;
        var role = message!.Role;

        var reply = $"role: {role}\ncontent: {content}";

        this.dialog += "*" + reply + "*" + Environment.NewLine + Environment.NewLine;
    }

    private class Message
    {
        public string? Role { get; set; }
        public string? Content { get; set; }
    }

    private class OpenAIResponse
    {
        public Choice[]? choices { get; set; }
    }

    private class Choice
    {
        public Message? message { get; set; }
    }
}

Explaining the above code:

  • The UI consists of a textarea and button.
  • OnInitialized() method
    • remember to set the value of apiKey with the key that you obtained from https://openai.com
    • an HTTP header with Authorization key is created with the appropriate Bearer value
    • array named messages is declared with the initial dialog text
    • the messages array is used to set the contents of the textarea
  • GetOpenAIChatCompletions() method
    • this method is called when the button is clicked
    • a POST request is made to the endpoint at https://api.openai.com/v1/chat/completions
    • response from the server is appended to the textarea. In order to distinguish the response from the rest of the dialog, it is surrounded by *
After replacing the value of apiKey in the onInitialized() method, run the application by executing the following command i a terminal window:

dotnet watch

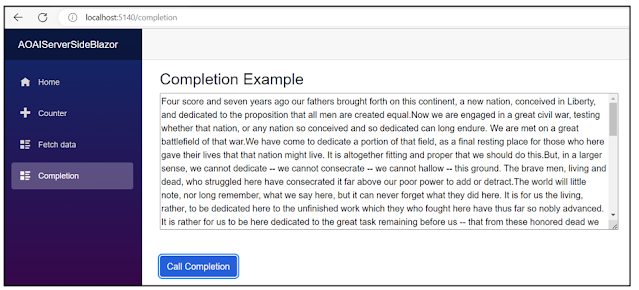
You should see the following page:


Note the text grounded in the NBA context about where the 2020 finals were played. Click on the green "Call Completion" button. The response indicates the the finals were held during the COVID pandemic in Orlando.
 

Let’s ask about what happened a year earlier in 2019 by appending this additional text:

role: user
content: How about in 2019? Which team won and where was it played?

Click on the “Call Completion” button.  Our page now looks like this:


We are told that the 2019 NBA champions were the Toronto Raptors.

You can see from this very simple tutorial that it is quite easy to incorporate ChaGPT into your Blazor Web Assembly applications.


Friday, June 9, 2023

Using ChatGPT Chat Completion API with pure JavaScript

 In this tutorial you will create a very simple JavaScript web page that interacts with ChatGPT.

Get an API key from openai.com

Visit https://openai.com and create an account. The login page looks like this:


Click on your profile and select “View API keys”. On the next page, click on the “+ Create new secret key” button.


Give your key a name, then click on “Generate secret key”.


An API key is generated. You must save this key somewhere because this is your only chance to view it as it cannot be viewed again. Click on the copy button and paste it is a safe place.


Creating a simple JavaScript app

We will create a very simple Chat Completion application that we can ask questions to and it will use the smarts of ChatGPT to provide us with answers. We will ground the chat so that it discusses topics related to the National Basketball Association (NBA).

Create a folder named ChatCompletionJS. Inside of that folder, create an HTML file named chatgpt-chat-completion_nba.html. Using a text editor, add the following HTML code to chatgpt-chat-completion_nba.html:

<!DOCTYPE html>
<html lang="en">
  <head>
     <title>ChatGPT with JavaScript (NBA)</title>
  </head>
  <body>
    <div>
      <h1>ChatGPT with JavaScript (NBA)</h1>
      <textarea id="dialog" cols="100" rows="30"></textarea>
      <br />
      <button id="btn">Call Completion</button>
    </div>
    <script>
    </script>
  </body>
</html>

The page will look like this when viewed in your favorite browser:


We have a simple textarea and a button

Let’s add some JavaScript code that will ground our discussion on the topic of the NBA. Add this code inside the <script> . . . </script> tags:

const messages = [
  { role: "system", content: "You are a helpful assistant." },
  { role: "user", content: "Who won the NBA in 2020?" },
  {
    role: "assistant",
    content: "The Los Angeles Lakers won the NBA in 2020.",
  },
  { role: "user", content: "Where was it played?" },
];

let defaultMessage = "";
messages.forEach((item) => {
  defaultMessage += `role: ${item.role}\ncontent: ${item.content}\n\n`;
});

document.getElementById("dialog").value = defaultMessage;

The above code basically takes the contents of the messages array and neatly places it inside the HTML textarea. Your page now looks like this:


As you can see, we are asking ChatGPT to let us know where the NBA finals in 2020 were held. Let’s add some code to work with ChatGPT that sends data to it and obtains a reply. Add the following JavaScript getOpenAIChatCompletions() function right under the opening <script> tag:

async function getOpenAIChatCompletions() {
  const apiKey = "this-is-a-fake-chatgpt-api-key";

  let text = document.getElementById("dialog").value;

  // remove any * in text
  text = text.replace(/\*/g, '');

  const lines = text.split('\n');

  // delete empty items in lines array
  for (let i = 0; i < lines.length; i++) {
    if (lines[i] === '') {
      lines.splice(i, 1);
    }
  }

  const result = [];

  for (let i = 0; i < lines.length; i += 2) {
    if (lines[i] === '') {
      continue;
    }
    const role = lines[i].split(': ')[1];
    const content = lines[i+1].split(': ')[1];
    result.push({ role, content });
  }

  console.log(result);

  fetch("https://api.openai.com/v1/chat/completions", {
    method: "POST",
    headers: {
      "Content-Type": "application/json",
      Authorization: `Bearer ${apiKey}`,
    },
    body: JSON.stringify({
      max_tokens: 50,
      n: 1,
      stop: "\n",
      model: "gpt-3.5-turbo",
      temperature: 0.5,
      messages: result,
    }),
  })
    .then((response) => response.json())
    .then((data) => {
      const message = data.choices[0].message;
      const content = message.content;
      const role = message.role;

      const dialog = `role: ${role}\ncontent: ${content}`;

      document.getElementById("dialog").value += "*" + dialog + "*";
    });
}

Remember to replace the value of apiKey with the API key that you copied from https://openai.com.

The above code passes on the content of our textarea to ChatGPT, then obtains a reply. Data is sent as a JSON array that looks like this:


Finally, add the following event handler code for the button that calls the getOpenAIChatCompletions() function:

const button = document.querySelector("#btn");
button.addEventListener("click", () => {
  getOpenAIChatCompletions();
});

Our sample application is complete. View the latest version of your page and click on the “Call Completion button. You will receive a response that looks like this:


The response from ChatGPT is surrounded by *. This tells us that the NBA finals were played in Orlando. Let’s ask about what happened a year earlier in 2019 by posing this additional text:

role: user
content: How about in 2019? Which team won and where was it played?

Our page now looks like this:


Click on the “Call Completion” button. 


We are told that the 2019 NBA champions were the Toronto Raptors.

You can see from this very simple tutorial that it is quite easy to incorporate ChaGPT in your JavaScript applications.

The complete code is given below:

<!DOCTYPE html>
<html lang="en">
  <head>
     <title>ChatGPT with JavaScript (NBA)</title>
  </head>
  <body>
    <div>
      <h1>ChatGPT with JavaScript (NBA)</h1>
      <textarea id="dialog" cols="100" rows="30"></textarea>
      <br />
      <button id="btn">Call Completion</button>
    </div>
    <script>
      async function getOpenAIChatCompletions() {
        const apiKey = "this-is-a-fake-chatgpt-api-key";

        let text = document.getElementById("dialog").value;

        // remove any * in text
        text = text.replace(/\*/g, '');

        const lines = text.split('\n');

        // delete empty items in lines array
        for (let i = 0; i < lines.length; i++) {
          if (lines[i] === '') {
            lines.splice(i, 1);
          }
        }

        const result = [];

        for (let i = 0; i < lines.length; i += 2) {
          if (lines[i] === '') {
            continue;
          }
          const role = lines[i].split(': ')[1];
          const content = lines[i+1].split(': ')[1];
          result.push({ role, content });
        }

        console.log(result);

        fetch("https://api.openai.com/v1/chat/completions", {
          method: "POST",
          headers: {
            "Content-Type": "application/json",
            Authorization: `Bearer ${apiKey}`,
          },
          body: JSON.stringify({
            max_tokens: 50,
            n: 1,
            stop: "\n",
            model: "gpt-3.5-turbo",
            temperature: 0.5,
            messages: result,
          }),
        })
          .then((response) => response.json())
          .then((data) => {
            const message = data.choices[0].message;
            const content = message.content;
            const role = message.role;

            const dialog = `role: ${role}\ncontent: ${content}`;

            document.getElementById("dialog").value += "*" + dialog + "*";
          });
      }

      const messages = [
        { role: "system", content: "You are a helpful assistant." },
        { role: "user", content: "Who won the NBA in 2020?" },
        {
          role: "assistant",
          content: "The Los Angeles Lakers won the NBA in 2020.",
        },
        { role: "user", content: "Where was it played?" },
      ];

      let defaultMessage = "";
      messages.forEach((item) => {
        defaultMessage += `role: ${item.role}\ncontent: ${item.content}\n\n`;
      });

      //console.log(defaultMessage);
      document.getElementById("dialog").value = defaultMessage;

      const button = document.querySelector("#btn");
      button.addEventListener("click", () => {
        getOpenAIChatCompletions();
      });

    </script>
  </body>
</html>

If you click on the Examples tab on the ChatGPT page you can find many examples that you can look into to explore other things that you can do.


The sky is the limit with regards to what is possible.


Azure OpenAI Completion with ASP.NET 7.0 Razor Pages

In this tutorial you will learn how to consume the Azure OpenAI Completion service from an ASP.NET 7.0 Razor Pages web application.

Source code: https://github.com/medhatelmasry/AOAIRazor

 Prerequisites

  1. To use Azure OpenAI, you need to have an Azure subscription. This can be obtained by visiting https://azure.microsoft.com/free/cognitive-services
  2. Currently, access to the Azure OpenAI service is granted by application. You can apply at https://aka.ms/oai/access.

Getting started with Azure OpenAI service

To follow this tutorial, you will need to create an Azure OpenAI service under your Azure subscription. Follow these steps:

Navigate to the Azure portal at https://portal.azure.com/


Click on “Create a resource”.


Enter “openai” in the filter then select “openai”.


Click on the “Azure OpenAI” card.


Click on the Create button.


Choose your subscription then create a new resource group. In my case (as shown above), I created a new resource group named “OpenAI-RG”.


Continue with the selection of a region, provide a instance name (mze-openai in the example above) and select the “Standard S0” pricing tier. Click on the Next button.


Accept the default (All networks, including the internet, can access this resource.) on the Network tab then click on the Next button.


On the Tags tab, click on Next without making any changes.


Click the Create button on the “Review + submit” tab. Deployment takes about one minute. 


On the Overview blade, click on “Keys and Endpoint” in the left side navigation.


Copy KEY 1 and Endpoint then save the values in a text editor like Notepad.

We will need to create a model deployment that we can use for text completion. To do this, return to the Overview tab.


Open “Go to Azure OpenAI Studio” in a new browser tab.


Click on “Create new deployment”.


Click on “+ Create new deployment”.


For the model, select “gpt-35-turbo” and give the deployment a name which you will need to remember as this will be configured in the app that we will soon develop. I called the deployment name gpt35-turbo-deployment. Click on the Create button.

As a summary, we will need the following parameters in our Razor Pages application:

SettingValue
KEY 1this-is-a-fake-api-key
Endpointhttps://mze-openai.openai.azure.com/
Model deploymentgpt35-turbo-deployment
ApiVersion2022-12-01

Next, we will create our ASP.NET Razor Pages web application.

ASP.NET Razor Pages application

In a working directory on your computer, open a terminal window. Enter the following command to create an ASP.NET Razor Pages web application:

dotnet new razor -f net7.0 -n AOAIRazor
cd AOAIRazor
dotnet add package AzureOpenAIClient -v 1.0

Open your application in VS Code by entering the following command in a terminal window:

code .

Configuration settings

Open the appsettings.json configurations file in VS Code and add the parameters obtained from Azure. In my case, these are the parameters I added:

"OpenAiClientConfiguration": {
  "BaseUri": "https://mze-openai.openai.azure.com/",
  "ApiKey": "this-is-a-fake-api-key",
  "DeploymentName": "gpt35-turbo-deployment",
  "ApiVersion": "2022-12-01"
},

Service Class

In a Services folder, create a C# file named AzureOpenAIService.cs with the following content:

public class AzureOpenAIService {
    private readonly OpenAIClient _openAiClient;

    public AzureOpenAIService(OpenAIClient client) {
        _openAiClient = client;
    }

    public async Task<CompletionResponse?> GetTextCompletionResponse(string input, int maxTokens) {
        var completionRequest = new CompletionRequest() {
            Prompt = input,
            MaxTokens = maxTokens
        };

        return await _openAiClient.GetTextCompletionResponseAsync(completionRequest);
    }
}

The code defines a class AzureOpenAIService which acts as a service that wraps the functionality of the OpenAIClient class.

The AzureOpenAIService class takes in an instance of OpenAIClient using dependency injection and stores it in a private variable _openAiClient.

The class has a single public method GetTextCompletionResponse that takes in two arguments, input and maxTokens, and returns a CompletionResponse as an asynchronous task.

The GetTextCompletionResponse method calls the GetTextCompletionResponseAsync method on the _openAiClient, passing in the completionRequest object, and returns the result as a CompletionResponse.

Note that the CompletionRequest class allows for other parameters to be passed such as TemperatureFrequencyPenalty and PresencePenalty.

Add this line of code to Program.cs right above var app = builder.Build();:

// OpenAIClient
builder.Services.AddOpenAIClient(x => builder.Configuration.Bind(nameof(OpenAIClientConfiguration), x));
builder.Services.AddScoped<AzureOpenAIService>();

Razor Page

In the Pages folder, replace Index.cshtml with the following content:

@page
@model IndexModel
@{
    ViewData["Title"] = "Azure OpenAI Completion Example";
}

<h2>@ViewData["Title"]</h2>
<div class="row">
    <div class="col-md-8">
        <form method="post">
            <div asp-validation-summary="ModelOnly" class="text-danger"></div>
            
            <div class="form-group">
                 <textarea asp-for="TextValue" class="form-control" rows="15"></textarea>
             </div>

            <div class="form-group">
                <input type="submit" value="Call Completion" class="btn btn-primary" />
            </div>
        </form>
    </div>
</div>

@section Scripts {
    @{await Html.RenderPartialAsync("_ValidationScriptsPartial");}
}

The above code displays a textarea and a button. Data in the textarea is bound to a variable named TextValue that is bound to a property in the code-behind file named Index.cshtml.cs.

Next, replace the content of Index.cshtml.cs with the following code:

using Microsoft.AspNetCore.Mvc;
using Microsoft.AspNetCore.Mvc.RazorPages;
using AOAIRazor.Services;
using AzureOpenAIClient.Http;

namespace AOAIRazor.Pages;

public class IndexModel : PageModel {
    CompletionResponse? completionResponse;

    [BindProperty]
    public string TextValue { get; set; } = default!;
    
    private readonly ILogger<IndexModel> _logger;
    private readonly AzureOpenAIService  _azureOpenAIService ;

    public IndexModel(ILogger<IndexModel> logger, 
    AzureOpenAIService azureOpenAIService) {
        _logger = logger;
        _azureOpenAIService = azureOpenAIService;
    }

    public IActionResult OnGetAsync() {
        // Retrieve the value of TextValue from TempData
        if (TempData.ContainsKey("TextValue")) {
            TextValue = (string)TempData["TextValue"]!;
        } else {
            TextValue = "Four score and seven years ago";
        }
        return Page();
    }

    public async Task<IActionResult> OnPostAsync() {
        
        if (TextValue != null) {
            completionResponse = await _azureOpenAIService.GetTextCompletionResponse(TextValue, 500);

            if (completionResponse?.Choices.Count > 0) {
                TextValue = TextValue + completionResponse.Choices[0].Text;
                
            }
        }

        // Store the value of TextValue in TempData
        TempData["TextValue"] = TextValue;

        // Do other processing as needed
        return RedirectToPage();
    }
}

The OnGetAsync sets a default value of "Four score and seven years ago" to TextValue.

The OnPostAsync method checks if the TextValue is not null. If it's not, it calls the GetTextCompletionResponse method on the _azureOpenAIService instance, passing in TextValue and 500 as the maxTokens argument. The response from the method is stored in the completionResponse variable.

After that, it checks if the Choices property of Completion has a count greater than 0. If it does, it appends the Choices[0] text to TextValue.

Run the application by executing the following terminal command:

dotnet watch

The application will start in a browser. 


In the above scenario, you start with a default statement “Four score and seven years ago”. Click on “Call Completion” and after about 20 seconds you will experience CharGPT completing the statement.


This tutorial should help you explore all kinds of ways to incorporate the power of ChatGPT into your ASP.NET web applications through the Azure OpenAPI service.

Thursday, June 8, 2023

Azure OpenAI Completion & Server-side Blazor

In this tutorial you will learn how to use the Azure OpenAI Completion service from a server-side Blazor application using .NET 7.0.

Source code: https://github.com/medhatelmasry/AOAIServerSideBlazor

 Prerequisites

  1. To use Azure OpenAI, you need to have an Azure subscription. This can be obtained by visiting https://azure.microsoft.com/free/cognitive-services
  2. Currently, access to the Azure OpenAI service is granted by application. You can apply at https://aka.ms/oai/access.

Getting started with Azure OpenAI service

To follow this tutorial, you will need to create an Azure OpenAI service under your Azure subscription. Follow these steps:

Navigate to the Azure portal at https://portal.azure.com/


Click on “Create a resource”.


Enter “openai” in the filter then select “openai”.


Click on the “Azure OpenAI” card.


Click on the Create button.


Choose your subscription then create a new resource group. In my case (as shown above), I created a new resource group named “OpenAI-RG”.


Continue with the selection of a region, provide a instance name (mze-openai in the example above) and select the “Standard S0” pricing tier. Click on the Next button.


Accept the default (All networks, including the internet, can access this resource.) on the Network tab then click on the Next button.


On the Tags tab, click on Next without making any changes.


Click the Create button on the “Review + submit” tab. Deployment takes about one minute. 


On the Overview blade, click on “Keys and Endpoint” in the left side navigation.


Copy KEY 1 and Endpoint then save the values in a text editor like Notepad.

We will need to create a model deployment that we can use for text completion. To do this, return to the Overview tab.


Open “Go to Azure OpenAI Studio” in a new browser tab.


Click on “Create new deployment”.


Click on “+ Create new deployment”.


For the model, select “gpt-35-turbo” and give the deployment a name which you will need to remember as this will be configured in the app that we will soon develop. I called the deployment name gpt35-turbo-deployment. Click on the Create button.

As a summary, we will need the following parameters in our Blazor application:
SettingValue
KEY 1 this-is-a-fake-api-key
Endpoint https://mze-openai.openai.azure.com/
Model deployment gpt35-turbo-deployment
ApiVersion 2022-12-01

Next, we will create our server-side Blazor application.

Server-side Blazor application

In a working directory on your computer, open a terminal window. Enter the following command to create a Server-side Blazor application:

dotnet new blazorserver -f net7.0 -n AOAIServerSideBlazor
cd AOAIServerSideBlazor
dotnet add package AzureOpenAIClient -v 1.0

Open your application in VS Code by entering the following command in a terminal window:

code .

Configuration settings

Open the appsettings.json configurations file in VS Code and add the parameters obtained from Azure. In my case, these are the parameters I added:

"OpenAiClientConfiguration": {
  "BaseUri": "https://mze-openai.openai.azure.com/",
  "ApiKey": "this-is-a-fake-api-key",
  "DeploymentName": "gpt35-turbo-deployment",
  "ApiVersion": "2022-12-01"
},

Service Class

In the Data folder, create a C# file named AzureOpenAIService.cs with the following content:

public class AzureOpenAIService {
    private readonly OpenAIClient _openAiClient;

    public AzureOpenAIService(OpenAIClient client)
    {
        _openAiClient = client;
    }

    public async Task<CompletionResponse?> GetTextCompletionResponse(string input, int maxTokens) {
        var completionRequest = new CompletionRequest() {
            Prompt = input,
            MaxTokens = maxTokens
        };
        
        return await _openAiClient.GetTextCompletionResponseAsync(completionRequest);
    }
}

The code defines a class AzureOpenAIService which acts as a service that wraps the functionality of the OpenAIClient class.

The AzureOpenAIService class takes in an instance of OpenAIClient using dependency injection and stores it in a private variable _openAiClient.

The class has a single public method GetTextCompletionResponse that takes in two arguments, input and maxTokens, and returns a CompletionResponse as an asynchronous task.

The GetTextCompletionResponse method calls the GetTextCompletionResponseAsync method on the _openAiClient, passing in the completionRequest object, and returns the result as a CompletionResponse.

Note that the CompletionRequest class allows for other parameters to be passed such as Temperature, FrequencyPenalty and PresencePenalty.

Add this line of code to Program.cs right above var app = builder.Build();:

// OpenAIClient
builder.Services.AddOpenAIClient(x => builder.Configuration.Bind(nameof(OpenAIClientConfiguration), x));
builder.Services.AddScoped<AzureOpenAIService>();

Razor Page

In the Pages folder, create razor pages named CompletionPage.razor with the following content:

@page "/completion"

@using AOAIServerSideBlazor.Data
@using AzureOpenAIClient.Http
@inject AzureOpenAIService azureOpenAIService 

<PageTitle>Completion Example</PageTitle>

<h3>Completion Example</h3>
<p>
<InputTextArea @bind-Value=@TextValue Cols="100" Rows="10" />
</p>
<br />
<button class="btn btn-primary" @onclick="CallCompletion">Call Completion</button>

@code {
     string TextValue = "Four score and seven years ago";
     CompletionResponse? completionResponse;
    
    async Task CallCompletion()
    {
        if (TextValue != null)
        {
            completionResponse = await azureOpenAIService.GetTextCompletionResponse(TextValue, 500);

            if (completionResponse?.Choices.Count > 0)
            {
                TextValue = TextValue + completionResponse.Choices[0].Text;
                StateHasChanged();
            }
        }

    }
}

The above code starts by declaring two variables: completionResponse of type CompletionResponse and TextValue of type string with an initial value of "Four score and seven years ago".

The code block also contains an asynchronous method called CallCompletion that is executed when the "Call Completion" button is clicked.

The CallCompletion method checks if the TextValue is not null. If it's not, it calls the GetTextCompletionResponse method on the azureOpenAIService instance, passing in TextValue and 500 as the maxTokens argument. The response from the method is stored in the completionResponse variable.

After that, it checks if the Choices property of Completion has a count greater than 0. If it does, it appends the Choices[0] text to TextValue and calls the StateHasChanged method, which signals Blazor to update the UI.

Add the following code to <nav> block in NavMenu.razor so that we have a menu item in the left navigation that we can access our /completion page:

<div class="nav-item px-3">
  <NavLink class="nav-link" href="completion">
    <span class="oi oi-list-rich" aria-hidden="true"></span> Completion
  </NavLink>
</div>

Run the application by executing the following terminal command:

dotnet watch

The application will start in a browser. Click on the Completion link on the left-side navigation. 


In the above scenario, you start with a default statement “Four score and seven years ago”. Click on “Call Completion” and after about 20 seconds, you will experience CharGPT completing the statement.


This tutorial should help you explore all kinds of ways to incorporate the power of ChatGPT into your applications through the Azure OpenAPI service.

References:

https://blazorhelpwebsite.com/ViewBlogPost/2065