In this tutorial you will learn how to consume the Azure OpenAI Completion service from an ASP.NET 7.0 Razor Pages web application.
Source code: https://github.com/medhatelmasry/AOAIRazor
Prerequisites
- To use Azure OpenAI, you need to have an Azure subscription. This can be obtained by visiting https://azure.microsoft.com/free/cognitive-services.
- Currently, access to the Azure OpenAI service is granted by application. You can apply at https://aka.ms/oai/access.
Getting started with Azure OpenAI service
To follow this tutorial, you will need to create an Azure OpenAI service under your Azure subscription. Follow these steps:
Navigate to the Azure portal at https://portal.azure.com/.

Click on “Create a resource”.

Enter “openai” in the filter then select “openai”.
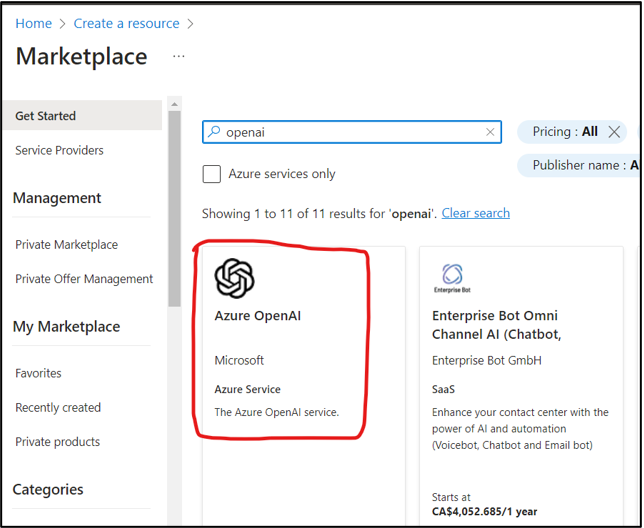
Click on the “Azure OpenAI” card.

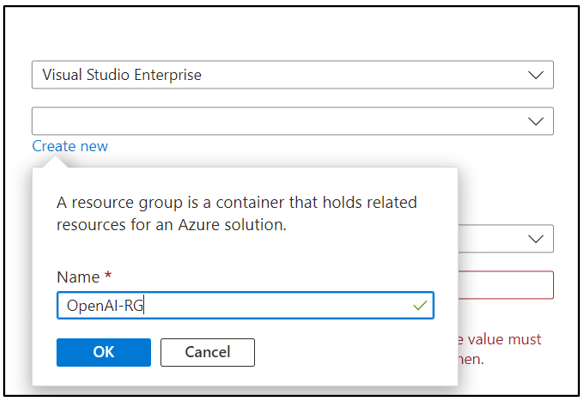
Choose your subscription then create a new resource group. In my case (as shown above), I created a new resource group named “OpenAI-RG”.
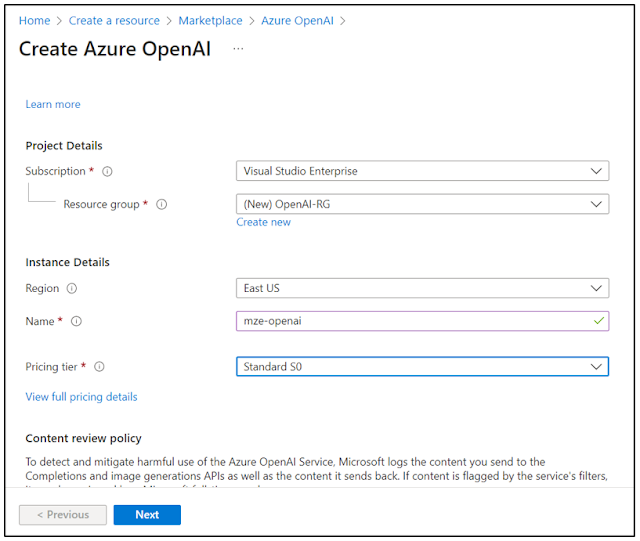
Continue with the selection of a region, provide a instance name (mze-openai in the example above) and select the “Standard S0” pricing tier. Click on the Next button.

Accept the default (All networks, including the internet, can access this resource.) on the Network tab then click on the Next button.


Copy KEY 1 and Endpoint then save the values in a text editor like Notepad.
We will need to create a model deployment that we can use for text completion. To do this, return to the Overview tab.


Click on “Create new deployment”.


For the model, select “gpt-35-turbo” and give the deployment a name which you will need to remember as this will be configured in the app that we will soon develop. I called the deployment name gpt35-turbo-deployment. Click on the Create button.
As a summary, we will need the following parameters in our Razor Pages application:
| Setting | Value |
|---|---|
| KEY 1 | this-is-a-fake-api-key |
| Endpoint | https://mze-openai.openai.azure.com/ |
| Model deployment | gpt35-turbo-deployment |
| ApiVersion | 2022-12-01 |
Next, we will create our ASP.NET Razor Pages web application.
ASP.NET Razor Pages application
In a working directory on your computer, open a terminal window. Enter the following command to create an ASP.NET Razor Pages web application:
dotnet new razor -f net7.0 -n AOAIRazorcd AOAIRazordotnet add package AzureOpenAIClient -v 1.0
Open your application in VS Code by entering the following command in a terminal window:
code .
Configuration settings
Open the appsettings.json configurations file in VS Code and add the parameters obtained from Azure. In my case, these are the parameters I added:
"OpenAiClientConfiguration": {"BaseUri": "https://mze-openai.openai.azure.com/","ApiKey": "this-is-a-fake-api-key","DeploymentName": "gpt35-turbo-deployment","ApiVersion": "2022-12-01"},
Service Class
In a Services folder, create a C# file named AzureOpenAIService.cs with the following content:
public class AzureOpenAIService {
private readonly OpenAIClient _openAiClient;
public AzureOpenAIService(OpenAIClient client) {
_openAiClient = client;
}
public async Task<CompletionResponse?> GetTextCompletionResponse(string input, int maxTokens) {
var completionRequest = new CompletionRequest() {
Prompt = input,
MaxTokens = maxTokens
};
return await _openAiClient.GetTextCompletionResponseAsync(completionRequest);
}
}
The code defines a class AzureOpenAIService which acts as a service that wraps the functionality of the OpenAIClient class.
The AzureOpenAIService class takes in an instance of OpenAIClient using dependency injection and stores it in a private variable _openAiClient.
The class has a single public method GetTextCompletionResponse that takes in two arguments, input and maxTokens, and returns a CompletionResponse as an asynchronous task.
The GetTextCompletionResponse method calls the GetTextCompletionResponseAsync method on the _openAiClient, passing in the completionRequest object, and returns the result as a CompletionResponse.
Note that the CompletionRequest class allows for other parameters to be passed such as Temperature, FrequencyPenalty and PresencePenalty.
Add this line of code to Program.cs right above var app = builder.Build();:
// OpenAIClient
builder.Services.AddOpenAIClient(x => builder.Configuration.Bind(nameof(OpenAIClientConfiguration), x));
builder.Services.AddScoped<AzureOpenAIService>();
Razor Page
In the Pages folder, replace Index.cshtml with the following content:
@page
@model IndexModel
@{
ViewData["Title"] = "Azure OpenAI Completion Example";
}
<h2>@ViewData["Title"]</h2>
<div class="row">
<div class="col-md-8">
<form method="post">
<div asp-validation-summary="ModelOnly" class="text-danger"></div>
<div class="form-group">
<textarea asp-for="TextValue" class="form-control" rows="15"></textarea>
</div>
<div class="form-group">
<input type="submit" value="Call Completion" class="btn btn-primary" />
</div>
</form>
</div>
</div>
@section Scripts {
@{await Html.RenderPartialAsync("_ValidationScriptsPartial");}
}
The above code displays a textarea and a button. Data in the textarea is bound to a variable named TextValue that is bound to a property in the code-behind file named Index.cshtml.cs.
Next, replace the content of Index.cshtml.cs with the following code:
using Microsoft.AspNetCore.Mvc;
using Microsoft.AspNetCore.Mvc.RazorPages;
using AOAIRazor.Services;
using AzureOpenAIClient.Http;
namespace AOAIRazor.Pages;
public class IndexModel : PageModel {
CompletionResponse? completionResponse;
[BindProperty]
public string TextValue { get; set; } = default!;
private readonly ILogger<IndexModel> _logger;
private readonly AzureOpenAIService _azureOpenAIService ;
public IndexModel(ILogger<IndexModel> logger,
AzureOpenAIService azureOpenAIService) {
_logger = logger;
_azureOpenAIService = azureOpenAIService;
}
public IActionResult OnGetAsync() {
// Retrieve the value of TextValue from TempData
if (TempData.ContainsKey("TextValue")) {
TextValue = (string)TempData["TextValue"]!;
} else {
TextValue = "Four score and seven years ago";
}
return Page();
}
public async Task<IActionResult> OnPostAsync() {
if (TextValue != null) {
completionResponse = await _azureOpenAIService.GetTextCompletionResponse(TextValue, 500);
if (completionResponse?.Choices.Count > 0) {
TextValue = TextValue + completionResponse.Choices[0].Text;
}
}
// Store the value of TextValue in TempData
TempData["TextValue"] = TextValue;
// Do other processing as needed
return RedirectToPage();
}
}
The OnGetAsync sets a default value of "Four score and seven years ago" to TextValue.
The OnPostAsync method checks if the TextValue is not null. If it's not, it calls the GetTextCompletionResponse method on the _azureOpenAIService instance, passing in TextValue and 500 as the maxTokens argument. The response from the method is stored in the completionResponse variable.
After that, it checks if the Choices property of Completion has a count greater than 0. If it does, it appends the Choices[0] text to TextValue.
Run the application by executing the following terminal command:
dotnet watch
The application will start in a browser.

In the above scenario, you start with a default statement “Four score and seven years ago”. Click on “Call Completion” and after about 20 seconds you will experience CharGPT completing the statement.

This tutorial should help you explore all kinds of ways to incorporate the power of ChatGPT into your ASP.NET web applications through the Azure OpenAPI service.
No comments:
Post a Comment