Showing posts with label Development. Show all posts

Sunday, February 2, 2025

Using PHP with AI models hosted on GitHub

Overview

In this article I will show you how you can experiment with AI models hosted on GitHub in a simple PHP web app. GitHub AI Models are intended for learning, experimentation and proof-of-concept activities. The feature is subject to various limits (including requests per minute, requests per day, tokens per request, and concurrent requests) and is not designed for production use cases.

Prerequisites

To proceed, you will need the following:

  • PHP - You need to have PHP version 8.3 (or higher) installed on your computer. You can download the latest version from https://www.php.net/downloads.php.
  • Composer – If you do not have Composer yet, download and install it for your operating system from https://getcomposer.org/download/.

Getting Started

There are many AI models from a variety of vendors that you can choose from. The starting point is to visit https://github.com/marketplace/models. At the time of writing, these are a subset of the models available:


For this article, I will use the "DeepSeek-R1" beside the red arrow above. If you click on that model, you will be taken to the model's landing page:

Click on the green "Get API key" button.


The first thing we need to do is get a 'personal access token' by clicking on the “Get developer key” button.

Choose 'Generate new token', which happens to be in beta at the time of writing.


Give your token a name, set the expiration, and optionally describe the purpose of the token. Thereafter, click on the green 'Generate token' button at the bottom of the page.


Copy the newly generated token and place it is a safe place because you cannot view this token again once you leave the above page.

Let's do some PHP coding

In a working directory, create a sub-directory named PHP-GitHub-AI inside a terminal window with the following command:

mkdir PHP-GitHub-AI

Change into the newly created directory named PHP-GitHub-AI with:

cd PHP-GitHub-AI

In the PHP-GitHub-AI folder, create a file named index.php and add to it the following code:

<?php

// Set your Azure API key and endpoint
$apiKey = 'PUT-YOUR-PERSONAL-ACCESS-TOKEN-FROM-GITHUB-HERE';
$endpoint = 'https://models.inference.ai.azure.com';

// Define the API endpoint
$url = $endpoint . '/chat/completions';

// Set up the data for the API request
$data = [
    'messages' => [
        [
            'role' => 'system',
            'content' => 'you are an expert in astronomy'
        ],
        [
            'role' => 'user',
            'content' => 'which is the furthest planet to earth?'
        ]
    ],
    'model' => 'DeepSeek-R1',    // gpt-4o   DeepSeek-R1
    'temperature' => 1,
    'max_tokens' => 4096,
    'top_p' => 1
];
// Initialize cURL
$ch = curl_init($url);

// Set cURL options
curl_setopt($ch, CURLOPT_RETURNTRANSFER, true);
curl_setopt($ch, CURLOPT_HTTPHEADER, [
    'Content-Type: application/json',
    'Authorization: ' . $apiKey,
]);

curl_setopt($ch, CURLOPT_POST, true);
curl_setopt($ch, CURLOPT_POSTFIELDS, json_encode($data));

// Execute the API request
$response = curl_exec($ch);

// Check for errors
if ($response === false) {
    echo 'Error: ' . curl_error($ch);
} else {

    // Decode the response
    $result = json_decode($response, true);

    // Print the entire response for debugging
    /*
    echo '<pre>';
    print_r($result);
    echo '</pre>';
    */
    // Check if the 'choices' key exists in the response
    if (isset($result['choices'][0]['message']['content'])) {
        echo '<h3>Generated Text by ' . $result['model'] .':</h3>';
        // Print the generated text
        echo "<p>" . $result['choices'][0]['message']['content'] . "</p>";
    } else {
        if (isset($result['error'])) {
            echo 'Error: ' . $result['error']['message'];
        } else {
            echo 'Error: Unable to retrieve generated text.';
        }
    }
}

// Close cURL

curl_close($ch);
?>

In the above code:

  • Set the value of $apiKey to be the personal access token from GitHub
  • The system prompt is: 'you are an expert in astronomy'.
  • The user prompt is: 'which is the furthest planet to earth?'
  • We will be using the ‘DeepSeek-R1’ model

You can start the PHP web server in the PHP-GitHub-AI folder with this terminal window command:

php -S localhost:8888

Point your browser to http://localhost:8888. The output would look like this:


The output is in markdown format. We will need a library that converts from markdown to HTML. To that end, stop the web server and install the erusev/parsedown package into your application with this terminal window command:

composer require erusev/parsedown

Back in the code, make the following changes:
  • Add this code to the first line of your PHP code:
// composer require erusev/parsedown
require_once 'vendor/autoload.php';

  • Replace the following statement:

echo "<p>" . $result['choices'][0]['message']['content'] . "</p>";

WITH

error_reporting(E_ALL ^ E_DEPRECATED);
$Parsedown = new Parsedown();
$text =  $Parsedown->text($result['choices'][0]['message']['content']);
echo "<p>$text</p>";

Restart the web server with “php -S localhost:8888”. The page now shows a much better looking output:

You can change the AI model from DeepSeek-R1 to any other model (like gpt-4o) and will get similar results.

Tuesday, January 28, 2025

Built-in token authentication with ASP.NET Core 9.0 Minimal WebAPI

In this tutorial I will showcase the built-in WebApi token authentication. To keep it simple, we shall persist our data in the lightweight SQLite database.

Prerequisites

It is assumed that you have installed the following on your computer:
  • .NET 9.0
  • Visual Studio Code editor

Getting Started

In a suitable working directory, create a new WebApi application using the following terminal window command:

dotnet new webapi --name WebApiTokenAuth

Change directory with:

cd WebApiTokenAuth

We will need to add some packages. Also in the same terminal window, run the following commands:

dotnet add package Microsoft.AspNetCore.Identity.EntityFrameworkCore

dotnet add package Microsoft.EntityFrameworkCore.Sqlite

dotnet add package Microsoft.EntityFrameworkCore.Tools

dotnet add package Microsoft.EntityFrameworkCore.Design

dotnet add package Swashbuckle.AspNetCore

The above packages allow us to use SQLite and Entity Framework. The last package (Swashbuckle.AspNetCore) will be used to provide a default Swagger UI.

Make sure you have the dotnet-ef tool. If you do not, you can globally install it with:

dotnet tool install --global dotnet-ef

If you already have the dotnet-ef, update your version to the latest with:

dotnet tool update --global dotnet-ef

Let us first add Swagger UI to our WebAPI application so that we can easily test our API endpoints. Open your source code with Visual Studio Code by executing the following statement from a terminal window inside the root folder of the application:

code .

You can now add the following statement right under app.MapOpenApi():

app.UseSwaggerUI(options =>  {
    options.SwaggerEndpoint("/openapi/v1.json", "My WebAPI");
});

Edit file Properties/launchSettings.json. In both http and https blocks, change the value of launchBrowser to true.

Also, in both http & https blocks, add the following setting:

"launchUrl": "swagger"

Let us run our web app and see what it does. Run the web app with:

dotnet watch

This gets loaded into your default browser:


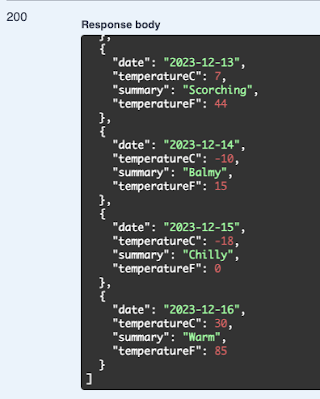
Click on GET >> Try it out >> Execute. This will produce the following output:


Database context class

Since we will be using Entity Framework to talk to the SQLite database, we will need a database context class. Add a folder named Data, then add to it a class named ApplicationDbContext that derives from IdentityDbContext<IdentityUser> with the following code:

public class ApplicationDbContext: IdentityDbContext<IdentityUser> {
    public ApplicationDbContext(DbContextOptions<ApplicationDbContext> options) : base(options)
    {}
}

Add the following connection string to appsettings.json:

"ConnectionStrings": {
  "DefaultConnection": "Data Source=webapi-auth.db;"
}

Next, we must register ApplicationDbContext with our app by adding the following code into Program.cs right before 'var app = builder.Build();':

// Configure identity database access via EF Core
var connectionString = builder.Configuration.GetConnectionString("DefaultConnection") ?? throw new InvalidOperationException("Connection string 'DefaultConnection' not found.");
builder.Services.AddDbContext<ApplicationDbContext>(options =>
    options.UseSqlite(connectionString));

Other required services

Add the following code right after the above code:

// Authorization
builder.Services.AddAuthorization();

// Activate identity APIs. By default, both cookies and proprietary tokens
// are activated. Cookies will be issued based on the 'useCookies' querystring
// parameter in the login endpoint
builder.Services.AddIdentityApiEndpoints<IdentityUser>()
    .AddEntityFrameworkStores<ApplicationDbContext>();

We need to add authorization and authentication middleware with the following code right after 'app.UseHttpsRedirection();':

app.UseAuthentication(); 
app.UseAuthorization(); 

Let us secure the /weatherforecast endpoint by forcing authentication. Chain the following to the endpoint by adding this code right under '.WithOpenApi()':

.RequireAuthorization();

The full app.MapGet() code will look like this:

app.MapGet("/weatherforecast", () =>
{
    var forecast =  Enumerable.Range(1, 5).Select(index =>
        new WeatherForecast
        (
            DateOnly.FromDateTime(DateTime.Now.AddDays(index)),
            Random.Shared.Next(-20, 55),
            summaries[Random.Shared.Next(summaries.Length)]
        ))
        .ToArray();
    return forecast;
})
.WithName("GetWeatherForecast")
.WithOpenApi()
.RequireAuthorization();

Adding Identity API endpoints

Add the identity endpoints to your app by calling MapIdentityApi<IdentityUser>(). Add the following code to Program.cs right before 'app.Run();':

app.MapIdentityApi<IdentityUser>();

Migrations

Since our app uses EF Core, we will create a migration in the Data folder and update the database. Run the following terminal commands:

dotnet ef migrations add M1 -o Data/Migrations

dotnet ef database update

You will notice that a SQLite database file is created named webapi-auth.db.

Try it out

Let us test our application to see whether or not we have indeed succeeded in securing our API endpoint. Start your app with:

dotnet watch

You will see a variety of identity related endpoints when the following page gets loaded into your default browser:


Try to hit the /weatherforecast endpoint and see the data. You will encounter a 401 (unauthorized) error:

Let us register a user. Click on the /register endpoint then click on the "Try it out" button. Update the JSON object so it looks like this:

{
  "email": "a@a.a",
  "password": "P@$$w0rd"
}

Click on the Execute button. You will get a Code 200 response representing success:


Next, let us login with the credentials we created. Click on the /login endpoint, then click on the "Try it out" button.


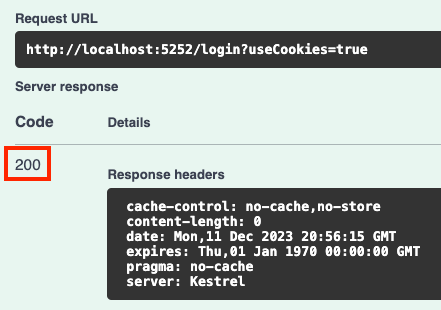
Choose true for useCookies and update the JSON object so it only has the credentials we had previously created. Thereafter, click on the Execute button. You should get a code 200 response:

Now let's try getting the data using the GET /weatherforecast endpoint. It should be a relief that we can now see the weather forecast information.

Conclusion

With ASP.NET Core 9.0 we need to follow these steps:
  • restore Swagger UI
  • configure our WebAPI application with the built in ,NET token authentication capability

Monday, January 20, 2025

Phi-3 Small Language Model (SLM) in a PHP app with Ollama and LLPhant framework

Overview

In this tutorial, we will see how easy it is to use the Phi-3 small language model in a PHP application. The best part is that it is free and runs entirely on your local device. Ollama is used to serve the Phi-3 small language model and LLPhant is the PHP framework for communicating with the AI model. 

Prerequisites

To proceed, you will need the following:

What is small language model (SLM)?

A small language model (SLM) is a machine learning model typically based on a large language model (LLM) but of greatly reduced size. An SLM retains much of the functionality of the LLM from which it is built but with far less complexity and computing resource demand.

What is Ollama?

Ollama is an application you can download onto your computer or server to run open-source generative AI small-language-models (SLMs) such as Meta's Llama 3 and Microsoft's Phi-3. You can see the many models available at https://www.ollama.com/library.

What is LLPhant

LLPhant is an open-source PHP Generative AI Framework at https://github.com/LLPhant/LLPhant

Getting Started

Download the Ollama installer from https://www.ollama.com/download.

Once you have installed Ollama, run these commands from a terminal window:

ollama pull phi3:latest
ollama list
ollama show phi3:latest

In a suitable working directory, create a folder named PhpAI with the following terminal window command:

mkdir PhpAI

Change into the newly created folder with:

cd PhpAI

Using Composer, install the theodo-group/llphant package by running this command:

composer require theodo-group/llphant

Let's get coding

Create a file named index.php with the following content:

<?php

require_once 'vendor/autoload.php';

use LLPhant\OllamaConfig;
use LLPhant\Chat\OllamaChat;  
 
$config = new OllamaConfig();
$config->model = 'phi3'; 
 
$chat = new OllamaChat($config); 
 
$chat->setSystemMessage('You are a helpful assistant who knows about world geography.'); 
 
$response = $chat->generateText('what is the capital of france?');  
 
echo $response;
?>

Running the app

To run the app, start the PHP web server to listen on port number 8888 with the following command in the PhpAI folder.

php -S localhost:8888

You can view the output by pointing your browser to the following URL:

http://localhost:8888/

This is what I experienced:

Conclusion

We can package our applications with a local SLM. This makes our applications cheaper, faster, connection-free, and self-contained.

Sunday, November 3, 2024

Using Dependency Injection with Sematic Kernel in ASP.NET

Overview

In this video I will show you how you Dependency Inject can be used with Semantic Kernel in an ASP.NET Razor Pages application. The same principals can be used with MVC. We will use the Phi-3 model hosted on GitHub. Developers can use a multitude of AI models on GitHub for free.

Source Code: https://github.com/medhatelmasry/AspWithSkDI
Companion Video: https://youtu.be/fLIWCkxXaM8

Pre-requisites

This walkthrough was done using .NET 8.0.

Getting Started

There are many AI models at GitHub from a variety of vendors that you can choose from. The starting point is to visit https://github.com/marketplace/models. At the time of writing, these are a subset of the models available:


For this article, I will use the "Phi-3.5-mini instruct (128k)" model highlighted above. If you click on that model you will be taken to the model's landing page:


Click on the green "Get started" button.


The first thing we need to do is get a 'personal access token' by clicking on the indicated button above.


Choose 'Generate new token', which happens to be in beta at the time of writing.


Give your token a name, set the expiration, and optionally describe the purpose of the token. Thereafter, click on the green 'Generate token' button at the bottom of the page.


Copy the newly generated token and place it is a safe place because you cannot view this token again once you leave the above page. 

Let's use Semantic Kernel in ASP.NET Razor Pages

In a working directory, create a Razor Pages web app named AspWithSkDI inside a terminal window with the following command:

dotnet new razor -n AspWithSkDI

Change into the newly created directory GitHubAiModelSK with:

cd AspWithSkDI

Next, let's add the Sematic Kernel package to our application with:

dotnet add package Microsoft.SemanticKernel -v 1.25.0

Open the project in VS Code and add this directive to the .csproj file right below: <Nullable>enable</Nullable>:

<NoWarn>SKEXP0010</NoWarn>

Add the following to appsettings.json:


    "AI": {
      "Endpoint": "https://models.inference.ai.azure.com",
      "Model": "Phi-3.5-mini-instruct",
      "PAT": "fake-token"
    }

Replace "fake-token" with the personal access token that you got from GitHub. 

Adding Dependency Injection support

Next, open Program.cs in an editor. Add the following code right above the statement "var app = builder.Build();" :

var modelId = builder.Configuration["AI:Model"]!;
var uri = builder.Configuration["AI:Endpoint"]!;
var githubPAT = builder.Configuration["AI:PAT"]!;

var client = new OpenAIClient(new ApiKeyCredential(githubPAT), new OpenAIClientOptions { Endpoint = new Uri(uri) });

var kernel = builder.Services.AddKernel()
    .AddOpenAIChatCompletion(modelId, client);

It is the last statement above that is key to making Semantic Kernel available to all other classes through Dependency Injection.

ASP.NET Razor Pages

Pages/Index.cshtml.cs

Add the following instance variable and property to the code-behind file named Pages/Index.cshtml.cs:

private readonly Kernel _kernel;

[BindProperty]
public string? Reply { get; set; }

Replace the class constructor with the following:

public IndexModel(ILogger<IndexModel> logger, Kernel kernel) {
    _logger = logger;
    _kernel = kernel;
}

We can now get access to Semantic Kernel through the _kernel object.

Add the following OnPostAsync() method to the IndexModel class:

// action method that receives user prompt from the form
public async Task<IActionResult> OnPostAsync(string userPrompt) {
    // get a chat completion service
    var chatCompletionService = _kernel.GetRequiredService<IChatCompletionService>(); 
 
    // Create a new chat by specifying the assistant
    ChatHistory chat = new(@"
        You are an AI assistant that helps people find information about baking. 
        The baked item must be easy, tasty, and cheap. 
        I don't want to spend more than $10 on ingredients.
        I don't want to spend more than 30 minutes preparing.
        I don't want to spend more than 30 minutes baking."
    ); 
 
    chat.AddUserMessage(userPrompt); 
 
    var response = await chatCompletionService.GetChatMessageContentAsync(chat, kernel: _kernel); 
 
    Reply = response.Content!.Replace("\n", "<br>"); 
 
    return Page();
}

In the above OnPostAsync() method, the user prompt is received and passed on to the Phi-3 GPT SLM model. In this case our assistant specializes suggests easy, fast and cheap baking ideas.

Pages/Index.cshtml

The Index.cshtml file represents the view that the user sees when interacting with our web app. Replace the content of Index.cshtml with the following:

@page
@model IndexModel

@{
    ViewData["Title"] = "SK Dependency Injection in ASP.NET Razor Pages";
}

<div class="text-center">
    <h3 class="display-6">@ViewData["Title"]</h3>
    <form method="post" onsubmit="showPleaseWaitMessage()">
        <input type="text" name="userPrompt" size="80" 
            required placeholder="What do you want to bake today?"/>
        <input type="submit" value="Submit" />
    </form>
</div>

<p>&nbsp;</p>

<div id="please-wait-message" style="display:none;">
    <p class="alert alert-info">Please wait...</p>
</div>

<div id="response-message">
    @if (Model.Reply != null) {
        <p class="alert alert-success">@Html.Raw(Model.Reply)</p>
    }
</div>

@section Scripts {
    <script>
        function showPleaseWaitMessage() {
    document.getElementById('response-message').innerHTML = '';      
    document.getElementById('please-wait-message').style.display = 'block';   
    }
    </script>
}

There is some JavaScript that was added to the view to display a "Please wait ...." message while the user waits for the AI model to respond.

Run the application

In a terminal window in the root of the application, run the following command:

dotnet watch

The home page of the web app displays in your default browser and it looks like this:

I entered "Apple Pie" then clicked on Submit. A "Please wait ..." message appeared while the AI model processed my request.

After about 40 seconds the response came back.


Conclusion

It is easy and straight forward to use dependency injection to create a kernel.

Monday, September 30, 2024

Using Sematic Kernel with SLM AI models downloaded to your computer

In this walkthrough, I will demonstrate how you can download the Phi-3 AI SLM (small language model) from Hugging Face and use it in a C# application. 

What is Hugging Face?

Hugging Face (https://huggingface.co/) provides AI/ML researchers & developers with access to thousands of curated datasets, machine learning models, and AI-powered demo apps. We will download he Phi-3 SLM model in ONNX format onto our computers from https://huggingface.co/models.

What is ONNX?

ONNX is an open format built to represent machine learning models. Visit https://onnx.ai/ for more information.

Getting Started

We will download the Phi-3 Mini SLM for the ONNX runtime from Hugging Face. Run the following command from within a terminal window so that the destination is a location of your choice. In the below example the destination is a folder named phi-3-mini on a Windows C: drive.

git clone https://huggingface.co/microsoft/Phi-3-mini-4k-instruct-onnx C:/phi-3-mini


   NOTE:

   This example only works on the Windows Operating System.

Be patient as the download could take some time. On my Windows computer the size of the download is 30.1 GB comprising 97 files and 48 folders.

We will be using the files in the cpu_and_mobile folder. Inside that folder, navigate into the cpu-int4-rtn-block-32 folder where you will find this pair of files that contain the AI ONNX model:

phi3-mini-4k-instruct-cpu-int4-rtn-block-32.onnx

phi3-mini-4k-instruct-cpu-int4-rtn-block-32.onnx.data

Getting Started

In a working directory, create a C# console app named LocalAiModelSK inside a terminal window with the following command:

dotnet new console -n LocalAiModelSK 

Change into the newly created directory LocalAiModelSK with:

cd LocalAiModelSK

Next, let's add two packages to our console application with:

dotnet add package Microsoft.SemanticKernel -v 1.16.2

dotnet add package Microsoft.SemanticKernel.Connectors.Onnx -v 1.16.2-alpha

Open the project in VS Code and add this directive to the .csproj file right below: <Nullable>enable</Nullable>:

<NoWarn>SKEXP0070</NoWarn>

Replace the contents of Program.cs with the following C# code:

using Microsoft.SemanticKernel;
using Microsoft.SemanticKernel.ChatCompletion;
using Microsoft.SemanticKernel.Connectors.OpenAI; 
 
// PHI-3 local model location 
var modelPath = @"C:\phi-3-mini\cpu_and_mobile\cpu-int4-rtn-block-32"; 
 
// Load the model and services
var builder = Kernel.CreateBuilder();
builder.AddOnnxRuntimeGenAIChatCompletion("phi-3", modelPath); 
 
// Build Kernel
var kernel = builder.Build(); 
 
// Create services such as chatCompletionService and embeddingGeneration
var chatCompletionService = kernel.GetRequiredService<IChatCompletionService>(); 
 
// Start the conversation
while (true) {
    // Get user input
    Console.ForegroundColor = ConsoleColor.Yellow;
    Console.Write("User : ");
    var question = Console.ReadLine()!; 
    
    OpenAIPromptExecutionSettings openAIPromptExecutionSettings = new() {
        MaxTokens = 200
    }; 
 
    var response = kernel.InvokePromptStreamingAsync(
        promptTemplate: @"{{$input}}",
        arguments: new KernelArguments(openAIPromptExecutionSettings){
            { "input", question }
        });
    Console.ForegroundColor = ConsoleColor.Green;
    Console.Write("\nAssistant : ");
    string combinedResponse = string.Empty;
    await foreach (var message in response) {
        // Write the response to the console
        Console.Write(message);
        combinedResponse += message;
    }
    Console.WriteLine();
}

In the above code, make sure that modelPath points to the proper location of the model on your computer.

I asked the question: How long do mosquito live?

This is the response I received:


Conclusion

You can choose from a variety of  SLMs at Hugging Face. Of course, the penalty is that the actual ONNX model sizes are significant making it, in some circumstances, more desirable to use a model that resides online.


Saturday, September 28, 2024

Using Sematic Kernel with AI models hosted on GitHub

Overview

In this article I will show you how you can experiment with AI models hosted on GitHub. GitHub AI Models are intended for learning, experimentation and proof-of-concept activities. The feature is subject to various limits (including requests per minute, requests per day, tokens per request, and concurrent requests) and is not designed for production use cases.

Companion Video: https://youtu.be/jMQ_1eDKPlo

Getting Started

There are many AI models from a variety of vendors that you can choose from. The starting point is to visit https://github.com/marketplace/models. At the time of writing, these are a subset of the models available:


For this article, I will use the "Phi-3.5-mini instruct (128k)" model highlighted above. If you click on that model you will be taken to the model's landing page:


Click on the green "Get started" button.


The first thing we need to do is get a 'personal access token' by clicking on the indicated button above.


Choose 'Generate new token', which happens to be in beta at the time of writing.


Give your token a name, set the expiration, and optionally describe the purpose of the token. Thereafter, click on the green 'Generate token' button at the bottom of the page.


Copy the newly generated token and place it is a safe place because you cannot view this token again once you leave the above page. 

Let's use Semantic Kernel

In a working directory, create a C# console app named GitHubAiModelSK inside a terminal window with the following command:

dotnet new console -n GitHubAiModelSK

Change into the newly created directory GitHubAiModelSK with:

cd GitHubAiModelSK

Next, let's add two packages to our console application with:

dotnet add package Microsoft.SemanticKernel -v 1.25.0

dotnet add package Microsoft.Extensions.Configuration.Json

Open the project in VS Code and add this directive to the .csproj file right below: <Nullable>enable</Nullable>:

<NoWarn>SKEXP0010</NoWarn>

Create a file named appsettings.json. Add this to appsettings.json:

{
    "AI": {
      "Endpoint": "https://models.inference.ai.azure.com",
      "Model": "Phi-3.5-mini-instruct",
      "PAT": "fake-token"
    }
}

Replace "fake-token" with the personal access token that you got from GitHub.

Next, open Program.cs in an editor and delete all contents of the file. Add this code to Program.cs:

using Microsoft.SemanticKernel;
using System.Text;
using Microsoft.SemanticKernel.ChatCompletion;
using OpenAI;
using System.ClientModel;
using Microsoft.Extensions.Configuration;

var config = new ConfigurationBuilder()
    .SetBasePath(Directory.GetCurrentDirectory())
    .AddJsonFile("appsettings.json", optional: true, reloadOnChange: true)
    .Build();

var modelId = config["AI:Model"]!;
var uri = config["AI:Endpoint"]!;
var githubPAT = config["AI:PAT"]!;

var client = new OpenAIClient(new ApiKeyCredential(githubPAT), new OpenAIClientOptions { Endpoint = new Uri(uri) });

// Initialize the Semantic kernel
var builder = Kernel.CreateBuilder();

builder.AddOpenAIChatCompletion(modelId, client);
var kernel = builder.Build();

// get a chat completion service
var chatCompletionService = kernel.GetRequiredService<IChatCompletionService>();

// Create a new chat by specifying the assistant
ChatHistory chat = new(@"
    You are an AI assistant that helps people find information. 
    The response must be brief and should not exceed one paragraph.
    If you do not know the answer then simply say 'I do not know the answer'."
);

// Instantiate a StringBuilder
StringBuilder strBuilder = new();

// User question & answer loop
while (true)
{
    // Get the user's question
    Console.Write("Q: ");
    chat.AddUserMessage(Console.ReadLine()!);

    // Clear contents of the StringBuilder
    strBuilder.Clear();

    // Get the AI response streamed back to the console
    await foreach (var message in chatCompletionService.GetStreamingChatMessageContentsAsync(chat, kernel: kernel))
    {
        Console.Write(message);
        strBuilder.Append(message.Content);
    }
    Console.WriteLine();
    chat.AddAssistantMessage(strBuilder.ToString());

    Console.WriteLine();
}

Run the application:


I asked the question "How many pyramids are there in Egypt?" and the AI answered as shown above. 

Using a different model

How about we use a different AI model. For example, I will try the 'Meta-Llama-3.1-405B-Instruct' model. We need to get the model ID. Click on the model on the https://github.com/marketplace/models page.

Change Model in appsettings.json to "Meta-Llama-3.1-405B-Instruct".

Run the application again. This is what I experienced with the AI model meta-llama-3.1-405b-instruct:


Conclusion

GitHub AI models are easy to access. I hope you come up with great AI driven applications that make a difference to our world.