Showing posts with label API. Show all posts

Wednesday, February 5, 2025

Develop simple REST API with PHP and MySQL

 Overview

In this article we will develop is simple REST API with PHP. The database backend is MySQL running in a Docker container and the sample data represents students.

Source code: https://github.com/medhatelmasry/school-api

Getting Started

Start MySQL in a Docker container with:

docker run -d -p 3333:3306 --name maria -e MYSQL_ROOT_PASSWORD=secret mariadb:10.7.3

In a working directory named school-api, create the following sub-folders:

mkdir src
cd src
mkdir Controller
mkdir System
mkdir TableGateways
cd ..
mkdir public

Add a composer.json file in the top directory with just one dependency: the DotEnv library which will allow us to keep our authentication details in a .env file outside our code repository:


Contents of the composer.json file:

{
    "require": {
        "vlucas/phpdotenv": "^2.4"
    },
    "autoload": {
        "psr-4": {
            "Src\\": "src/"
        }
    }
}

We also configured a PSR-4 autoloader which will automatically look for PHP classes in the /src directory.

We can install our dependencies with:

composer install

We now have a /vendor directory, and the DotEnv dependency is installed (we can also use our autoloader to load our classes from /src with no include() calls).

Let’s create a .gitignore file for our project with two lines in it, so the /vendor directory and our local .env file are ignored if our code is pushed to source control. Add this to .gitignore:

vendor/
.env

Next, add a .env file where we’ll put our database connection details:

DB_CONNECTION=mysql
DB_HOST=127.0.0.1
DB_PORT=3333
DB_DATABASE=apidb
DB_USERNAME=root
DB_PASSWORD=secret

Add a bootstrap.php file to load environment variables.

<?php
error_reporting(E_ALL & ~E_DEPRECATED);

require 'vendor/autoload.php';

use Dotenv\Dotenv;

use Src\System\DatabaseConnector;

$dotenv = new DotEnv(__DIR__);
$dotenv->load();

$dbConnection = (new DatabaseConnector())->getConnection();

Configure DB for PHP REST API

We can now create a class to hold our database connection and add the initialization of the connection to our bootstrap.php file. In the src/System/ folder, add a file named DatabaseConnector.php with this code:

<?php
namespace Src\System;
class DatabaseConnector {
    private $dbConnection = null;
    public function __construct() {
        $host = getenv('DB_HOST');
        $port = getenv('DB_PORT');
        $db   = getenv('DB_DATABASE');
        $user = getenv('DB_USERNAME');
        $pass = getenv('DB_PASSWORD');
        try {
            $pdo = new \PDO("mysql:host=$host;port=$port;charset=utf8mb4", $user, $pass);
            $pdo->exec("CREATE DATABASE IF NOT EXISTS `$db`");
        } catch (\PDOException $e) {
            die("DB ERROR: " . $e->getMessage());
        }
        try {
            $this->dbConnection = new \PDO(
                "mysql:host=$host;port=$port;charset=utf8mb4;dbname=$db",
                $user,
                $pass
            );
        } catch (\PDOException $e) {
            exit($e->getMessage());
        }
    }
         public function getConnection() {
        return $this->dbConnection;
    }
}

Let’s create a dbseed.php file which creates a students table and inserts some records for testing. Code for dbseed.php is shown below:

<?php
require 'bootstrap.php';
$statement = "
    CREATE TABLE IF NOT EXISTS students (
        id INT NOT NULL AUTO_INCREMENT,
        firstname VARCHAR(40) NOT NULL,
        lastname VARCHAR(40) NOT NULL,
        school VARCHAR(40) NOT NULL,
        PRIMARY KEY (id)
    );
    INSERT INTO students
        (firstname, lastname, school)
    VALUES
        ('Mark', 'Fisher','Computing'),
        ('Lisa', 'Fisher','Computing'),
        ('Judy', 'Fisher','Computing'),
        ('Jane', 'Smith','Nursing'),
        ('Mary', 'Smith','Nursing'),
        ('Andy', 'Smith','Nursing'),
        ('Bill', 'Smith','Business'),
        ('Fred', 'Plumber','Business'),
        ('Anna', 'Plumber','Business');
";
try {
    $createTable = $dbConnection->exec($statement);
    echo "Success!\n";
} catch (\PDOException $e) {
    exit($e->getMessage());
}

Run the following command to seed the database with sample data:

php dbseed.php

Add a Gateway Class for students table

In the src/TableGateways/StudentsGateway.php class file, we will implement methods to return all students, return a specific student and add/update/delete a student:

<?php
namespace Src\TableGateways;
class StudentsGateway {
    private $db = null;
    public function __construct($db) {
        $this->db = $db;
    }
    public function findAll() {
        $statement = "
            SELECT 
                id, firstname, lastname, school
            FROM
                students;
        ";
        try {
            $statement = $this->db->query($statement);
            $result = $statement->fetchAll(\PDO::FETCH_ASSOC);
            return $result;
        } catch (\PDOException $e) {
            exit($e->getMessage());
        }
    }
    public function find($id) {
        $statement = "
            SELECT 
                id, firstname, lastname, school
            FROM
                students
            WHERE id = ?;
        ";
        try {
            $statement = $this->db->prepare($statement);
            $statement->execute(array($id));
            $result = $statement->fetchAll(\PDO::FETCH_ASSOC);
            return $result;
        } catch (\PDOException $e) {
            exit($e->getMessage());
        }    
    }
    public function insert(Array $input) {
        $statement = "
            INSERT INTO students 
                (firstname, lastname, school)
            VALUES
                (:firstname, :lastname, :school);
        ";
        try {
            $statement = $this->db->prepare($statement);
            $statement->execute(array(
                'firstname' => $input['firstname'],
                'lastname'  => $input['lastname'],
                'school' => $input['school'] ?? null,
            ));
            return $statement->rowCount();
        } catch (\PDOException $e) {
            exit($e->getMessage());
        }    
    }
    public function update($id, Array $input) {
        $statement = "
            UPDATE students
            SET 
                firstname = :firstname,
                lastname  = :lastname,
                school = :school
            WHERE id = :id;
        ";
        try {
            $statement = $this->db->prepare($statement);
            $statement->execute(array(
                'id' => (int) $id,
                'firstname' => $input['firstname'],
                'lastname'  => $input['lastname'],
                'school' => $input['school'] ?? null,
            ));
            return $statement->rowCount();
        } catch (\PDOException $e) {
            exit($e->getMessage());
        }    
    }
    public function delete($id) {
        $statement = "
            DELETE FROM students
            WHERE id = :id;
        ";
        try {
            $statement = $this->db->prepare($statement);
            $statement->execute(array('id' => $id));
            return $statement->rowCount();
        } catch (\PDOException $e) {
            exit($e->getMessage());
        }    
    }
}

Implement the PHP REST API

Our REST API will have the following endpoints:

return all recordsGET /students
return a specific recordGET /students/{id}
create a new recordPOST /students
update an existing recordPUT /students/{id}
delete an existing recordDELETE /students/{id}

Create a src/Controller/StudentsController.php to handle the API endpoints with this code:

<?php
namespace Src\Controller;
use Src\TableGateways\StudentsGateway;
class StudentsController {
    private $db;
    private $requestMethod;
    private $id;
    private $studentsGateway;
    public function __construct($db, $requestMethod, $id) {
        $this->db = $db;
        $this->requestMethod = $requestMethod;
        $this->id = $id;
        $this->studentsGateway = new StudentsGateway($db);
    }
    public function processRequest() {
        switch ($this->requestMethod) {
            case 'GET':
                if ($this->id) {
                    $response = $this->getById($this->id);
                } else {
                    $response = $this->getAll();
                };
                break;
            case 'POST':
                $response = $this->createRequest();
                break;
            case 'PUT':
                $response = $this->updateFromRequest($this->id);
                break;
            case 'DELETE':
                $response = $this->deleteById($this->id);
                break;
            default:
                $response = $this->notFoundResponse();
                break;
        }
        header($response['status_code_header']);
        if ($response['body']) {
            echo $response['body'];
        }
    }
    private function getAll() {
        $result = $this->studentsGateway->findAll();
        $response['status_code_header'] = 'HTTP/1.1 200 OK';
        $response['body'] = json_encode($result);
        return $response;
    }
    private function getById($id) {
        $result = $this->studentsGateway->find($id);
        if (! $result) {
            return $this->notFoundResponse();
        }
        $response['status_code_header'] = 'HTTP/1.1 200 OK';
        $response['body'] = json_encode($result);
        return $response;
    }
    private function createRequest() {
        $input = (array) json_decode(file_get_contents('php://input'), TRUE);
        if (! $this->validate($input)) {
            return $this->unprocessableEntityResponse();
        }
        $this->studentsGateway->insert($input);
        $response['status_code_header'] = 'HTTP/1.1 201 Created';
        $response['body'] = null;
        return $response;
    }
    private function updateFromRequest($id) {
        $result = $this->studentsGateway->find($id);
        if (! $result) {
            return $this->notFoundResponse();
        }
        $input = (array) json_decode(file_get_contents('php://input'), TRUE);
        if (! $this->validate($input)) {
            return $this->unprocessableEntityResponse();
        }
        $this->studentsGateway->update($id, $input);
        $response['status_code_header'] = 'HTTP/1.1 200 OK';
        $response['body'] = null;
        return $response;
    }
    private function deleteById($id) {
        $result = $this->studentsGateway->find($id);
        if (! $result) {
            return $this->notFoundResponse();
        }
        $this->studentsGateway->delete($id);
        $response['status_code_header'] = 'HTTP/1.1 200 OK';
        $response['body'] = null;
        return $response;
    }
    private function validate($input) {
        if (! isset($input['firstname'])) {
            return false;
        }
        if (! isset($input['lastname'])) {
            return false;
        }
        return true;
    }
    private function unprocessableEntityResponse() {
        $response['status_code_header'] = 'HTTP/1.1 422 Unprocessable Entity';
        $response['body'] = json_encode([
            'error' => 'Invalid input'
        ]);
        return $response;
    }
    private function notFoundResponse() {
        $response['status_code_header'] = 'HTTP/1.1 404 Not Found';
        $response['body'] = null;
        return $response;
    }
}

Finally, create a /public/index.php file to serve as the front controller to process requests:

<?php
require "../bootstrap.php";

use Src\Controller\StudentsController;

header("Access-Control-Allow-Origin: *");
header("Content-Type: application/json; charset=UTF-8");
header("Access-Control-Allow-Methods: OPTIONS,GET,POST,PUT,DELETE");
header("Access-Control-Max-Age: 3600");
header("Access-Control-Allow-Headers: Content-Type, Access-Control-Allow-Headers, Authorization, X-Requested-With");  
 
$uri = parse_url($_SERVER['REQUEST_URI'], PHP_URL_PATH);
$uri = explode( '/', $uri ); 
 
// all of our endpoints start with /students
// everything else results in a 404 Not Found
if ($uri[1] !== 'students') {
    header("HTTP/1.1 404 Not Found");
    exit();
} 
 
// the id is, of course, optional and must be a number:
$id = null;
if (isset($uri[2])) {
    $id = (int) $uri[2];
} 
 
$requestMethod = $_SERVER["REQUEST_METHOD"]; 
 
// pass the request method and user ID to the StudentsController and process the HTTP request:
$controller = new StudentsController($dbConnection, $requestMethod, $id);
$controller->processRequest();

Start the web server with the following command, where switch -t starts the server in the public folder:

php -S 127.0.0.1:8888 -t public

Test your API with postman with these endpoints:

return all recordsGET http://localhost:8888/students
return a specific recordGET http://localhost:8888/students/{id}
create a new recordPOST http://localhost:8888/students
update an existing recordPUT / http://localhost:8888/students/{id}
delete an existing recordDELETE http://localhost:8888/students/{id}


Tuesday, January 28, 2025

Built-in token authentication with ASP.NET Core 9.0 Minimal WebAPI

In this tutorial I will showcase the built-in WebApi token authentication. To keep it simple, we shall persist our data in the lightweight SQLite database.

Prerequisites

It is assumed that you have installed the following on your computer:
  • .NET 9.0
  • Visual Studio Code editor

Getting Started

In a suitable working directory, create a new WebApi application using the following terminal window command:

dotnet new webapi --name WebApiTokenAuth

Change directory with:

cd WebApiTokenAuth

We will need to add some packages. Also in the same terminal window, run the following commands:

dotnet add package Microsoft.AspNetCore.Identity.EntityFrameworkCore

dotnet add package Microsoft.EntityFrameworkCore.Sqlite

dotnet add package Microsoft.EntityFrameworkCore.Tools

dotnet add package Microsoft.EntityFrameworkCore.Design

dotnet add package Swashbuckle.AspNetCore

The above packages allow us to use SQLite and Entity Framework. The last package (Swashbuckle.AspNetCore) will be used to provide a default Swagger UI.

Make sure you have the dotnet-ef tool. If you do not, you can globally install it with:

dotnet tool install --global dotnet-ef

If you already have the dotnet-ef, update your version to the latest with:

dotnet tool update --global dotnet-ef

Let us first add Swagger UI to our WebAPI application so that we can easily test our API endpoints. Open your source code with Visual Studio Code by executing the following statement from a terminal window inside the root folder of the application:

code .

You can now add the following statement right under app.MapOpenApi():

app.UseSwaggerUI(options =>  {
    options.SwaggerEndpoint("/openapi/v1.json", "My WebAPI");
});

Edit file Properties/launchSettings.json. In both http and https blocks, change the value of launchBrowser to true.

Also, in both http & https blocks, add the following setting:

"launchUrl": "swagger"

Let us run our web app and see what it does. Run the web app with:

dotnet watch

This gets loaded into your default browser:


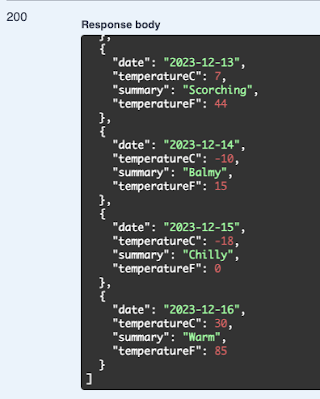
Click on GET >> Try it out >> Execute. This will produce the following output:


Database context class

Since we will be using Entity Framework to talk to the SQLite database, we will need a database context class. Add a folder named Data, then add to it a class named ApplicationDbContext that derives from IdentityDbContext<IdentityUser> with the following code:

public class ApplicationDbContext: IdentityDbContext<IdentityUser> {
    public ApplicationDbContext(DbContextOptions<ApplicationDbContext> options) : base(options)
    {}
}

Add the following connection string to appsettings.json:

"ConnectionStrings": {
  "DefaultConnection": "Data Source=webapi-auth.db;"
}

Next, we must register ApplicationDbContext with our app by adding the following code into Program.cs right before 'var app = builder.Build();':

// Configure identity database access via EF Core
var connectionString = builder.Configuration.GetConnectionString("DefaultConnection") ?? throw new InvalidOperationException("Connection string 'DefaultConnection' not found.");
builder.Services.AddDbContext<ApplicationDbContext>(options =>
    options.UseSqlite(connectionString));

Other required services

Add the following code right after the above code:

// Authorization
builder.Services.AddAuthorization();

// Activate identity APIs. By default, both cookies and proprietary tokens
// are activated. Cookies will be issued based on the 'useCookies' querystring
// parameter in the login endpoint
builder.Services.AddIdentityApiEndpoints<IdentityUser>()
    .AddEntityFrameworkStores<ApplicationDbContext>();

We need to add authorization and authentication middleware with the following code right after 'app.UseHttpsRedirection();':

app.UseAuthentication(); 
app.UseAuthorization(); 

Let us secure the /weatherforecast endpoint by forcing authentication. Chain the following to the endpoint by adding this code right under '.WithOpenApi()':

.RequireAuthorization();

The full app.MapGet() code will look like this:

app.MapGet("/weatherforecast", () =>
{
    var forecast =  Enumerable.Range(1, 5).Select(index =>
        new WeatherForecast
        (
            DateOnly.FromDateTime(DateTime.Now.AddDays(index)),
            Random.Shared.Next(-20, 55),
            summaries[Random.Shared.Next(summaries.Length)]
        ))
        .ToArray();
    return forecast;
})
.WithName("GetWeatherForecast")
.WithOpenApi()
.RequireAuthorization();

Adding Identity API endpoints

Add the identity endpoints to your app by calling MapIdentityApi<IdentityUser>(). Add the following code to Program.cs right before 'app.Run();':

app.MapIdentityApi<IdentityUser>();

Migrations

Since our app uses EF Core, we will create a migration in the Data folder and update the database. Run the following terminal commands:

dotnet ef migrations add M1 -o Data/Migrations

dotnet ef database update

You will notice that a SQLite database file is created named webapi-auth.db.

Try it out

Let us test our application to see whether or not we have indeed succeeded in securing our API endpoint. Start your app with:

dotnet watch

You will see a variety of identity related endpoints when the following page gets loaded into your default browser:


Try to hit the /weatherforecast endpoint and see the data. You will encounter a 401 (unauthorized) error:

Let us register a user. Click on the /register endpoint then click on the "Try it out" button. Update the JSON object so it looks like this:

{
  "email": "a@a.a",
  "password": "P@$$w0rd"
}

Click on the Execute button. You will get a Code 200 response representing success:


Next, let us login with the credentials we created. Click on the /login endpoint, then click on the "Try it out" button.


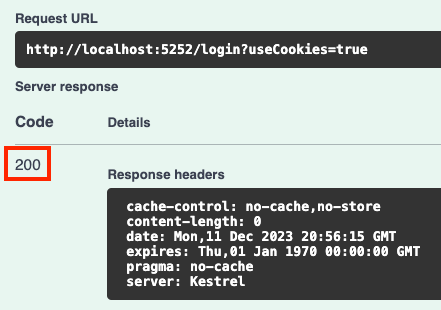
Choose true for useCookies and update the JSON object so it only has the credentials we had previously created. Thereafter, click on the Execute button. You should get a code 200 response:

Now let's try getting the data using the GET /weatherforecast endpoint. It should be a relief that we can now see the weather forecast information.

Conclusion

With ASP.NET Core 9.0 we need to follow these steps:
  • restore Swagger UI
  • configure our WebAPI application with the built in ,NET token authentication capability

Monday, January 15, 2024

PHP meets OpenAI with image generation

Let's generate images using OpenAI's dall-e-3 service. When using PHP, the open-source openai-php/client library facilitates the process. Check it out at https://github.com/openai-php/client.

In this article, we will learn how easy it is to generate an image with OpenAI and PHP. 

Source code: https://github.com/medhatelmasry/openai-dalle3-php

Prerequisites

In order to proceed, you will need the following:

  1. Subscription with OpenAI - If you do not have a subscription, go ahead and register at https://openai.com/.
  2. PHP - You need to have PHP version 8.2 (or higher) installed on your computer. You can download the latest version from https://www.php.net/downloads.php.
  3. Composer – If you do not have Composer yet, download and install it for your operating system from https://getcomposer.org/download/.

Getting Started

In a suitable working directory, create a folder named openai-dalle3-php with the following terminal window command:

mkdir openai-dalle3-php

Change into the newly created folder with:

cd openai-dalle3-php

Using Composer, install the openai-php/client package by running this command:

composer require openai-php/client

We will be reading our ApoenAPI key from the .env text file. We need to install this package in order to do that.

composer require vlucas/phpdotenv

Getting an API KEY from OpenAI

With your OpenAI credentials, login into https://openai.com/.  Click on API.

In the left navigation, click on "API keys". 


Click on the "+ Create new secret key" button.


Give the new key a name. I named it 20240115 representing the date when it was created. You may wish to give it a more meaningful or creative name. Once you are happy with the name, click on the "Create secret key" to generate the key.


Click on the copy button beside the key and paste the API-Key somewhere safe as we will need to use it later on. Note that you cannot view this key again. Click on Done to dismiss the dialog.

We will create a text file named .env in our  openai-dalle3-php folder with the following content:

OPENAI_API_KEY=put-your-openai-api-key-here

Set the API-Key as the value of OPENAI_API_KEY. This may look like this:

OPENAI_API_KEY=sk-OOghjTs8GsuHQklTCWOeT3BasdGJAjklBr3tr8ViZKv21BRN

Let's get coding

We can generate images by obtaining a URL to the newly created image, or by getting the Base-64 representation of the image. We will try both ways.

1) Get URL of the image

In the openai-dalle3-php folder, create a file named image-url.php with the following content:

<?php

require_once __DIR__ . '/vendor/autoload.php';

$dotenv = Dotenv\Dotenv::createImmutable(__DIR__);
$dotenv->load();
 
$client = OpenAI::client($_ENV['OPENAI_API_KEY']);

$response = $client->images()->create([
    'model' => 'dall-e-3',
    'prompt' => 'A panda flying over Paris at night',
    'n' => 1,
    'size' => '1024x1024',
    'response_format' => 'url',
]);

foreach ($response->data as $data) {
    $data->url; 
    $data->b64_json; // null
}

// display the image
echo '<img src="' . $data->url . '" />';

?>

In the above code, note the following:

  • we read in the API Key from .env file and pass it in the OpenAI::client($_ENV['OPENAI_API_KEY']); statement
  • we request a URL response with an image size 1024 x 1024
  • we prompt the dall-e-3 service to generate an image of 'A panda flying over Paris at night'.

To run the app, start the PHP web server to listen on port number 8888 with the following command in the openai-dalle3-php folder.

php -S localhost:8888

You can view the resulting image that gets created by OpenAI by pointing your browser to the following URL:

http://localhost:8888/image-url.php

This is the image that got created for me:


Every time you run the app you will likely get a different image.

2) Get Base64 encoding of the image

Create another file named image-b64.php with the following content:

    <?php

require_once __DIR__ . '/vendor/autoload.php';

$dotenv = Dotenv\Dotenv::createImmutable(__DIR__);
$dotenv->load();
 
$client = OpenAI::client($_ENV['OPENAI_API_KEY']);

$response = $client->images()->create([
    'model' => 'dall-e-3',
    'prompt' => 'A panda flying over Paris at night',
    'n' => 1,
    'size' => '1024x1024',
    'response_format' => 'b64_json',
]);

foreach ($response->data as $data) {
    $data->url; // null
    $data->b64_json; 
}

// display base64 encoded image
echo '<img src="data:image/jpeg;base64,' . $data->b64_json. '" />';

?>

The only changes that were made are in the following lines of code:

(1) 'response_format' => 'b64_json',

Whereas previously, we requested a URL, this time we request base-64 encoding.

(2) echo '<img src="data:image/jpeg;base64,' . $data->b64_json. '" />';

When rendering the image, we use base64 rendering instead of an image URL.

Point your browser to http://localhost:8888/image-b64.php. This is what I experienced:

Conclusion

There are may services that you can consume from OpenAP, like chat completion, text completion, embeddings, etc.. Now that you know how things work, go ahead and try some of the other services.

Monday, December 11, 2023

Built-in authentication with ASP.NET Core .NET 8.0 Minimal WebAPI

In this tutorial I will showcase the built-in WebApi authentication that was introduced with ASP.NET Core 8.0. To keep it simple, we shall persist our data in the lightweight SQLite database.

Source Code: https://github.com/medhatelmasry/WebApiAuth

Companion Video: https://youtu.be/SSLSNWRQJiA

Prerequisites

It is assumed that you have installed the following on your computer:
  • .NET 8.0
  • Visual Studio Code editor

Getting Started

In a suitable working directory, create a new WebApi application using the following terminal window command:

dotnet new webapi -f net8.0 --name WebApiAuth

Change directory with:

cd WebApiAuth

We will need to add some packages. Also in the same terminal window, run the following commands:

dotnet add package Microsoft.AspNetCore.Identity.EntityFrameworkCore -v 8.0.0
dotnet add package Microsoft.EntityFrameworkCore.Sqlite -v 8.0.0
dotnet add package Microsoft.EntityFrameworkCore.Tools -v 8.0.0
dotnet add package Microsoft.EntityFrameworkCore.Design -v 8.0.0

The above packages allow us to use SQLite and Entity Framework.

Make sure you have the dotnet-ef tool. If you do not, you can globally install it with:

dotnet tool install --global dotnet-ef

If you already have the dotnet-ef, update your version to the latest with:

dotnet tool update --global dotnet-ef

Let us run our web app and have a peek at what it does. Run the web app with:

dotnet watch

This gets loaded into your default browser:


Click on GET >> Try it out >> Execute. This will produce the following output:


It is time for us to peek into the code. Stop the server with CTRL C, then start Visual Studio Code with the following terminal command:

code .

Database context class

Since we will be using Entity Framework to talk to the SQLite database, we will need a database context class. Add a folder named Data, then add to it a class named ApplicationDbContext that derives from IdentityDbContext<IdentityUser> with the following code:

using Microsoft.AspNetCore.Identity;
using Microsoft.AspNetCore.Identity.EntityFrameworkCore;
using Microsoft.EntityFrameworkCore;

namespace WebApiAuth.Data;

public class ApplicationDbContext: IdentityDbContext<IdentityUser> {
    public ApplicationDbContext(DbContextOptions<ApplicationDbContext> options) : base(options)
    {}
}

Add the following connection string to appsettings.json:

"ConnectionStrings": {
  "DefaultConnection": "Data Source=webapi-auth.db;"
}

Next, we must register ApplicationDbContext with our app by adding the following code into Program.cs right before 'var app = builder.Build();':

// Configure identity database access via EF Core
var connectionString = builder.Configuration.GetConnectionString("DefaultConnection") ?? throw new InvalidOperationException("Connection string 'DefaultConnection' not found.");
builder.Services.AddDbContext<ApplicationDbContext>(options =>
    options.UseSqlite(connectionString));

Other required services

Add the following code right after the above code:

// Authorization
builder.Services.AddAuthorization();

// Activate identity APIs. By default, both cookies and proprietary tokens
// are activated. Cookies will be issued based on the 'useCookies' querystring
// parameter in the login endpoint
builder.Services.AddIdentityApiEndpoints<IdentityUser>()
    .AddEntityFrameworkStores<ApplicationDbContext>();

We need to add authorization and authentication middleware with the following code right after 'app.UseHttpsRedirection();':

app.UseAuthentication(); 
app.UseAuthorization(); 

Let us secure the /weatherforecast endpoint by forcing authentication. Chain the following to the endpoint by add ing this code right under '.WithOpenApi()':

.RequireAuthorization();

The full app.MapGet() code will look like this:

app.MapGet("/weatherforecast", () =>
{
    var forecast =  Enumerable.Range(1, 5).Select(index =>
        new WeatherForecast
        (
            DateOnly.FromDateTime(DateTime.Now.AddDays(index)),
            Random.Shared.Next(-20, 55),
            summaries[Random.Shared.Next(summaries.Length)]
        ))
        .ToArray();
    return forecast;
})
.WithName("GetWeatherForecast")
.WithOpenApi()
.RequireAuthorization();

Adding Identity API endpoints

Add the identity endpoints to your app by calling MapIdentityApi<IdentityUser>(). Add the following code to Program.cs right before 'app.Run();':

app.MapIdentityApi<IdentityUser>();

Migrations

Since our app uses EF Core, we will create a migration in the Data folder and update the database. Run the following terminal commands:

dotnet ef migrations add M1 -o Data/Migrations

dotnet ef database update

You will notice that a SQLite database file is created named webapi-auth.db.

Try it out

Let us test our application to see whether or not we have indeed succeeded in securing our API endpoint. Start your app with:

dotnet watch

You will see a variety of identity related endpoints when the following gets loaded into your default browser:


Try to hit the /weatherforecast endpoint and see the data. You will encounter a 401 (unauthorized) error:

Let us register a user. Click on the /register endpoint then click on the "Try it out" button. Update the JSON object so it looks like this:

{
  "email": "a@a.a",
  "password": "P@$$w0rd"
}

Click on the Execute button. You will get a Code 200 response representing success:


Next, let us login with the credentials we created. Click on the /login endpoint, then click on the "Try it out" button.


Choose true for useCookies and update the JSON object so it only has the credentials we had previously created. Thereafter, click on the Execute button. You should get a code 200 response:

Now let's try getting the data using the GET /weatherforecast endpoint. It should be a relief that we can now see the data.


With ASP.NET Core 8.0 came an easier way for securing WebAPI. 

Saturday, March 5, 2022

Deploy ReactJS app to Azure Blob Storage through GitHub Actions

This tutorial will show you how easy it is to deploy a simple ReactJS single page application to Azure Blob Storage.

Source code: https://github.com/medhatelmasry/react2az.gitPre-requisites

The following pre-requisites are assumed:

  • The latest versions of Node.js & npm are installed on your computer
  • You have an Azure subscription
  • You have git installed on your computer
  • You have a GitHub account
  • You have some basic knowledge of ReactJS

Create a simple React app

Choose a suitable working folder and then execute the following command in a terminal window to create a ReactJS app named react2az:

npx create-react-app react2az --use-npm
cd react2az 
npm start

The app will display in your default browser as shown below:

Let us make this application more interesting. 

Install the following client-side packages for bootstrap support:

npm install react-bootstrap bootstrap

Visit React-Bootstrap · React-Bootstrap Documentation for documentation on how to use Bootstrap with ReactJS.

Create /src/pages folder, then add to this new folder a file named home-page.js with content:

import React from "react";
import { useState, useEffect } from "react";
import { Card, Col, Row } from "react-bootstrap";

const HomePage = () => {
  const [toonInfo, setToonInfo] = useState({});

  useEffect(() => {
    const fetchData = async () => {
      const result = await fetch(
        `https://api4all.azurewebsites.net/api/people/`
      );
      const body = await result.json();
      setToonInfo(body);
    };
    fetchData();
  }, []);

  const renderCard = (card, index) => {
    return (
      <Col>
        <Card style={{ width: "50%" }} key={index}>
          <Card.Img variant="top" src={card.pictureUrl} />
          <Card.Body>
            <Card.Title style={{ fontSize: "12px" }}>
              {card.firstName} {card.lastName}
            </Card.Title>
            <Card.Text style={{ fontSize: "10px" }}>
              {card.occupation}
            </Card.Text>
          </Card.Body>
        </Card>
      </Col>
    );
  };

  return (
    <React.Fragment>
      <Row xs={1} sm={2} md={3} lg={5} className="g-4">
        {Array.from(toonInfo).map((item, key) => renderCard(item, key))}
      </Row>
    </React.Fragment>
  );
};

export default HomePage;

The above code accesses an API at https://api4all.azurewebsites.net/api/people/ and renders the images of some cartoon characters in a bootstrap grid of cards.

Open src/App.js in your favourite editor and made the following changes:
  • Delete the first two import lines and replace them with the following:
import HomePage from './pages/home-page';
import 'bootstrap/dist/css/bootstrap.min.css';
  • Delete the content inside return (. . . ); and replace with:
<div className="container">
  <HomePage />
</div>

This means that your src/App.js will look like this:

import HomePage from './pages/home-page';
import 'bootstrap/dist/css/bootstrap.min.css';

function App() {
  return (
    <div className="container">
      <HomePage />
    </div>
  );
}

export default App;

Run your application and you should experience the following web page:

Push ReactJS app to GitHub

Note that your application already contains a .gitignore file. This means that the node_modules folder will be excluded for being pushed to GitHub.

Create a local git repo by running the following command in the root of your application:

git init
git add .
git commit -m "1st commit"

Login into your GitHub account and create a repository. In my case I created a repository by the same name of the application react2az. After you create a new repository, you will see a page that looks like this:


Copy the instructions under "…or push an existing repository from the command line" and execute them in the root of your application. This pushes your code to GitHub.

If you refresh the previous GitHub page, you will see your code had indeed been pushed to GitHub:

Create Storage Account on Azure

Visit https://portal.azure.com/ and login into your Azure subscription. Click on "Create a resource":

In the search field, enter the word storage, hit ENTER, then click on "Storage account".

Click on the blue Create button:


Beside "Resource group", click on "Create new" and give your resource group a suitable name. 


Meantime, change the other settings so that they are similar to the following:


Click on "Review + create":


On the next screen, click on Create. After a short while, your storage account will be provisioned and your page will look like this:

Click on "Go to resource".  In the search field, enter the word static then click on "Static website". 

Click on Enabled.

Enter index.html and 404.html then click on Save at the top.


Your static website will be placed into a folder named $web. You can go ahead and click on it to see that it contains nothing:

Click on your browser back button, clear the search field, then select "Access keys".


Click on "Show keys", copy the connection string, then temporarily paste it in a a text editor.

GitHub Actions

In GitHub, click on Settings:


Click on Secrets followed by Actions:


Click on "New repository secret".

Create a key named AZURE_STORAGE then paste the connection string that you previously saved in a text editor. Click on "Add secret".


Add a folder .github/workflows to your source code. Inside that folder, create a text file named react2az.yml with the following content:

name: Deploy React App to Azure Storage

on:
  push:
    branches:
      - main
  pull_request:
    branches:
      - '*'
defaults:
  run:
    working-directory: ./
env:
  NODE_VERSION: '17'                # set this to the node version to use
  CI: false
jobs:
  build-and-deploy:
    name: Build and Deploy
    runs-on: ubuntu-latest
    steps:
    - uses: actions/checkout@v2
    - name: Use Node.js ${{ env.NODE_VERSION }}
      uses: actions/setup-node@v1
      with:
        node-version: ${{ env.NODE_VERSION }}
    - name: npm install & build
      run: |
        # Build and test the project, then
        # deploy to Azure Web App.
        npm install
        npm run build
    - name: 'Deploy react app to Azure blob storage'
      uses: bacongobbler/azure-blob-storage-upload@main
      with:
          source_dir: './build'
          container_name: '$web'
          connection_string: ${{ secrets.AZURE_STORAGE }} 
          sync: 'true'

Once this file gets pushed or created on GitHub, you can see that the workflow gets kicked off. Click on Actions and you will see a workflow running. This workflow will likely have a different name than "workflow". 


If all goes well, the workflow will turn green, meaning that it completed successfully:

Viewing our web application

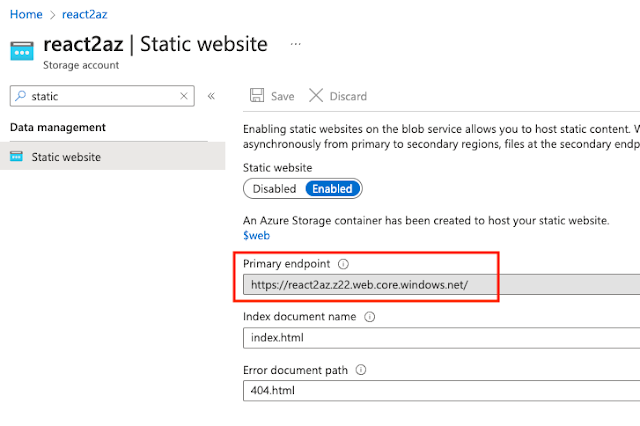
You must be dying to view the application hosted on Azure. Return to the Azure portal then go to "static websites". The URL for accessing your application is beside "Primary endpoint".

Visit the primary endpoint URL and you will see that your ReactJS app is happily hosted on Azure:


In Azure, if you click on $web you will see your files on Azure Blob Storage.

Happy coding and deploying.