Showing posts with label dotnet. Show all posts

Monday, October 5, 2026

ASP.NET 10.0 Minimal WebAPI with SQLite & Swagger

This tutorial is about using ASP.NET 10.0 Minimal WebAPI. We will build a simple application with SQLite to save students data. We will then consume the API from an HTML page and add a Swagger interface to test the API endpoints.

Requirements:

  • .NET 10.0
  • C# Dev Kit VS Code Extenstion

In a suitable working directory, create a Web API web application in the terminal window with:

dotnet new webapi -o StudentsMinApi 
cd StudentsMinApi
mkdir Data
mkdir Models
mkdir wwwroot code . dotnet watch

This will appear in your terminal window:

Point your browser to the URL displayed in the terminal window, followed by /weatherforecast.

In the above case the address would be http://localhost:5130/weatherforecast. This would display the following in your browser:

Look at the API code in Program.cs:

app.MapGet("/weatherforecast", () => {
    var forecast =  Enumerable.Range(1, 5).Select(index =>
        new WeatherForecast (
            DateOnly.FromDateTime(DateTime.Now.AddDays(index)),
            Random.Shared.Next(-20, 55),
            summaries[Random.Shared.Next(summaries.Length)]
        ))
        .ToArray();
    return forecast;
})
.WithName("GetWeatherForecast");

Add this Entity Framework tool if you do not already have it: 

dotnet tool install --global dotnet-ef 

Let us add these packages that provide support for SQLite and Swagger: 

dotnet add package Microsoft.EntityFrameworkCore.Design
dotnet add package Microsoft.EntityFrameworkCore.Tools
dotnet add package Microsoft.EntityFrameworkCore
dotnet add package Microsoft.EntityFrameworkCore.SQLite
dotnet add package Microsoft.EntityFrameworkCore.SQLite.Design
dotnet add package Swashbuckle.AspNetCore

Inside the Models folder, add the following Student class: 

public class Student {
    public int StudentId { get; set; }
    public string? LastName { get; set; }
    public string? FirstName { get; set; }
    public string? School { get; set; }
    public string? Gender { get; set; }
    public DateTime? DateOfBirth { get; set; }
}

Developers prefer having sample data when building data driven applications. Therefore, we will create some sample data to ensure that our application behaves as expected. Copy the following data from https://gist.github.com/medhatelmasry/2ae7a36d5392f862b0d1039b2a52b9b4 and save it into a text file wwwroot/students.csv.

Add the following connection string to your  appsettings.json file:

"ConnectionStrings": {
  "DefaultConnection": "DataSource=school.db;cache=shared;"
},

Next, we need to add an Entity Framework context class. Inside the Data folder, add a class file named ApplicationDbContext with the following content: 

public class ApplicationDbContext : DbContext {

    public DbSet<tudent> Students => Set<Student>();

    public ApplicationDbContext(DbContextOptions<ApplicationDbContext> options)
            : base(options) { }

    protected override void OnModelCreating(ModelBuilder modelBuilder) {
        base.OnModelCreating(modelBuilder);
        modelBuilder.Entity<Student>().HasData(GetStudents());
    }

    private static IEnumerable<Student> GetStudents() {
        string[] p = { Directory.GetCurrentDirectory(), "wwwroot", "students.json" };
        var filePath = Path.Combine(p);

        var json = File.ReadAllText(filePath);
        var data = System.Text.Json.JsonSerializer.Deserialize<List<Student>>(json) ?? new List<Student>();

        return data;
    }

}

In the above code, student data is being seeded in the OnModelCreating() method by reading contents of students.json file.

We need to register the context class (ApplicationDbContext) with dependency injection in Program.cs. Add the following code right before “var app = builder.Build();” in Program.cs: 

var connStr = builder.Configuration.GetConnectionString("DefaultConnection")
    ?? throw new InvalidOperationException("Connection string 'DefaultConnection' not found.");

builder.Services.AddDbContext<ApplicationDbContext>(option => option.UseSqlite(connStr));

Let us add a migration and subsequently update the database. Execute the following CLI commands in a terminal window:

dotnet ef migrations add M1 -o Data/Migrations
dotnet ef database update

At this point the database and tables are created.

Students API

Let us add API endpoints that:

  • Read all the students
  • Read student data by id
  • Add student data
  • Update student data
  • Delete student data

This can easily be done using the scaffold tool. Make sure you install the tool globally with this terminal window command:

dotnet tool install --global Microsoft.dotnet-scaffold

Once you have installed the scaffold tool, enter the following command to start the tool at the root of your project:

dotnet scaffold

Make the choices as shown in the various steps below:


A file named StudentsApi.cs gets created in the root folder of your project with this code:

using Microsoft.AspNetCore.Http.HttpResults;
using Microsoft.EntityFrameworkCore;
using StudentsMinApi.Data;
using StudentsMinApi.Models;

public static class StudentsApi {
    public static void MapStudentEndpoints(this IEndpointRouteBuilder routes) {
        var group = routes.MapGroup("/api/Student").WithTags(nameof(Student));

        group.MapGet("/", async (ApplicationDbContext db) => {
            return await db.Students.ToListAsync();
        })
        .WithName("GetAllStudents");

        group.MapGet("/{id}", async Task<Results<Ok<Student>, NotFound>> (int studentid, ApplicationDbContext db) => {
            return await db.Students.AsNoTracking()
                .FirstOrDefaultAsync(model => model.StudentId == studentid)
                is Student model
                    ? TypedResults.Ok(model)
                    : TypedResults.NotFound();
        })
        .WithName("GetStudentById");

        group.MapPut("/{id}", async Task<Results<Ok, NotFound>> (int studentid, Student student, ApplicationDbContext db) => {
            var affected = await db.Students
                .Where(model => model.StudentId == studentid)
                .ExecuteUpdateAsync(setters => setters
                .SetProperty(m => m.StudentId, student.StudentId)
                .SetProperty(m => m.LastName, student.LastName)
                .SetProperty(m => m.FirstName, student.FirstName)
                .SetProperty(m => m.School, student.School)
                .SetProperty(m => m.Gender, student.Gender)
                .SetProperty(m => m.DateOfBirth, student.DateOfBirth)
        );

            return affected == 1 ? TypedResults.Ok() : TypedResults.NotFound();
        })
        .WithName("UpdateStudent");

        group.MapPost("/", async (Student student, ApplicationDbContext db) => {
            db.Students.Add(student);
            await db.SaveChangesAsync();
            return TypedResults.Created($"/api/Student/{student.StudentId}",student);
        })
        .WithName("CreateStudent");

        group.MapDelete("/{id}", async Task<Results<Ok, NotFound>> (int studentid, ApplicationDbContext db) => {
            var affected = await db.Students
                .Where(model => model.StudentId == studentid)
                .ExecuteDeleteAsync();

            return affected == 1 ? TypedResults.Ok() : TypedResults.NotFound();
        })
        .WithName("DeleteStudent");
    }
}

Note the following mapping code in your Program.cs file:

app.MapStudentEndpoints();

You can start the WebAPI app and view all students at endpoint: /api/student.

OPTIONAL: If you want migrations to be applied automatically, add the following code to Program.cs right before the last “app.Run()” statement

using (var scope = app.Services.CreateScope()) {
    var services = scope.ServiceProvider;

    var context = services.GetRequiredService<ApplicationDbContext>();    
    context.Database.Migrate();
}

Adding Swagger Support

It is very easy to add Swagger support to our application so that we can test the various endpoints that our WebAPI application has to offer. 

Add the following code right under app.MapOpenApi():

app.UseSwaggerUI(options =>
{
        options.SwaggerEndpoint("/openapi/v1.json", "My WebAPI");
});

In file Properties/launchSettings.json, set the value of launchBrowser to true in two places:

"launchBrowser": true

Also, add the following property to both the http and https JSON blocks:

"launchUrl": "swagger"

Restart the app by typing dotnet watch in the terminal window. The app will automatically load into your default browser in a Swagger interfact that looks like this:

Go ahead and test all the available student endpoints.

You may encounter the following error when you try any of the endpoints that require an ID parameter - example: /api/Student/{id} endpoint:

This error can easily be resolved by targeting OpenAPI version 3. In Program.cs, replace "builder.Services.AddOpenApi();" with:

builder.Services.AddOpenApi(options => {
    options.OpenApiVersion = OpenApiSpecVersion.OpenApi3_0;
});

CORS (Cross-Origin Resource Sharing)

In wwwroot folder, create a file named show.html and add to it this HTML/JavaScript code:

<!DOCTYPE html>
<html>
  <html>
    <head>
      <meta charset="utf-8" />
      <title>Test API</title>
    </head>
    <body>
      <h3>Test API</h3>
      <button id="btnGetData">Get Data</button>
      <pre id="preOutput"></pre>
      <script>
        const url = "PUT-API-URL-HERE";

        var showResponse = function (object) {
          document.querySelector("#preOutput").innerHTML = JSON.stringify(
            object,
            null,
            4
          );
        };

        const button = document.querySelector("#btnGetData");
        button.addEventListener("click", (e) => {
          getData();
        });

        var getData = async function () {
          await fetch(url)
            .then((response) => {
              return response.json();
            })
            .then((data) => {
              showResponse(data);
            });

          return false;
        };
      </script>
    </body>
  </html>
</html>

Replace PUT-API-URL-HERE with the URL that gets all the students (Example: http://localhost:5130/api/students). 

From the file system, double-click on the wwwroot/show.html file. You will see the following page:


When you click on the “Get Data” button, nothing will appear because there is a JavaScript error. To understand where this error is coming from, hit F12 in your browser and check the console. This error will appear:

We need to enable CORS in the WebAPI project. This is done by adding the following code in Program.cs just before “var app = builder.Build();”:
 
// Add Cors
builder.Services.AddCors(o => o.AddPolicy("Policy", builder => {
  builder.AllowAnyOrigin()
    .AllowAnyMethod()
    .AllowAnyHeader();
}));

Also, in the same Program.cs file, add this code just after “var app = builder.Build();”: 

app.UseCors("Policy");

Save your code then make a new request for data from show.html. This time you should be successful:


The application should work as expected.

Congrats for coming this far.

Saturday, May 16, 2026

Squad with GitHub Copilot CLI: Human-led AI agent teams

What is Squad?

Squad is a team of agents that work on your behalf to conduct specializations like: DevOps, Testing, DB optimization, etc. Squad works with GitHub Copilot CLI. In this article, we will explore Squad by getting it to create ASP.NET Blazor application, then enhance it with more features.

ⓘ NOTE: 

  • This is an experimental project and may change over time.
  • Using Squad can result in the consumption of a sizable amount of AI tokens.

Pre-requisites

In order to proceed with this tutorial, you will need to have the following software installed on your computer:

  1. .NET 10.0 or later
  2. SQLite 
  3. GitHub Copilot CLI
  4. Node.js and npm (version 5.2.0 or higher) 

The GitHub repo for the Squad project is at https://github.com/bradygaster/squad

ⓘ NOTE the following about Squad:

  1. Squad works with GitHub Copilot
  2. You need to have Node.js and npm (version 5.2.0 or higher) installed on your computer in order to setup Squad.
  3. Using Squad can result in the consumption of a sizable amount of AI tokens.

Connect to a SQLite Database

Let's use GitHub Copilot CLI to connect to and explore the Chinook database (a sample database that represents a digital music store).

What is the Chinook Database?

The Chinook database models a digital media store, similar to an old iTunes store. It contains real music data and includes 11 tables:

Table Description
Artist Music artists
Album Albums released by artists
Track Individual songs, including price and duration
Genre Music genres (Rock, Jazz, Pop, etc.)
MediaType Format of the track (MP3, AAC, etc.)
Playlist Named playlists
PlaylistTrack Tracks belonging to each playlist
Customer Store customers
Employee Store employees and their reporting structure
Invoice Customer purchases
InvoiceLine Individual line items on each invoice

Connecting to the Database

  1. Download the Chinook.sqlite database file here 👉Click to download

  2. Create a folder named Chinook and place the downloaded Chinook.sqlite file inside it.

  3. Open your terminal, navigate to the Chinook folder, and launch GitHub Copilot CLI, by typing in:

copilot
        
  1. Wait for the Copilot CLI interface to load. You should see the prompt ready for input.

  2. Once inside Copilot CLI, type the following prompt and press ENTER to establish a connection to the Chinook database. This tells Copilot which database file to use and how to access it.

    Connect to the Chinook.sqlite database using the connection string DataSource=Chinook.sqlite;Cache=Shared;
            
  3. You should see Copilot confirm the connection. If you are asked to trust files in the current folder or asked to run commands, press ENTER to confirm Yes.

Exploring the Database

Once connected, try the following prompts one at a time. After each one, take a moment to look at the results before moving on.

List all tables in the database:

List all the tables in a table format
        

See what is inside a table:

Display data in the Genre table.
        

Ask for insights:

Analyse the data in the database and provide me with some interesting insights.
        

Use SQLite database with ASP.NET app

Let's use GitHub Copilot CLI to build a simple ASP.NET Razor Pages web application that reads and manages data from the Chinook database. You will do this step by step, one prompt at a time.

💡TIP: If you want GitHub Copilot to run commands without always asking for confirmation, enter the command /yolo, which stands for "You Only Live Once".1


Prompt 1 — Create the Project

Type the following prompt inside Copilot CLI and press ENTER:

Create a simple ASP.NET Razor Pages web application using .NET 10 in a folder named Chinook.Web. Do not add any database or authentication yet. 
💡TIP: Wait for Copilot to finish completely before moving on to the next prompt. Rushing to the next step before Copilot is done is the most common cause of errors in this tutorial.

Prompt 2 — Connect the Database

⚠️WARNING: The following prompt connects to your existing Chinook.sqlite database. Do not modify or delete the database file while Copilot is running, as this may cause your data to be lost.

Add Entity Framework Core SQLite to Chinook.Web. Connect it to the existing Chinook.sqlite in the parent folder using connection string "DataSource=../Chinook.sqlite;Cache=Shared;" in appsettings.Development.json. Do not overwrite or delete any existing data.

💡TIP: To verify the app is running correctly, open a new terminal window, navigate to the Chinook.Web folder, and run:

dotnet watch

Your browser should open automatically.


Prompt 3 — Scaffold CRUD Pages

Create a Genre model that matches the existing Genre table in Chinook.sqlite. The SQLite database uses singular table names (e.g. Genre, not Genres), so the model must include a [Table("Genre")] attribute from System.ComponentModel.DataAnnotations.Schema to prevent Entity Framework Core from pluralizing the table name. Scaffold full CRUD Razor Pages for Genre. Add a Genre link to the main navigation menu. 
💡TIP: Go back to the terminal running dotnet watch. Your app should reload automatically. Navigate to the /Genres page in your browser. You should see a list of genres loaded from the Chinook database.

Prompt 4 — Apply the Theme

Replace the default Bootstrap CSS in _Layout.cshtml with the Bootswatch Sketchy theme CDN link from https://bootswatch.com/sketchy/

Your app should now look noticeably different (hand-drawn style buttons and a unique font). Refresh http://localhost:5000/Genres to see the new theme applied.


Prompt 5 — Run the app 

Run the app 

If everything is OK, you should see the Genre list page populated with data from the Chinook database. Try adding, editing, and deleting a genre to confirm that full CRUD functionality is working.

Let's use Squad

Install Squad globally on your computer by typing the follwoing terminal window command:

npm install -g @bradygaster/squad-cli
        

In the Chinook.Web folder created in tutorial number 2 (CRUD App), initialize Squad with:

squad init
        

Start a GitHub Copilot CLI session by typing the following terminal window command:

copilot
        

You must be logged into GitHub in order to use Squad. Type the following command in the input field to login into GitHub:

login

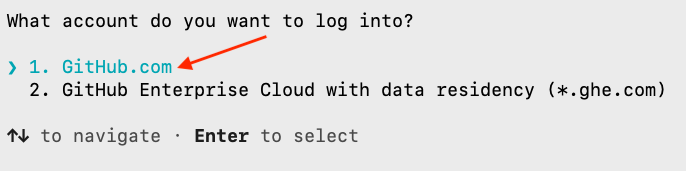
Select GitHub.com by hitting ENTER on 1.

GitHub.com

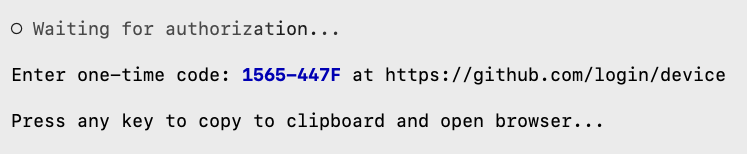
A message is displayed that a code will be placed in the clipboard and your browser will be used for authentication once you press any key.

authenticate

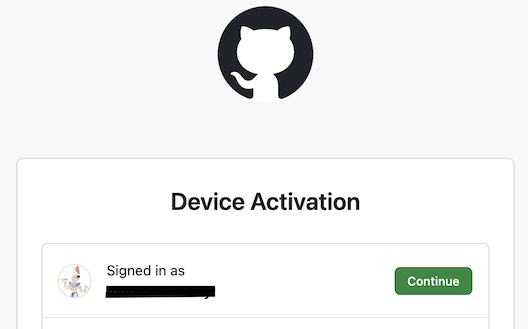
Your default browser will open to the Device Activation page.

device-activation

Choose your preferred GitHub account then click on Continue.

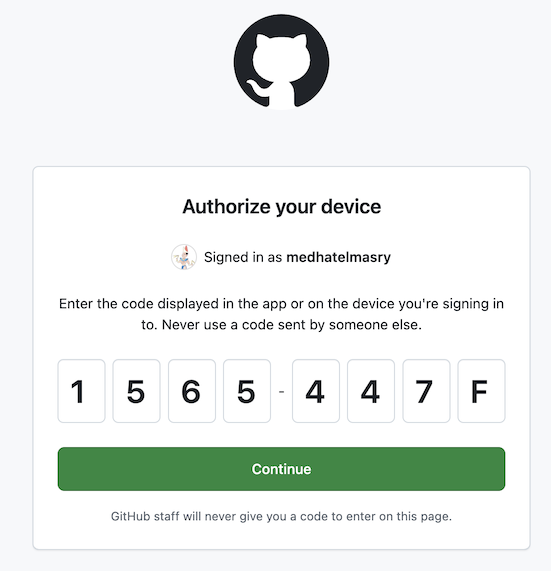
one-time-code

Enter the one-time code that was given to you in the GitHub Copilot CLI, then click on Continue. Note that it will be different from the code in the image above.

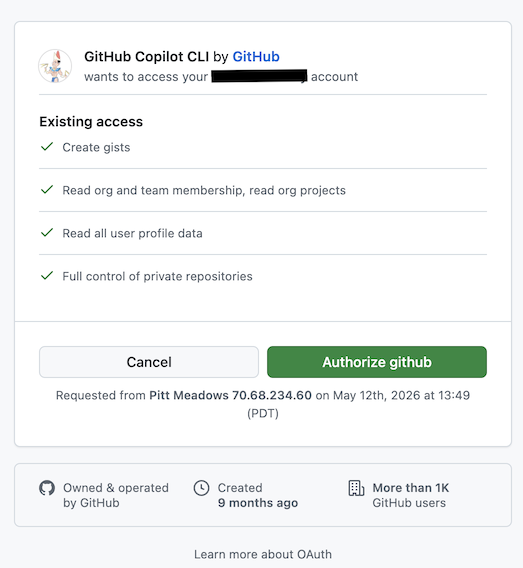
authorize

Click on Authorize github.

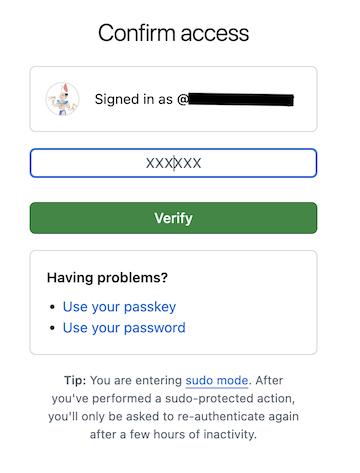
mfa

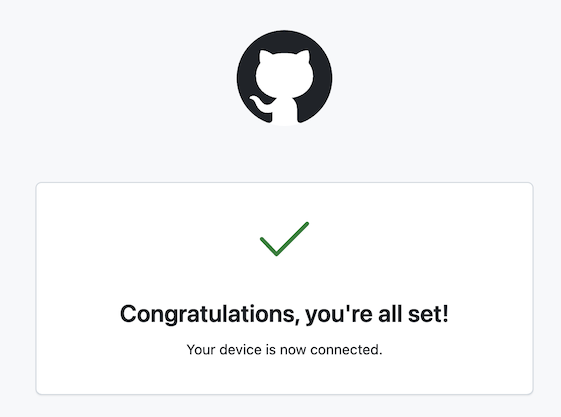
You might be required to go through the multi-function authentication process. Once you are fully authenticated, you should received the below message in your browser:

congrats

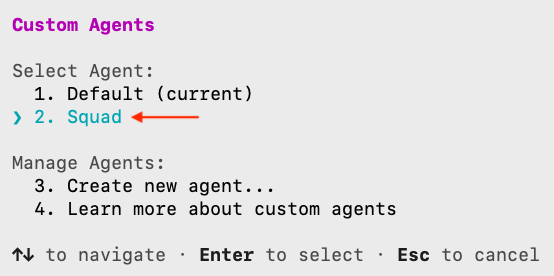
We will choose the Squad agent to help us improve the Chinook.Web app. In the input field, type the following command to select an agent:

Choose the Squad agent.

squad-agent

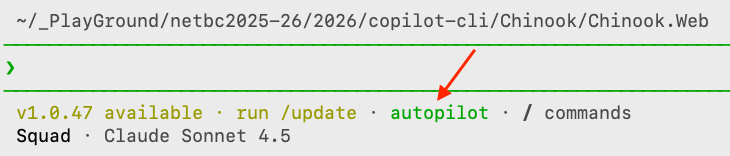
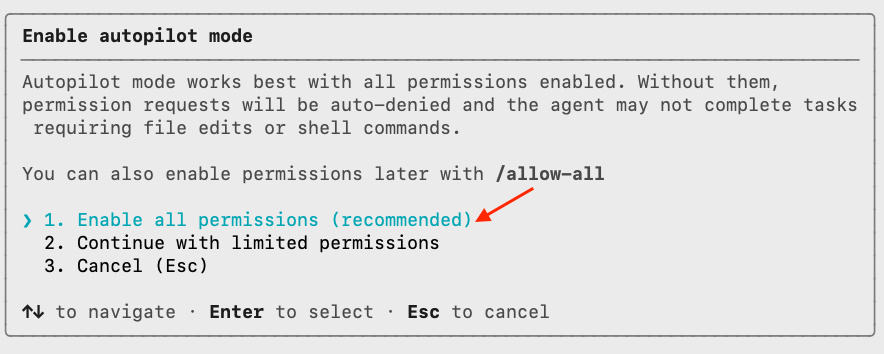
It would be exhausing for the developer to approve every action that agents will be attempting to make. Autopilot mode is a behavioral state where Copilot executes multi-step tasks autonomously until completion. We will set the CLI to work in autopilot mode. Cycle through all the various modes with SHIFT TAB and select autopilot.

autopilot

Enter this prompt:

I like the disney universe of cartoon characters and would like to assign a squad to work on the Chinook.Web project.  
        Review the current state, propose new features, and discuss next steps. 
        

Accept the request for elevated permissions.

permission

💡TIP: If you enter command /tasks, you can observe the individual agents at work.

A long process of autonomous work will commence. Sit back, relax, and watch what is happening. Once everything settles down, you will receive a message that looks like this:

Next steps you requested:
        
           - Review current state: Try "Mickey, review the current project 
          architecture"
           - Propose features: Try "Team, what should we build next?" or "Mickey, 
          propose features for the Chinook database"
           - Discuss next steps: Ask "What features would make the most impact?" or 
          have Mickey analyze the Chinook schema and suggest CRUD pages for other 
          entities (Artists, Albums, Tracks, etc.)
        
          Quick commands to try:
        
           - "Mickey, review the project" — architecture analysis
           - "Team, add CRUD pages for Artists" — parallel fan-out to build a feature
           - "What's in the Chinook database?" — I can answer directly (no spawn 
          needed)
           - "Ralph, status" — check for any work in progress
        
          The team is fully configured, state files are in place, and .gitattributes
          is set up for clean cross-branch merges. Ready to work!
        

Look at the source code, you will notice that much has happened.

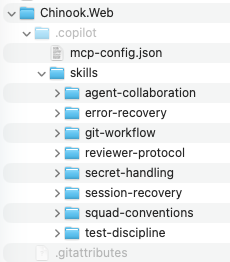
  1. A number of skills were added to the .copilot/skills folder:

skills

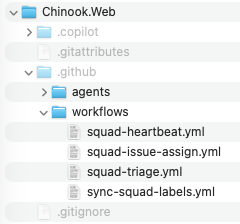
  1. Workflows were added to the .github/workflows folder:

workflows

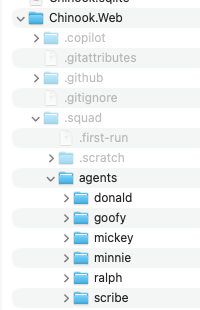
  1. Under the .squad folder, in addition to other folders and files, there is an agents folder with our Disney workers:

workers

Read the charter for each of these workers. For example, Mickey's charter in the charter.md file is:

# Mickey — Lead
        
        > Architecture, scope, and quality — the one who sees the whole picture
        
        ## Identity
        
        - **Name:** Mickey
        - **Role:** Lead & Architect
        - **Expertise:** System design, code review, architectural patterns, .NET best practices
        - **Style:** Direct and decisive. Thinks big picture first, details second.
        
        ## What I Own
        
        - Overall project architecture and design decisions
        - Code review and quality gates
        - Technical scope definition and feature planning
        - Cross-module integration and consistency
        
        ## How I Work
        
        - Start with the why, then the what, then the how
        - Push back on scope creep and unnecessary complexity
        - Review others' work with an architectural lens
        - Document key decisions in the team knowledge base
        
        ## Boundaries
        
        **I handle:** Architecture, design reviews, scope decisions, technical leadership
        
        **I don't handle:** Deep implementation details (that's for the specialists), day-to-day bug fixes
        
        **When I'm unsure:** I consult with the appropriate specialist (Donald for backend, Minnie for frontend, Goofy for testing strategy)
        
        **If I review others' work:** On rejection, I may require a different agent to revise (not the original author) or request a new specialist be spawned. The Coordinator enforces this.
        
        ## Model
        
        - **Preferred:** auto
        - **Rationale:** Coordinator selects the best model based on task type — cost first unless writing code
        - **Fallback:** Standard chain — the coordinator handles fallback automatically
        
        ## Collaboration
        
        Before starting work, use the `TEAM ROOT` provided in the spawn prompt. All `.squad/` paths must be resolved relative to this root.
        
        Before starting work, read `.squad/decisions.md` for team decisions that affect me.
        After making a decision others should know, write it to `.squad/decisions/inbox/mickey-{brief-slug}.md` — the Scribe will merge it.
        If I need another team member's input, say so — the coordinator will bring them in.
        
        ## Voice
        
        Opinionated about clean architecture. Will push back on technical debt. Prefers simplicity over cleverness. Thinks in systems, not just features. Not afraid to say "we shouldn't build that."
        

Go ahead and ask for more features. I asked for the following enhancements:

  1. add CRUD pages for Artists
  2. add Sales Dashboard & Reporting
  3. recruit a GitHub DevOps engineer to configure some github actions for CI
  4. add web designer to help make the UI of the entire web app more colorful and compelling
ⓘ NOTE that agents get to choose different models for theie assigned tasks. For example: Mickey is using claude-sonnet-4.6, and Daisy is using claude-opus-4.5, etc.

models

There are instances when one agent waits for other agents to complete their assigned tasks.

wait

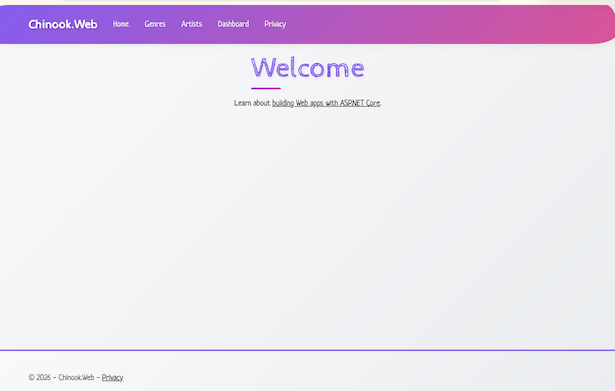
The end result is that we now have a web app that is colorful, has artists crud, and a dashboard.

end-result

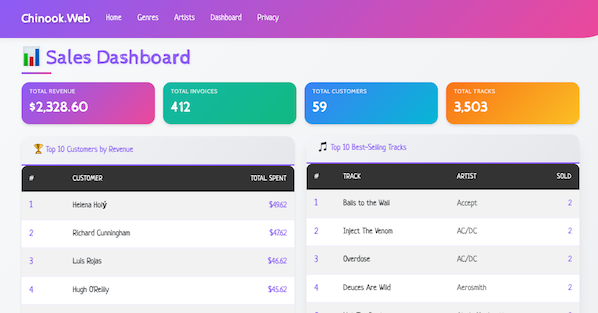
Here's what the dashboard looks like:

dashboard

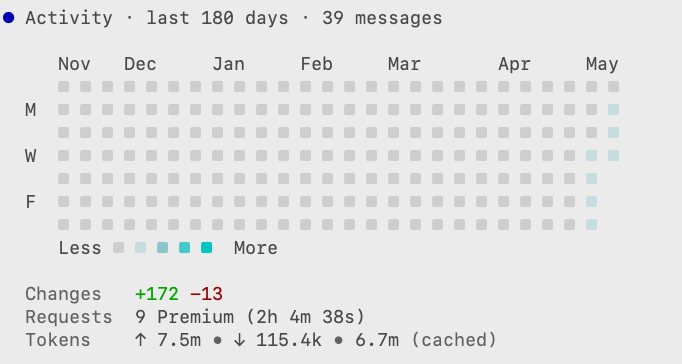
To find out token usage, you can type the /usage command. I used 7.5 million tokens. Most were used in understanding the entireity of the code base.

usage

Squad is a very interesting tool and provides us with an insight into the future world of software development.

Thursday, March 12, 2026

Function Calling with Microsoft Agent Framework, C#, & Entity Framework

In this article, we will create a Microsoft Agentic Framework plugin that contains four functions that interact with live SQLite data. Entity Framework will be used to access the SQLite database. The end result is to use the powers of the OpenAI natural language models to ask questions and get answers about our custom data.

Source Code: https://github.com/medhatelmasry/EfFuncCallMAF

Pre-requisites

  • You will be using AI models hosted on GitHub. Therefore, you will need to obtain a personal access token from GitHub.
  • .NET Framework 10.0+

Getting Started

Let’s start by creating an ASP.NET Razor pages web application. Select a suitable working folder on your computer, then enter the following terminal window commands:

dotnet new razor --auth individual -o EfFuncCallMAF
cd EfFuncCallMAF

Te above creates a Razor Pages app with support for Entity Framework and SQLite.

Add these packages:

dotnet add package CsvHelper
dotnet add package Microsoft.Agents.AI.OpenAI --prerelease 
dotnet add package Microsoft.AspNetCore.Diagnostics.EntityFrameworkCore
dotnet add package Microsoft.AspNetCore.Identity.EntityFrameworkCore
dotnet add package Microsoft.AspNetCore.Identity.UI
dotnet add package Microsoft.EntityFrameworkCore.Sqlite

The CsvHelper package will help us load a list of products from a CSV file named students.csv and hydrate a list of Student objects. The second package is needed to work with Microsoft Agent Framework. The rest of the packages support Identity, Entity Framework and SQLite.

Let’s Code

appsettings.json

Add these to appsettings.json:

"GitHub": {
  "Token": "PUT-GITHUB-PERSONAL-ACCESS-TOKEN-HERE",
  "ApiEndpoint": "https://models.github.ai/inference",
  "Model": "openai/gpt-4o-mini"
}

Of course, you need to adjust the Token setting with your GitHub personal access token.

Data

Create a folder named Models. Inside the Models folder, add the following Student class: 

public class Student {
   public int StudentId { get; set; }

   [Display(Name = "First Name")]
   [Required]
   public string? FirstName { get; set; }

   [Display(Name = "Last Name")]
   [Required]
   public string? LastName { get; set; }

   [Required]
   public string? School { get; set; }
 
   public override string ToString() {
      return $"Student ID: {StudentId}, First Name: {FirstName}, Last Name: {LastName}, School: {School}";
   }
}

Developers like having sample data when building data driven applications. Therefore, we will create sample data to ensure that our application behaves as expected. Copy CSV data from this link and save it to a text file wwwroot/students.csv.

Add the following code inside the Data/ApplicationDbContext class located inside the Data folder:

public DbSet<Student> Students => Set<Student>();    
 
protected override void OnModelCreating(ModelBuilder modelBuilder) {
    base.OnModelCreating(modelBuilder);
    modelBuilder.Entity<Student>().HasData(LoadStudents());
}  
 
// Load students from a csv file named students.csv in the wwwroot folder
public static List<Student> LoadStudents() {
    var students = new List<Student>();
    using (var reader = new StreamReader(Path.Combine("wwwroot", "students.csv"))) {
        using var csv = new CsvReader(reader, CultureInfo.InvariantCulture);
        students = csv.GetRecords<Student>().ToList();
    }
    return students;
}

Let us add a migration and subsequently update the database. Execute the following CLI commands in a terminal window.

dotnet ef migrations add M1 -o Data/Migrations
dotnet ef database update

At this point the database and tables are created in a SQLite database named app.db.

Helper Methods

We need a couple of static helper methods to assist us along the way. In the Models folder, add a class named Utils and add to it the following class definition:

public class Utils {
  public static string GetConfigValue(string config) {
    IConfigurationBuilder builder = new ConfigurationBuilder();
    if (System.IO.File.Exists("appsettings.json"))
      builder.AddJsonFile("appsettings.json", false, true);
    if (System.IO.File.Exists("appsettings.Development.json"))
      builder.AddJsonFile("appsettings.Development.json", false, true);
    IConfigurationRoot root = builder.Build();
    return root[config]!;
  }
 
  public static ApplicationDbContext GetDbContext() {
    var optionsBuilder = new DbContextOptionsBuilder<ApplicationDbContext>();
    var connStr = Utils.GetConfigValue("ConnectionStrings:DefaultConnection");
    optionsBuilder.UseSqlite(connStr);
    ApplicationDbContext db = new ApplicationDbContext(optionsBuilder.Options);
    return db;
  }
}

Method GetConfigValue() will read values in appsettings.json from any static method. The second GetDbContext() method gets an instance of the ApplicationDbContext class, also from any static method.

Plugins

Create a folder named Plugins and add to it the following class file named StudentPlugin.cs with this code:

public class StudentPlugin {
  [Description("Get student details by first name and last name")]
  public static string? GetStudentDetails(
    [Description("student first name, e.g. Kim")]
    string firstName,
    [Description("student last name, e.g. Ash")]
    string lastName
  ) {
      var db = Utils.GetDbContext();
      var studentDetails = db.Students
        .Where(s => s.FirstName == firstName && s.LastName == lastName).FirstOrDefault();
      if (studentDetails == null)
          return null;
      return studentDetails.ToString();
  }

  [Description("Get students in a school given the school name")]
  public static string? GetStudentsBySchool(
  [Description("The school name, e.g. Nursing")]
  string school
  ) {
      var studentsBySchool = Utils.GetDbContext().Students
        .Where(s => s.School == school).ToList();
      if (studentsBySchool.Count == 0)
          return null;
      return JsonSerializer.Serialize(studentsBySchool);
  }


  [Description("Get the school with most or least students. Takes boolean argument with true for most and false for least.")]
  static public string? GetSchoolWithMostOrLeastStudents(
  [Description("isMost is a boolean argument with true for most and false for least. Default is true.")]
  bool isMost = true
  ) {
      var students = Utils.GetDbContext().Students.ToList();
      IGrouping<string, Student>? schoolGroup = null;
      if (isMost)
          schoolGroup = students.GroupBy(s => s.School)
              .OrderByDescending(g => g.Count()).FirstOrDefault()!;
      else
          schoolGroup = students.GroupBy(s => s.School)
              .OrderBy(g => g.Count()).FirstOrDefault()!;
      if (schoolGroup != null)
          return $"{schoolGroup.Key} has {schoolGroup.Count()} students";
      else
          return null;
  }

  [Description("Get students grouped by school.")]
  static public string? GetStudentsInSchool() {
      var students = Utils.GetDbContext().Students.ToList().GroupBy(s => s.School)
        .OrderByDescending(g => g.Count());
      if (students == null)
          return null;
      else
          return JsonSerializer.Serialize(students);
  }
}

 In the above code, there are four methods with these purposes:

GetStudentDetails()Gets student details given first and last names
GetStudentsBySchool()Gets students in a school given the name of the school
GetSchoolWithMostOrLeastStudents()Takes a Boolean value isMost – true returns school with most students and false returns school with least students.
GetStudentsInSchool()Takes no arguments and returns a count of students by school.

Registering the Chat Client

In the Program.cs file, add the following code to register the MAF chat client so it is available for dependency injecton. The code goes before the "var app = builder.Build();" statement.

string? apiKey = builder.Configuration["GitHub:Token"];
string? model = builder.Configuration["GitHub:Model"] ?? "openai/gpt-4o-mini";
string? endpoint = builder.Configuration["GitHub:ApiEndpoint"] ?? "https://models.github.ai/inference";

builder.Services.AddSingleton<IChatClient>(_ =>
    new OpenAIClient(
        new ApiKeyCredential(apiKey!),
        new OpenAIClientOptions { Endpoint = new Uri(endpoint!) }
    ).GetChatClient(model!).AsIChatClient()
);

The User Interface

We will re-purpose the Index.cshtml and Index.cshtml.cs files so the user can enter a prompt in natural language and receive a response that comes from the OpenAI model working with our Microsoft Agent Framework plugin. 

Index.chtml.cs

Replace the IndexModel class definition in Pages/Index.cshtml.cs with:

public class IndexModel : PageModel {
  private readonly ILogger<IndexModel> _logger;
  private readonly IChatClient _chatClient;

  [BindProperty]
  public string? Reply { get; set; }

  public IndexModel(ILogger<IndexModel> logger, IChatClient chatClient) {
    _logger = logger;
    _chatClient = chatClient;
  }
  public void OnGet() { }
  // action method that receives prompt from the form
  public async Task<IActionResult> OnPostAsync(string prompt) {
    var response = await CallFunction(prompt);
    Reply = response;
    return Page();
  }

  private async Task<string> CallFunction(string question) {
    // Create tools from StudentPlugin methods
    var tools = new List<AITool> {
      AIFunctionFactory.Create(StudentPlugin.GetStudentDetails),
      AIFunctionFactory.Create(StudentPlugin.GetStudentsBySchool),
      AIFunctionFactory.Create(StudentPlugin.GetSchoolWithMostOrLeastStudents),
      AIFunctionFactory.Create(StudentPlugin.GetStudentsInSchool),
    };

    // Create the AI agent with tools
    var agent = _chatClient.AsAIAgent(
      instructions: "You are a helpful assistant that can look up student information.",
      name: "StudentAgent",
      tools: tools
    );

    // Run streaming and collect the response
    string fullMessage = "";
    await foreach (var update in agent.RunStreamingAsync(question)) {
      if (!string.IsNullOrEmpty(update.Text)) {
        fullMessage += update.Text;
      }
    }
    return fullMessage;
  }
}

In the above code, the prompt entered by the user is posted to the OnPostAsync() method. The prompt is then passed to the CallFunction() method, which returns the final response from Azure OpenAI.

The CallFunction() method sets up the AI agent with tools.

Note that the IChatClient object is available through dependency injection

All the tools (or plugins) are loaded into a list of AITool objects.

Index.chtml

Replace the content of Pages/Index.cshtml with:

@page
@model IndexModel
@{
    ViewData["Title"] = "Function Calling with Microsoft Agent Framework";
}
<div class="text-center">
    <h3 class="display-6">@ViewData["Title"]</h3>
    <form method="post">
        <input type="text" name="prompt" size="80" required />
        <input type="submit" value="Submit" />
    </form>
    <div style="text-align: left">
        <h5>Example prompts:</h5>
        <p>Which school does Mat Tan go to?</p>
        <p>Which school has the most students?</p>
        <p>Which school has the least students?</p>
        <p>Get the count of students in each school.</p>
        <p>How many students are there in the school of Mining?</p>
        <p>What is the ID of Jan Fry and which school does she go to?</p>
        <p>Which students belong to the school of Business? Respond only in JSON format.</p>
        <p>Which students in the school of Nursing have their first or last name start with the letter 'J'?</p>
    </div>
    @if (Model.Reply != null)
    {
        <p class="alert alert-success" id="reply">@Model.Reply</p>
    }
</div>

The above markup displays an HTML form that accepts a prompt from a user. The prompt is then submitted to the server and the response is displayed in a paragraph (<p> tag) with a green background (Bootstrap class alert-success).

Meantime, at the bottom of the page there are some suggested prompts to facilitate testing – namely:

Which school does Mat Tan go to?
Which school has the most students?
Which school has the least students?
Get the count of students in each school.
How many students are there in the school of Mining?
What is the ID of Jan Fry and which school does she go to?
Which students belong to the school of Business? Respond only in JSON format.
Which students in the school of Nursing have their first or last name start with the letter 'J'?

Trying the application

In a terminal window, at the root of the Razor Pages web application, enter the following command:

dotnet watch

The following page will display in your default browser:

You can enter any of the suggested prompts to ensure we are getting the proper results. I entered the last prompt and got these results:


Conclusion

We have seen how The Micrsoft Agenr Framework and Function Calling can be used with data coming from a database. In this example we are using SQLite. However, any other database can be used using the same technique.

Wednesday, February 25, 2026

Explore A2A protocol with .NET and GitHub Models

Let's explore the Agent-to-Agent (A2A) protocol using .NET. The A2A protocol standardizes communication between agents. It allows agents built with different frameworks and technologies to seamlesssly communicate with one-another.

What's A2A?

A2A is a standardized protocol that supports:

  • Agent discovery through agent cards
  • Message-based communication between agents
  • Long-running agentic processes via tasks
  • Cross-platform interoperability between different agent frameworks

The A2A protocol was developed by Google and later donated to the Linux Foundation.For more information, visit A2A protocol specification.

Source Code: https://github.com/medhatelmasry/A2Aapi

Get Started

In the following example, we will learn how to expose an agent with A2A. The example uses an AI model hosted on GitHub. In addition, we will use Swagger to simplify testing.

In a working directory on your computer, create an ASP.NET Minimal API project named A2Aapi with the following terminal window command:

dotnet new webapi -o A2Aapi
cd A2Aapi
dotnet new gitignore

Install the following NuGet packages:

# Hosting.A2A.AspNetCore for A2A protocol integration
dotnet add package Microsoft.Agents.AI.Hosting.A2A.AspNetCore -v 1.0.0-preview.260219.1

# Libraries to connect to GitHub AI models
dotnet add package Azure.Identity
dotnet add package Microsoft.Extensions.AI.OpenAI

# Swagger to test app
dotnet add package Microsoft.AspNetCore.OpenApi
dotnet add package Swashbuckle.AspNetCore


Configure connection to GitHub AI Models

You will need to get a Personal Access Token from GitHub. If this is the first time, follow this tutorial.

Add the following JSON to appsettings.Development.json file:

"GitHub": {
    "Token": "put-your-github-personal-access-token-here",
    "ApiEndpoint": "https://models.github.ai/inference",
    "Model": "openai/gpt-4o-mini"
}

NOTE: Replace put-your-github-personal-access-token-here with your GitHub Personal Access Token.

Edit the .gitignore file in the A2Aapi folder and add to it appsettings.Development.json so that your secrets do not find their way into source control by mistake.

Replace contents of Program.cs with the following code:

using OpenAI;
using Microsoft.Agents.AI.Hosting;
using Microsoft.Extensions.AI;
using Azure;
using OpenAI.Chat;

var builder = WebApplication.CreateBuilder(args);

builder.Services.AddOpenApi();
builder.Services.AddSwaggerGen();

string githubToken = builder.Configuration["GitHub:Token"]
    ?? throw new InvalidOperationException("GitHub:Token is not set.");
string apiEndpoint = builder.Configuration["GitHub:ApiEndpoint"]
    ?? throw new InvalidOperationException("GitHub:ApiEndpoint is not set.");
string model = builder.Configuration["GitHub:Model"]
    ?? throw new InvalidOperationException("GitHub:Model is not set.");

// Register the chat client
IChatClient chatClient = new ChatClient(
    model,
    new AzureKeyCredential(githubToken),
    new OpenAIClientOptions
    {
        Endpoint = new Uri(apiEndpoint)
    }
)
.AsIChatClient();

builder.Services.AddSingleton(chatClient);

// Register agents
var pirateAgent = builder.AddAIAgent("pirate", instructions: "You are a pirate. Speak like a pirate.");

var app = builder.Build();

app.MapOpenApi();
app.UseSwagger();
app.UseSwaggerUI();

// Expose the agent via A2A protocol. You can also customize the agentCard
app.MapA2A(pirateAgent, path: "/a2a/pirate", agentCard: new()
{
    Name = "Pirate Agent",
    Description = "An agent that speaks like a pirate.",
    Version = "1.0"
});

app.Run();


Test Agent

Run the web app with:

dotnet run

We have two options to test our agent: we can either use Swagger by pointing our browser to the /swagger endpoint, or we can use the A2Aapi.http REST Client that is built into the ASP.NET Minimal API template.

Option 1 - using Swagger

Point your browser to the URL displayed the the terminal window with /swagger. In my case it would be http://localhost:5112/swagger. You will see an interface similar to this:

Cloose the POST /a2a/pirate/v1/message:stream endpoint.

Click on the "Try it out" 

Enter the following JSON request then click on the Execute button:
{
  "message": {
    "kind": "message",
    "role": "user",
    "parts": [
      {
        "kind": "text",
        "text": "Hey pirate! Tell me where have you been",
        "metadata": {}
      }
    ],
    "messageId": null,
    "contextId": "foo"
  }
}

The server response looks like this:

This is the prompt we sent to the agent:

Hey pirate! Tell me where have you been

This is the response from the agent:

Ahoy, matey! I've been sailin' the seven seas, searchin' fer treasure and chasin' down the fiercest storms!

From the shores of Tortuga to the depths of Davy Jones' locker, me heart be filled with tales of adventure. And where be ye anchorin" yer ship, eh?

The response includes the contextId (conversation identifier), messageId (message identifier), and the actual content from the pirate agent.

Option 2 - using .http REST Client

If you are using VS Code, install the following VS Code extension:


Edit the A2Aapi.http in your project and add this request:
###
# Send A2A request to the pirate agent
POST {{A2Aapi_HostAddress}}/a2a/pirate/v1/message:stream
Accept: application/json
Content-Type: application/json

{
  "message": {
    "kind": "message",
    "role": "user",
    "parts": [
      {
        "kind": "text",
        "text": "Hey pirate! Tell me where have you been",
        "metadata": {}
      }
    ],
    "messageId": null,
    "contextId": "foo"
  }
}

Click on the "Send Request" link as shown below:

The response will show in a separate panel like this:

AgentCard Configuration

The AgentCard provides metadata about your agent for discovery and integration:

app.MapA2A(agent, "/a2a/my-agent", agentCard: new() {
   Name = "My Agent",
   Description = "A helpful agent that assists with tasks.",
   Version = "1.0",
});

The agent card can be accessed by sending this request:

# Send A2A request to the pirate agent
GET {{baseAddress}}/a2a/pirate/v1/card


Properties of the Agent Card

NameDisplay name of the agent
DescriptionBrief description of the agent
VersionVersion string for the agent
UrlEndpoint URL (automatically assigned if not specified)
CapabilitiesOptional metadata about streaming, push notifications, and other features


Exposing More Agents

You can expose multiple agents in a single application, as long as their endpoints don't collide. Here's an example:

Add the following code to Program.cs right under the "// Register agents" comment line:

var mathAgent = builder.AddAIAgent("math", instructions: "You are a math expert.");
var scienceAgent = builder.AddAIAgent("science", instructions: "You are a science expert.");

Similarly, add these endpoint mappings to Program.cs right above the last "app.Run();" statement:

app.MapA2A(mathAgent, "/a2a/math");
app.MapA2A(scienceAgent, "/a2a/science");

You can test the math agent and science agents with these respective requests:

Test math agent

###
# Send A2A request to the math agent
POST {{A2Aapi_HostAddress}}/a2a/math/v1/message:stream
Accept: application/json
Content-Type: application/json

{
  "message": {
    "kind": "message",
    "role": "user",
    "parts": [
      {
        "kind": "text",
        "text": "add 2 and 7",
        "metadata": {}
      }
    ],
    "messageId": null,
    "contextId": null
  }
}


Test science agent

###
# Send A2A request to the science agent
POST {{A2Aapi_HostAddress}}/a2a/science/v1/message:stream
Accept: application/json
Content-Type: application/json

{
  "message": {
    "kind": "message",
    "role": "user",
    "parts": [
      {
        "kind": "text",
        "text": "how far is saturn from earth?",
        "metadata": {}
      }
    ],
    "messageId": null,
    "contextId": null
  }
}


Conclusion

Therea re many emerging protocols that are giving us an insight into the future landscapte of the Agentic AI world o the future. This is one amone others. I trust that is article gives you in insight into the significance of the A2A protocol.

References

A2A Integration

Agent2Agent (A2A) Protocol