Showing posts with label chat. Show all posts

Thursday, March 12, 2026

Function Calling with Microsoft Agent Framework, C#, & Entity Framework

In this article, we will create a Microsoft Agentic Framework plugin that contains four functions that interact with live SQLite data. Entity Framework will be used to access the SQLite database. The end result is to use the powers of the OpenAI natural language models to ask questions and get answers about our custom data.

Source Code: https://github.com/medhatelmasry/EfFuncCallMAF

Pre-requisites

  • You will be using AI models hosted on GitHub. Therefore, you will need to obtain a personal access token from GitHub.
  • .NET Framework 10.0+

Getting Started

Let’s start by creating an ASP.NET Razor pages web application. Select a suitable working folder on your computer, then enter the following terminal window commands:

dotnet new razor --auth individual -o EfFuncCallMAF
cd EfFuncCallMAF

Te above creates a Razor Pages app with support for Entity Framework and SQLite.

Add these packages:

dotnet add package CsvHelper
dotnet add package Microsoft.Agents.AI.OpenAI --prerelease 
dotnet add package Microsoft.AspNetCore.Diagnostics.EntityFrameworkCore
dotnet add package Microsoft.AspNetCore.Identity.EntityFrameworkCore
dotnet add package Microsoft.AspNetCore.Identity.UI
dotnet add package Microsoft.EntityFrameworkCore.Sqlite

The CsvHelper package will help us load a list of products from a CSV file named students.csv and hydrate a list of Student objects. The second package is needed to work with Microsoft Agent Framework. The rest of the packages support Identity, Entity Framework and SQLite.

Let’s Code

appsettings.json

Add these to appsettings.json:

"GitHub": {
  "Token": "PUT-GITHUB-PERSONAL-ACCESS-TOKEN-HERE",
  "ApiEndpoint": "https://models.github.ai/inference",
  "Model": "openai/gpt-4o-mini"
}

Of course, you need to adjust the Token setting with your GitHub personal access token.

Data

Create a folder named Models. Inside the Models folder, add the following Student class: 

public class Student {
   public int StudentId { get; set; }

   [Display(Name = "First Name")]
   [Required]
   public string? FirstName { get; set; }

   [Display(Name = "Last Name")]
   [Required]
   public string? LastName { get; set; }

   [Required]
   public string? School { get; set; }
 
   public override string ToString() {
      return $"Student ID: {StudentId}, First Name: {FirstName}, Last Name: {LastName}, School: {School}";
   }
}

Developers like having sample data when building data driven applications. Therefore, we will create sample data to ensure that our application behaves as expected. Copy CSV data from this link and save it to a text file wwwroot/students.csv.

Add the following code inside the Data/ApplicationDbContext class located inside the Data folder:

public DbSet<Student> Students => Set<Student>();    
 
protected override void OnModelCreating(ModelBuilder modelBuilder) {
    base.OnModelCreating(modelBuilder);
    modelBuilder.Entity<Student>().HasData(LoadStudents());
}  
 
// Load students from a csv file named students.csv in the wwwroot folder
public static List<Student> LoadStudents() {
    var students = new List<Student>();
    using (var reader = new StreamReader(Path.Combine("wwwroot", "students.csv"))) {
        using var csv = new CsvReader(reader, CultureInfo.InvariantCulture);
        students = csv.GetRecords<Student>().ToList();
    }
    return students;
}

Let us add a migration and subsequently update the database. Execute the following CLI commands in a terminal window.

dotnet ef migrations add M1 -o Data/Migrations
dotnet ef database update

At this point the database and tables are created in a SQLite database named app.db.

Helper Methods

We need a couple of static helper methods to assist us along the way. In the Models folder, add a class named Utils and add to it the following class definition:

public class Utils {
  public static string GetConfigValue(string config) {
    IConfigurationBuilder builder = new ConfigurationBuilder();
    if (System.IO.File.Exists("appsettings.json"))
      builder.AddJsonFile("appsettings.json", false, true);
    if (System.IO.File.Exists("appsettings.Development.json"))
      builder.AddJsonFile("appsettings.Development.json", false, true);
    IConfigurationRoot root = builder.Build();
    return root[config]!;
  }
 
  public static ApplicationDbContext GetDbContext() {
    var optionsBuilder = new DbContextOptionsBuilder<ApplicationDbContext>();
    var connStr = Utils.GetConfigValue("ConnectionStrings:DefaultConnection");
    optionsBuilder.UseSqlite(connStr);
    ApplicationDbContext db = new ApplicationDbContext(optionsBuilder.Options);
    return db;
  }
}

Method GetConfigValue() will read values in appsettings.json from any static method. The second GetDbContext() method gets an instance of the ApplicationDbContext class, also from any static method.

Plugins

Create a folder named Plugins and add to it the following class file named StudentPlugin.cs with this code:

public class StudentPlugin {
  [Description("Get student details by first name and last name")]
  public static string? GetStudentDetails(
    [Description("student first name, e.g. Kim")]
    string firstName,
    [Description("student last name, e.g. Ash")]
    string lastName
  ) {
      var db = Utils.GetDbContext();
      var studentDetails = db.Students
        .Where(s => s.FirstName == firstName && s.LastName == lastName).FirstOrDefault();
      if (studentDetails == null)
          return null;
      return studentDetails.ToString();
  }

  [Description("Get students in a school given the school name")]
  public static string? GetStudentsBySchool(
  [Description("The school name, e.g. Nursing")]
  string school
  ) {
      var studentsBySchool = Utils.GetDbContext().Students
        .Where(s => s.School == school).ToList();
      if (studentsBySchool.Count == 0)
          return null;
      return JsonSerializer.Serialize(studentsBySchool);
  }


  [Description("Get the school with most or least students. Takes boolean argument with true for most and false for least.")]
  static public string? GetSchoolWithMostOrLeastStudents(
  [Description("isMost is a boolean argument with true for most and false for least. Default is true.")]
  bool isMost = true
  ) {
      var students = Utils.GetDbContext().Students.ToList();
      IGrouping<string, Student>? schoolGroup = null;
      if (isMost)
          schoolGroup = students.GroupBy(s => s.School)
              .OrderByDescending(g => g.Count()).FirstOrDefault()!;
      else
          schoolGroup = students.GroupBy(s => s.School)
              .OrderBy(g => g.Count()).FirstOrDefault()!;
      if (schoolGroup != null)
          return $"{schoolGroup.Key} has {schoolGroup.Count()} students";
      else
          return null;
  }

  [Description("Get students grouped by school.")]
  static public string? GetStudentsInSchool() {
      var students = Utils.GetDbContext().Students.ToList().GroupBy(s => s.School)
        .OrderByDescending(g => g.Count());
      if (students == null)
          return null;
      else
          return JsonSerializer.Serialize(students);
  }
}

 In the above code, there are four methods with these purposes:

GetStudentDetails()Gets student details given first and last names
GetStudentsBySchool()Gets students in a school given the name of the school
GetSchoolWithMostOrLeastStudents()Takes a Boolean value isMost – true returns school with most students and false returns school with least students.
GetStudentsInSchool()Takes no arguments and returns a count of students by school.

Registering the Chat Client

In the Program.cs file, add the following code to register the MAF chat client so it is available for dependency injecton. The code goes before the "var app = builder.Build();" statement.

string? apiKey = builder.Configuration["GitHub:Token"];
string? model = builder.Configuration["GitHub:Model"] ?? "openai/gpt-4o-mini";
string? endpoint = builder.Configuration["GitHub:ApiEndpoint"] ?? "https://models.github.ai/inference";

builder.Services.AddSingleton<IChatClient>(_ =>
    new OpenAIClient(
        new ApiKeyCredential(apiKey!),
        new OpenAIClientOptions { Endpoint = new Uri(endpoint!) }
    ).GetChatClient(model!).AsIChatClient()
);

The User Interface

We will re-purpose the Index.cshtml and Index.cshtml.cs files so the user can enter a prompt in natural language and receive a response that comes from the OpenAI model working with our Microsoft Agent Framework plugin. 

Index.chtml.cs

Replace the IndexModel class definition in Pages/Index.cshtml.cs with:

public class IndexModel : PageModel {
  private readonly ILogger<IndexModel> _logger;
  private readonly IChatClient _chatClient;

  [BindProperty]
  public string? Reply { get; set; }

  public IndexModel(ILogger<IndexModel> logger, IChatClient chatClient) {
    _logger = logger;
    _chatClient = chatClient;
  }
  public void OnGet() { }
  // action method that receives prompt from the form
  public async Task<IActionResult> OnPostAsync(string prompt) {
    var response = await CallFunction(prompt);
    Reply = response;
    return Page();
  }

  private async Task<string> CallFunction(string question) {
    // Create tools from StudentPlugin methods
    var tools = new List<AITool> {
      AIFunctionFactory.Create(StudentPlugin.GetStudentDetails),
      AIFunctionFactory.Create(StudentPlugin.GetStudentsBySchool),
      AIFunctionFactory.Create(StudentPlugin.GetSchoolWithMostOrLeastStudents),
      AIFunctionFactory.Create(StudentPlugin.GetStudentsInSchool),
    };

    // Create the AI agent with tools
    var agent = _chatClient.AsAIAgent(
      instructions: "You are a helpful assistant that can look up student information.",
      name: "StudentAgent",
      tools: tools
    );

    // Run streaming and collect the response
    string fullMessage = "";
    await foreach (var update in agent.RunStreamingAsync(question)) {
      if (!string.IsNullOrEmpty(update.Text)) {
        fullMessage += update.Text;
      }
    }
    return fullMessage;
  }
}

In the above code, the prompt entered by the user is posted to the OnPostAsync() method. The prompt is then passed to the CallFunction() method, which returns the final response from Azure OpenAI.

The CallFunction() method sets up the AI agent with tools.

Note that the IChatClient object is available through dependency injection

All the tools (or plugins) are loaded into a list of AITool objects.

Index.chtml

Replace the content of Pages/Index.cshtml with:

@page
@model IndexModel
@{
    ViewData["Title"] = "Function Calling with Microsoft Agent Framework";
}
<div class="text-center">
    <h3 class="display-6">@ViewData["Title"]</h3>
    <form method="post">
        <input type="text" name="prompt" size="80" required />
        <input type="submit" value="Submit" />
    </form>
    <div style="text-align: left">
        <h5>Example prompts:</h5>
        <p>Which school does Mat Tan go to?</p>
        <p>Which school has the most students?</p>
        <p>Which school has the least students?</p>
        <p>Get the count of students in each school.</p>
        <p>How many students are there in the school of Mining?</p>
        <p>What is the ID of Jan Fry and which school does she go to?</p>
        <p>Which students belong to the school of Business? Respond only in JSON format.</p>
        <p>Which students in the school of Nursing have their first or last name start with the letter 'J'?</p>
    </div>
    @if (Model.Reply != null)
    {
        <p class="alert alert-success" id="reply">@Model.Reply</p>
    }
</div>

The above markup displays an HTML form that accepts a prompt from a user. The prompt is then submitted to the server and the response is displayed in a paragraph (<p> tag) with a green background (Bootstrap class alert-success).

Meantime, at the bottom of the page there are some suggested prompts to facilitate testing – namely:

Which school does Mat Tan go to?
Which school has the most students?
Which school has the least students?
Get the count of students in each school.
How many students are there in the school of Mining?
What is the ID of Jan Fry and which school does she go to?
Which students belong to the school of Business? Respond only in JSON format.
Which students in the school of Nursing have their first or last name start with the letter 'J'?

Trying the application

In a terminal window, at the root of the Razor Pages web application, enter the following command:

dotnet watch

The following page will display in your default browser:

You can enter any of the suggested prompts to ensure we are getting the proper results. I entered the last prompt and got these results:


Conclusion

We have seen how The Micrsoft Agenr Framework and Function Calling can be used with data coming from a database. In this example we are using SQLite. However, any other database can be used using the same technique.

Monday, October 6, 2025

Explore Docker MCP Toolkit and VS Code

To explore Docker MCP Toolkit, we will use two MCP server in the toolkit, namely PostgreSQL and Playwright.

Companion Video: https://youtu.be/43oJi_gAucU

What is Docker MCP Toolkit?

The Docker MCP Toolkit enables hosting and managing MCP servers. These servers expose APIs for specific development tasks, such as retrieving GitHub issue data or querying databases using natural language.

Prerequisites

You will need the following before you can continue:

  • Docker Desktop (latest version)
  • Visual Studio Code (latest version)
  • GitHub Copilot extension for VS Code
  • GitHub Copilot with Chat and Agent Mode enabled

1) Explore PostgreSQL MCP Server

We will use natural language to query a PostgreSQL database that is already pre-loaded with the sample Northwind database. To run the PostgreSQL server in a docker container on your computer, execute the following command from any terminal window:


docker run --name psqlnw -e POSTGRES_PASSWORD=VerySecret -p 5433:5432 -d melmasry/nw-psql:1.0.0

Start “Docker Desktop” on your computer and go to the Containers tab on the left navigation. You will see that the psqlnw container is running.


Next, let us use the Docker MCP Toolkit. In Docker Desktop, click on “MCP Toolkit” in the left navigation.

Click on the Catalog tab. This will show you a list of MCP Servers that are ready for you to explore. 

We will start with PostgreSQL. Find the PostgreSQL MCP Server by entering ‘postgr’ in the filter field. Then click on + to add it to your list.

You will be asked to enter a secret. This is nothing but the connection string and it is based on this format:

postgresql://readonly_user:readonly_password@host:port/database_name

In our case, this would be:

postgresql://postgres:VerySecret@host.docker.internal:5433/northwind

Click on the "My Servers" tab to see the MCP servers that you have chosen.

Connect Docker MCP Toolkit to Visual Studio Code

Let us query our northwind database in PostgreSQL from VS Code. Go to a working directory and execute these commands to create an empty folder on your computer:

mkdir mcp-server
cd mcp-server

In the same terminal window, logout and login into docker with:

docker logout  
docker login

Start VS Code in the folder with

code .

In VS Code, open the Command Palette by pressing Ctrl + Shift + P (or Cmd + Shift + P on macOS).

Select “Add MCP Server”.

Select “Command (stdio) Run a local command that implements the MCP protocol Manual Install”.

Enter the gateway command:

docker mcp gateway run

Give the server an ID named: 

my-mcp-server

Choose “Workspace Available in this workspace, runs locally”.


Click Trust.

A file named mcp.json is created in a .vscode folder with this content:

Note that the server is running. 

Inside the Github Copilot Chat window, choose Agent and any Claude model. Click on the tools icon to see active MCP servers.

You will find MCP servers that are configured in VS Code. Among them will be the one we enabled in the Docker MCP Toolkit.

You will notice that it only has one tool: “query Run a read-only SQL query”. This is all that is needed to query the northwind database.

Click ok the Ok button to close the tools popup.

Enter this prompt in the GitHub Copilot window:

What are the tables in the PostgreSQL northwind database?

You will be asked to click on the Allow button.

Thereafter, it displays a list of database tables in the northwind database.

Try this other prompt:

What are the products supplied by "Exotic Liquids"?

You will get a similar response to this:

2) Explore Playwright MCP Server

Back in Docker Desktop >> MCP Toolkit, add Playwright.

You now have two MCP servers in our list: Playwright and PostgreSQL.

Back in VS Code, restart the MCP Server in the .vscode/mcp.json file.

In the VS Code GitHub Copilot Chat window, enter this prompt:

Using the tools provided from the Docker MCP Server, navigate to https://www.bbc.com/, find the two most important business stories.

I got the following response at the time of writing this article:

Conclusion

I hope you found this article useful. These are early days of MCP servers. I am sure things will evolve much more in this very important space.

Saturday, September 20, 2025

Build web-based MCP server and client with ASP.NET & GitHub Models

Overview

This article demonstrates how to build a basic MCP server and client using ASP.NET and Server Sent Events (SSE). The MCP server exposes tools that can be discovered and used by LLMs, while the client application connects these tools to an AI service. GitHub AI models are used on the client application.

Server Sent Events (SSE)

SSE transport enables server-to-client streaming with HTTP POST requests for client-to-server communication. This approach facilitates communication between frontend microservices and backend business contexts through the MCP server. 

Companion Video: https://youtu.be/vTBtPU7AnT4

Source Code: https://github.com/medhatelmasry/AspMCP

Prerequisites

  • GitHub account
  • Visual Studio Code
  • .NET 9.0 (or later)

Setup

We will create an .NET solution comprising of an ASP.NET web server project; a WebAPI client project; and add the required packages with these terminal window commands:

mkdir AspMCP
cd AspMCP
dotnet new sln
dotnet new web -n ServerMCP
dotnet sln add ./ServerMCP/ServerMCP.csproj
cd ServerMCP
dotnet add package Azure.AI.OpenAI
dotnet add package Microsoft.Extensions.AI
dotnet add package Microsoft.Extensions.AI.OpenAI --prerelease
dotnet add package ModelContextProtocol --prerelease
dotnet add package ModelContextProtocol.AspNetCore --prerelease
cd ..
dotnet new webapi --use-controllers -n ClientMCP
dotnet sln add ./ClientMCP/ClientMCP.csproj
cd ClientMCP
dotnet add package Azure.AI.OpenAI
dotnet add package Azure.Identity
dotnet add package Microsoft.Extensions.AI
dotnet add package Microsoft.Extensions.AI.OpenAI --prerelease
dotnet add package ModelContextProtocol --prerelease
dotnet add package Swashbuckle.AspNetCore
cd ..

Open the solution in VS Code. To do that, you can enter this command in a terminal a terminal window:

code .

Build ASP.NET Server

In the ServerMCP project, add this service to Program.cs before “var app = builder.Build();”:

builder.Services.AddMcpServer()
.WithHttpTransport()
.WithToolsFromAssembly();

In the same server Program.cs file, add this code just before “app.Run();”:

// Add MCP middleware
app.MapMcp();

Delete (or comment out) this code in the Program.cs file:

app.MapGet("/", () => "Hello World!");

In the server project create a folder named McpTools folder and add to it a GreetingTool class with this code:

[McpServerToolType]
public sealed class GreetingTool {
  public GreetingTool() { }
  
  [McpServerTool, Description("Says Hello to a user")]
  public static string Echo(string username) {
    return "Hello " + username;
  }
}

Test Server

In a terminal window inside the server project, run this command to start the server:

dotnet watch

Point your browser to https://localhost:????/sse. 

Note : replace ???? with your port number. 

This is what you will see:


Build Client

In the client project......

1) Add these settings to the appsettings.json file.

"AI": {
  "ModelName": "gpt-4o-mini",
  "Endpoint": "https://models.inference.ai.azure.com",
  "ApiKey": "PUT-GITHUB-TOKEN-HERE",
  "MCPServiceUri": "http://localhost:5053/sse"
}

NOTE: adjust values for ApiKey and MCPServiceUri accordingly.

2) Register Services via Dependency Injection. Add the following to your client Program.cs:
var endpoint = builder.Configuration["AI:Endpoint"];
var apiKey = builder.Configuration["AI:ApiKey"];
var model = builder.Configuration["AI:ModelName"];

builder.Services.AddChatClient(services =>
  new ChatClientBuilder(
    (
      !string.IsNullOrEmpty(apiKey)
        ? new AzureOpenAIClient(new Uri(endpoint!), new AzureKeyCredential(apiKey))
        : new AzureOpenAIClient(new Uri(endpoint!), new DefaultAzureCredential())
    ).GetChatClient(model).AsIChatClient()
  )
  .UseFunctionInvocation()
  .Build());
 

3) To view the swagger UI, add this code right below “app.MapOpenApi();”:
app.UseSwaggerUI(options => {
  options.SwaggerEndpoint("/openapi/v1.json", "MCP Server");
  options.RoutePrefix = "";
});
 

4) Edit Properties/launchSettings.json, change launchBrowser to true under http and https. This is so that the app automatically launches in a browser when you run the project with “dotnet watch”.

In the Controllers folder, create a ChatController class with the following code:

[ApiController]
[Route("[controller]")]
public class ChatController : ControllerBase {
  private readonly ILogger<ChatController> _logger;
  private readonly IChatClient _chatClient;

  private readonly IConfiguration? _configuration;
  public ChatController(
    ILogger<ChatController> logger,
    IChatClient chatClient,
    IConfiguration configuration
  ) {
    _logger = logger;
    _chatClient = chatClient;
    _configuration = configuration;
  }

  [HttpPost(Name = "Chat")]
  public async Task<string> Chat([FromBody] string message) {
    // Create MCP client connecting to our MCP server
    var mcpClient = await McpClientFactory.CreateAsync(
      new SseClientTransport(
          new SseClientTransportOptions {
              Endpoint = new Uri(_configuration?["AI:MCPServiceUri"] ?? throw new InvalidOperationException("MCPServiceUri is not configured"))
          }
      )
    );
    // Get available tools from the MCP server
    var tools = await mcpClient.ListToolsAsync();

    // Set up the chat messages
    var messages = new List<ChatMessage> {
      new ChatMessage(ChatRole.System, "You are a helpful assistant.")
    };
    messages.Add(new(ChatRole.User, message));

    // Get streaming response and collect updates
    List<ChatResponseUpdate> updates = [];
    StringBuilder result = new StringBuilder();

    await foreach (var update in _chatClient.GetStreamingResponseAsync(
      messages,
      new() { Tools = [.. tools] }
    )) {
      result.Append(update);
      updates.Add(update);
    }
    
    // Add the assistant's responses to the message history
    messages.AddMessages(updates);
    return result.ToString();
  }
}

Test server and client

1) Start the server in a terminal window with: dotnet watch

2) Start the client in another terminal window also with: dotnet watch

The following swagger page will load in your browser. Click on POST, then “Try it out”.


3)  string with your name, then click on Execute.


4) You will receive a response like below.


A more realistic solution

To develop a more realistic solution, we will add a database to the server project. Thereafter, our MCP client can query the database using natural language. This is very compelling for line-of-business applications.

In the server project, make these changes.

1) Add these packages:
dotnet add package Microsoft.EntityFrameworkCore
dotnet add package Microsoft.EntityFrameworkCore.Design
dotnet add package Microsoft.EntityFrameworkCore.Sqlite
dotnet add package Microsoft.EntityFrameworkCore.SQLite.Design
dotnet add package Microsoft.EntityFrameworkCore.Tools
dotnet add package CsvHelper
 

2) Add this to appsettings.json:

"ConnectionStrings": {
  "DefaultConnection": "DataSource=beverages.sqlite;Cache=Shared"
}

3) Copy CSV data from this link. Then, save the content is a file named beverages.csv and put that file in a wwwroot folder in tour project.

4) In a Models folder, add a class named Beverage with this code:
public class Beverage {
  [Required]
  public int BeverageId { get; set; }

  public string? Name { get; set; }

  public string? Type { get; set; }

  public string? MainIngredient { get; set; }

  public string? Origin { get; set; }

  public int? CaloriesPerServing { get; set; }

  public void DisplayInfo() {
    Console.WriteLine($"{Name} is a {Type} from {Origin} made with {MainIngredient}. It has {CaloriesPerServing} calories per serving.");
  }
}

5) In a Data folder, add this ApplicationDbContext class:
public class ApplicationDbContext : DbContext {
  public DbSet<Beverage> Beverages => Set<Beverage>();

  public ApplicationDbContext(DbContextOptions<ApplicationDbContext> options)
    : base(options) { }

  protected override void OnModelCreating(ModelBuilder modelBuilder) {
    base.OnModelCreating(modelBuilder);
    modelBuilder.Entity<Beverage>().HasData(GetBeverages());
  }

  private static IEnumerable<Beverage> GetBeverages() {
    string[] p = { Directory.GetCurrentDirectory(), "wwwroot", "beverages.csv" };
    var csvFilePath = Path.Combine(p);

    var config = new CsvConfiguration(CultureInfo.InvariantCulture) {
      Encoding = Encoding.UTF8,
      PrepareHeaderForMatch = args => args.Header.ToLower(),
    };

    var data = new List<Beverage>().AsEnumerable();
    using (var reader = new StreamReader(csvFilePath)) {
      using (var csvReader = new CsvReader(reader, config)) {
        data = csvReader.GetRecords<Beverage>().ToList();
      }
    }

    return data;
  }
}

6) Add this service to Program.cs:
var connStr = builder.Configuration.GetConnectionString("DefaultConnection") 
    ?? throw new InvalidOperationException("Connection string 'DefaultConnection' not found.");
    
builder.Services.AddDbContext<ApplicationDbContext>(
	option => option.UseSqlite(connStr)
);

 7) In the same Program.cs file, add this code right before “app.Run();”:
// Apply database migrations on startup
using (var scope = app.Services.CreateScope()) {
    var services = scope.ServiceProvider;

    var context = services.GetRequiredService<ApplicationDbContext>();    
    context.Database.Migrate();
}

8) Now, we can add and apply database migrations with:
dotnet ef migrations add M1 -o Data/Migrations
dotnet ef database update

At this stage, the beverages.sqlite database is populated with real data:


9) Let us add a class that queries the SQLite database. Inside of a Services folder, add a class named BeverageService with this content:

public class BeverageService(ApplicationDbContext db) {
  public async Task<string> GetBeveragesJson() {
    var beverages = await db.Beverages.ToListAsync();
    return System.Text.Json.JsonSerializer.Serialize(beverages);
  }

  public async Task<string> GetBeverageByIdJson(int id) {
    var beverage = await db.Beverages.FindAsync(id);
    return System.Text.Json.JsonSerializer.Serialize(beverage);
  }

  public async Task<string> GetBeveragesContainingNameJson(string name) {
    var beverages = await db.Beverages
      .Where(b => b.Name!.Contains(name))
      .ToListAsync();

    return System.Text.Json.JsonSerializer.Serialize(beverages);
  }


  public async Task<string> GetBeveragesContainingTypeJson(string type) {
    var beverages = await db.Beverages
      .Where(b => b.Type!.Contains(type))
      .ToListAsync();

    return System.Text.Json.JsonSerializer.Serialize(beverages);
  }

  public async Task<string> GetBeveragesByIngredientJson(string ingredient) {
    var beverages = await db.Beverages
      .Where(b => b.MainIngredient!.Contains(ingredient))
      .ToListAsync();

    return System.Text.Json.JsonSerializer.Serialize(beverages);
  }

  public async Task<string> GetBeveragesByCaloriesLessThanOrEqualJson(int calories) {
    var beverages = await db.Beverages
      .Where(b => b.CaloriesPerServing <= calories)
      .ToListAsync();

    return System.Text.Json.JsonSerializer.Serialize(beverages);
  }

  public async Task<string> GetBeveragesByOriginJson(string origin) {
    var beverages = await db.Beverages
      .Where(b => b.Origin!.Contains(origin))
      .ToListAsync();

    return System.Text.Json.JsonSerializer.Serialize(beverages);
  }
}

10) Next, expose MCP tooling that interacts with the SQLite data. In the McpTools folder, add a class named BeverageTools with this code:

[McpServerToolType]
public class BeverageTool
{
    private readonly BeverageService _beverageService;
    private readonly ApplicationDbContext _db;

    public BeverageTool(ApplicationDbContext db)
    {
        _db = db;
        _beverageService = new BeverageService(_db);
    }

    [McpServerTool, Description("Get a list of beverages and return as JSON array")]
    public string GetBeveragesJson()
    {
        var task = _beverageService.GetBeveragesJson();
        return task.GetAwaiter().GetResult();
    }

    [McpServerTool, Description("Get a beverage by ID and return as JSON")]
    public string GetBeverageByIdJson([Description("The ID of the beverage to get details for")] int id)
    {
        var task = _beverageService.GetBeverageByIdJson(id);
        return task.GetAwaiter().GetResult();
    }

    [McpServerTool, Description("Get beverages by name and return as JSON")]
    public string GetBeveragesByNameJson([Description("The name of the beverage to filter by")] string name)
    {
        var task = _beverageService.GetBeveragesContainingNameJson(name);
        return task.GetAwaiter().GetResult();
    }

    [McpServerTool, Description("Get beverages by type and return as JSON")]
    public string GetBeveragesByTypeJson([Description("The type of the beverage to filter by")] string type)
    {
        var task = _beverageService.GetBeveragesContainingTypeJson(type);
        return task.GetAwaiter().GetResult();
    }

    [McpServerTool, Description("Get beverages by ingredient and return as JSON")]
    public string GetBeveragesByIngredientJson([Description("The ingredient of the beverage to filter by")] string ingredient)
    {
        var task = _beverageService.GetBeveragesByIngredientJson(ingredient);
        return task.GetAwaiter().GetResult();
    }

    [McpServerTool, Description("Get beverages by calories less than or equal to and return as JSON")]
    public string GetBeveragesByCaloriesLessThanOrEqualJson([Description("The maximum calories per serving to filter by")] int calories)
    {
        var task = _beverageService.GetBeveragesByCaloriesLessThanOrEqualJson(calories);
        return task.GetAwaiter().GetResult();
    }

    [McpServerTool, Description("Get beverages by origin and return as JSON")]
    public string GetBeveragesByOriginJson([Description("The origin of the beverage to filter by")] string origin)
    {
        var task = _beverageService.GetBeveragesByOriginJson(origin);
        return task.GetAwaiter().GetResult();
    }
}

You can now test the Student MCP service. Start the server project followed by the client project. In the client app, enter prompt: beverages high in calories.

Here is the output:


Conclusion

You are now able to create your own MCP server using .NET. Of course, you can deploy the server to the cloud and use it from a variety of client applications and devices. Go ahead and create MCP servers that do wonderful things.

Sunday, June 29, 2025

Build and deploy a remote MCP server with Azure Functions and C#

In this walkthrough, we will build an MCP Server based on Azure Funtions and C#. It will be tested locally, then deployed to Azure using the az tool. To avoid confusion, we will go through this journey step-by-step. Although the methods we implement are very basic, the same concepts can be extended to cover much more sophisticated solutions.

Companion Video: https://youtu.be/D5qQKzQ8vTQ

MCP, what is that?

The Model Context Protocol (MCP) is a specification created by Anthropic that makes it easier for AI applications to talk to tooling.

Why Remote MCP Servers?

Installing the same MCP server locally everywhere you need it is unrealistic. Making sure people on your team have the same version installed is a daunting task.

The solution is MCP servers that run remotely. As long as the endpoint supports server-side events (SSE), you are good to go.

Prerequisites

Getting Started

We will create a vanilla C# console application with:

mkdir RemoteMcpFunc
cd RemoteMcpFunc

Open the console application in VS Code with:

code .

Click on the Azure tool on the left-side, then click on the "Azure Functions" tool and choose "Create New Project...".

On the "Create new project" panel, choose the already highlighted current directory:

Next, choose C#.

Choose the latest version of .NET, which at the time of writing is ".NET 9.0 Isolated".

We will keep it simple by choosing the "HTTP trigger" template.

It the "Create new HTTP trigger" panel, provide a name for the Azure Function class file. In my case I simply named it HttpMCP.

Next you will provide a namespace (like Mcp.Function).

Again, to keep it simple, we will choose Anonymous.

NOTE: You can automate the creation of an Azure Functions app by using the func terminal window command:

func init --worker-runtime dotnet-isolated
func new --template "HTTP trigger" --name HttpMCP

To make sure that our basic Azure Function works as expected, type this command in the root of your project:
func start

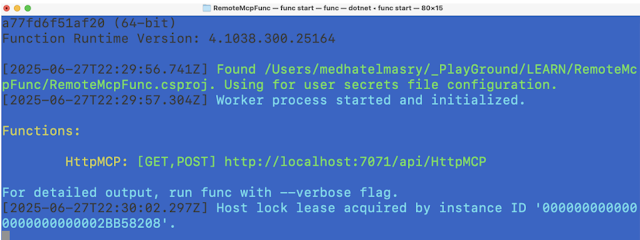
This should show you output similar to this:

If you point your browser to the given URL, you will experience a welcome message similar to this:

Hit CTRL C to stop the application.

Add MCP package

At this stage our Azure Functions application has no MCP capability. We will change this by adding the following package:

dotnet add package Microsoft.Azure.Functions.Worker.Extensions.Mcp -v 1.0.0-preview.7

NOTE: At this time, the above package is experimental and in pre-release mode.

Add MCP smarts

We will add three simple MCP server functions with these abilities:

  1. the classic Hello World
  2. reverse a message
  3. multiply two numbers

Add the following ToolDefinitions.cs class file:

public static class ToolDefinitions {
  public static class HelloWorldTool {
    public const string Name = "HelloWorldTool";
    public const string Description = "A simple tool that says: Hello World!";
  }


  public static class ReverseMessageTool {
    public const string Name = "ReverseMessageTool";
    public const string Description = "Echoes back message in reverse.";

    public static class Param {
      public const string Name = "Message";
      public const string Description = "The Message to reverse";
    }
  }

  public static class MultiplyNumbersTool {
    public const string Name = "MultiplyNumbersTool";
    public const string Description = "A tool that shows paramater usage by asking for two numbers and multiplying them together";

    public static class Param1 {
      public const string Name = "FirstNumber";
      public const string Description = "The first number to multiply";
    }

    public static class Param2 {
      public const string Name = "SecondNumber";
      public const string Description = "The second number to multiply";
    }
  }

  public static class DataTypes {
    public const string Number = "number";
    public const string String = "string";
  }
}

The above file contains tool names, descriptions and data types. There are three MCP tools that we will be creating:

Name Purpose Parameters
HelloWorldTool Simply displays 'Hello World'  
ReverseMessageTool Reverses text string
MultiplyNumbersTool Multiplies two numbers number,number

To keep things clean, we will create a separate class for each tool. 

HelloWorldMcpTool.cs

public class HelloWorldMcpTool {
  [Function("HelloWorldMcpTool")]
  public IActionResult Run(
    [McpToolTrigger(ToolDefinitions.HelloWorldTool.Name, ToolDefinitions.HelloWorldTool.Description)]
    ToolInvocationContext context
  ) {
      return new OkObjectResult($"Hi. I am {ToolDefinitions.HelloWorldTool.Name} and my message is 'HELLO WORLD!'");
  }
}

ReverseMessageMcpTool.cs

public class ReverseMessageMcpTool {
  [Function("ReverseMessageMcpTool")]
  public IActionResult Run(
    [McpToolTrigger(ToolDefinitions.ReverseMessageTool.Name, ToolDefinitions.ReverseMessageTool.Description)]
    ToolInvocationContext context,
    [McpToolProperty(ToolDefinitions.ReverseMessageTool.Param.Name, ToolDefinitions.DataTypes.String, ToolDefinitions.ReverseMessageTool.Param.Description)]
    string message
  ) {
    string reversedMessage = new string(message.ToCharArray().Reverse().ToArray());
    return new OkObjectResult($"Hi. I'm {ToolDefinitions.ReverseMessageTool.Name}!. The reversed message is: {reversedMessage}");
  }
}

MultiplyNumbersMcpTool.cs

public class MultiplyNumbersMcpTool {
  [Function("MultiplyNumbersMcpTool")]
  public IActionResult Run(
    [McpToolTrigger(ToolDefinitions.MultiplyNumbersTool.Name, ToolDefinitions.MultiplyNumbersTool.Description)]
    ToolInvocationContext context,
    [McpToolProperty(ToolDefinitions.MultiplyNumbersTool.Param1.Name, ToolDefinitions.DataTypes.Number, ToolDefinitions.MultiplyNumbersTool.Param1.Description)]
    int firstNumber,
    [McpToolProperty(ToolDefinitions.MultiplyNumbersTool.Param2.Name, ToolDefinitions.DataTypes.Number, ToolDefinitions.MultiplyNumbersTool.Param2.Description)]
    int secondNumber) {
    return new OkObjectResult($"Hi. I am {ToolDefinitions.MultiplyNumbersTool.Name}!. The result of {firstNumber} multiplied by {secondNumber} is: {firstNumber * secondNumber}");
  }
}

At this stage, we have created all the business logic for our three tools. What remains is configuring these tools in our Program.cs file. Add this code to Program.cs before: builder.Build().Run();

builder.EnableMcpToolMetadata();

builder.ConfigureMcpTool(ToolDefinitions.HelloWorldTool.Name);

builder.ConfigureMcpTool(ToolDefinitions.ReverseMessageTool.Name)
  .WithProperty(ToolDefinitions.ReverseMessageTool.Param.Name, ToolDefinitions.DataTypes.String, ToolDefinitions.ReverseMessageTool.Param.Description);

builder.ConfigureMcpTool(ToolDefinitions.MultiplyNumbersTool.Name)
  .WithProperty(ToolDefinitions.MultiplyNumbersTool.Param1.Name, ToolDefinitions.DataTypes.Number, ToolDefinitions.MultiplyNumbersTool.Param1.Description)
  .WithProperty(ToolDefinitions.MultiplyNumbersTool.Param2.Name, ToolDefinitions.DataTypes.Number, ToolDefinitions.MultiplyNumbersTool.Param2.Description);

In local.settings.json, make the following changes:

  1. Set the value of AzureWebJobsStorage to "UseDevelopmentStorage=true" for local development with the Azure emulator.
  2. Inside the "Values" section, add: "AzureWebJobsSecretStorageType": "Files". This is to use local file system for secrets instead of blob storage.

Contents of local.settings.json will look like this:

{
  "IsEncrypted": false,
  "Values": {
    "AzureWebJobsStorage": "UseDevelopmentStorage=true",
    "FUNCTIONS_WORKER_RUNTIME": "dotnet-isolated",
    "AzureWebJobsSecretStorageType": "Files"
  }
}

Testing our MCP server locally

Start your Azure Functions app with:

func start

Note the MCP server SSE endpoint which will be later used to configure the server in VS Code.

Open the VS Code Command Palatte.

Choose 'MCP: Add Server...".

Next, choose "HTTP (HTTP or Server-Sent Events)".

Paste the MCP server SSE endpoint. In my case it is http://localhost:7071/runtime/webhooks/mcp/sse.

Next, you will be asked to give your MCP Server a name. You can accept the defaut value.

Select "Workspace Settings" so that the configuration is saved in your project in the .vscode/mcp.json file.

The .vscode/mcp.json file is open in the editor.

{
  "servers": {
    "my-mcp-server-c5a639d4": {
      "url": "http://localhost:7071/runtime/webhooks/mcp/sse"
    }
  }
}

Click on Start to start the MCP server.

Open the Open the GitHub Copilot Chat panel in the top right of VS Code.

In the chat panel, choose Agent, any Claude model, then click on the tools icon.

Our three tools appear. This means that we can now use them.

Back in the chat window, try this prompt:

Call the HelloWorldTool.

The MCP HelloWorldTool is detected. Click on the Continue button.

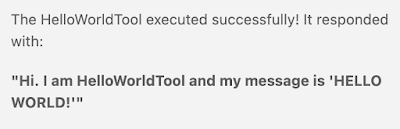
This is the respose I received:

I also tried this prompt to test the reverse merssage tool.

Reverse the message: MCP is very cool

And, received this response:

Again, I tried this prompt to test the multiplication tool tool.

Multiply 100 and 89.

And, received this result:

Our Azure Functions MCP Server works well locally. The next challenge is to make it work remotely by deploying it to Azure.

Deploy to Azure

We will use the az Azure CLI Tool. Folow these steps.

# Login to Azure

az login

# Create a resource group named: rg-mcp-func-server

az group create --name rg-mcp-func-server --location eastus

# Create a storage account named mcpstoreacc in resource-group rg-mcp-func-server in the eastus data center

az storage account create --name mcpstoreacc --resource-group rg-mcp-func-server --location eastus --sku Standard_LRS

# Create a function app named mcp-func-app

az functionapp create --resource-group rg-mcp-func-server --consumption-plan-location eastus --runtime dotnet-isolated --functions-version 4 --name mcp-func-app --storage-account mcpstoreacc

# Deploy (or redeploy) function app named mcp-func-app

func azure functionapp publish mcp-func-app

Upon successful deployment, the endpoint will be displayed in your terminal window:

Login into your Azure account and search for the resource group to find the deployed Azure Function.

Click on the functions app. In the example above, the functions app is named mcp-func-app. Copy the Default Domain and add to it https://. In .vscode/mcp.json replace http://localhost:7071 with the 'Default Domain' from Azure. Leave /runtime/webhooks/mcp/sse in the URL. Your .vscode/mcp.json will be similar to this:

{
    "servers": {
        "my-mcp-server-c5a639d4": {
            //"url": "http://localhost:7071/runtime/webhooks/mcp/sse"
            "url": "https://mcp-func-app.azurewebsites.net/runtime/webhooks/mcp/sse"
        }
    }
}

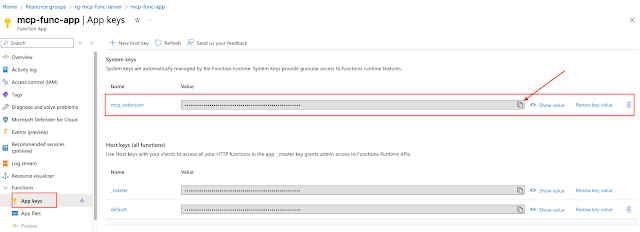
We will need to get an mcp_extension key from Azure. You will find that by clicking on "App keys" on the left navigarion in Azure and copying the mcp_extension key.

In .vscode/mcp.json, add this code above “servers”:

"inputs": [
  {
    "type": "promptString",
    "id": "functions-mcp-extension-system-key",
    "description": "Azure Functions MCP Extension System Key",
    "password": true
  }
],

.vscode/mcp.json looks like this:

The above JSON will prompt the user to enter the mcp-extension key.

Again, in .vscode/mcp.json, add this “headers” block under “url”:

"headers": {
  "x-functions-key": "${input:functions-mcp-extension-system-key}"
}

.vscode/mcp.json now looks like this:

When you start the server, you will be prompted for the MCP Extension System Key. Enter the mcp_extension key you obtained from Azure. Once the server is running again, you can start prompting it as before. The big difference this time is that it is running remotely, instead of on your local computer.

I entered this prompt:

Multiply 11 and 22 and provide the answer.

And received this result:

Conclusion

We have learned how to create MCP servers using Microsoft's Azure Functions technology with C#. We went through the development, testing, and deployment process. In general, this is a much more compelling solution for large scale implementations of MCP Servers. You can take these basic concepts and build bigger and better MCP Servers.