Showing posts with label Node. Show all posts

Sunday, March 6, 2022

Build a socket.io chat web app with node.js

Socket.IO is a JavaScript library for real-time web applications. It enables real-time, bi-directional communication between web clients and servers. 

This article addresses the very basic building blocks to creating a socket.io  application in Node.js. 

Source code: https://github.com/medhatelmasry/socket-chat.git

Pre-requisites

The following pre-requisites are assumed:
  • The latest versions of Node.js & npm are installed on your computer
  • You have some basic knowledge of Node.js and Express

Getting started

In a working directory, create a folder for our web app named socket-chat then change into that directory with the following commands:

mkdir socket-chat
cd socket-chat

Initialize a Node.js application with the following command:

npm init -y

Install packages ejsexpress, nodemon and  socket.io with the following command:

npm install ejs express nodemon socket.io

We need to create our server. To accomplish this, create a file in the root of your app named index.js with the the following content:

const express = require("express");
const app = express();
const server = require("http").createServer(app);
const io = require("socket.io")(server, { cors: { origin: "*" } }); 

app.set("view engine", "ejs");

app.get("/", (req, res) => {
  res.render("index", {title: "Socket.io chat example"});
}); 

const port = process.env.PORT || 3030;
server.listen(port, () => {
  console.log(`Server started and listening on port ${port}`);
});

// emit & receive messages
io.on('connection', (socket) => {
  console.log(`Someone connected with socket id: ${socket.id}`);
});

What does the above code do?

  • we initialize express, server, and io 
  • EJS is declared as our view engine
  • the / route points to a view page named index. This will be created later.
  • the server will be started on port 3030
  • whenever someone connects, the unique socket id is displayed in the server console

Edit file package.json and add the following to the "scripts" section:

"dev": "nodemon index.js"

The above allows us to run the web app using command "npm run dev". The advantage of nodemon is that it watches for any changes in the file system and restarts the server whenever a file changes.
 
Create a folder named views and add to it a file named index.ejs with the following content:

<!DOCTYPE html>
<html lang="en">
<head>
    <title><%- title %></title>
    <script src="https://cdn.socket.io/socket.io-3.0.1.min.js"></script>
    <link rel="stylesheet" href="https://cdn.jsdelivr.net/npm/bootstrap@5.1.3/dist/css/bootstrap.min.css"/>
</head>
<body>
    <div class="container">
        <h3><%- title %></h3>
    </div>
</body>
</html>

Also in views/index.ejs, add the following JavaScript code below the closing </div> tag:

<script>
    const socket = io('http://localhost:3030');
    socket.on("connection", () => {});
</script>

The above code does a web socket hand-shake with the server. Start your server, if it is not started already, then point your browser to http://localhost:3030. The page looks like this:


More interesting is that your console window reveals information about socket IDs:


This proves that we have established a socket.io connection between the server and clients. Let us write some code that sends messages from one client to all the others. To do that, we will create a simple input field and a button in our frontend view. Add the following markup in views/index.ejs right under " <h3><%- title %></h3>":

<input type="text" id="msg" />
<button onclick="sendMessage()" class="btn btn-success btn-sm">
   Send Message
</button>
<hr />
<ul id="msgList" class="list-group"></ul>

In our backend index.js file,  add the following just under the console.log(. . .) statement:

socket.on('chat', (data) => {
   console.log(data);
   // broadcast the same message to all except the sender
   socket.broadcast.emit('chat', data);
});

The above code indicates that when a message named "chat" is received, it will broadcast that same message to all other clients except the sender. The variable data represents the actual message.

Now, back in our views/index.ejs frontend, we will actually emit (or send) a message. Type the following code right under "socket.on("connection", () => {});":

const sendMessage = () => {
   const msgInput = document.querySelector("#msg");
   socket.emit("chat", msgInput.value);
   document.querySelector("#msg").value = "";
}

The above is the sendMessage() handler for the button click. It sends the text entered by user to the message event named chat and, subsequently, clears the input field.

To actually see the message that is being passed around, we need to add some code to the frontend that will append each chat message received to the <ul> . . . </ul> unordered list with id msgList. Add this code below the "const sendMessage = () => { . . . . });" block: 

socket.on("chat", (data) => {
  const msg = data
    .replace(/&/g, "&amp;")
    .replace(/</g, "&lt;")
    .replace(/>/g, "&gt;");
  var li = document.createElement("li");
  li.classList.add("list-group-item", "list-group-item-warning");
  li.textContent = msg;
  document.querySelector("#msgList").appendChild(li);
});

What does the above code do?

  • data is sanitized such that & is replaced by &amp; and < is replaced by &lt; and > is replaced by &gt;
  • an li element is created and given bootstrap styling
  • data is assigned as content to the li element
  • finally, the li item is appended to the unordered list with id msgList

Testing our chat app

Point two (or more) browser windows to http://localhost:3030. In the first window enter a message then click on "Send message". You will notice the second window will pickup the same message:


This is a very simple socket.io app. I hope you will use this starting point to do much more useful and interesting applications.

Saturday, March 5, 2022

Deploy ReactJS app to Azure Blob Storage through GitHub Actions

This tutorial will show you how easy it is to deploy a simple ReactJS single page application to Azure Blob Storage.

Source code: https://github.com/medhatelmasry/react2az.gitPre-requisites

The following pre-requisites are assumed:

  • The latest versions of Node.js & npm are installed on your computer
  • You have an Azure subscription
  • You have git installed on your computer
  • You have a GitHub account
  • You have some basic knowledge of ReactJS

Create a simple React app

Choose a suitable working folder and then execute the following command in a terminal window to create a ReactJS app named react2az:

npx create-react-app react2az --use-npm
cd react2az 
npm start

The app will display in your default browser as shown below:

Let us make this application more interesting. 

Install the following client-side packages for bootstrap support:

npm install react-bootstrap bootstrap

Visit React-Bootstrap · React-Bootstrap Documentation for documentation on how to use Bootstrap with ReactJS.

Create /src/pages folder, then add to this new folder a file named home-page.js with content:

import React from "react";
import { useState, useEffect } from "react";
import { Card, Col, Row } from "react-bootstrap";

const HomePage = () => {
  const [toonInfo, setToonInfo] = useState({});

  useEffect(() => {
    const fetchData = async () => {
      const result = await fetch(
        `https://api4all.azurewebsites.net/api/people/`
      );
      const body = await result.json();
      setToonInfo(body);
    };
    fetchData();
  }, []);

  const renderCard = (card, index) => {
    return (
      <Col>
        <Card style={{ width: "50%" }} key={index}>
          <Card.Img variant="top" src={card.pictureUrl} />
          <Card.Body>
            <Card.Title style={{ fontSize: "12px" }}>
              {card.firstName} {card.lastName}
            </Card.Title>
            <Card.Text style={{ fontSize: "10px" }}>
              {card.occupation}
            </Card.Text>
          </Card.Body>
        </Card>
      </Col>
    );
  };

  return (
    <React.Fragment>
      <Row xs={1} sm={2} md={3} lg={5} className="g-4">
        {Array.from(toonInfo).map((item, key) => renderCard(item, key))}
      </Row>
    </React.Fragment>
  );
};

export default HomePage;

The above code accesses an API at https://api4all.azurewebsites.net/api/people/ and renders the images of some cartoon characters in a bootstrap grid of cards.

Open src/App.js in your favourite editor and made the following changes:
  • Delete the first two import lines and replace them with the following:
import HomePage from './pages/home-page';
import 'bootstrap/dist/css/bootstrap.min.css';
  • Delete the content inside return (. . . ); and replace with:
<div className="container">
  <HomePage />
</div>

This means that your src/App.js will look like this:

import HomePage from './pages/home-page';
import 'bootstrap/dist/css/bootstrap.min.css';

function App() {
  return (
    <div className="container">
      <HomePage />
    </div>
  );
}

export default App;

Run your application and you should experience the following web page:

Push ReactJS app to GitHub

Note that your application already contains a .gitignore file. This means that the node_modules folder will be excluded for being pushed to GitHub.

Create a local git repo by running the following command in the root of your application:

git init
git add .
git commit -m "1st commit"

Login into your GitHub account and create a repository. In my case I created a repository by the same name of the application react2az. After you create a new repository, you will see a page that looks like this:


Copy the instructions under "…or push an existing repository from the command line" and execute them in the root of your application. This pushes your code to GitHub.

If you refresh the previous GitHub page, you will see your code had indeed been pushed to GitHub:

Create Storage Account on Azure

Visit https://portal.azure.com/ and login into your Azure subscription. Click on "Create a resource":

In the search field, enter the word storage, hit ENTER, then click on "Storage account".

Click on the blue Create button:


Beside "Resource group", click on "Create new" and give your resource group a suitable name. 


Meantime, change the other settings so that they are similar to the following:


Click on "Review + create":


On the next screen, click on Create. After a short while, your storage account will be provisioned and your page will look like this:

Click on "Go to resource".  In the search field, enter the word static then click on "Static website". 

Click on Enabled.

Enter index.html and 404.html then click on Save at the top.


Your static website will be placed into a folder named $web. You can go ahead and click on it to see that it contains nothing:

Click on your browser back button, clear the search field, then select "Access keys".


Click on "Show keys", copy the connection string, then temporarily paste it in a a text editor.

GitHub Actions

In GitHub, click on Settings:


Click on Secrets followed by Actions:


Click on "New repository secret".

Create a key named AZURE_STORAGE then paste the connection string that you previously saved in a text editor. Click on "Add secret".


Add a folder .github/workflows to your source code. Inside that folder, create a text file named react2az.yml with the following content:

name: Deploy React App to Azure Storage

on:
  push:
    branches:
      - main
  pull_request:
    branches:
      - '*'
defaults:
  run:
    working-directory: ./
env:
  NODE_VERSION: '17'                # set this to the node version to use
  CI: false
jobs:
  build-and-deploy:
    name: Build and Deploy
    runs-on: ubuntu-latest
    steps:
    - uses: actions/checkout@v2
    - name: Use Node.js ${{ env.NODE_VERSION }}
      uses: actions/setup-node@v1
      with:
        node-version: ${{ env.NODE_VERSION }}
    - name: npm install & build
      run: |
        # Build and test the project, then
        # deploy to Azure Web App.
        npm install
        npm run build
    - name: 'Deploy react app to Azure blob storage'
      uses: bacongobbler/azure-blob-storage-upload@main
      with:
          source_dir: './build'
          container_name: '$web'
          connection_string: ${{ secrets.AZURE_STORAGE }} 
          sync: 'true'

Once this file gets pushed or created on GitHub, you can see that the workflow gets kicked off. Click on Actions and you will see a workflow running. This workflow will likely have a different name than "workflow". 


If all goes well, the workflow will turn green, meaning that it completed successfully:

Viewing our web application

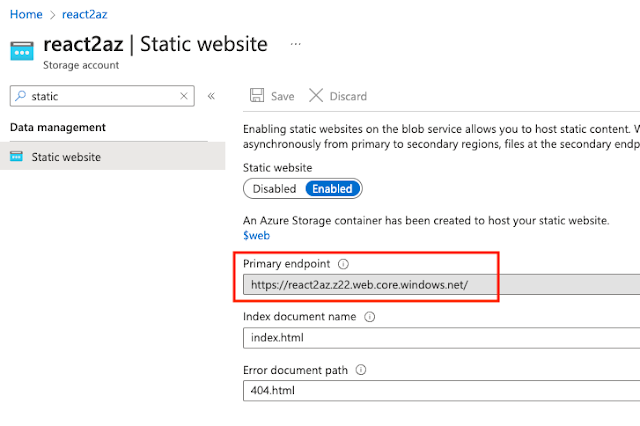
You must be dying to view the application hosted on Azure. Return to the Azure portal then go to "static websites". The URL for accessing your application is beside "Primary endpoint".

Visit the primary endpoint URL and you will see that your ReactJS app is happily hosted on Azure:


In Azure, if you click on $web you will see your files on Azure Blob Storage.

Happy coding and deploying.