Showing posts with label ASP.NET Core. Show all posts

Monday, November 6, 2023

Server-side Blazor 7.0 APP with CRUD Operations and SQLite

In this post, we will build a Server-side Blazor app talks directly to the SQLite database. This is a very realistic option since both blazor and the database server run on the server. 

Source Code: https://github.com/medhatelmasry/ServerBlazorEF7

Overview

Blazor is a framework for developing interactive client-side web applications using C# instead of JavaScript. 

Architecture

The architecture of the application that we will be building will look like this:


ASP.NET Core hosts the server-side app and sets up SignalR endpoint where clients connect. SignalR is responsible for updating the DOM on the client with any changes. The Blazor application on the server connects directly to the database using Entity Framework Core.

What are we doing in this tutorial?

In this tutorial I will show you how to build a server-side Blazor application that connects directly with SQLite database using Entity Framework Core.

Let's start coding

1) In a terminal window, go to your working directory. Enter the following command to create a Server-Side Blazor application inside a directory called ServerBlazorEF

dotnet new blazorserver -f net7.0 -o ServerBlazorEF

2) Open the ServerBlazorEF folder in Visual Studio Code.

3) For a Blazor server-side project, the IDE requests that you add assets to build and debug the project. Select Yes.

4) Hit Ctrl F5 (or dotnet watch in a terminal windowto run the application. Your default browser will load a page that looks like this: 


Our objective is to extend the above application so that it talks to SQLite using Entity Framework Core. To this end, we will be dealing with a very simple student model. Therefore, add a Student.cs class file in a folder named Models with the following content: 

public class Student {
    public int StudentId { get; set; }
    [Required]
    public string? FirstName { get; set; }
    [Required]
    public string? LastName { get; set; }
    [Required]
    public string? School { get; set; }
}

Since we will be using SQLite, we will need to add the appropriate packages. Therefore, from within a terminal window at the root of your ServerBlazorEF project, run the following commands that will add the appropriate database related packages: 

dotnet add package Microsoft.AspNetCore.Diagnostics.EntityFrameworkCore
dotnet add package Microsoft.AspNetCore.Identity.EntityFrameworkCore
dotnet add package Microsoft.EntityFrameworkCore.Sqlite
dotnet add package Microsoft.EntityFrameworkCore.Design
dotnet add package CsvHelper 

We need to add a connection string for the database. Add the following to the appsettings.json file: 

"ConnectionStrings": {
  "DefaultConnection": "DataSource=college.db;Cache=Shared"
}
 
We will be using the Entity Framework Code First approach. 

Developers prefer having sample data when building data driven applications. Therefore, we will create some sample data to ensure that our application behaves as expected. Copy the following data and save it in a text file named students.csv in the wwwroot folder:

StudentId,FirstName,LastName,School
1,Tom,Max,Nursing
2,Ann,Fay,Mining
3,Joe,Sun,Nursing
4,Sue,Fox,Computing
5,Ben,Ray,Mining
6,Zoe,Cox,Business
7,Sam,Ray,Mining
8,Dan,Ash,Medicine
9,Pat,Lee,Computing
10,Kim,Day,Nursing
11,Tim,Rex,Computing
12,Rob,Ram,Business
13,Jan,Fry,Mining
14,Jim,Tex,Nursing
15,Ben,Kid,Business
16,Mia,Chu,Medicine
17,Ted,Tao,Computing
18,Amy,Day,Business
19,Ian,Roy,Nursing
20,Liz,Kit,Nursing
21,Mat,Tan,Medicine
22,Deb,Roy,Medicine
23,Ana,Ray,Mining
24,Lyn,Poe,Computing
25,Amy,Raj,Nursing
26,Kim,Ash,Mining
27,Bec,Kid,Nursing
28,Eva,Fry,Computing
29,Eli,Lap,Business
30,Sam,Yim,Nursing
31,Joe,Hui,Mining
32,Liz,Jin,Nursing
33,Ric,Kuo,Business
34,Pam,Mak,Computing
35,Cat,Yao,Medicine
36,Lou,Zhu,Mining
37,Tom,Dag,Business
38,Stu,Day,Business
39,Tom,Gad,Mining
40,Bob,Bee,Business
41,Jim,Ots,Business
42,Tom,Mag,Business
43,Hal,Doe,Mining
44,Roy,Kim,Mining
45,Vis,Cox,Nursing
46,Kay,Aga,Nursing
47,Reo,Hui,Nursing
48,Bob,Roe,Mining
49,Jay,Eff,Computing
50,Eva,Chu,Business
51,Lex,Rae,Nursing
52,Lin,Dex,Mining
53,Tom,Dag,Business
54,Ben,Shy,Computing
55,Rob,Bos,Nursing
56,Ali,Mac,Business
57,Ken,Sim,Medicine

The starting point is to create a database context class. Add a C# class file named SchoolDbContext.cs in the Data folder with the following class code: 

public class SchoolDbContext : DbContext {
  public DbSet<Student> Students => Set<Student>();

  public SchoolDbContext(DbContextOptions<SchoolDbContext> options)
    : base(options) { }

  protected override void OnModelCreating(ModelBuilder modelBuilder) {
    base.OnModelCreating(modelBuilder);
    modelBuilder.Entity<Student>().HasData(GetStudents());
  }
  
  private static IEnumerable<Student> GetStudents() {
    string[] p = { Directory.GetCurrentDirectory(), "wwwroot", "students.csv" };
    var csvFilePath = Path.Combine(p);

    var config = new CsvConfiguration(CultureInfo.InvariantCulture) {
      PrepareHeaderForMatch = args => args.Header.ToLower(),
    };

    var data = new List<Student>().AsEnumerable();
    using (var reader = new StreamReader(csvFilePath)) {
      using (var csvReader = new CsvReader(reader, config)) {
        data = csvReader.GetRecords<Student>().ToList();
      }
    }
    return data;
  }
}

Notice the above code is adding the contents of the wwwroot/students.csv file as seed data into the database.

In the Program.cs file, just before ‘var app = builder.Build();’, add the following code so that our application can use SQLite:

var connectionString = builder.Configuration.GetConnectionString("DefaultConnection");
builder.Services.AddDbContext<SchoolDbContext>(
    options => options.UseSqlite(connectionString)
);
 
We are now ready to apply Entity Framework migrations, create the database and seed some sample data. If you have not done so already, you will need to globally install the Entity Framework CLI tool. This tooling is installed globally on your computer by running the following command in a terminal window:

dotnet tool install --global dotnet-ef

Remember to build your entire solution before proceeding. Then, from within a terminal window inside the ServerBlazorEF root directory, run the following command to create migrations: 

dotnet ef migrations add M1 -o Data/Migrations

 You should get no errors and this results in the creation of a migration file ending with the name ....M1.cs in the Migrations folder which contains commands for inserting sample data.

The next step is to create the SQLite college.db database file. This is done by running the following command from inside a terminal window at the root folder of the application. 

dotnet ef database update

If no errors are encountered, you can assume that the database was created and properly seeded with data.

Add a class file named StudentService.cs in the Data folder with following code: 

public class StudentService {
  private SchoolDbContext _context;
  
  public StudentService(SchoolDbContext context) {
    _context = context;
  }

  public async Task<List<Student>> GetStudentsAsync() {
   return await  _context.Students.ToListAsync();
  }

  public async Task<Student?> GetStudentByIdAsync(int id) {
    return await _context.Students.FindAsync(id) ?? null;
  }

  public async Task<Student?> InsertStudentAsync(Student student) {
    _context.Students.Add(student);
    await _context!.SaveChangesAsync();

    return student;
  }

  public async Task<Student> UpdateStudentAsync(int id, Student s) {
    var student = await _context.Students!.FindAsync(id);

    if (student == null)
      return null!;

    student.FirstName = s.FirstName;
    student.LastName = s.LastName;
    student.School = s.School;

    _context.Students.Update(student);
    await _context.SaveChangesAsync();

    return student!;
  }

  public async Task<Student> DeleteStudentAsync(int id) {
    var student = await _context.Students!.FindAsync(id);

    if (student == null)
      return null!;

    _context.Students.Remove(student);
    await _context.SaveChangesAsync();

    return student!;
  }

  private bool StudentExists(int id) {
    return _context.Students!.Any(e => e.StudentId == id);
  }
}

The above StudentService class provides all the necessary methods for CRUD operations involving data retrieval, insertion, update and deletion.

We need to configure the StudentService class as a scoped service so that we can use dependency injection. Scoped lifetime services are created once per client request (connection). Add the following statement to the Program.cs just before ‘var app = builder.Build()’: 

builder.Services.AddScoped<StudentService>();

Close all the files in your editor. Rename FetchData.razor file in the Pages folder to Students.razor. Replace its contents with the following code: 

@page "/students"
@using ServerBlazorEF.Data
@using ServerBlazorEF.Models
@inject StudentService studentService
<h1>Students</h1>

@if (students == null) {
  <p><em>Loading...</em></p>
} else {
  <table class='table table-hover'>
    <thead>
      <tr>
        <th>ID</th>
        <th>First Name</th>
        <th>Last Name</th>
        <th>School</th>
      </tr>
    </thead>
    <tbody>
      @foreach (var item in students)
      {
        <tr>
          <td>@item.StudentId</td>
          <td>@item.FirstName</td>
          <td>@item.LastName</td>
          <td>@item.School</td>
        </tr>
        }
    </tbody>
  </table>
}


@code {
  List<Student>? students;

  protected override async Task OnInitializedAsync() {
    students = await studentService.GetStudentsAsync();
  }

}

Since we will be using the Student class in multiple razor pages, move the @using ServerBlazorEF.Models statement on line 3 in the above code to _Imports.razor.

Let us focus on the @code block. The OnInitAsyns() method is called when the page gets loaded. It makes a call to the student service which loads a list of students from the database. The remaining HTML/Razor code simply displays the data in a table.

Let's modify the menu item on the left navigation of our application. Open Shared/NavMenu.razor in the editor and change the link for “Fetch data” so it looks like this:

<div class="nav-item px-3">
  <NavLink class="nav-link" href="students">
    <span class="oi oi-list-rich" aria-hidden="true"></span> Get Students
  </NavLink>
</div>

You must be eager to test out the server-side Blazor project. Run your app and select the “Get Students” link on the left navigation, this is what the output will look like: 

Adding data

Our Blazor app is not complete without add, edit and delete functionality. We shall start with adding data. 

Let us re-purpose Counter.razor so that it becomes our page for adding data. Rename Counter.razor to AddStudent.razor.

Replace AddStudent.razor with the following code:

@page "/addstudent"
@using ServerBlazorEF.Models
@inject ServerBlazorEF.Data.StudentService studentService
@inject NavigationManager NavManager

<PageTitle>Add Student</PageTitle>

<h1>Add Student</h1>

<EditForm Model="@student" OnValidSubmit="HandleValidSubmit">
  <DataAnnotationsValidator />
  <ValidationSummary />

  <div class="form-group">
    <label for="FirstName">First Name:</label>
    <InputText id="FirstName" class="form-control" @bind-Value="student.FirstName" />
  </div>

  <div class="form-group">
    <label for="LastName">Last Name:</label>
    <InputText id="LastName" class="form-control" @bind-Value="student.LastName" />
  </div>

  <div class="form-group">
    <label for="School">School:</label>
    <InputText id="School" class="form-control" @bind-Value="student.School" />
  </div>

  <button type="submit" class="btn btn-primary">Submit</button>
</EditForm>

@code {
  private Student student = new Student();

  private async Task HandleValidSubmit() {
    await studentService.InsertStudentAsync(student);
    NavManager.NavigateTo("/students");
  }
}

Open Shared/NavMenu.razor in the editor and change the link for “Counter” so it looks like this:

<div class="nav-item px-3">
    <NavLink class="nav-link" href="addstudent">
        <span class="oi oi-list-rich" aria-hidden="true"></span> Add Student
    </NavLink>
</div>

Run the Blazor server-side project and select Add Student on the left navigation menu. This is what it should look like: 


I entered Bob, Smith and Travel for data and when I clicked on the Submit button I got the following data inserted into the database:


Update & Delete data using PUT & DELETE methods

We want to be able to select a row of data and update or delete  it. Add the following additional cells to the table row in Students.razor

<td><a class="btn btn-success btn-sm" href="/updel/@item.StudentId/edit">edit</a></td>

<td><a class="btn btn-danger btn-sm" href="/updel/@item.StudentId/del">del</a></td> 

The above would pass the appropriate studentId and mode parameters to another page with route /updel.

Create a text file named UpdateDelete.razor in the Pages folder with the following content:

@page "/updel/{id}/{mode}"
@using ServerBlazorEF.Models
@inject ServerBlazorEF.Data.StudentService studentService
@inject NavigationManager NavManager

<style>
    fieldset {
        border: 2px solid #000;
        padding-left: 20px;
        margin-bottom: 20px;
    }
</style>

<PageTitle>Update/Delete Student</PageTitle>

@if (student != null && Mode == "edit") // Update
{
    <p>Update Student with ID == @Id</p>
    <EditForm Model="@student" OnValidSubmit="HandleValidSubmit">
        <DataAnnotationsValidator />
        <ValidationSummary />

        <div class="form-group">
            <label for="FirstName">First Name:</label>
            <InputText id="FirstName" class="form-control" @bind-Value="student.FirstName" />
        </div>

        <div class="form-group">
            <label for="LastName">Last Name:</label>
            <InputText id="LastName" class="form-control" @bind-Value="student.LastName" />
        </div>

        <div class="form-group">
            <label for="School">School:</label>
            <InputText id="School" class="form-control" @bind-Value="student.School" />
        </div>

        <button type="submit" class="btn btn-primary">Update</button>
    </EditForm>

    @code {
        private async Task HandleValidSubmit()
        {
            await studentService.UpdateStudentAsync(student!.StudentId, student);
            NavManager.NavigateTo("/students");
        }
    }
}
else if (student != null && Mode == "del")
{ // Delete
    // display student details
    <fieldset>
        <legend>Student Information</legend>
        <p>Student ID: @Id</p>
        <p>First Name: @student.FirstName</p>
        <p>Last Name: @student.LastName</p>
        <p>School: @student.School</p>
    </fieldset>
    <p>Delete Student with ID == @Id</p>
    <p>Are you sure?</p>
    <button type="button" class="btn btn-danger" @onclick="HandleDeleteStudent">Delete</button>
    @code {
    private async Task HandleDeleteStudent()
    {
        await studentService.DeleteStudentAsync(student!.StudentId);
        NavManager.NavigateTo("/students");
    }
}
}
else
{
    <p>Student with ID == @Id not found</p>
}

@code {
    [Parameter]
    public string? Id { get; set; }
    [Parameter]
    public string? Mode { get; set; }
    private Student? student = new Student();

    protected override async Task OnInitializedAsync()
    {
        int intId = Convert.ToInt32(Id);
        student = await studentService.GetStudentByIdAsync(intId);
    }
}

Note how parameters are passed from one page to another.

1) {id}/{mode} are defined in the route
2) In the @code section, the following parameters are defined:

[Parameter]
public string? Id { get; set; }
[Parameter]
public string? Mode { get; set; }

CRUD Experience


Component CSS

In the UpdateDeleter.razor page, notice that we have some CSS in the <style> . . .  </style> block. We can move this into a CSS file that only serves the UpdateDelete.razor component. 

In the Pages foldr, create a text file name UpdateDelete.razor.css and add to it the following CSS:

fieldset {
  border: 2px solid #000;
  padding-left: 20px;
  margin-bottom: 20px;
}

Meantime, delete the entire <style> . . . . </style> block in UpdateDeleter.razor. The page should behave just like it did before when you view the delete page.

SignalR

Server-side Blazor uses SignalR to keep a copy of the DOM on the server and to only update changes on the client. Open your Chrome browser development settings and look at the blazor line in the Network tab. This gives you an indication that websockets are used to transmit data between clent and server.


Also, look at the negotiate line in the Network tab.


I hope you learned something new in this tutorial and trust that you will build much more sophisticated Blazor apps.

Monday, December 20, 2021

Generate charts with Google DataTable .NET Wrapper from ASP.NET 6.0 Razor Pages App

The scenario that this article addresses is a situation whereby there is server-side generated data that needs to be displayed on a web page as a chart. The API used for generating the chart is the freely available Google Charts JavaScript-based API. The Google DataTable .NET Wrapper is used to create a lightweight representation of the google.visualization.DataTable object directly in Microsoft.NET. The wrapper allows for the creation of the appropriate JSON which is easily ingested by the Google Chart Tools JavaScript library.

I will show you how to generate six types of charts to display dynamically generated data. The source of data will be the well known Northwind database running in a Docker container. I will work with the ASP.NET Razor Pages template (AKA Web App).

Source code:  https://github.com/medhatelmasry/ChartRazorGoogleWrapper

The environment I am using is: 

  • Windows 11
  • Docker Desktop for Windows
  • .NET version 6.0.100
  • Visual Studio Code

Start Northwind database in a Docker container

To pull & run the Northwind database in a Docker container, run the following command in a terminal window:

docker run -d --name nw -p 1444:1433 kcornwall/sqlnorthwind

The above command does the following:

Docker image:kcornwall/sqlnorthwind
Container Name (--name):nw
Ports (-p):Port 1433 in container is exposed as port 1444 on the host computer
Password:The sa password is Passw0rd2018. This was determined from the Docker Hub page for the image.
-d:Starts the container in detached mode

This is what I experienced after I ran the above command:


Let us make sure that the container is running. Execute this command to ensure that the container is indeed running.

docker ps

The following confirmed to me that the container is running:

Project setup

Run the following command to create an ASP.NET Core MVC application using .NET 6.0 in a folder named ChartRazorGoogleWrapper:

dotnet new razor -f net6.0 -o ChartRazorGoogleWrapper

Change directory into the new folder and open the project inside VS Code with the following commands:

cd ChartRazorGoogleWrapper 

code .

We will need to install an Entity Framework command-line utility. If you have not done so already, install dotnet-ef with this command:

dotnet tool install –g dotnet-ef 

It does not hurt to upgrade this tool to the latest version with:

dotnet tool update -g dotnet-ef

Also, from within the root folder of your project, add some SQL-Server and Entity Framework related packages with the following terminal-window commands:

dotnet add package Microsoft.EntityFrameworkCore.Design
dotnet add package Microsoft.EntityFrameworkCore.SqlServer
dotnet add package Microsoft.EntityFrameworkCore.Tools


Also, install the Google DataTable .NET Wrapper Nuget package:

dotnet add package Google.DataTable.Net.Wrapper

In appsettings.json, add this to ConnectionStrings block just before “Logging”:

"ConnectionStrings": {
    "NW": "Data Source=localhost,1444;Initial Catalog=Northwind;Persist Security Info=True;User ID=sa;Password=Passw0rd2018"
},

Next, let us reverse engineer only the Orders entities in the Northwind database. Execute this command from the root of your project:

dotnet-ef dbcontext scaffold "Data Source=localhost,1444;Initial Catalog=Northwind;Persist Security Info=True;User ID=sa;Password=Passw0rd2018" Microsoft.EntityFrameworkCore.SqlServer -c NorthwindContext -o NW --table Orders

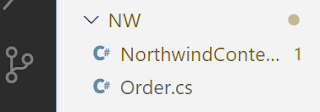
This creates a NW folder in your project with entity Orders and database context class NorthwindContext.


Delete the OnConfiguring() method in NorthwindContext.cs so that there is no hard-coded connection string in our C# code.

Add the following code to Program.cs right after where the variable builder is declared:

var connectionString = builder.Configuration.GetConnectionString("NW");
builder.Services.AddDbContext<NorthwindContext>(options => {
  options.UseSqlServer(connectionString);
});

Reading data

In the Pages folder, add two files ChartData.cshtml and ChartData.cshtml.cs.

Content of ChartData.cshtml is:

@page
@model ChartDataModel

Content of ChartData.cshtml.cs is:

using ChartRazorGoogleWrapper.NW;
using Google.DataTable.Net.Wrapper;
using Microsoft.AspNetCore.Mvc;
using Microsoft.AspNetCore.Mvc.RazorPages;
using Microsoft.EntityFrameworkCore;

namespace ChartRazorGoogleWrapper.Pages;

public class ChartDataModel : PageModel {
   private readonly ILogger<ChartDataModel> _logger;
   private readonly NorthwindContext _northwindContext;

   public ChartDataModel(ILogger<ChartDataModel> logger, NorthwindContext northwindContext) {
     _logger = logger;
     _northwindContext = northwindContext;
   }

   public async Task<IActionResult> OnGet() {
     var data = await _northwindContext.Orders
     .GroupBy(_ => _.ShipCity)
     .Select(g => new {
         Name = g.Key,
         Count = g.Count()
     })
     .OrderByDescending(cp => cp.Count)
     .ToListAsync();

     //let's instantiate the DataTable.
     var dt = new Google.DataTable.Net.Wrapper.DataTable();
     dt.AddColumn(new Column(ColumnType.String, "Name", "Name"));
     dt.AddColumn(new Column(ColumnType.Number, "Count", "Count"));

     foreach (var item in data) {
         Row r = dt.NewRow();
         r.AddCellRange(new Cell[] {
             new Cell(item.Name),
             new Cell(item.Count)
         });
         dt.AddRow(r);
     }

     //Let's create a Json string as expected by the Google Charts API.
     return Content(dt.GetJson());
   }
}

The above code in ChartData.cshtml.cs returns a JSON representation of  Google.DataTable.Net.Wrapper.DataTable. It contains data from the Northwind database representing the number of orders by city.

At this stage, let's run our web application and verify that we are indeed able to read data from the Northwind database and subsequently generate JSON data. Run your application with:

dotnet watch run

Point your browser to https://localhost:7108/chartdata

NOTE: you will need to adjust the port number to suit your environment.

This is what was revealed in my browser:


We have a sense of assurance that our data is ready to be displayed in a chart.

Charting the data

Replace your Pages/Index.cshtml with the following code:

@page
@model IndexModel

<script type="text/javascript" src="https://www.gstatic.com/charts/loader.js"></script>

<div id="column_chart_div"></div>
<div id="line_chart_div"></div>
<div id="pie_chart_div"></div>
<div id="area_chart_div"></div>
<div id="bar_chart_div"></div>
<div id="pie_chart_3d_div"></div>


<script type="text/javascript">
    google.charts.load('current', {
        packages: ['corechart', 'bar']
    });

    google.setOnLoadCallback(drawChart);

    function drawChart() {
        var jsonData = $.ajax({
            url: '/ChartData',
            dataType: "json",
            async: false
        }).responseText;

        PopulationChart(jsonData, "column-chart");
        PopulationChart(jsonData, "line-chart");
        PopulationChart(jsonData, "pie-chart");
        PopulationChart(jsonData, "area-chart");
        PopulationChart(jsonData, "bar-chart");
        PopulationChart(jsonData, "pie-chart-3d");
    }

    function PopulationChart(jsonData, chart_type) {
        // Create our data table out of JSON data loaded from server.
        var data = new google.visualization.DataTable(jsonData);
        var chart;
        var options = { title: 'Orders by city' };

        switch (chart_type) {

            case "line-chart":
                chart = new google.visualization.LineChart(document.getElementById('line_chart_div'));
                break;
            case "pie-chart":
                chart = new google.visualization.PieChart(document.getElementById('pie_chart_div'));
                break;
            case "area-chart":
                chart = new google.visualization.AreaChart(document.getElementById('area_chart_div'));
                break;
            case "bar-chart":
                chart = new google.visualization.BarChart(document.getElementById('bar_chart_div'));
                break;
            case "pie-chart-3d":
                options.is3D = true;
                chart = new google.visualization.PieChart(document.getElementById('pie_chart_3d_div'));
                break;
            default:
                chart = new google.visualization.ColumnChart(document.getElementById('column_chart_div'));
                break;
        }

        chart.draw(data, options);
        return false;
    }

</script>    

If you point your browser to the home page, you should see six charts, namely: column, line, pie, area, bar and pie 3D charts.


Conclusion

This shows you how the Google Chart Tools JavaScript library makes it much easier to generate charts from an ASP.NET Razor application.


Sunday, December 19, 2021

Using Google Charts API with an ASP.NET Core 6.0 Razor Pages App

Google Charts is a free JavaScript API that you can use to generate good looking charts on a web page. Although it has nothing to do with C# and .NET, we can still use it in an ASP.NET application. I will show you how to generate five types of charts to display dynamically generated data. The source of data will be the well known Northwind database running in a Docker container.

In another article, I show how to use Google charts with an ASP.NET Core MVC application.  In this article, I work with the ASP.NET Razor Pages template (AKA Web App), instead.

Source code: https://github.com/medhatelmasry/gChartRazor

The environment I am using is:

  • Windows 11
  • Docker Desktop for Windows
  • .NET version 6.0.100
  • Visual Studio Code

Start Northwind database in a Docker container

To pull & run the Northwind database in a Docker container, run the following command in a terminal window:

docker run -d --name nw -p 1444:1433 kcornwall/sqlnorthwind

The above command does the following:

Docker image:kcornwall/sqlnorthwind
Container Name (--name):nw
Ports (-p):Port 1433 in container is exposed as port 1444 on the host computer
Password:The sa password is Passw0rd2018. This was determined from the Docker Hub page for the image.
-d:Starts the container in detached mode

This is what I experienced after I ran the above command:


Let us make sure that the container is running. Execute this command to ensure that the container is indeed running.

docker ps

The following confirmed to me that the container is running:

Project setup

Run the following command to create an ASP.NET Core razor pages application using .NET 6.0 in a folder named gChartRazor:

dotnet new razor -f net6.0 -o gChartRazor

Change directory into the new folder and open the project inside VS Code with the following commands:

cd gChartRazor 

code .

We will need to install an Entity Framework command-line utility. If you have not done so already, install dotnet-ef with this command:

dotnet tool install –g dotnet-ef 

It does not hurt to upgrade this tool to the latest version with:

dotnet tool update -g dotnet-ef

Also, from within the root folder of your project, add some SQL-Server and Entity Framework related packages with the following terminal-window commands:

dotnet add package Microsoft.EntityFrameworkCore.Design
dotnet add package Microsoft.EntityFrameworkCore.SqlServer
dotnet add package Microsoft.EntityFrameworkCore.Tools

In appsettings.json, add this to ConnectionStrings block just before “Logging”:

"ConnectionStrings": {
    "NW": "Data Source=localhost,1444;Initial Catalog=Northwind;Persist Security Info=True;User ID=sa;Password=Passw0rd2018"
},

Next, let us reverse engineer the Products Categories entities in the Northwind database. Execute this command from the root of your project:

dotnet-ef dbcontext scaffold "Data Source=localhost,1444;Initial Catalog=Northwind;Persist Security Info=True;User ID=sa;Password=Passw0rd2018" Microsoft.EntityFrameworkCore.SqlServer -c NorthwindContext -o NW --table Products --table Categories

This creates a NW folder in your project with entities Category Product. It also adds the database context class NorthwindContext.


Delete the OnConfiguring() method in NorthwindContext.cs so that there is no hard-coded connection string in our C# code.

Add the following code to Program.cs right after where the variable builder is declared:

var connectionString = builder.Configuration.GetConnectionString("NW");
builder.Services.AddDbContext<NorthwindContext>(options => {
  options.UseSqlServer(connectionString);
});

Reading data

In the Pages folder, add two files ChartData.cshtml and ChartData.cshtml.cs.

Content of ChartData.cshtml is:

@page
@model ChartDataModel

Content of ChartData.cshtml.cs is:

using gChartRazor.NW;
using Microsoft.AspNetCore.Mvc;
using Microsoft.AspNetCore.Mvc.RazorPages;
using Microsoft.EntityFrameworkCore;

namespace gChartRazor.Pages;

public class ChartDataModel : PageModel {
   private readonly ILogger<ChartDataModel> _logger;
   private readonly NorthwindContext _northwindContext;

   public ChartDataModel(ILogger<ChartDataModel> logger, NorthwindContext northwindContext) {
     _logger = logger;
     _northwindContext = northwindContext;
   }

   public async Task<JsonResult> OnGet() {
     var query = await _northwindContext.Products
     .Include(c => c.Category)
     .GroupBy(p => p.Category!.CategoryName)
     .Select(g => new
     {
         Name = g.Key,
         Count = g.Count()
     })
     .OrderByDescending(cp => cp.Count)
     .ToListAsync();

     return new JsonResult(query);
   }
}

The above code in ChartData.cshtml.cs returns a JSON array with data from the Northwind database representing the number of products in each category.

At this stage, let's run our web application and verify that we are indeed able to read data from the Northwind database and subsequently generate JSON data. Run your application with:

dotnet watch run

Point your browser to https://localhost:7108/chartdata

NOTE: you will need to adjust the port number to suit your environment.

This is what was revealed in my browser:


We have a sense of assurance that our data is ready to be displayed in a chart.

Charting the data

Replace your Pages/Index.cshtml with the following code:

@page
@model IndexModel
@{
    ViewData["Title"] = "Home page";
}

<title>@ViewData["Title"] - Google Charts</title>  
<script type="text/javascript" src="https://www.gstatic.com/charts/loader.js"></script>  
  
<div id="column_chart_div"></div>  
<div id="line_chart_div"></div>  
<div id="pie_chart_div"></div>  
<div id="area_chart_div"></div>  
<div id="bar_chart_div"></div>  
<script type="text/javascript">  
  
   google.charts.load('current', {  
     packages: ['corechart', 'bar']  
   });  
   google.charts.setOnLoadCallback(LoadData);  
   function LoadData() {  
      $.ajax({  
         url: '/ChartData',  
         dataType: "json",  
         type: "GET",  
         error: function(xhr, status, error) {  
            toastr.error(xhr.responseText);  
         },  
         success: function(data) {  
            PopulationChart(data, "column-chart");  
            PopulationChart(data, "line-chart");  
            PopulationChart(data, "pie-chart");  
            PopulationChart(data, "area-chart"); 
            PopulationChart(data, "bar-chart"); 
            return false;  
         }  
      });  
      return false;  
   }  
   function PopulationChart(data, chart_type) {  
      var dataArray = [  
         ['Category', 'Product']  
      ];  
      $.each(data, function(i, item) {  
         dataArray.push([item.name, item.count]);  
      });  
      var data = google.visualization.arrayToDataTable(dataArray);  
      var options = {  
         title: 'Product count by category',  
         chartArea: {  
             width: '80%'  
         },  
         colors: ['#b0120a', '#7b1fa2', '#ffab91', '#d95f02'],  
         hAxis: {  
             title: 'Categories',  
             minValue: 0  
         },  
         vAxis: {  
             title: 'Product Count'  
         }  
      };  
      var chart;
      switch(chart_type) {
         case "line-chart":
            chart = new google.visualization.LineChart(document.getElementById('line_chart_div'));  
            break;
         case "pie-chart":
            chart = new google.visualization.PieChart(document.getElementById('pie_chart_div'));  
            break;
         case "area-chart":
            chart = new google.visualization.AreaChart(document.getElementById('area_chart_div'));  
            break;
         case "bar-chart":
            chart = new google.visualization.BarChart(document.getElementById('bar_chart_div'));  
            break;
         default:
            chart = new google.visualization.ColumnChart(document.getElementById('column_chart_div'));  
            break;
      }
      chart.draw(data, options);  
      return false;  
   }  
</script>    

If you point your browser to the home page, you should see five charts, namely: column, line, pie, area and bar charts.


Conclusion

I trust the above article helps you consider using Google Charts with ASP.NET Razor Pages to visually display data.