Showing posts with label Windows. Show all posts

Friday, July 17, 2026

Coding with Microsoft Foundry Local

Coding with Microsoft Foundry Local

In this article we will explore the Microsoft Foundry Local CLI application. We will then write a simple C# program that interacts with a local model that is served by Foundry Local.

Copanion Video: https://youtu.be/YD5QKDcb8T8

What is Microsoft Foundry Local?

Foundry Local is an AI solution that runs entirely on the user's device. It also provides an SDK (C#, JavaScript, Rust, and Python) that helps you build apps that interact with Foundry Local.

Installation

To install Foundry Local, follow these steps:

Windows

winget install Microsoft.FoundryLocal


macOS (only on silicon chips)

brew tap microsoft/foundrylocal
brew trust microsoft/foundrylocal
brew install foundrylocal


Exporing CLI commands

Try the following Foundry Local CLI commands:

Detect the CLI version:

foundry --version

Expected output:

0.8.119

View the list of CLI commands:

foundry --help

Expected output:

Description:
Foundry Local CLI: Run AI models on your device.
 ðŸš€ Getting started:
 1. To view available models: foundry model list
 2. To run a model: foundry model run <model>

 EXAMPLES:
foundry model run phi-3-mini-4k

 Usage:
foundry [command] [options]

 Options:
-?, -h, --help Show help and usage information
--version Show version information
--license Display foundry license information

Commands:
model Discover, run and manage models
cache Manage the local cache
service Manage the local model inference service

Download a model into local cache:

foundry model download qwen2.5-0.5b

Expected output:

Downloading qwen2.5-0.5b-instruct-generic-gpu:4... 
 . . . T R U N C A T E D . . . 
 [################################## ] 94.85 % [Time remaining: about 1s]
[################################## ] 95.22 % [Time remaining: about 1s]
[################################## ] 95.59 % [Time remaining: about 1s]
[################################## ] 95.96 % [Time remaining: about 1s]
[################################## ] 96.33 % [Time remaining: about 1s]
[################################## ] 96.69 % [Time remaining: about 1s]
[################################## ] 97.06 % [Time remaining: about 1s]
[################################### ] 97.43 % [Time remaining: about 1s]
[################################### ] 97.79 % [Time remaining: about 1s]
[################################### ] 98.16 % [Time remaining: about 1s]
[################################### ] 98.53 % [Time remaining: about 1s]
[################################### ] 98.90 % [Time remaining: about 1s]
[################################### ] 99.27 % [Time remaining: about 1s]
[################################### ] 99.63 % [Time remaining: about 1s]
[####################################] 100.00 % [Time remaining: about 0s]
[####################################] 100.00 % [Time remaining: about 0s] 85.9 MB/s

Tips:
- To find model cache location use: foundry cache location
- To find models already downloaded use: foundry cache ls

List models in local cache:

foundry cache list

Expected output:

💾 qwen2.5-0.5b              qwen2.5-0.5b-instruct-generic-gpu:4

Remove a model from local cache:

foundry cache remove qwen2.5-0.5b

Expected output:

⚠️ This will delete model 'qwen2.5-0.5b (qwen2.5-0.5b-instruct-generic-gpu:4)' from cache.
⚠️ Are you sure you want to delete this model from the local cache? (y/n)
y
Deleted model qwen2.5-0.5b-instruct-generic-gpu:4 from the cache.

Download and run a model:

foundry model run qwen2.5-0.5b

Expected output:

Downloading qwen2.5-0.5b-instruct-generic-gpu:4...
[####################################] 100.00 % [Time remaining: about 0s]  105.2 MB/s
🕛 Loading model...
🟢 Model qwen2.5-0.5b-instruct-generic-gpu:4 loaded successfully

Interactive Chat. Enter /? or /help for help.
Press Ctrl+C to cancel generation. Type /exit to leave the chat.

Interactive mode, please enter your prompt
>

💡 TIP

If you get an error when running a model, it may mean that your hardware is incompatible with the specific model that was downloaded. You can try looking ar variants of that model for different processor configurations. To view the variants for a model (Example: qwen2.5-0.5b), type the following command: 

foundry model info qwen2.5-0.5b

You can then try one of the variants like qwen2.5-0.5b-instruct-generic-cpu with: 
foundry model run qwen2.5-0.5b-instruct-generic-cpu

The above puts the user in a CLI interactive mode. You can then send prompt to the model. Let's ask the model to create for us a C# program that does temperature conversion. Type in the following prompt:

Write a C# console app that converts temperature from C to F and also from F to C.

Expected output:

🧠 Thinking...
🤖 Certainly! Below is a simple console application written in C# that takes user input for Celsius temperature and converts it to either Fahrenheit or vice versa.


using System;
using System.Windows.Forms;

namespace TemperatureConverterApp
{
    class Program
    {
        static void Main(string[] args)
        {
            try
            {
                Console.WriteLine("Enter the Temperature (in Celcius): ");
                int celsius = Convert.ToInt32(Console.ReadLine());

                bool convertToFahrenheit = false;
                string result;

                if (Convert.ToBoolean(calculateCtoF(celsius)) == true)
                    result = "Celsius to Fahrenheit: ";
                else
                    result = "Temperature not converted";

                result += $"Celsius {result}";

                if (convertToFahrenheit) 
                {
                    Console.WriteLine($"Result: Fahrenheits");
                    return;
                }

                Console.WriteLine(result);
            }
            catch
            {
                Console.WriteLine("Invalid Input");
            }
        }

        public static bool calculateCtoF(int celsius)
        {
            double fahrenheit = 9/5 * celsius + 32;
            double result = Math.Round(fahrenheit, 1);

            // Round down to the nearest integer since temperatures must be whole numbers
            if (fahrenheit.ToString() != "0")
                return true;
            else
                return false;
        }

        public static bool calculateFtoc(double fahrenheit)
        {
            double celsius = fahrenheit - 32 * 5 / 9;
            double result = Math.Round(celsius, 1);

            // Round down to the nearest integer since temperatures must be whole numbers
            if (celsius.ToString() != "0")
                return true;
            else
                return false;
        }
    }
}

Explanation: 

1. Imports: The code starts with importing necessary namespaces (System and System.Windows.Forms). It's assumed you have this namespace available. 

2. Program Class
    - This contains the main program logic. 

3. calculateCtoF Function
    - Calculates the temperature in Fahrenheit given Celsius temperature. 
    - If successful, calculates the equivalent number of degrees Celsius based on the provided value and rounds it to the closest integer.  
    - Outputs the result along with any additional information like "Celsius" or "Temperature not converted". 

4. calculateFtoc Function
    - Calculates the equivalent temperature in Celcius given the equivalent degrees Fahrenheit. 
    - Same as calculateCtoF, but used for converting degrees Fahrenheit back to Celsius. 

Example Usage: 

If you run the program, pressing the keyboard will take an input to calculate the correct conversion type and output results accordingly. 

Example Input: 25 
    - If calculated using Celsius, it will print: "Celsius", then "25". 
    - If converted to Fahrenheit, it will print: "Temperature not converted", then "25". 

This example only demonstrates basic conversions between the two temperature scales and does not handle invalid inputs like non-numerical characters which would throw exceptions during parsing.

Exit CLI mode, type:

/exit

Stop the Foundry service:

foundry service stop

Expected output:

🔴 Service is stopped.

Start the Foundry service:

foundry service start

Expected output:

🟢 Service is Started on http://127.0.0.1:64398/, PID 9459!

Develop a C# app using Foundry Local SDK

The Foundry Local SDK enables you to ship AI features in your applications that are capable of using local AI models through a simple and intuitive API. The SDK abstracts away the complexities of managing AI models and provides a seamless experience for integrating local AI capabilities into your applications.

dotnet new console -o FoundryLocalConsoleApp
cd FoundryLocalConsoleApp
dotnet add package Microsoft.AI.Foundry.Local
dotnet add package Microsoft.Extensions.Logging
dotnet add package Betalgo.Ranul.OpenAI -v  9.1.0

Add this to the .csproj file right above </PropertyGroup>:

<RuntimeIdentifiers>osx-arm64;osx-x64;win-x64;linux-x64</RuntimeIdentifiers>

Replace Program.cs with this code that asks the qwen2.5-0.5b local AI model the question: Where did coffee come from?:

using Betalgo.Ranul.OpenAI.ObjectModels.RequestModels;
using Microsoft.AI.Foundry.Local;
using Microsoft.Extensions.Logging;

CancellationToken ct = new();

var config = new Configuration {
    AppName = "foundry_local_samples",
    LogLevel = Microsoft.AI.Foundry.Local.LogLevel.Information
};

using var loggerFactory = LoggerFactory.Create(builder => {
    // Intentionally no providers configured; this still yields a valid ILogger instance.
});
ILogger logger = loggerFactory.CreateLogger("FoundryLocalConsoleApp");

// Initialize the singleton instance.
await FoundryLocalManager.CreateAsync(config, logger);
var mgr = FoundryLocalManager.Instance;


// Discover available execution providers and their registration status.
var eps = mgr.DiscoverEps();
int maxNameLen = 30;
Console.WriteLine("Available execution providers:");
Console.WriteLine($"  {"Name".PadRight(maxNameLen)}  Registered");
Console.WriteLine($"  {new string('─', maxNameLen)}  {"──────────"}");
foreach (var ep in eps) {
    Console.WriteLine($"  {ep.Name.PadRight(maxNameLen)}  {ep.IsRegistered}");
}

// Download and register all execution providers with per-EP progress.
// EP packages include dependencies and may be large.
// Download is only required again if a new version of the EP is released.
// For cross platform builds there is no dynamic EP download and this will return immediately.
Console.WriteLine("\nDownloading execution providers:");
if (eps.Length > 0) {
    string currentEp = "";
    await mgr.DownloadAndRegisterEpsAsync((epName, percent) => {
        if (epName != currentEp) {
            if (currentEp != "") {
                Console.WriteLine();
            }
            currentEp = epName;
        }
        Console.Write($"\r  {epName.PadRight(maxNameLen)}  {percent,6:F1}%");
    });
    Console.WriteLine();
} else {
    Console.WriteLine("No execution providers to download.");
}


// Get the model catalog
var catalog = await mgr.GetCatalogAsync();


// Get a model using an alias.
var model = await catalog.GetModelAsync("qwen2.5-0.5b") ?? throw new Exception("Model not found");

// Download the model (the method skips download if already cached)
await model.DownloadAsync(progress =>{
    Console.Write($"\rDownloading model: {progress:F2}%");
    if (progress >= 100f)
    {
        Console.WriteLine();
    }
});

// Load the model
Console.Write($"Loading model {model.Id}...");
await model.LoadAsync();
Console.WriteLine("done.");

// Get a chat client
var chatClient = await model.GetChatClientAsync();

// Create a chat message
List<ChatMessage> messages = new() {
    new ChatMessage { Role = "user", Content = "Where did coffee come from?" }
};

// Get a streaming chat completion response
Console.WriteLine("Chat completion response:");
var streamingResponse = chatClient.CompleteChatStreamingAsync(messages, ct);
await foreach (var chunk in streamingResponse) {
    Console.Write(chunk.Choices[0].Message.Content);
    Console.Out.Flush();
}
Console.WriteLine();

// Tidy up - unload the model
await model.UnloadAsync();

ℹ️ NOTE - Notice model qwen2.5-0.5b in the above code (around line 59). Change this to any other model or variant of your choice.

Expected output:


  Available execution providers:
  Name                            Registered
  ──────────────────────────────  ──────────
  WebGpuExecutionProvider         False

Downloading execution providers:
  WebGpuExecutionProvider          100.0%
Loading model qwen2.5-0.5b-instruct-generic-gpu:4...done.
Chat completion response:
Coffee originated in the Ethiopian Highlands and later spread to other regions due to various factors such as trade, migration, and disease. It''s believed that people first brought coffee from Ethiopia with them when they migrated to other parts of the world. The earliest known records suggest that the first drink made from coffee was consumed by the Shas people in West Africa.

As the demand for coffee grew, more people began to experiment with making their own beverages. By 1750, coffee had been developed into its current form in the Middle East and Asia. It wasn''t until 1826 that an American named Robert Brown invented espresso, which has since become one of the most popular beverages worldwide.

The history of coffee is a story of innovation, trade, and cultural exchange over centuries. Coffee has played a significant role in many societies around the world and continues to be enjoyed today through different methods and traditions.
 

For more information, see the Foundry Local SDK reference.

Wednesday, March 16, 2022

Build & publish Azure Functions app that uses a budget SQLite database & .NET 6.0

In this tutorial I will build a Web API application using Azure Functions & SQLite. Although it is not typical to use SQLite with Azure Functions, this is a decent option if you want to have a cheap storage solution. I will later deploy the SQLite enabled Azure Function. This tutorial was done on a Windows 11 computer with VS Code.

Source code: https://github.com/medhatelmasry/SQLiteFunction.git

Prerequisites

Create a folder named SQLiteFunction on your hard drive at the location where your project will reside. 

Under the Functions tab in VS Code, create a new Azure Functions project.


Navigate to the location on your hard drive that you have designated as your workspace folder for this project. You will next be asked to select a programming language. Choose C#.


You will then be asked to choose the .NET runtime, choose .NET 6:


You will be asked to choose a template for your project's first function. Note that you can have more than one function in your project. Choose HttpTrigger.


Give your function a name. I named my function HttpApi.


Hit Enter after you give your function a name. Give your class a namespace. The namespace I used is SQLiteFunction. I then hit Enter.


Choose Anonymous for AccessRights.

When asked about how you would like to open your project, choose "Open in current window".


If a popup window appears asking if you wish to restore unresolved dependencies, click the Restore button.

Let us see what the app does. Hit CTRL F5 on the keyboard. The built-in VS Code terminal window will eventually display a URL that uses port number 7071:


NOTE: You can start your function app with the terminal command: func start

Copy and paste the URL into a browser or hit CTRL Click on the link. You will see the following output in your browser:


The message in your browser suggests that you should pass a name query string. I appended the following to the URL: ?name=Superman and got the following result:


We will need to add some NuGet packages. Execute the following dotnet commands from a terminal window in the root directory of your project:

dotnet add package Microsoft.Azure.Functions.Extensions
dotnet add package Microsoft.EntityFrameworkCore.SQLite
dotnet add package Microsoft.EntityFrameworkCore.SQLite.Design
dotnet add package Microsoft.EntityFrameworkCore.Tools

Let us make a few minor enhancements to our application.

1) Our SQLite database will be named school.db. Add the following to the project's .csproj file so that the SQLite database is copied to the output directory when the app gets built:

<ItemGroup>
 <None Update="school.db">
   <CopyToOutputDirectory>PreserveNewest</CopyToOutputDirectory>
 </None>  
</ItemGroup>
2) Change the signature of the HttpAPI class so that it does not have the static keyword. Therefore, the signature of the class will look like this:

public class HttpApi

3) Create a Models folder and add to it a simple Student.cs class file with the following content:

using System.ComponentModel.DataAnnotations;

namespace SQLiteFunction.Models;

public class Student {
    public int StudentId { get; set; }
    [Required]
    public string FirstName { get; set; }
    [Required]
    public string LastName { get; set; }
    [Required]
    public string School { get; set; }
}

4) We will deploy our Azure Functions app to a Windows server on Azure. When the school.db SQLite database file is published to Azure, it will reside in directory d:\home\site\wwwroot. Therefore, we shall create a helper class that will locate for us the SQLite database file in both development and deployment environments. Create a file named Utils.cs in the Models folder and add to it the following code:

using System;

namespace SQLiteFunction.Models;

public class Utils
{
    public static string GetSQLiteConnectionString()
    {
        var home = Environment.GetEnvironmentVariable("HOME") ?? "";
        Console.WriteLine($"home: {home}");
        if (!string.IsNullOrEmpty(home))
        {
            home = System.IO.Path.Combine(home, "site", "wwwroot");
        }
        var databasePath = System.IO.Path.Combine(home, "school.db");
        var connStr = $"Data Source={databasePath}";

        return connStr;
    }
}

The above helper class provides us with a static method Utils.GetSQLiteConnectionString() that returns the fully qualified location of the SQLite database file named school.db.

5) Add an Entity Framework DbContext class to the Models folder. In our case, we will add a class file named ApplicationDbContext.cs with the following content:

using Microsoft.EntityFrameworkCore;
using System;

namespace SQLiteFunction.Models;

public class ApplicationDbContext : DbContext
{
    public ApplicationDbContext() { }
    public ApplicationDbContext(DbContextOptions<ApplicationDbContext> options) : base(options) { }
    public DbSet<Student> Students { get; set; }

    protected override void OnConfiguring(DbContextOptionsBuilder optionsBuilder)
    {
        if (!optionsBuilder.IsConfigured)
        {
             optionsBuilder.UseSqlite(Utils.GetSQLiteConnectionString());
        }
    }

    protected override void OnModelCreating(ModelBuilder builder)
    {
        base.OnModelCreating(builder);

        builder.Entity<Student>().HasData(
          new
          {
              StudentId = 1,
              FirstName = "Jane",
              LastName = "Smith",
              School = "Medicine"
          }, new
          {
              StudentId = 2,
              FirstName = "John",
              LastName = "Fisher",
              School = "Engineering"
          }, new
          {
              StudentId = 3,
              FirstName = "Pamela",
              LastName = "Baker",
              School = "Food Science"
          }, new
          {
              StudentId = 4,
              FirstName = "Peter",
              LastName = "Taylor",
              School = "Mining"
          }
        );
    }
}

The above context class seeds some sample data pertaining to four students.

6) To register a service like ApplicationDbContext, create a class file named Startup.cs in the root of your application. The Startup class implements FunctionStartup. This class will look like this:

using Microsoft.EntityFrameworkCore;
using Microsoft.Extensions.DependencyInjection;
using Microsoft.Azure.Functions.Extensions.DependencyInjection;
using SQLiteFunction.Models;

[assembly: FunctionsStartup(typeof(SQLiteFunction.StartUp))]
namespace SQLiteFunction
{
    public class StartUp : FunctionsStartup
    {
        public override void Configure(IFunctionsHostBuilder builder)
        {
            builder.Services.AddDbContext<ApplicationDbContext>(options =>
            {
                options.UseSqlite(Utils.GetSQLiteConnectionString());
            });
        }

        public override void ConfigureAppConfiguration(IFunctionsConfigurationBuilder builder)
        {
            base.ConfigureAppConfiguration(builder);
        }

    }
}

7) Inject the ApplicationDbContext class that is needed by your function class. Open HttpApi.cs in the editor and add the following instance variables and constructor at the top of the class:

private readonly ApplicationDbContext _context;
 
public HttpApi(ApplicationDbContext context) {
   _context = context;
}

8) The next step is to apply Entity Framework migrations. Open a terminal window in the root of your application and execute the following EF migration command inside the same terminal window:

dotnet-ef migrations add m1 -o Data/Migrations

This produces a Data/Migrations folder in your project.


9) The next step is to create the database and tables. Execute the following command in the same terminal window as above:

dotnet-ef database update

If all goes well, you will receive a message that looks like this:

Applying migration '20220314204919_m1'.
Done.

10) Let us now create an endpoint in our Azure function that returns all the students as an API. Add the following method to the Azure functions file named HttpApi.cs:

[FunctionName("students")]
public IActionResult GetStudents(
   [HttpTrigger(AuthorizationLevel.Anonymous, "get", Route = "students")] HttpRequest req,
   ILogger log) {
   
   log.LogInformation("C# HTTP GET trigger function processed api/students request.");

   var studentsArray = _context.Students.ToArray();

   return new OkObjectResult(studentsArray);
}

All that is left for us to do is test out our application and make sure it returns our students data. Run the application by hitting CTRL F5 on the keyboard. You will see the following output in a VS Code terminal window:


Copy and paste the /api/students endpoint into a browser. Alternatively, you can simply hit CTRL Click on the link. The result will look like this:

Deployment to Azure

Click on the "Deploy to Function App ..." icon.


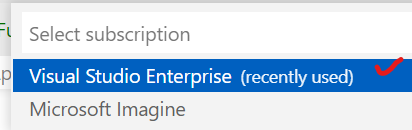
Select your subscription.


Choose "+ Create new Function App in Azure ...".


Enter a globally unique name for your function app then hit Enter.


Select .NET 6 for runtime stack:


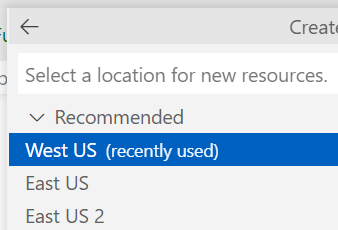
Choose a preferred data center.


The deployment process starts. Be patient as it could take 3-4 minutes. When deployment is complete you will see the following message:


If you click on the "View output" you will see the two endpoints. 


Although the first endpoint works, the second does not. To fix this problem, login into the azure portal https://portal.azure.com. In the filter field, enter func then choose "Function App".


Click on the function that was created.


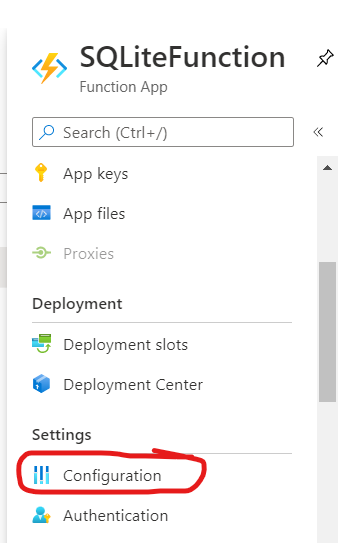
Select Configuration on the left navigation.


Click on WEBSITE_RUN_FROM_PACKAGE.


Change the value from 1 to 0 then click on OK.


Remember to Save at the top.


Back in VS Code, publish your functions app again.


Click on Deploy to confirm.


This time, deployment will not take as long as the last time. Once deployment is completed, try the /api/students on the deployed endpoint and you should find it working to your satisfaction.


Conclusion

It is easy to create Azure Functions with the SQLite. Also, creating an API with Azure Functions is much more cheaper than doing it with an ASP.NET Core Web API application because you pay a fraction of a cent for every request and the app does not need to be constantly running. It is also worth mentioning that using SQLite makes it even cheaper as you do not need to pay extra for hosting your relational database.

Saturday, February 5, 2022

docker-compose with MySQL pomelo driver and ASP.NET 7.0

It is customary to develop ASP.NET with either SQL Server or SQLite databases. How about if you want to use the popular MySQL database server? This article discussed one approach to making this possible by having your ASP.NET 7.0 development environment connect with MySQL running in a docker container.

Source code: https://github.com/medhatelmasry/AspMySQL-docker-compose

This article assumes the following:

  1. You have .NET 7.0 installed on your computer. 
  2. You have Docker Desktop installed on your computer.
  3. You have the dotnet-ef tool installed. 

Let's get started.

Setting up the mariadb:10.7.3 container

To download the MySQL version 8.0.0 image from Docker Hub and run it on your local computer, type the following command from within a terminal window:

docker run -p 3333:3306 --name db -e MYSQL_ROOT_PASSWORD=secret -d mariadb:10.7.3

This starts a container named db that listens on port 3333 on your local computer. The root password is secret.

To ensure that the MySQL container is running, type the following from within a terminal window:

docker ps

You will see a message like the following:

CONTAINER ID   IMAGE         COMMAND                  CREATED        STATUS        PORTS                    NAMES

67335fb804e4   mariadb:10.7.3                     "docker-entrypoint.s…"   5 seconds ago   Up 3 seconds   0.0.0.0:3333->3306/tcp

Creating our ASP.NET 7.0 MVC App

The first step is to create a working directory somewhere on your computer's hard drive. I did so by creating a folder named AspMySQL with the following terminal command:

mkdir AspMySQL

Thereafter, go into the new folder with:

cd AspMySQL

We will create an ASP.NET 7.0 application that uses individual authentication with the following command:

dotnet new mvc -f net7.0 --auth individual

To run the web application and see what it looks like, enter the following command:

dotnet run

You will see a message in the terminal window that resembles the following:

info: Microsoft.Hosting.Lifetime[14]
      Now listening on: https://localhost:7042
info: Microsoft.Hosting.Lifetime[14]
      Now listening on: http://localhost:5035
info: Microsoft.Hosting.Lifetime[0]
      Application started. Press Ctrl+C to shut down.
info: Microsoft.Hosting.Lifetime[0]
      Hosting environment: Development
info: Microsoft.Hosting.Lifetime[0]
      Content root path: /Users/medhatelmasry/AspMySQL/

The above message indicates that the Kestrel web server is running and listening on port 7042. The port number you get is probably different. Start your browser with the appropriate URL. You should see a page that looks like this:


Look into the root folder of the project, you will find a file named app.db. This is an SQLite database file. The web application that we scaffolded is configured to work with SQLite. We will change it so that it works with the popular MySQL database instead. Go ahead and delete app.db.

Close your browser and stop the web server in the terminal window by hitting CTRL + C.

There is only one NuGet package that is needed to talk to MySQL. Add the package by typing the following command from within a terminal window:

dotnet add package Pomelo.EntityFrameworkCore.MySql -v 7.0.0

Let us configure our web application to use MySQL instead of SQLite. Open the Program.cs file in your favourite editor and comment out (or delete) the following statements found at around line 8:

var connectionString = builder.Configuration.GetConnectionString("DefaultConnection");
builder.Services.AddDbContext<ApplicationDbContext>(options =>
    options.UseSqlite(connectionString));

Replace the above code with the following:

var host = builder.Configuration["DBHOST"] ?? "localhost";
var port = builder.Configuration["DBPORT"] ?? "3333";
var password = builder.Configuration["DBPASSWORD"] ?? "secret";
var db = builder.Configuration["DBNAME"] ?? "test-db";
var user = builder.Configuration["DBUSER"] ?? "root";

string connectionString = $"server={host}; userid={user}; pwd={password};"
        + $"port={port}; database={db};SslMode=none;allowpublickeyretrieval=True;";

var serverVersion = new MySqlServerVersion(new Version(10,7,3));

builder.Services.AddDbContext<ApplicationDbContext>(options =>
    options.UseMySql(connectionString, serverVersion));

Five environment variables are used in the database connection string. These are: DBHOST, DBPORT , DBPASSWORD, DBNAME and DBUSER. If these environment variables are not found then they will take up default values: localhost, 3333, secret, test-db and test-dbroot respectively.

Entity Framework Migrations

The migration files that were created in the /Data/Migrations folder contain commands for creating SQLite artifacts. These are not valid in our situation because we will be using MySQL and not SQLite. Therefore, delete the Migrations folder under /Data and create new migrations with the following command:

dotnet-ef migrations add M1 -o Data/Migrations

We can instruct our application to automatically process any outstanding Entity Framework migrations. This is done by adding the following statement to Program.cs right before the last app.Run() statement:

using (var scope = app.Services.CreateScope()) {
    var services = scope.ServiceProvider;

    var context = services.GetRequiredService<ApplicationDbContext>();    
    context.Database.Migrate();
}

Test our app

Now, let us test our web app and see whether or not it is able to talk to the containerized MySQL database server. 

Run the web application with the following terminal command:

dotnet run

If all goes well, you will see a message that indicates that the web server is listening on some random port number. Point your browser to http://localhost:???? (where ???? is your port number). The same web page will appear as before. Click on the Register link on the top right side.

I entered an Email, Password and Confirm password, then clicked on the Register button. The website then displays the following page that requires that you confirm the email address:


Click on the “Click here to confirm your account” link. This leads you to a confirmation page:


Login with the email address and password that you registered with.


The message on the top right side confirms that the user was saved and that communication between the ASP.NET MVC app and MySQL is working as expected.

Dockeri-zing solution

We will generate the release version of the application by executing the following command from a terminal window in the root directory of your web app:

dotnet publish -o dist

The above command instructs the dotnet utility to produce the release version of the application in the dist directory.

If you inspect the dist directory, you will see content similar to the following:


The highlighted file in the above image is the main DLL file that is the entry point into the web application.

Let us run the release version of the web app. To do this, change to the dist directory with the following terminal instruction:

cd dist

You can then run your main DLL file. In my case, this file is AspMySQL.dll. I executed the following command:

dotnet AspMySQL.dll

This displays the familiar messages from the web server that the app is ready to be accessed from a browser. Hit CTRL C to stop the web server.

We now have a good idea about what ASP.NET 7.0 artifacts need to be copied into a container. We shall simply copy contents of the dist directory into a Docker image that has the .NET 7.0 runtime.

Stop the web server by hitting CTRL C in the terminal window.

Also, in a terminal window, stop and remove the MySQL container with:

docker rm -f db

Return to the root directory of your project by typing the following in a terminal window:

cd ..

We need to create a docker image that will contain the .NET 7.0 runtime. A suitable image for this purpose is: mcr.microsoft.com/dotnet/aspnet:7.0

Create a text file named Dockerfile and add to it the following content:

FROM mcr.microsoft.com/dotnet/aspnet:7.0
COPY dist /app
WORKDIR /app
          ENV ASPNETCORE_URLS http://+:80
EXPOSE 80/tcp
ENTRYPOINT ["dotnet", "AspMySQL.dll"]

Above are instructions to create a Docker image that will contain our ASP.NET application. I describe each line below:

FROM mcr.microsoft.com/dotnet/aspnet:7.0Base image mcr.microsoft.com/dotnet/aspnet:7.0 will be used
COPY dist /appContents of the dist directory on the host computer will be copied to directory /app in the container
WORKDIR /appThe working directory in the container is /app
EXPOSE 80/tcpPort 80 will be exposed in the container
ENTRYPOINT ["dotnet", "AspMySQL.dll"]The main ASP.NET web app will be launched by executing "dotnet AspMySQL.dll"

We will next compose a docker yml file that orchestrates the entire system which involves two containers: a MySQL database server container and a container that holds our application. In the root folder of your application, create a text file named docker-compose.yml and add to it the following content:

version: '3.8'

volumes:
  datafiles:

services:
  db:
    image: mariadb:10.7.3 
    volumes:
      - datafiles:/var/lib/mysql
    #restart: always
    environment:
      MYSQL_ROOT_PASSWORD: secret
      MYSQL_TCP_PORT: 3306

  webapp:
    build:
      context: .
    depends_on:
      - db
    ports:
      - "8888:80"
    #restart: always
    environment:
      - DBHOST=db
      - DBPORT=3306
      - DBPASSWORD=secret
      - DBNAME=bingo-db
      - ASPNETCORE_ENVIRONMENT=Development


Below is an explanation of what this file does.

We will be having two containers. Each container is considered a service. The first service is named db and will host MySQL. The second service is named webapp and will host our ASP.NET web app.

The most current version of docker-compose is version 3.8. This is the first line in our docker-compose file.

The MySQL Container

Image mariadb:10.7.3 will be used for the MySQL container.

A volume named datafiles is declared that will host MySQL data outside of the container. This ensures that even if the MySQL container is decommissioned, data will not be lost.

restart: always is so that if the container stops, it will be automatically restarted.

The root password will be secret when MySQL is configured. This is set by the MYSQL_ROOT_PASSWORD environment variable.

The ASP.NET Web Application Container

The container will be built using the instructions in the Dockerfile file and the context used is the current directory.

depends_on indicates that the web app relies on the MySQL container (db) to properly function.

Port 80 in the mvc container is mapped to port 8888 on the host computer.

The environment variables needed by the web app are:

DBHOSTpoints to the MySQL service
DBPORTShould be set to 3306 because it is the depault port # that MySQL listens on
DBPASSWORDthis is the root password for MySQL
DBNAMEWe shall call the database for our web app bingo
ASPNETCORE_ENVIRONMENTset to Development more. In reality, you should change this to Production one you determine that your web app container works as expected.

Running the yml file

To find out if this all works, go to a terminal window and run the following command:

docker-compose up

Point your browser to http://localhost:8888/ and you should see the main web page. 


NOTE: If you cannot view the home page, check that the web container is running. If it is stopped then start it with docker start …

To ensure that the database works properly, register a user by clicking on the Register link in the top right corner.


You will then receive a “Register Confirmation”:


Click on the “Click here to confirm your account” so that the app accepts the email address that was used. On the “Confirm Email” page. 


Login with the account you created.


As you can see in the top-right corner, the user with email a@a.a has been successfully registered.


This opens a whole new world for containerizing your ASP.NET web apps.

Cleanup

Hit CTRL C in the terminal window to stop docker-compose, then run the following command:

docker-compose down