Sunday, December 18, 2016

Seeing detailed error message for ASP.NET Core 1.0 app deployed on Azure App Services

I am sure I am not alone in scratching my head when trying to figure out why an ASP.NET Core 1.0 web app deployed  to Azure crashes and does not work. That happened to me earlier today when I attempted to deploy an ASP.NET Core 1.0 web app that uses the SQLite database to Azure. The error message I received (Oops. 500 Internal Server Error | An error occurred while starting the application) was cryptic and not too helpful – see below:

image

This is the generic error that is displayed when web apps have their environment variable set to production or staging.

This bears the question – how does one set the environment variable in Azure App Services to a setting that sheds some light on what the problem is? Well, Here’s what I determined:
The name of the environment variable key that your ASP.NET Core 1.0 app uses can be determined by looking at your project’s Debug properties in Visual Studio 2015:

image

Alternatively, you can peek into Properties/launchSettings.json to see the values for the environment variable in question:

image

This means that the environment variable that controls detailed error messages is ASPNETCORE_ENVIRONMENT. Ideally, the three common values for this variable are Development, Staging and Production.

My next thought is -, how do I set the ASPNETCORE_ENVIRONMENT environment variable on Azure App Services. It turned out quite easy to do.

1) Login to your Azure subscription then click on “App Services” on the left-side.

image

2) Next, click on your web application. In my case it is SQLiteWeb, as shown below:

image

3) On the next blade, click on “Application Settings”:

image

4) On the next blade, scroll further down until you find the “App Settings” section. Add key=ASPNETCORE_ENVIRONMENT and value=Development as shown below:

image

Don’t forget to click on Save when you are done.

Now refresh the page that had a cryptic error and, voila, you can see a more meaningful error message:

image

Even though the error message looks ugly, at least I have something to work on.
BTW, I was able to solve the error by adding the following statement at the bottom of the Configure() method in Startup.cs:

context.Database.Migrate();

My final Configure() method looks like this:
public void Configure(IApplicationBuilder app,
    IHostingEnvironment env,
    ILoggerFactory loggerFactory,
    SchoolContext context)
{
    loggerFactory.AddConsole(Configuration.GetSection("Logging"));
    loggerFactory.AddDebug();

    if (env.IsDevelopment())
    {
      app.UseDeveloperExceptionPage();
      app.UseBrowserLink();
    }
    else
    {
      app.UseExceptionHandler("/Home/Error");
    }

    app.UseStaticFiles();
    app.UseMvc(routes =>
    {
      routes.MapRoute(
          name: "default",
          template: "{controller=Home}/{action=Index}/{id?}");
    });

    context.Database.Migrate();
    DummyData.Initialize(context);
}

References:

https://docs.microsoft.com/en-us/aspnet/core/fundamentals/error-handling
https://docs.microsoft.com/en-us/aspnet/core/fundamentals/environments
http://druss.co/2016/01/asp-net-core-1-0-automatic-migrations-entity-framework-7-ef-core-1-0/

Thursday, December 1, 2016

Test driven development (TDD) with xunittest and .NET Core

We will create the test cases for .NET Core application named FizzBuzz. Here’s how it goes. If a number is divisible by 3 then you will call out Fizz. If a number is divisible by 5 then you will call out Buzz. If a number is divisible by 3 and 5 then you will call out FizzBuzz. Otherwise, you will just call out the number itself.

Here are some examples:

2 1 2
4 1 2 Fizz 4
5 1 2 Fizz 4 Buzz
15 1 2 Fizz 4 Buzz Fizz 7 8 Fizz Fuzz 11 Fizz 13 14 FizzBuzz

The above table would represent our four test cases.

Directory & file structure

Create source (src) and test apps with the following directory and file structure:
image

In the root FizzBuzz directory, create a global.json file that contains the following content:
{
  "projects": [
    "src",
    "test"
  ]
}

Creating the business logic project

In a command line, while in the src/FizzBuzzLibrary directory, create the library project files by executing the following command:
dotnet new --type lib
Similarly, in a command line while the test/FizzBuzzTests directory, create the test project files by executing the following command:
dotnet new --type xunittest
If you open the FizzBuzz directory in Visual Studio Code, your directories & files will look like this:

image
 
Rename the src/FizzBuzzLibrary/Library.cs file to src/FizzBuzzLibrary/FizzBuzzMaster.cs. Open src/FizzBuzzLibrary/FizzBuzzMaster.cs in the editor and change the class name from Class1 to FizzBuzzMaster.
Similarly, rename test/FizzBuzzTests/Test.cs to test/FizzBuzzTests/FizzBuzzTestsMaster.cs. Open test/FizzBuzzTests/FizzBuzzTestsMaster.cs in the editor and change the class name from Tests to FizzBuzzTestsMaster.
Open the src/FizzBuzzLibrary/FizzBuzzMaster.cs file in the editor. Change the namespace to FizzBuzzLibrary and replace Method1() with the following method:
public string GetResult(int nmbr) {   
  string result = "";
  return result;
}
You will notice that the above method is destined to fail. This is the fundamental principal of test driven development whereby methods are built to fail.

We should create our test cases. Open test/FizzBuzzTests/FizzBuzzTestsMaster.cs in the editor and replace the Test1() method with the following four test cases:

[Fact]
public void Given2Result12() {
  FizzBuzzMaster fbm = new FizzBuzzMaster();
  var expected = "1 2 ";
  var actual = fbm.GetResult(2);
  Assert.Equal(expected, actual);
}

[Fact]
public void Given4Result12fizz4() {
  FizzBuzzMaster fbm = new FizzBuzzMaster();
  var expected = "1 2 Fizz 4 ";
  var actual = fbm.GetResult(4);
  Assert.Equal(expected, actual);
}

[Fact]
public void Given5Result12fizz4buzz() {
  FizzBuzzMaster fbm = new FizzBuzzMaster();
  var expected = "1 2 Fizz 4 Buzz ";
  var actual = fbm.GetResult(5);
  Assert.Equal(expected, actual);
}

[Fact]
public void Given15Result12fizz4buzzfizz78fizzbuzz11fizzfizz1314fizzbuzz() {
  FizzBuzzMaster fbm = new FizzBuzzMaster();
  var expected = "1 2 Fizz 4 Buzz Fizz 7 8 Fizz Buzz 11 Fizz 13 14 FizzBuzz ";
  var actual = fbm.GetResult(15);
  Assert.Equal(expected, actual);
}
We need to make a reference to the Library project from the test project. This is done by adding the following dependency to the test/FizzBuzzTests/project.json file:
"FizzBuzzLibrary":{
  "target": "project"
}
The dependencies collection in test/FizzBuzzTests/project.json now looks like this:
"dependencies": {
  "System.Runtime.Serialization.Primitives": "4.1.1",
  "xunit": "2.1.0",
  "dotnet-test-xunit": "1.0.0-rc2-192208-24",
  "FizzBuzzLibrary":{
    "target": "project"
  }
}
We have built our preliminary business logic and test cases. In addition, we referenced our business logic application into our test cases application. Now let us test things out.

To restore, build and test Library application, execute the following commands from within the root FizzBuzz directory:
dotnet restore src/FizzBuzzLibrary
dotnet build src/FizzBuzzLibrary
dotnet restore test/FizzBuzzTests
dotnet build test/FizzBuzzTests
It is now time to run the actual tests. This is done by executing the following command also from within the root FizzBuss directory:

dotnet test test/FizzBuzzTests

The test execution shows the following results:

Project FizzBuzzLibrary (.NETStandard,Version=v1.6) was previously compiled. Skipping compilation.
Project FizzBuzzTests (.NETCoreApp,Version=v1.0) was previously compiled. Skipping compilation.
xUnit.net .NET CLI test runner (64-bit win10-x64)
  Discovering: FizzBuzzTests
  Discovered:  FizzBuzzTests
  Starting:    FizzBuzzTests
    Tests.FizzBuzzTestsMaster.Given5Result12fizz4buzz [FAIL]
      Assert.Equal() Failure
                Γåô (pos 0)
      Expected: 1 2 Fizz 4 Buzz
      Actual:
                Γåæ (pos 0)
      Stack Trace:
        D:\scrap\_3973\FizzBuzz\test\FizzBuzzTests\FizzBuzzTestsMaster.cs(24,0): at Tests.FizzBuzzTestsMaster.Given5Result12fizz4buzz()
    Tests.FizzBuzzTestsMaster.Given2Result12 [FAIL]
      Assert.Equal() Failure
                Γåô (pos 0)
      Expected: 1 2
      Actual:
                Γåæ (pos 0)
      Stack Trace:
        D:\scrap\_3973\FizzBuzz\test\FizzBuzzTests\FizzBuzzTestsMaster.cs(12,0): at Tests.FizzBuzzTestsMaster.Given2Result12()
    Tests.FizzBuzzTestsMaster.Given15Result12fizz4buzzfizz78fizzbuzz11fizzfizz1314fizzbuzz [FAIL]
      Assert.Equal() Failure
                Γåô (pos 0)
      Expected: 1 2 Fizz 4 Buzz Fizz 7 8 Fizz Buzz 11 Fiz┬╖┬╖┬╖
      Actual:
                Γåæ (pos 0)
      Stack Trace:
        D:\scrap\_3973\FizzBuzz\test\FizzBuzzTests\FizzBuzzTestsMaster.cs(30,0): at Tests.FizzBuzzTestsMaster.Given15Result12fizz4buzzfizz78fizzbuzz11fizzfizz1314fizzbuzz()
    Tests.FizzBuzzTestsMaster.Given4Result12fizz4 [FAIL]
      Assert.Equal() Failure
                Γåô (pos 0)
      Expected: 1 2 Fizz 4
      Actual:
                Γåæ (pos 0)
      Stack Trace:
        D:\scrap\_3973\FizzBuzz\test\FizzBuzzTests\FizzBuzzTestsMaster.cs(18,0): at Tests.FizzBuzzTestsMaster.Given4Result12fizz4()
  Finished:    FizzBuzzTests
=== TEST EXECUTION SUMMARY ===
   FizzBuzzTests  Total: 4, Errors: 0, Failed: 4, Skipped: 0, Time: 0.229s
SUMMARY: Total: 1 targets, Passed: 0, Failed: 1.


Let’s fix all four failed tests by fixing our GetResult() method in src/FizzBuzzLibrary/FizzBuzzMaster.cs. Replace the GetResult() method with the following code:
public string GetResult(int nmbr) {   
  string result = "";

  for (int ndx=1; ndx<nmbr+1; ndx++) {
    if (ndx % 3 == 0 && ndx % 5 ==0) {
      result += "FizzBuzz ";
    } else if (ndx % 5 ==0 ) {
      result += "Buzz ";
    } else if (ndx % 3 ==0 ) {
      result += "Fizz ";                   
    }
    else
      result += ndx.ToString() + " ";
  }

  return result;
}
Build and run your tests again. This should be the outcome after you build and run your tests again:

Project FizzBuzzLibrary (.NETStandard,Version=v1.6) was previously compiled. Skipping compilation.
Project FizzBuzzTests (.NETCoreApp,Version=v1.0) was previously compiled. Skipping compilation.
xUnit.net .NET CLI test runner (64-bit win10-x64)
  Discovering: FizzBuzzTests
  Discovered:  FizzBuzzTests
  Starting:    FizzBuzzTests
  Finished:    FizzBuzzTests
=== TEST EXECUTION SUMMARY ===
   FizzBuzzTests  Total: 4, Errors: 0, Failed: 0, Skipped: 0, Time: 0.161s
SUMMARY: Total: 1 targets, Passed: 1, Failed: 0.


We are happy that all our tests have successfully passed.


Sunday, November 20, 2016

Continuous deployment of angular-cli Angular 2 app to Azure thru GitHub

In this post, I will show you how to deploy an Angular 2 application on GitHub to Azure. The application will first be pushed to GitHub then we will configure Azure to automatically sync changes from GitHub. This may not be the quickest way to do it, but it does work.

The following are prerequisites:
  • node.js is installed
  • angular-cli is installed
  • git is installed on your computer
  • you have a GitHub account
  • you have an Azure subscription

Creating a sample Angular 2 app

The first step is to create an application named ng2_to_azure. Type the following within a working directory in a terminal windows:

ng new ng2_to_azure

Once the above command completes, you will find the following directory and file structure has been created in a new directory named ng2_to_azure:
image

Change to the newly created directory with:

cd ng2_to_azure

Start the Angular 2 app with this command:

ng serve

If you point your browser to http://localhost:4200. You should see the following web page:

image

Creating production version of Angular 2 app

If you open the .gitignore text file in an editor, you will notice that the /dist directory is excluded. Comment out that line by adding a # so that it looks like this:

image

Save the .gitignore file and exit your editor. We will next produce the production version of our app. This is done by executing the following build command while in the root ng2_to_azure directory:

ng build --prod --aot

The above command transpiles all the TypeScript files JavaScript files and puts the results in the /dist folder. The aot switch builds using ahead-of-time compilation. Have a peek at the contents of the /dist folder:

image

Notice that the main page is index.html. Assuming that your web server is still running, point your browser to http://localhost:4200/dist. The production version of your application will display in the browser:

image

Adding GitHub source control to your application

Go to http://github.com and login into your account.

image

On the right-side, beside "Your repositories", click on the green "New Repository" button.

image

Enter ng2_to_azure for repository name, then click on the green "Create repository" button.

image

We will follow some of the instructions highlighted above. Go to a command-line in the ng2_to_azure directory on your computer. and type in the following commands:

git add .
git commit -m "first commit"
git remote add origin
https://github.com/{github user}/ng2_to_azure.git
git push -u origin master


Note: Make sure you enter your GitHub handle instead of {github user} in the URL above.
Once you have successfully completed the above, you can go back to GitHub in your browser and view all the files in your ng2_to_azure repository:

image

Note that the /dist folder is also contained in the repository.

Continuous deployment on azure

Go to http://portal.azure.com and login into you Azure account.

image

Click on the big + (New) on the top left-side.

image

Click Web App on the next blade.

image
  • Choose an "App name" that is sufficiently unique when combined with domain azurewebsites.net
  • Choose your subscription
  • For "Resource Group" either create a new or use an existing one
  • While configuring "App Service plan/Location", you get to choose which data center you want.
Finally, click on the blue Create button at the bottom of the blade. Once your web app is created, it will appear in the list of your "App Services".

image

Click on the web app you just created.

image

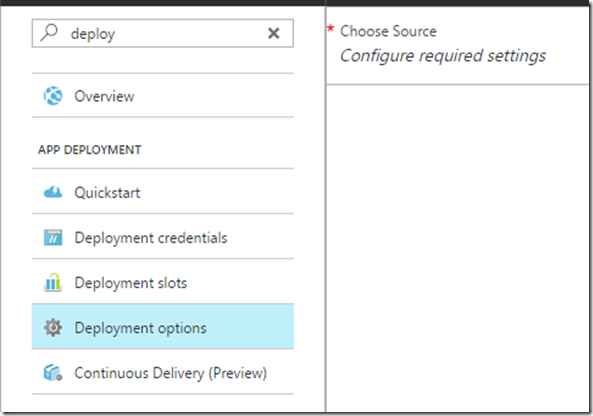
Enter "deploy" in the filter field at the top then select "Deployment Options".
image

On the next blade, click on "Choose Source".

image

Click on GitHub. If this is the first time you connect to GitHub from Azure, you will be asked for your credentials. Once your GitHub credentials are known to Azure then you will see a blade that looks like this:

image

Click on "Choose project" to select the appropriate GitHub repository that you wish to connect Azure with.

image

Click on the Angular 2 repository you previously setup on GitHub. Back in the "Deployment source" blade, click on the blue OK button at the bottom of the blade. If you click on "Deployment options" again, you will determine that Azure is building your app with the following message:

image

Finally, when the build process is complete, you should see the following:

image

Now let us point to our application in the browser. In my case, I tried to access http://ng2azure.azurewebsites.net and this is the response I got:

image

One can guess that the web server found no default page in the root of the web application. To prove my point, we can find out what files we have in the root of the web site. Go back to the Azure portal in your browser and enter the word “Tools” in your filter field:

image

Click on Console. This will take you into the Azure terminal window. Type "dir" to see what is in the root folder.

image

It is obvious that there is no welcome page in the root of the web application. What we need to do is educate Azure that the /dist directory is indeed the root of our web application.

Enter the word "application" into the filter field.

image

Click on Application settings. Under "App settings", add the following

key = Project
value = ./dist

image

Do not forget to click on Save at the top.

image

To get the new configuration to take effect, we must trigger a new deployment. Go back to "Deployment options" and click on Sync so a new deployment is initiated.

image

Once the new deployment is completed, click on your fully qualified web address on azure and you should see that your application is indeed working.

image

If you have a better way of deploying an Angular 2 application to Azure, I would appreciate your letting me know through a comment on this post.

ASP.NET Core MVC + Web API app with EF Core 1.0 & SQLite

This tutorial uses Visual Studio 2015 and ASP.NET Core 1.0.

My intention is to give you a practical introduction into developing ASP.NET Core 1.0 MVC and Web API apps with the SQLite database as an alternative to traditional SQL Server.

A useful utility that comes in handy when working with the SQLite database is SQLiteStudio. Download SQLiteStudio from: http://sqlitestudio.pl/?act=download. Extract the ZIP file and place contents in a separate folder. Run SQLiteStudio.exe.

We will build an ASP.NET Core 1.0 app that uses the following Student entity:

image_thumb1

ASP.NET Core 1.0 MVC project

Create a new ASP.NET Core app in Visual Studio 2015:
  • File >> New >> Project
  • Templates >> Visual C# >> Web
image
  • Select “ASP.NET Web Application (.NET Core)”, name the project SQLiteWeb then click on OK.
image
  • Select “Web Application”, uncheck “Host in the cloud”, then click on OK.

Open the global.json and note the runtime version that will be used by the application:
{
  "projects": [ "src", "test" ],
  "sdk": {
    "version": "1.0.0-preview2-003131"
  }
}

The above indicates that the version of the runtime that is being used is 1.0.0-preview2-003131.
Dependencies are added to the project.json file. Open this file and have a peek at the dependencies section:
"dependencies": {
  "Microsoft.NETCore.App": {
    "version": "1.0.1",
    "type": "platform"
  },
  "Microsoft.AspNetCore.Diagnostics": "1.0.0",
  "Microsoft.AspNetCore.Mvc": "1.0.1",
  "Microsoft.AspNetCore.Razor.Tools": {
    "version": "1.0.0-preview2-final",
    "type": "build"
  },
  "Microsoft.AspNetCore.Routing": "1.0.1",
  "Microsoft.AspNetCore.Server.IISIntegration": "1.0.0",
  "Microsoft.AspNetCore.Server.Kestrel": "1.0.1",
  "Microsoft.AspNetCore.StaticFiles": "1.0.0",
  "Microsoft.Extensions.Configuration.EnvironmentVariables": "1.0.0",
  "Microsoft.Extensions.Configuration.Json": "1.0.0",
  "Microsoft.Extensions.Logging": "1.0.0",
  "Microsoft.Extensions.Logging.Console": "1.0.0",
  "Microsoft.Extensions.Logging.Debug": "1.0.0",
  "Microsoft.Extensions.Options.ConfigurationExtensions": "1.0.0",
  "Microsoft.VisualStudio.Web.BrowserLink.Loader": "14.0.0"
},
Build the application then run it by hitting CTRL F5 to see what it looks like in your browser.

image

This runs your application in IIS Express. Close your browser.

When working with ASP.NET Core 1.0, you will need to go to the command-line interface frequently. Add a command-prompt extension to make it easier. Click on Tools >> Extensions and Updates…

image

Find an extension named “Open Command Line” as shown below.

image

If you have not installed it already, install the above extension.

In solution explorer, right-click on the SQLiteWeb node the choose “Open Command Line” >> “Default (cmd)

image

This opens a regular operating system terminal window. Try out some important .NET Core 1.0 commands.
  1. dotnet --help – this gives you a list of common commands
  2. dotnet restore – restore dependencies specified in the .NET project
  3. dotnet build - Builds a .NET project
  4. dotnet run --help – provides help information about the run command
  5. dotnet new --type --help – shows the types of templates that can be scaffolded. At the time of writing these are: Console, Web, Lib, xunittest.
  6. dotnet new --type web – scaffolds a web template in the current directory
Execute the following command in order to run your web application using another cross-platform web server called Kestrel on port 5000, instead of IIS Express.

dotnet run

Note the following message:

Project SQLiteWeb (.NETCoreApp,Version=v1.0) was previously compiled. Skipping compilation.
Hosting environment: Production
Content root path: D:\scrap\_4976\SQLiteWeb\src\SQLiteWeb
Now listening on:
http://localhost:5000
Application started. Press Ctrl+C to shut down.

Point your browser to http://localhost:5000. You will see the exact same page as before.
Close your browser, close the command-line terminal window and return to Visual Studio 2015.
We will need to add some dependencies in order to use SQLite with Entity Framework Core . Add these dependencies to the project.json file:

"Microsoft.EntityFrameworkCore.Sqlite": "1.0.1",
"Microsoft.EntityFrameworkCore.Tools": "1.0.0-preview2-final"

Add the following to the tools section in the project.json file:
"Microsoft.EntityFrameworkCore.Tools": "1.0.0-preview2-final"

Class Library Project

It is good practice to place all your data models inside a Models folder. Therefore, add a folder called Models. Inside of the Models folder, add a class file named Student.cs. Use the following code for the class file:

public class Student {
  public int Id { get; set; }
  public string FirstName { get; set; }
  public string LastName { get; set; }
  public string School { get; set; }
  public DateTime StartDate { get; set; }
}


Also, to the Models folder, add another class file named SchoolContext.cs with the following class definition code:

public class SchoolContext : DbContext {
  public SchoolContext(DbContextOptions<SchoolContext> options) :base(options)
        { }

  public DbSet<Student> Students { get; set; }
}


We will need to add a connection string for the SQLite database in the SQLiteWebAPI project:
  • Open the appsettings.json file in the SQLiteWebAPI project
  • Add the following section after the Logging block:
"Data": {
  "DefaultConnection": {
    "ConnectionString": "Data Source=school-db.sqlite"
  }
}
We will need to add both Entity Framework and SQLite to the project’s Startup.cs class:
  • Open the Startup.cs file.
  • Add the following code to the ConfigureServices() method just before services.AddMvc();
var connection = Configuration["Data:DefaultConnection:ConnectionString"];
services.AddDbContext<SchoolContext>(options => options.UseSqlite(connection));


The above reads the connection string from the appsettings.json file and passes it on to the SchoolContext class.

Seed Data

Before we carry out code first migrations, let us first create some seed data:
  • In the Models folder, create a class named DummyData.cs.
  • Add the following Initialize() method code inside the DummyData class:
public static void Initialize(SchoolContext db) {
  if (!db.Students.Any()) {
    db.Students.Add(new Student {
      FirstName = "Bob",
      LastName = "Doe",
      School = "Engineering",
      StartDate = Convert.ToDateTime("2015/09/09")
    });
    db.Students.Add(new Student {
      FirstName = "Ann",
      LastName = "Lee",
      School = "Medicine",
      StartDate = Convert.ToDateTime("2014/09/09")
    });
    db.Students.Add(new Student {
      FirstName = "Sue",
      LastName = "Douglas",
      School = "Pharmacy",
      StartDate = Convert.ToDateTime("2016/01/01")
    });
    db.Students.Add(new Student {
      FirstName = "Tom",
      LastName = "Brown",
      School = "Business",
      StartDate = Convert.ToDateTime("2015/09/09")
    });
    db.Students.Add(new Student {
      FirstName = "Joe",
      LastName = "Mason",
      School = "Health",
      StartDate = Convert.ToDateTime("2015/01/01")
    });
    db.SaveChanges();
  }
}

To generate seed data, we will first inject the dependency “SchoolContext context” into the arguments of the Configure() method in Startup.cs. Next, we can make a call to seed the data at the bottom of the Configure() method with the following statement:
      
DummyData.Initialize(context);

Migrations

We are now ready to do some migrations:
  • Compile your application
  • Open a command terminal inside the src\SQLiteWeb folder
  • Add a migration to the project with the following ef command:
dotnet ef migrations add FirstMigration

Notice that class files are created in the Migrations folder.
  • We will then update the database with the following terminal command:
dotnet ef database update

At this point, there will be a file named school-db.sqlite in the src\SQLiteWeb\bin\Debug\netcoreapp1.0 folder. The data will not have been seeded yet because this happens when the application is actually run. 

Creating an MVC UI

Let us seed the data by running your web application in a browser. You should see the same page as we saw earlier. Let us create a UI so that we can see the seeded data.

  • Right-click on the Controllers folder and choose Add >> New Item… >> MVC Controller Class
  • Name the class file StudentController.cs.
  • Replace the class definition with the following code:
public class StudentController : Controller {
  private SchoolContext _context;

  public StudentController(SchoolContext context) {
      _context = context;
  }

  public IActionResult Index() {
      return View(_context.Students.ToList());
  }

  public IActionResult Create() {
      return View();
  }

  [HttpPost]
  [ValidateAntiForgeryToken]
  public IActionResult Create(Student student) {
      if (ModelState.IsValid) {
          _context.Students.Add(student);
          _context.SaveChanges();
          return RedirectToAction("Index");
      }

      return View(student);
  }

}

You’ll notice that the controller takes a SchoolContext as a constructor parameter. ASP.NET dependency injection will take care of passing an instance of SchoolContext into your controller.

The controller contains an Index action, which displays all blogs in the database, and a Create action, which inserts a new student into the database.

Let us add a view for the UI.
  • Create a new folder under Views named Student.
  • Right-click on the newly created Student folder and and select Add >> New Item…
  • Add an “MVC View Page” item and accept the default name index.cshtml.
  • replace the contents of the index.cshtml with the following code:
@model IEnumerable<SQLiteWeb.Models.Student>
@{
  ViewBag.Title = "Students";
}

<h2>@ViewBag.Title</h2>
<p>
  <a asp-controller="Student" asp-action="Create">Create New</a>
</p>

<table class="table">
  <tr>
    <th>Id</th>
    <th>First Name</th>
    <th>Last Name</th>
    <th>School</th>
    <th>Start Date</th>
  </tr>

  @foreach (var item in Model) {
  <tr>
      <td>
        @Html.DisplayFor(modelItem => item.Id)
      </td>
      <td>
        @Html.DisplayFor(modelItem => item.FirstName)
      </td>
      <td>
        @Html.DisplayFor(modelItem => item.LastName)
      </td>
      <td>
        @Html.DisplayFor(modelItem => item.School)
      </td>
      <td>
        @Html.DisplayFor(modelItem => item.StartDate)
      </td>
  </tr>
  }
</table>

  • Let us add a link to the Student controller on the main page of our application. Open _Layout.cshtml under Views/Shared.
  • Paste the following markup in the navigation section around line 36:
<li><a asp-area="" asp-controller="Student" asp-action="Index">Student</a></li>
  • Run the application then click on the Student link. You should see the dummy data that we created.
image
The “Create New” link is currently broken. We need to develop the UI for adding new students
  • Create a “MVC View Page” item create.cshtml under Views/Student.
  • Replace the contents of create.cshtml with the following markup:
@model SQLiteWeb.Models.Student
@{
  ViewBag.Title = "New Blog";
}

<h2>@ViewData["Title"]</h2>
<form asp-controller="Student" asp-action="Create" method="post" class="form-horizontal" role="form">
  <div class="form-horizontal">
    <div asp-validation-summary="All" class="text-danger"></div>
    <div class="form-group">
      <label asp-for="FirstName" class="col-md-2 control-label"></label>
      <div class="col-md-10">
        <input asp-for="FirstName" class="form-control" />
        <span asp-validation-for="FirstName" class="text-danger"></span>
      </div>
    </div>
    <div class="form-group">
      <label asp-for="LastName" class="col-md-2 control-label"></label>
      <div class="col-md-10">
        <input asp-for="LastName" class="form-control" />
        <span asp-validation-for="LastName" class="text-danger"></span>
      </div>
    </div>
    <div class="form-group">
      <label asp-for="School" class="col-md-2 control-label"></label>
      <div class="col-md-10">
        <input asp-for="School" class="form-control" />
        <span asp-validation-for="School" class="text-danger"></span>
      </div>
    </div>
    <div class="form-group">
      <label asp-for="StartDate" class="col-md-2 control-label"></label>
      <div class="col-md-10">
        <input asp-for="StartDate" class="form-control" />
        <span asp-validation-for="StartDate" class="text-danger"></span>
      </div>
    </div>
    <div class="form-group">
      <div class="col-md-offset-2 col-md-10">
        <input type="submit" value="Create" class="btn btn-default" />
      </div>
    </div>
  </div>
</form>

  • Add a new student to the database by running your application and clicking on Student >> Create New.
image

The WebAPI Controller

Let us add a Web API Studentsapi controller to our projects.
  • In the Controllers folder, add a new “Web API Controller Class” named StudentapiController
  • Replace StudentapiController class definition with the following code:
[Route("api/[controller]")]
public class StudentapiController : Controller {
  private SchoolContext _context { get; set; }

  public StudentapiController(SchoolContext context) {
    _context = context;
  }

  // GET: api/student
  [HttpGet]
  public IEnumerable<Student> Get() {
    return _context.Students.ToList();
  }

  // GET api/studentapi/5
  [HttpGet("{id}")]
  public Student Get(int id) {
    return _context.Students.FirstOrDefault(s => s.Id == id);
  }

  // POST api/studentapi
  [HttpPost]
  public void Post([FromBody]Student student) {
    _context.Students.Add(student);
    _context.SaveChanges();
  }

  // PUT api/studentapi/5
  [HttpPut("{id}")]
  public void Put(int id, [FromBody]Student student) {
    _context.Students.Update(student);
    _context.SaveChanges();
  }

  // DELETE api/studentapi/5
  [HttpDelete("{id}")]
  public void Delete(int id) {
    var student = _context.Students.FirstOrDefault(t => t.Id == id);
    if (student != null) {
        _context.Students.Remove(student);
        _context.SaveChanges();
    }
  }
}


  • Hit CTRL-F5 on your keyboard and point your browser to /api/studentapi. You will see the seed data appearing as JSON in the browser:
image_thumb11

In subsequent blog posts I shall discuss

Saturday, November 19, 2016

Build an ASP.NET Core tag helper that consumes an Azure Web API RESTful service

Tag Helpers in ASP.NET Core allow you to create your own tags that fulfill a server-side purpose. In this tutorial, I will show you how to create a tag helper <cartoon-characters> that accesses a Web API service and displays contents in any razor view page.

The Web API service we will consume in this exercise is located at http://cartoonapi.azurewebsites.net/api/cartoon. It delivers the names of cartoon characters and their respective images.

1) To start with, create an ASP.NET Core Web application named TagHelperDemo in Visual Studio 2015.

2) We need to create a class that closely matches the nature of the Web API JSON object. Therefore, add the following CartoonCharacter class to a Models folder in your project:
public class CartoonCharacter {
  public string Name { get; set; }
  public string PictureUrl { get; set; }
}
3) Next, we will need to install the We API Client libraries. To that end, execute the following commands from within the Package Manager Console window in Visual Studio 2015:
Install-Package Microsoft.AspNet.WebApi.Client
Install-Package System.Runtime.Serialization.Xml
This should add the following dependencies to your project.json file:
"Microsoft.AspNet.WebApi.Client": "5.2.3",
"System.Runtime.Serialization.Xml":  "4.1.1"
4) Add the following tag to the bottom of Views/Home/About.cshtml:

<cartoon-characters></cartoon-characters>

5) Create a folder named TagHelpers and add to it a class file named CartoonCharactersTagHelper.cs. Have the class inherit from TagHelper and implement the ProcessAsync() method as follows:

public override async Task ProcessAsync(TagHelperContext context, TagHelperOutput output)
{
}


We could have implemented a method Process() instead. However, in our case, it is appropriate to implement ProcessAsync() instead because we are about to make an async call to a remote service.

6) Add the following instance variable to the CartoonCharactersTagHelper class:
 private string baseUrl = "http://cartoonapi.azurewebsites.net";

7) Annotate the CartoonCharactersTagHelper class with the following:

[HtmlTargetElement("cartoon-characters")]
[HtmlTargetElement(Attributes = "cartoon-characters")]


The first annotation defines the tag <cartoon-characters> and the second defines the “cartoon-characters” attribute. This means that we have two different ways to produce the same output on a razor .cshtml view.

8) Add the following method to the CartoonCharactersTagHelper class:

async Task<IEnumerable<CartoonCharacter>> GetCartoonCharactersAsync() {
    HttpClient client = new HttpClient();
    client.BaseAddress = new Uri(baseUrl);
    client.DefaultRequestHeaders.Accept.Clear();
    client.DefaultRequestHeaders.Accept.Add(new MediaTypeWithQualityHeaderValue("application/json"));

    IEnumerable<CartoonCharacter> cartoonCharacters = null;
    try {
        // Get all cartoon characters
        HttpResponseMessage response = await client.GetAsync("/api/cartoon");
        if (response.IsSuccessStatusCode) {
            cartoonCharacters = response.Content.ReadAsAsync<IEnumerable<CartoonCharacter>>().Result;
        }
    } catch (Exception e) {
        System.Diagnostics.Debug.WriteLine(e.ToString());
    }

    return cartoonCharacters;
}


The above code makes a request to the Web API service and returns an IEnumerable<CartoonCharacter> collection with the results.

9) Add the following code inside the ProcessAsync() method:

IEnumerable<CartoonCharacter> cartoonCharacters = await GetCartoonCharactersAsync();
string html = string.Empty;
html += "<table><tr><th>Name</th><th>Picture</th></tr>";
foreach (var item in cartoonCharacters) {
    string photoUrl = baseUrl + "/" + item.PictureUrl;
    html += "<tr>";
    html += "<td>" + item.Name + "</td>";
    html += "<td><img src='" + photoUrl + "' style='width: 50px' /></td>";
    html += "</tr>";
}
html += "<tr><table>";
output.Content.SetHtmlContent(html);


The above code creates a table with the collection of cartoon characters so that it can be displayed wherever the tag helper is used.

11) Register the tag name in the Views/_ViewImports.cshtml file by adding the following to the list of tags that are already there:

@addTagHelper "TagHelperDemo.TagHelpers.CartoonCharactersTagHelper, TagHelperDemo"

You may need to adjust the above names depending on what you called your app and/or your tag helper class.

11) Compile and run your application then click on About. You should see the following output:

image

If you inspect the table in your browser, you will see the following:

image

The above is using the tag and not the attribute. Edit About.cshtml and comment out “<cartoon-characters></cartoon-characters>” and put the following <div> tag with the cartoon-characters attribute underneath it:
<div cartoon-characters></div>

Your About.cshtml should now look like this:
@{
    ViewData["Title"] = "About";
}
<h2>@ViewData["Title"].</h2>
<h3>@ViewData["Message"]</h3>

<p>Use this area to provide additional information.</p>
@*<cartoon-characters></cartoon-characters>*@
<div cartoon-characters></div>
When you run your application. you should see the same output as before. If you inspect the table you will see the following HTML source:

image

This proves to us that you can either use tags or attributes with TagHelpers in ASP.NET Core.