- You are using the Windows 10 Operating System
- You have Visual Studio 2017 installed on your computer
- ASP.NET Core 2.1 is installed on your computer
The objective is to model NHL (National Hockey League) teams and players as shown below:
Team
TeamName
City
Province
Country
Player
PlayerId
FirstName
LastName
Position
The Visual Studio Project
Start your Visual Studio 2017
File >> New >> Project...
Select ASP.NET Core Web Application
Give your project a name (like MvcEfCore)

On the next dialog, after you click on OK, choose ASP.NET Core 2.1 and Web Application (Model-View-Controller). Click on the Change Authentication button and select Individual User Accounts.

Click on OK.
Let us add two classes (Team & Player) that represent the entities that were mentioned beforehand. Create two class files in the Models folder: Team.cs & Player.cs. Replace the class code with the following:
Let us add two classes (Team & Player) that represent the entities that were mentioned beforehand. Create two class files in the Models folder: Team.cs & Player.cs. Replace the class code with the following:
Team class
public class Team {
    [Key]
    [MaxLength(30)]
    public string TeamName { get; set; }
    public string City { get; set; }
    public string Province { get; set; }
    public string Country { get; set; }

    public List<Player> Players { get; set; }
}
Make sure you resolve the namespaces for the "Key" and "MaxLength" classes.
Player class
public class Player {
    public int PlayerId { get; set; }
    public string FirstName { get; set; }
    public string LastName { get; set; }
    public string Position { get; set; }

    public string TeamName { get; set; }
    public Team Team { get; set; }
}
Next we need to add a Entity Framework context class. Create a class file named NhlContext in the Data folder. Replace the class code with the following:
    public class NhlContext : DbContext
    {
        public NhlContext(DbContextOptions options) : base(options) { }

        protected override void OnModelCreating(ModelBuilder builder)
        {
            base.OnModelCreating(builder);
        }

        public DbSet<Team> Teams { get; set; }
        public DbSet<Player> Players { get; set; }
    }
Make sure you resolve the inherited DbContext, Team, and Player classes.
Build your application to ensure that you do not have any compiler errors.
Build your application to ensure that you do not have any compiler errors.
Add the following code to the ConfigureServices() method in Startup.cs:
The above code ensures that we can use the NhlContext class in dependency injection and that it uses the DefaultConnection connection string in appsettings.json.
services.AddDbContext<NhlContext>(options =>
    options.UseSqlServer(Configuration.GetConnectionString("DefaultConnection")));
The above code ensures that we can use the NhlContext class in dependency injection and that it uses the DefaultConnection connection string in appsettings.json.
Open appsettings.json for editing and change the database name so that it is simply NHL and not a long non-sense name. The appropriate connection string setting in appsettings.json will look like this:
Developers prefer having sample data when building data driven applications. Therefore we will create some dummy data to ensure that our application behaves as expected. Create a class file named DummyData in the Data directory and add to it the following code:
"DefaultConnection": "Server=(localdb)\\mssqllocaldb;Database=NHL;Trusted_Connection=True;MultipleActiveResultSets=true"
Developers prefer having sample data when building data driven applications. Therefore we will create some dummy data to ensure that our application behaves as expected. Create a class file named DummyData in the Data directory and add to it the following code:
public class DummyData {
  public static void Initialize(IApplicationBuilder app) {
    using (var serviceScope = app.ApplicationServices.GetService<IServiceScopeFactory>().CreateScope()) {
      var context = serviceScope.ServiceProvider.GetService<ApplicationDbContext>();
      context.Database.EnsureCreated();
      //context.Database.Migrate();

      // Look for any teams.
      if (context.Teams!=null && context.Teams.Any()) {
          return;   // DB has already been seeded
      }

      var teams = DummyData.GetTeams().ToArray();
      context.Teams.AddRange(teams);
      context.SaveChanges();

      var players = DummyData.GetPlayers(context).ToArray();
      context.Players.AddRange(players);
      context.SaveChanges();
    }
  }

    public static List<Team> GetTeams() {
        List<Team> teams = new List<Team>() {
            new Team() {
                TeamName="Canucks",
                City="Vancouver",
                Province="BC",
                Country="Canada",
            },
            new Team() {
                TeamName="Sharks",
                City="San Jose",
                Province="CA",
                Country="USA",
            },
            new Team() {
                TeamName="Oilers",
                City="Edmonton",
                Province="AB",
                Country="Canada",
            },
            new Team() {
                TeamName="Flames",
                City="Calgary",
                Province="AB",
                Country="Canada",
            },
            new Team() {
                TeamName="Leafs",
                City="Toronto",
                Province="ON",
                Country="Canada",
            },
            new Team() {
                TeamName="Ducks",
                City="Anaheim",
                Province="CA",
                Country="USA",
            },
            new Team() {
                TeamName="Lightening",
                City="Tampa Bay",
                Province="FL",
                Country="USA",
            },
            new Team() {
                TeamName="Blackhawks",
                City="Chicago",
                Province="IL",
                Country="USA",
            },
        };

        return teams;
    }

    public static List<Player> GetPlayers(NhlContext context) {
        List<Player> players = new List<Player>() {
            new Player {
                FirstName = "Sven",
                LastName = "Baertschi",
                TeamName = context.Teams.Find("Canucks").TeamName,
                Position = "Forward"
            },
            new Player {
                FirstName = "Hendrik",
                LastName = "Sedin",
                TeamName = context.Teams.Find("Canucks").TeamName,
                Position = "Left Wing"
            },
            new Player {
                FirstName = "John",
                LastName = "Rooster",
                TeamName = context.Teams.Find("Flames").TeamName,
                Position = "Right Wing"
            },
            new Player {
                FirstName = "Bob",
                LastName = "Plumber",
                TeamName = context.Teams.Find("Oilers").TeamName,
                Position = "Defense"
            },
        };

        return players;
    }
}
Resolve all outstanding namespaces.
Add the following code to seed data to the end of the Configure() method in Startup.cs:
Add the following code to seed data to the end of the Configure() method in Startup.cs:
DummyData.Initialize(app);
It is time to run some migration script. This can be done either at the terminal window or in the package manager console.
Option 1: Package Manager Console
To access the package manager console, click on Tools >> NuGet Package Manager >> Package Manager Console. This will open a window in a bottom pane in Visual Studio.Type the following commands:
Add-Migration InitialCreate -Context NhlContext -o Data/Migrations/NHL
Update-Database -Context NhlContext
The first command produces the code that is needed to create the Players and Teams tables in the database. This code will be found in the Data/Migrations/NHL folder.
The second command will actually create the Teams & Players tables in the database.
Option 2: Terminal window using dotnet CLI
Drop into a terminal window in the project folder that contains the .csproj file.Type the following dotnet CLI commands:
dotnet ef migrations add InitialCreate -c NhlContext -o Data/Migrations/NHL
dotnet ef database update -c NhlContext
Test Application
We are now ready to run the application. Hit Ctrl+F5 on your keyboard. The application will run and will look like this:
Of course there is no sight of the data that was created. To view the sample data in Visual Studio, click on View >> SQL Server Object Explorer. This opens up a pane in Visual Studio. Expand nodes database server >> Databases >> NHL >> Tables.

Right-click on dbo.Teams then select View Data. You should see Teams sample data in the database.

Likewise, view Players sample data.

Notice that the last column in the Players entity is a foreign key into the Teams entity.
Let us now scaffold the MVC controllers for both of these entities. Back in Solution Explorer, right-click on Controllers then select Add >> Controller. Select "MVC Controller with views, using Entity Framework".

Choose Team for Model class and NhlContext for Data context class.

Just like you created a controller for the Team table, do the same for the Player table.

To view the output of the controllers created, you can run the application by hitting Ctrl + F5 then add either /teams or /players to view the Teams or Players controllers respectively.
The Teams controller

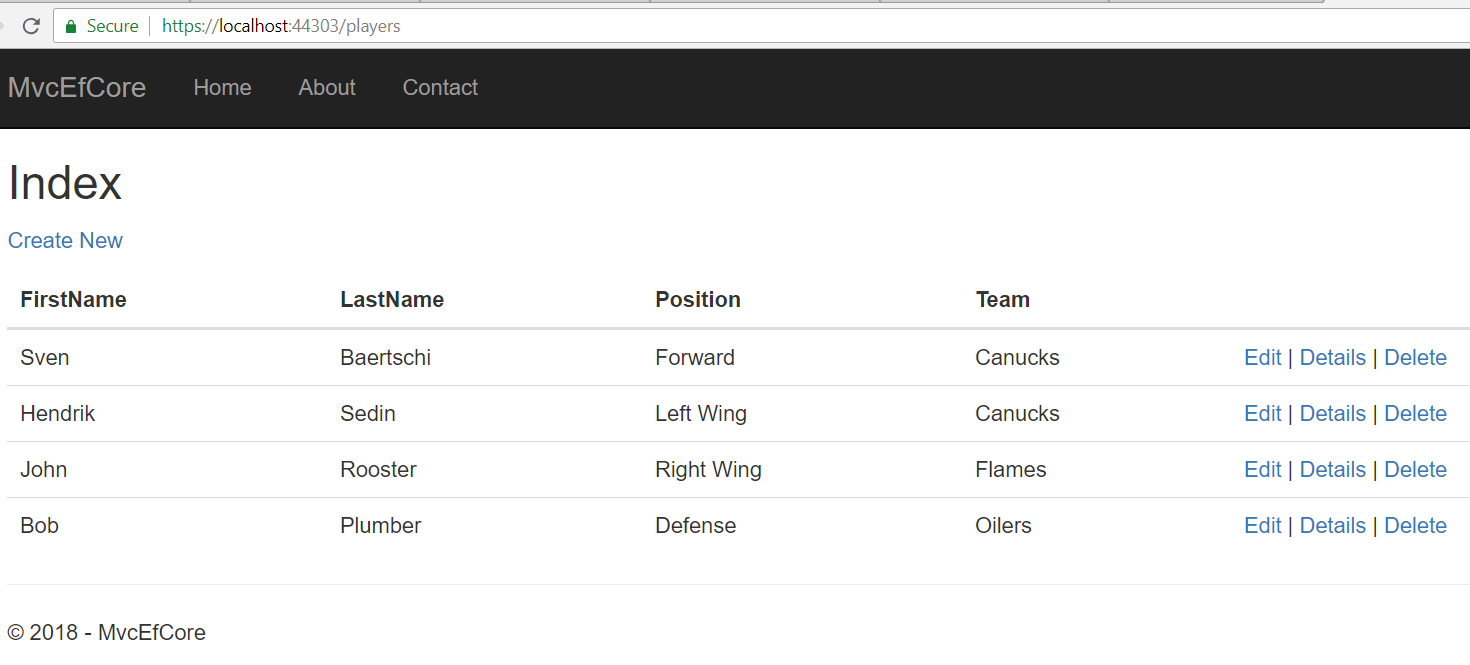
The Players controller
There is one thing we need to fix in the Teams index view. Since team name is a primary key it does not display in the tabls. The team-name is important to us so we need to modify Views/Teams/Index.cshtml. Open the file in Visual Studio and add the following HTML code as the first column title in the table:
<th>
@Html.DisplayNameFor(model => model.TeamName)
</th>
Also, add the following column data to the table with this HTML code:
<td>
@Html.DisplayFor(modelItem => item.TeamName)
</td>
When you run the application with /teams added to the address line, you should see team names.

<li><a asp-action="Index" asp-area="" asp-controller="Teams" href="https://www.blogger.com/null">Team</a></li>
<li><a asp-action="Index" asp-area="" asp-controller="Players" href="https://www.blogger.com/null">Player</a></li>
Now, when you run the application you will see two new menu buttons for Team & Player.

I hope you found this article useful. Meantime, cheers until we meet again.
No comments:
Post a Comment