Microsoft has added a new project type in Azure that facilitates DevOps. This is the "DevOps Project" and it is currently in preview. In this post I shall show you how it works in its present state. You can expect it to look different when it reaches final release.
Some of the benefits of the DevOps project are:
- you can be up and running with a new DevOps pipeline very quickly
- a wide range of languages and frameworks are supported like .NET, Java, PPH, Node and Python
- you can start fresh or bring in your application from GitHub on external Git
- it has built-in Application Insights integration for instant analytics and actionable insights
- CI/CD using Visual Studio Team Services (VSTS)
In this tutorial, we will use a very simple ASP.NET Core 2.0 web application that you can clone from GitHub.
I assume you already have the following:
- You have an Azure account at https://portal.azure.com
- You have a VSTS account at https://www.visualstudio.com/team-services/
- You have Docker installed on your computer
- You have Git installed on your computer
- You have a GitHub account at http://github.com
- You have some basic knowledge about Docker
The plan is to deploy a sample ASP.NET Core 2.0 application into a Docker container on Azure using the new DevOps project in Azure.
Forking the sample ASP.NET Core 2.0 application
Login into your GitHub account in your favorite browser.
In a different browser tab, go to https://github.com/medhatelmasry/CompoundInterestCalculator.
Fork this repository into your GitHub account by clicking on the Fork button in the top-right corner.

In a different browser tab, go to https://github.com/medhatelmasry/CompoundInterestCalculator.
Fork this repository into your GitHub account by clicking on the Fork button in the top-right corner.

The Sample Web Application
In the CompoundInterestCalculator directory, there are two other folders: Calculator & UnitTests. Go into the Calculator folder with the following terminal command:
cd CompoundInterestCalculator\Calculator
The Dockerfile in the current folder looks like this:
FROM microsoft/aspnetcore-build:2.0 AS build-env
WORKDIR /app
# Copy csproj and restore as distinct layers
COPY *.csproj ./
RUN dotnet restore
# Copy everything else and build
COPY . ./
RUN dotnet publish --framework netcoreapp2.0 --configuration Release --output dist
# Build runtime image
FROM microsoft/aspnetcore:2.0
WORKDIR /app
COPY --from=build-env /app/dist .
# run the application
ENTRYPOINT ["dotnet", "Calculator.dll"]
OPTIONAL - do this only if you have Docker installed on your computer
Let's create the Docker image and run the application in a Docker container by executing the following terminal window commands while in the Calculator folder:
docker build -t calculator .
docker run -d -p 8080:80 calculator
docker run -d -p 8080:80 calculator

The DevOps project in Azure
Let us deploy this application using the DevOps project in Azure. Point your browser to https://portal.azure.com and login into your Azure subscription. Click on "All services" on the left-side navigation:
In the blade that appears, enter "devops" in the filter field then choose "Dev Ops Projects PREVIEW".

Click on the blue "Create DevOps Projects" button in the "DevOps Projects" blade.

The next dialog shows us the types of pipelines that can be generated for us, namely: .NET, Java, Static Websites, Node.js, PHP, Python and your own code. This list is sure to change as time goes by.
Click on the bottom square titled "Bring your own coded", then click Next.

You are asked to choose your code repository. You choices are either GitHub or External Git. Choose GitHub. You will next be asked to choose the the repository and branch.


Simply click on OK in the above dialog without changing anything, then click on Next.
The next blade is so that Azure can create for you an end-to-end pipeline in VSTS.

Below is a table that describes the values that you should choose:
| Account | Choose "Use existing" radio button if you already have a VSTS account that uses the same credentials as Azure. If you do not already have a VSTS account, then go ahead and choose "Create New". |
| Project name | You can name the VSTS project: "CompoundInterestCalculator". |
| Subscription | Choose a valid Azure subscription |
| App name | Choose an app name that comprises a unique host name when combined with .azurewebsites.net |
| App Service location | Choose a data center that is closest to where you are |
After you are satisfied with the values that you have entered, click on Done.
Deployment of the DevOps project gets underway and it could take about 4 minutes. There is much that is happening behind the scenes:
- A project is being created in VSTS that points to a GitHub repository.
- Build and Release definitions are created in VSTS
- The release version of the application is deployed to Azure
- A number of other resources are automatically created in both Azure and VSTS
When deployment is completed you can view the website by going to https://.[your app name].azurewebsites.net or simply click on the Browse button on the blade that appears.

It takes a few minutes before the web application appears in your browser. If you see a message "Service Unavailable", it may be that you need to be patient and wait a while longer. When it eventually does appear, it should look just like this:

Azure Artifacts
Let us see what artifacts were created in Azure. Click on "Resource groups" in the left-side navigation.
You will find two resource groups that were created for you, one for Azure artifacts and the other for VSTS.

In my case, clicking on the top Resource Group revealed the following four items:

The second resource group contained the following items:

There are two resources in the second resource group: a Team Services Account and a DevOps project.
VSTS Artifacts
Next, let's have a look at what is going on in VSTS. Login into your VSTS account and have a look around.
NOTE: You can go directly into your project in VSTS from the DevOps project in Azure by clicking on the link shown below in Azure:

You will find that a new project was created for you.

Click on the project that was just created, then click on Build and Release >> Builds. A new build was created and it shows that it successfully ran.
Click on Build and Release >> Releases. You will also discover that a release was created for you and that it has also completed successfully.

Continue to look around in VSTS by checking the build and release definitions.
Unit Tests
As mentioned before, there are two projects in our Visual Studio 2017 solution. One happens to be a a Unit Testing project that uses the xunit framework. Let us look at the Build tasks in VSTS in order to determine whether or not out test cases are being executed.
Click on Build and Release >> Builds.

Click on the build definition that was created for you by the DevOps project in Azure as shown below.

Click on Edit in the top-right.

There are two tasks that have already been defined:
- Build an image
- Push an image

It is obvious that unit testing tasks are absent. Let us add tasks that will run our unit tests. These must be added before the push & build image tasks. Click on + then add three .NET Core tasks.

You can drag-and-drop three of these .NET Core tasks and place them before the already existing tasks.

Change the configuration of each of the .NET Core tasks as follows:
First .NET Core task
Display Name: Restore
Command: restore
Path to projects: **/*.csproj
Second .NET Core task
Display Name: Build
Command: build
Path to projects: **/*.csproj
Arguments: --configuration $(BuildConfiguration)
Third .NET Core task
Display Name: Test
Command: test
Path to projects: **/*Tests/*.csproj
Arguments: --configuration $(BuildConfiguration)
Publish Test Results
Below are the screen captures of each of the three .NET Core task configurations:


This is all we need to ensure that our test cases are processed. Let us queue a build and see what happens. Click on Save & queue >> Save & queue on the top right side.

On the next dialog, simply click on the Save & queue button.

To see progress of the build, click on the link on the top-left side.

After the build completes, click on Tests on the left-side and you will see that all eight test cases have successfully passed.

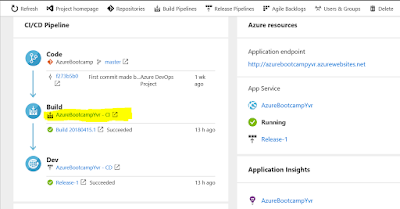
Eventually, when the build is successful, it will automatically trigger a release.

Whenever any application code changes are committed to source control, the build and release processes are automatically triggered. Let's see for ourselves that this is indeed the case. Let's make a change to the code in GitHub. Find the file CompoundInterestCalculator/Calculator/Models/CompoundInterest.cs in GitHub. Edit the document by clicking on the pencil icon on the top-right side:

We will disable a piece of logic that is important to one of the test cases. Comment out statement "throw new Exception("Principal amount cannot be negative.");" on line 19. then click on the "Preview Changes" tab.

Enter a comment under "Commit changes" then click on the green "Commit changes" button.

The above edit an commit automatically triggers a VSTS build. Return to VSTS then click on Build and Release >> Builds. Click on the build definition.

You will notice that the last build failed. Click on the failed build to find out the root cause. There is a red X beside Test node. Click on it.
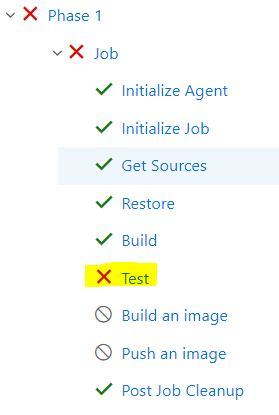
More detail is available regarding what exactly happened as shown below:
It is clear from this short walk-through that the DevOps project in Azure has automatically done many of the steps that would have had to be done manually in VSTS. We only needed to do a minor tweak to the generated build definition by adding three tasks to run our unit tests. I am sure this new DevOps addition to Azure will become much more mature and useful with the passage of time.