Showing posts with label Azure App Services. Show all posts

Monday, December 20, 2021

Deploy multi-container app to Azure App Service with docker-compose

In this article, I will show how easy it is to deploy a multi-container application to Azure App Service using a docker-compose.yml file. This service is currently in preview on Azure. The example is deployment of a WordPress site on the Azure portal. This involves two containers on docker hub, namely: mysql:8.0.0 and wordpress:5.8.2-php7.4-apache.

The only pre-requisite is that you have a valid Azure subscription.

Save the following to a text file named docker-compose.yml:

version: '3.1'

services:

  wordpress:
    image: wordpress:5.8.2-php7.4-apache
    restart: always
    ports:
      - 8888:80
    environment:
      WORDPRESS_DB_HOST: db
      WORDPRESS_DB_USER: exampleuser
      WORDPRESS_DB_PASSWORD: examplepass
      WORDPRESS_DB_NAME: exampledb
    volumes:
      - wordpress:/var/www/html

  db:
    image: mysql:8.0.0
    restart: always
    environment:
      MYSQL_DATABASE: exampledb
      MYSQL_USER: exampleuser
      MYSQL_PASSWORD: examplepass
      MYSQL_RANDOM_ROOT_PASSWORD: '1'
    volumes:
      - db:/var/lib/mysql

volumes:
  wordpress:
  db:

Login to https://portal.azure.com. Create a new app service as follows:
  1. Create a new resource group
  2. Provide a unique host name for your app's URL
  3. Select 'Docker Container" for Publish
  4. Select Linux for the Operating System
  5. Choose a data center closest to your city


Click on the "Next Docker" button.
  1. Select 'Docker Compose (Preview)' for Options.
  2. Select 'Docker Hub' for Image Source
  3. Select Public for Access Type
  4. Beside 'Configuration File', navigate to the docker-compose.yml and select it.

Click on blue "Review + create" button.


Click on the blue Create button. It may take some time to provision the containers. Upon completion, you will see a page that looks like this:


Click on the blue "Go to resource" button.


Click on the URL to view the WordPress page.


Troubleshooting

If something goes wrong and you wish to look into the console logs:

1) Enter 'log' into the filter
2) Turn "App Service Logs" ON


3) Click Save at the top
4) Click on "Log stream"


Cleanup

If you do not need these containers anymore, all you have to do to tear down everything is to delete the resource group.

Conclusion

It is painless to create a multi-container web application using docker-compose.yml.


Wednesday, March 25, 2020

Implementing CI/CD DevOps pipelines using a simple ASP.NET Core 3.1 MVC application with GitHub Actions and Azure App Services


In this post I will show you how easy it is to implement a CI/CD DevOps pipeline using GitHb Actions. The sample web application I will use is an ASP.NET Core 3.1 MVC application and I will deploy it to Azure App Services. 

Before proceeding, It is assumed that you have the following pre-requisites:
- You already have an Azure Account
- You already have a GitHub account
- You have .NET Core 3.1 (or later) installed on your computer
Creating a simple ASP.NET Core 3.1 application
In a working directory, execute the following command from within a terminal window:

dotnet new mvc -o GithubActions2Azure

Change directory to the newly created app:

cd GithubActions2Azure

Add a .gitignore file to the application:

dotnet new gitignore

Let us make the application our own by, perhaps, changing the title of the app and the background color.

1) Add the following CSS to wwwroot/css/site.css


body {   background-color: tomato;}


2) In Views/Home/Index.cshtml, change the main heading from:

<h1 class="display-4">Welcome</h1>

           TO

<h1 class="display-4">Welcome to our MVC Core 3.1 App</h1>

Let us now run the application and see what it looks like. In the terminal window run the following command:

dotnet run

Point your browser to https://localhost:5001. You will see a strangely colored web page that looks like this:


Stop the server by hitting CTRL + C in the terminal window.

Push code to GitHub

We are now ready to push this application to GitGub. Go to GitHub and create a repository. I created a repository named GithubActions2Azure. Copy the commands that are shown on the GitHub page that looks like this:

Back in your application’s terminal window, type the following commands to initialize a git repo, add files to the repo and commit the changes:

git init
git add .
git commit -m "1st commit"

Next, we will push the code to GitHub. Paste the git commands that you copied from GitHub. This is what it looked like for me:

git remote add origin https://github.com/medhatelmasry/GithubActions2Azure.git
git push -u origin master

If you refresh the GitHub page, you will see that the code is in GitHub. It looks like this:


Azure

The next step is to create a web app in Azure. Login to the Azure portal at https://portal.azure.com/. Click on Create a resource:

Enter “web" in the filter then choose "Web App”:


On the next page, click on the blue Create button:


Choose a subscription then create a new Resource Group:


In named my new resource group GithubActions2Azure. Here are all the choices I made:


Click on Create on the next page:


Creation of a new Azure web service takes less than three minutes. When it is completed, a message appears declaring that “Your deployment is complete”. Click on the blue “Go to resource” button:


We need the publish profile. Click on “Get publish profile” to download your publish profile XML file:


Build & Deploy using GitHub Actions
 Back it GitHub, click on the Settings tab of your application’s repo:


Click on Secrets on the left-side:


Click on “Add a new secret”:


Give the secret the name AZURE_WEBAPP_PUBLISH_PROFILE and paste the contents of the publish profile file that you earlier downloaded from the Azure portal for your web app:

 
Click on Actions on the top navigation bar in GitHub:


You will see a multitude of templates for a multitude of technologies and programming languages. We will paste our own template, therefore, click on the “Set up a workflow yourself” link on the right-side:


This will create a .github/Workflows folder in your application. Name the file deploy_to_azure.yml then click on the green “Start commit” button:


Enter a comment and description for the commit then click on the “Commit new file” button:


Go to this site to get an appropriate template for our web app: https://github.com/Azure/webapps-deploy. Scroll down until you find this section then click on dotnet.yml:


Copy the contents of the asp.net-core-webapp-on-azure.yml. Return to the GitHub repo of our application, edit the deploy_to_azure.yml file, and replace the contents by pasting the clipboard. This is what it looks like for me:


On line 18, set the value of AZURE_WEBAPP_NAME to the name of your app. In my case it is GithubActions2Azure.

On line 20, set the value of DOTNET_VERSION with the exact version of .NET Core with which you created your app. You can find out by running the following command in a terminal window:

dotnet --version

In my case, the .NET Core version is 3.1.200.

Click on the green “Start commit” button, give it a title then click on “Commit changes”.

Click on Actions on the top navigation bar:


Click on “Deploy ASP.NET Are all to ..”. If all goes well, there should be a green check mark beside the workflow, which was responsible for building and deploying the app to Azure. Click on “Updated deploy_to_azure.yml”.


Click on “build-and-deploy” on the left-side:


You will be comforted by the fact that all tasks completed successfully:


To make sure all is well, go to the Azure portal and click on the URL of your website:


Our ugly looking tomato-colored website appears:


Note that if you make any changes to your source code and push it to GitHub, it will automatically get deployed to Azure. This is what CI/CD is all about. Let's try that.

CI/CD
In a terminal window at your project folder, do a pull in order to get all the changes we made in GitHub when we added the .yml file:

git pull

In wwwroot/css/site.css, change the background-color to wheat. Let us push our changes to Github with these commands:

git add .
git commit -m "changed background color to wheat"
git push origin master

Back in GitHub, you will find that the deployment is running:


Upon completion it will display a green check mark:

Refresh the website in your browser and you will find that it has changed background color to something nicer:


Thanks for coming this far in my tutorial and I hope you found it useful.

Saturday, February 2, 2019

Deploying Node Express app to Azure through Azure DevOps

In this tutorial, we will deploy a simple Node.js application that displays the responses from two separate APIs. First the application's source code is pushed to Azure DevOps using Git. The CI & CD pipelines are setup inside Azure DevOps. The application is eventually deployed to Microsoft Azure App Services.

The following is assumed:
  • You have node.js & git installed on your computer
  • You have an Azure DevOps account. Otherwise, create one at http://dev.azure.com.
  • You have a Microsoft Azure account.
Preparation
Clone a sample application from GitHub with the following terminal command:

git clone https://github.com/medhatelmasry/json-express

Create a new project in Azure DevOps. I created one called Toons.

Click on Repos on the left-side menu. Copy the URL under “Clone your computer” into the clipboard.

Go into a terminal window at the root of your application and execute the following Git commands:

git init
git add .
git commit -m "First commit"
git remote add azdev {paste the git URL here}
git push azdev master

Upon refreshing the Azure DevOps page in your browser, you should see your source code.
 

Build

Let us create a build. Click on Pipeline >> Build on the left side in Azure DevOps. Click on “New pipeline” in the middle of the page:

On the next page, choose “Azure Repos Git” then click on Continue.

Select the “Node.js With Gulp” template.
 
This creates for you these set of tasks:
 
We want to enable “Continuous Integration” so that whenever new code is pushed into the Git repo it automatically triggers a build. To do this, click on Triggers at the top. Check the “Enable continuous integration” checkbox.
 
To start the build, click on “Save & queue” >> “Save & Queue”. Ignore all the other input fields and click the “Save & queue” button on the next page.
 
You can see build progress by clicking on the build # on the top.
 
If things go well, all tasks will complete successfully.

The next step is to create a web app in Azure. In your browser, go to http://portal.azure.com and create a web app. Click on App Services on the left-side, then click on the “Add" button.
 
From the available templates, choose “Node JS Empty Web App”.
 
Click Create to go the next page.
You will be asked for a unique host name. Accept the other defaults then click on the blue Create button. It will take about 2 minutes to provision your website. Once the website has been provisioned, return to Azure DevOps in your browser.

Release

The next step is to create a release in Azure DevOps. Click on Pipelines >> Releases on the left side. Click on the blue “New pipeline” button in the middle of the page.

On the next page, choose the “Deploy a Node.js app to Azure App Service” template, then click on the blue Apply button.
 
In the left-side box, click on “Add an artifact”. A dialog pops up on the right-side. From the Source drop-down-list, choose a  build then click on the blue Add button.

Let us add continuous deployment. Click on the thunderbolt symbol in the top-right of the first box.
 
Enable the “Continuous development trigger”.

Next, we need to setup the connection between DevOps and Azure. Click on “1 job, 1 task” in the second box.

Select the correct subscription under Azure subscription. While authorizing you may need to allow popups in your browser from the Azure site.
Under “App service name” select the web app that you created in Azure.
 
Once all these configurations are OK, click on the Save button on the top. After the release definition is saved, the Release button lights up. Click on “Release” >> “Create a Release”.
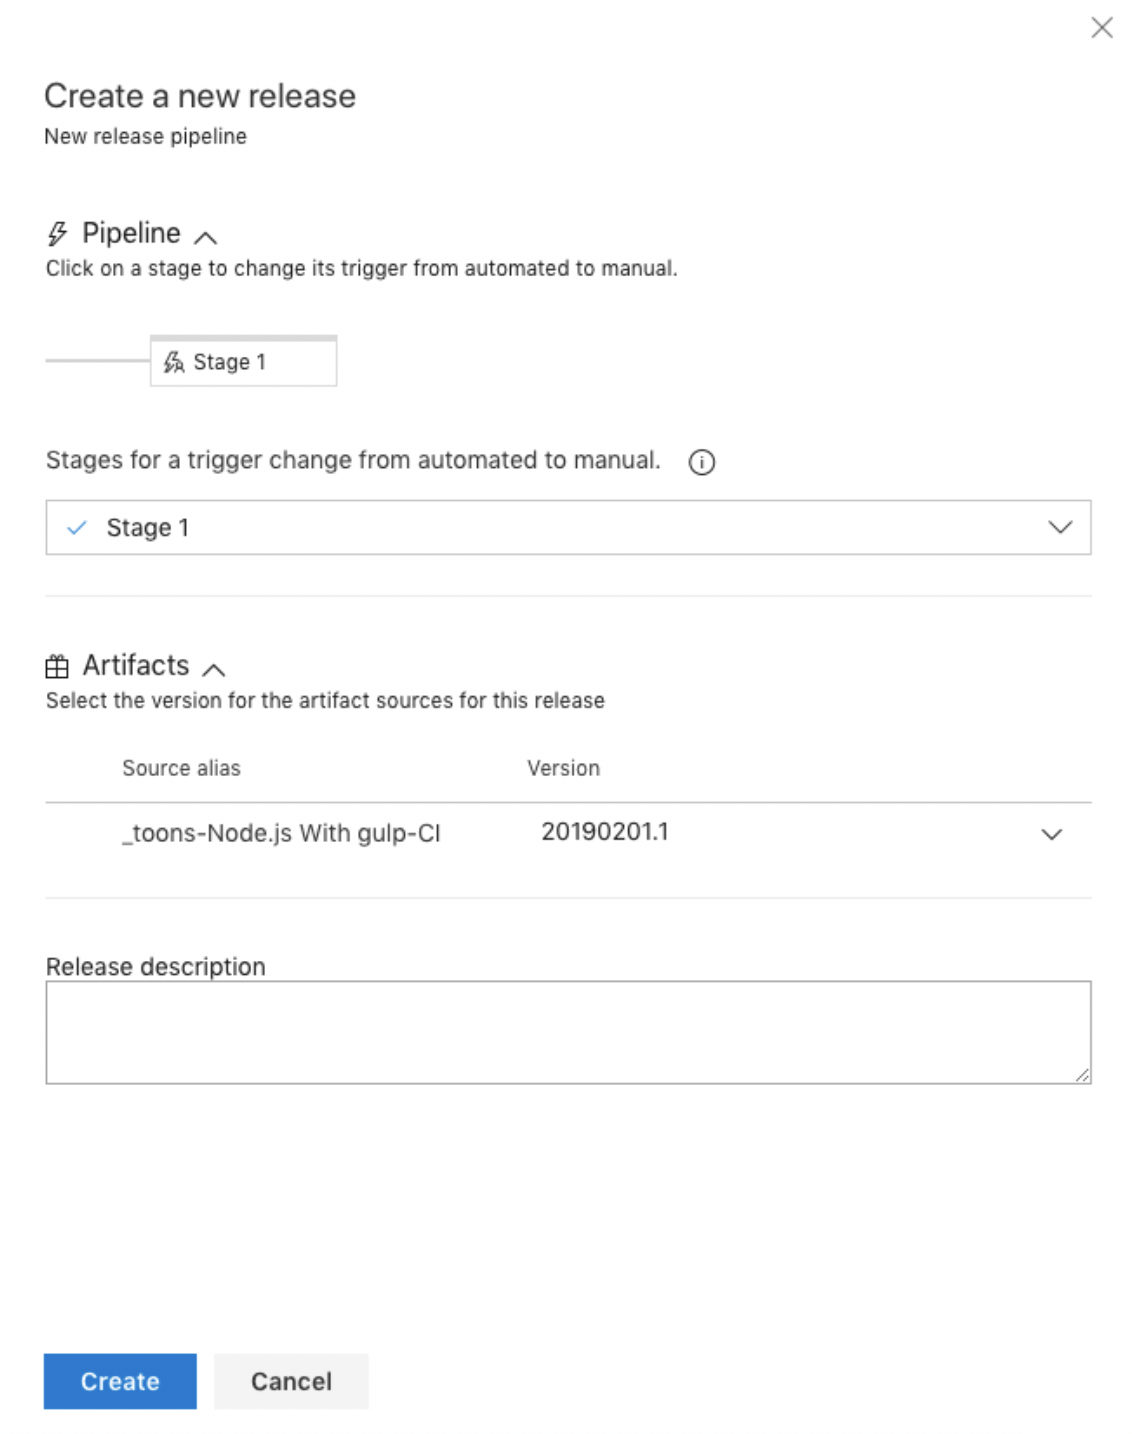
Choose a Stage and build artifact then click on Create.

Click on the release link on the top.

On the next page, click on the second “Stage 1” box.

Click Deploy on the following page.

On the dialog that pops up on the right-side, click on the blue Deploy button.

You should see progress of the release process. Copying of the contents of node_modules takes the longest time.

Once it completes successfully, you can request the web app in your browser.