Showing posts with label Node Express. Show all posts

Wednesday, February 13, 2019

Deploy Node Express Docker Container to Azure

In this tutorial I will show you how to easily deploy a simple Node-Express docker image and run it from Azure containers. It is assumed that you have:
  • Docker installed on your computer
  • Git installed on your computer
  • You have a billable Azure account
  • You have a Docker hub account
  • You have installed the Azure CLI on your computer
Let us start with a very simple Node-Express application. I have one that you can clone from GitHub. Run the following command from a working directory in order to clone my simple Node-Express application:
Once you have cloned the application, you can create a Docker image named toon-node. View a file named Dockerfile located in the root of the application. This file looks like this:
# Create image based on the official Node 6 image from the dockerhub
FROM node:10.13.0-jessie

# Create a directory where our app will be placed
RUN mkdir -p /usr/src/app

# Change directory so that our commands run inside this new directory
WORKDIR /usr/src/app

# Copy dependency definitions
COPY package.json /usr/src/app

# Install dependecies
RUN npm install

# Get all the code needed to run the app
COPY . /usr/src/app

# Expose the port the app runs in
ENV PORT 80

# Serve the app
CMD ["npm", "start"]
This is what each command in Dockerfile does.
FROM node:10.13.0-jessie Base the new image on node:10:13.0-jessie
RUN mkdir -p /usr/src/app Create a directory /usr/src/app in the container
WORKDIR /usr/src/app Make /usr/src/app the working dir in the container
COPY package.json /usr/src/app Copy package.json on your computer into the working directory in the container
RUN npm install Execute "npm install" in the container
COPY . /usr/src/app Copy all files in the. current directory of your computer into the container’s working directory. Note that any files in .dockerignore will be ignored
ENV PORT 80 The node application inside the container will listen in on port 80
CMD ["npm", "start"] Launch the web application by executing “npm start”.
Create a Docker image with the following terminal command:
docker build -f Dockerfile -t snoopy/toons:toon-node . --no-cache
Note that you must prefix the image name with your Docker hub account. In the above example, snoopy represents your username on Docker hub.
Once the image is created, you can verify that it indeed exists by using the following Docker terminal command that lists on the images on your computer:
docker images
You should see an image named toons:toon-node prefixed by your Docker hub username.
Now let us run this Node-Express application to see what it does. We will create a container from the image that we just created. Run the following command to create a container whereby port 80 in the container is mapped to port 3000 on your computer:
docker run -p 3000:80 snoopy/toons:toon-node
You can then point your browser to http://localhost:3000 to see what the node-express application looks like. If all goes well, you should see the following web page:
 
The next thing we need to do is push our image to Docker hub. This is done by first logging-in into Docker hub with:
docker login
Note that this needs to be done only once on the computer.
You can then push the image to Docker hub with:
docker push snoopy/toons:toon-node
If you go to Docker hub at https://hub.docker.com/, you will see that the image exists in the toons repository. This is what my toons repository looked like on Docker hub:
With our image sitting in the Docker hub repository, we can now start using Azure to pull the image and run a container in Azure.
Login into Azure on your computer using the Azure CLI (command line interface). This is done by running the following terminal window command:
az login
This opens a browser window in which you will be authenticated. You can close the browser once you have successfully authenticated. 
We need to either use an existing resource group or. create a new one. I created a new resource group named toon-rg in data centre West-US2 with the following terminal window command:
az group create --location westus2 --name toon-rg 
Once you execute the above command, a successful response from the server will look similar to this:
{
  "id": "/subscriptions/aaaaaaaa-bbbb-cccc-dddd-eeeeeeeeeeee/resourceGroups/toon-rg",
  "location": "westus2",
  "managedBy": null,
  "name": "toon-rg",
  "properties": {
    "provisioningState": "Succeeded"
  },
  "tags": null,
  "type": null
}

Let us use the image we have in Docker hub to run a container in Azure. This can be done by executing the following command:
az container create --name toon-c --resource-group toon-rg --image snoopy/toons:toon-node --ip-address public
These are what the above settings represent:
--name toon-c The container name is “toon-c".
--resource-group toon-rg The resource group name is “toon-rg".
--image snoopy/toons:toon-node The name of our image on Docker hub is "snoopy/toons:toon-node".
--ip-address public Respond with the public IP address so that we can run and verify that indeed our web site is working on Azure.
Remember that you must replace snoopy with your Docker hub username.
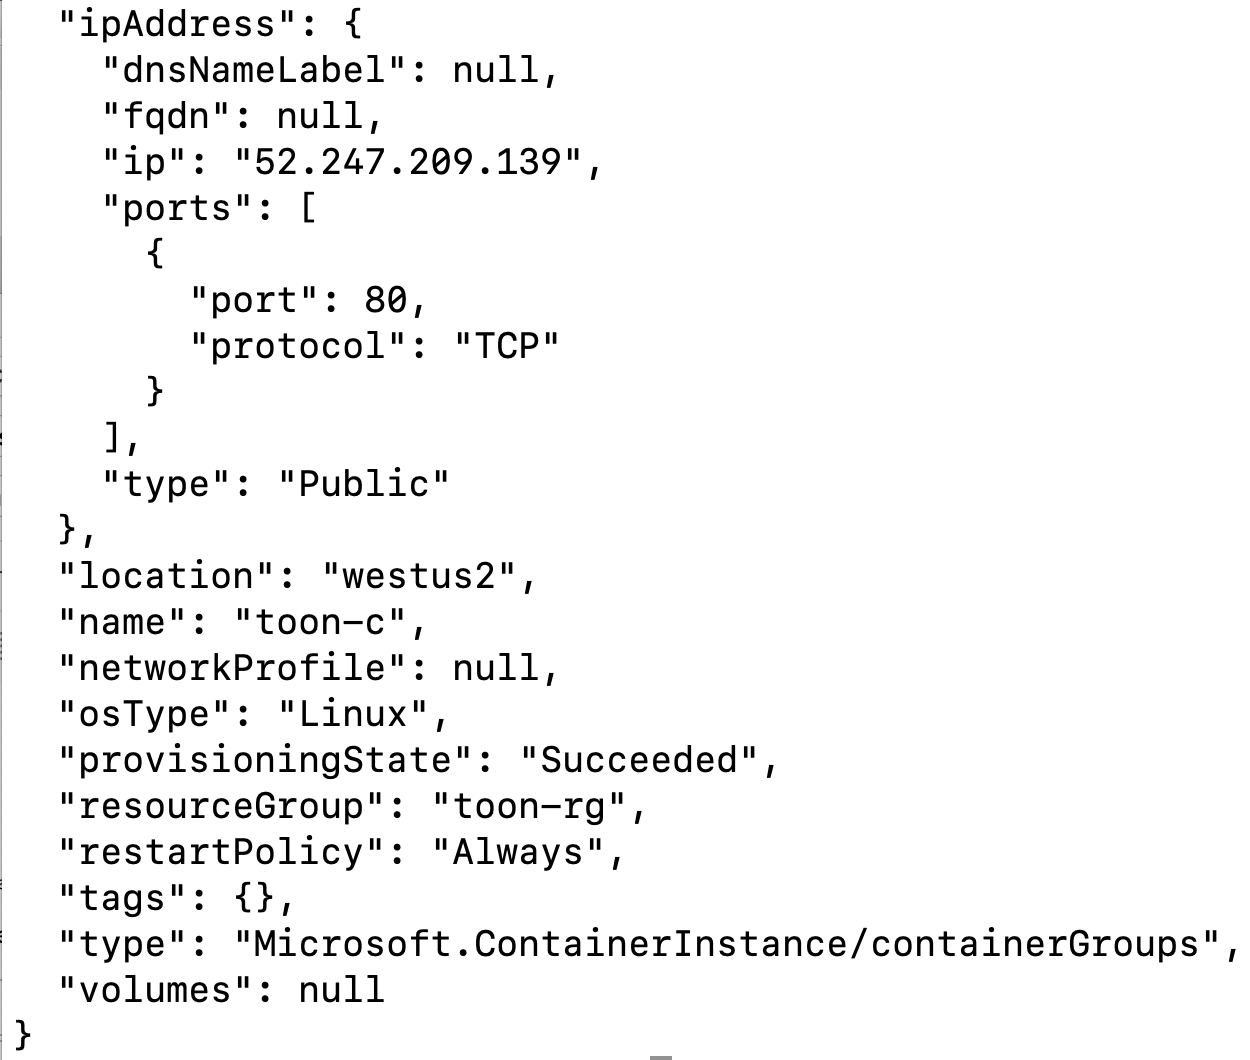
When I ran the last command, it took some time to run and I eventually got a long JSON response. I am showing you a part of the response that has the public IP address:
You can see the public IP address in the JSON response. If you point your browser to this IP address you should see the application running on Azure. This is what I experienced when I pointed my browser to http://52.247.209.239
It is rather impressive how easy it is to host a Docker container on Azure.

Saturday, February 2, 2019

Deploying Node Express app to Azure through Azure DevOps

In this tutorial, we will deploy a simple Node.js application that displays the responses from two separate APIs. First the application's source code is pushed to Azure DevOps using Git. The CI & CD pipelines are setup inside Azure DevOps. The application is eventually deployed to Microsoft Azure App Services.

The following is assumed:
  • You have node.js & git installed on your computer
  • You have an Azure DevOps account. Otherwise, create one at http://dev.azure.com.
  • You have a Microsoft Azure account.
Preparation
Clone a sample application from GitHub with the following terminal command:

git clone https://github.com/medhatelmasry/json-express

Create a new project in Azure DevOps. I created one called Toons.

Click on Repos on the left-side menu. Copy the URL under “Clone your computer” into the clipboard.

Go into a terminal window at the root of your application and execute the following Git commands:

git init
git add .
git commit -m "First commit"
git remote add azdev {paste the git URL here}
git push azdev master

Upon refreshing the Azure DevOps page in your browser, you should see your source code.
 

Build

Let us create a build. Click on Pipeline >> Build on the left side in Azure DevOps. Click on “New pipeline” in the middle of the page:

On the next page, choose “Azure Repos Git” then click on Continue.

Select the “Node.js With Gulp” template.
 
This creates for you these set of tasks:
 
We want to enable “Continuous Integration” so that whenever new code is pushed into the Git repo it automatically triggers a build. To do this, click on Triggers at the top. Check the “Enable continuous integration” checkbox.
 
To start the build, click on “Save & queue” >> “Save & Queue”. Ignore all the other input fields and click the “Save & queue” button on the next page.
 
You can see build progress by clicking on the build # on the top.
 
If things go well, all tasks will complete successfully.

The next step is to create a web app in Azure. In your browser, go to http://portal.azure.com and create a web app. Click on App Services on the left-side, then click on the “Add" button.
 
From the available templates, choose “Node JS Empty Web App”.
 
Click Create to go the next page.
You will be asked for a unique host name. Accept the other defaults then click on the blue Create button. It will take about 2 minutes to provision your website. Once the website has been provisioned, return to Azure DevOps in your browser.

Release

The next step is to create a release in Azure DevOps. Click on Pipelines >> Releases on the left side. Click on the blue “New pipeline” button in the middle of the page.

On the next page, choose the “Deploy a Node.js app to Azure App Service” template, then click on the blue Apply button.
 
In the left-side box, click on “Add an artifact”. A dialog pops up on the right-side. From the Source drop-down-list, choose a  build then click on the blue Add button.

Let us add continuous deployment. Click on the thunderbolt symbol in the top-right of the first box.
 
Enable the “Continuous development trigger”.

Next, we need to setup the connection between DevOps and Azure. Click on “1 job, 1 task” in the second box.

Select the correct subscription under Azure subscription. While authorizing you may need to allow popups in your browser from the Azure site.
Under “App service name” select the web app that you created in Azure.
 
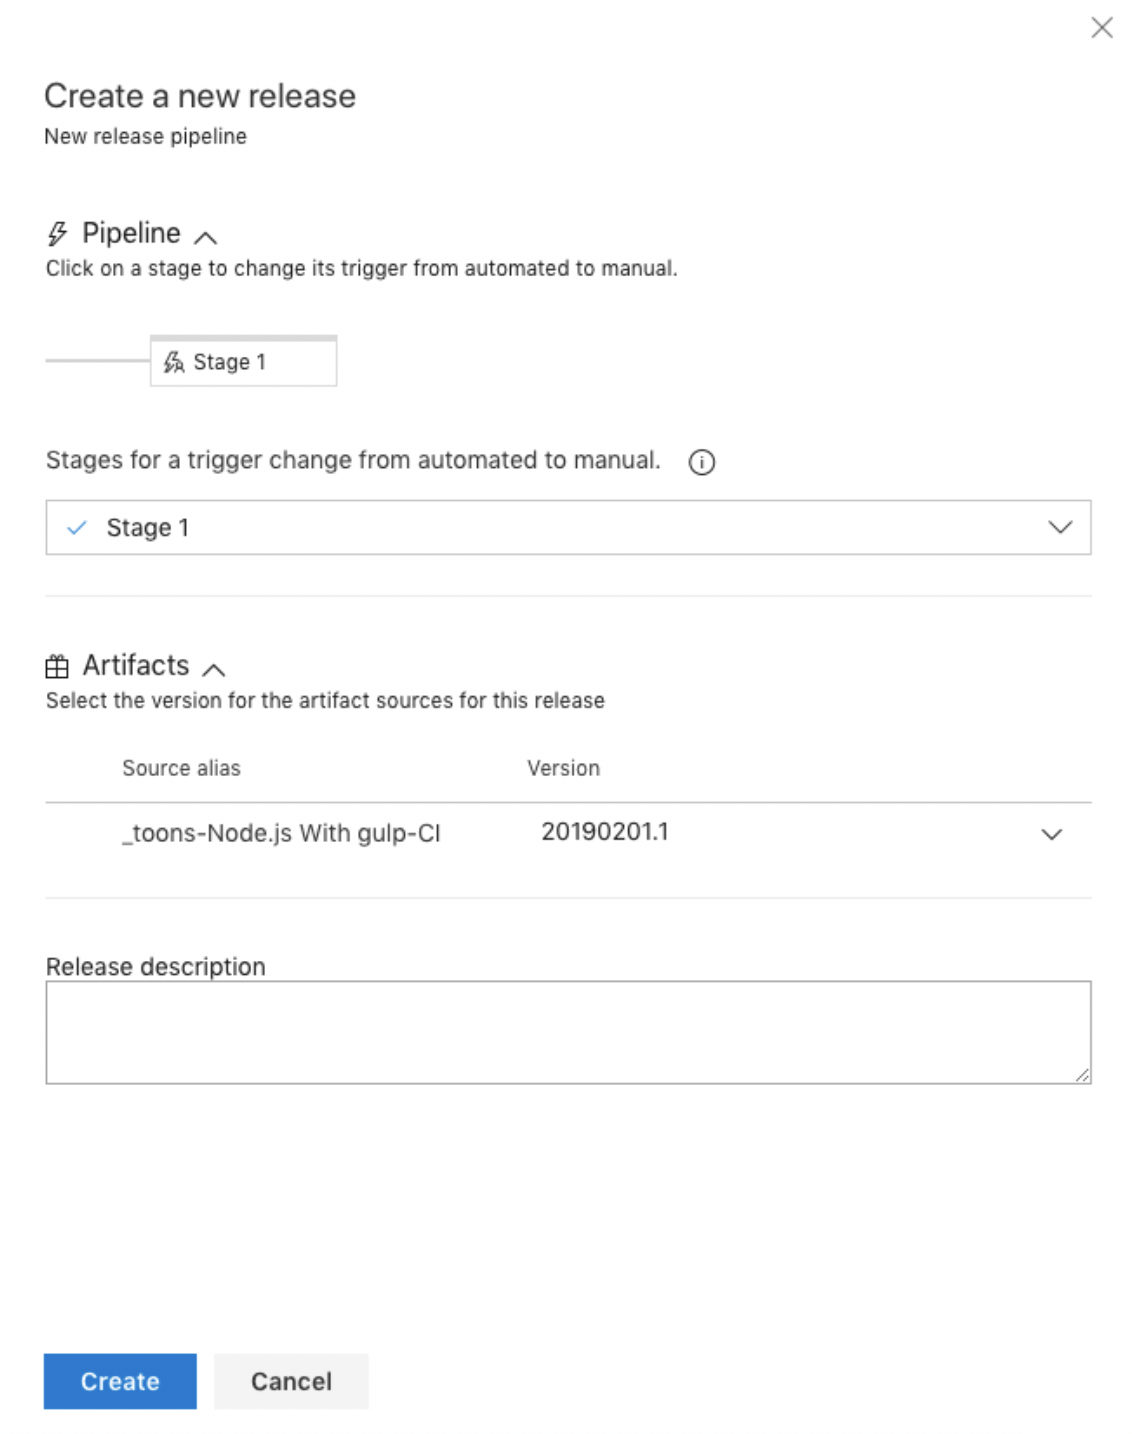
Once all these configurations are OK, click on the Save button on the top. After the release definition is saved, the Release button lights up. Click on “Release” >> “Create a Release”.
Choose a Stage and build artifact then click on Create.

Click on the release link on the top.

On the next page, click on the second “Stage 1” box.

Click Deploy on the following page.

On the dialog that pops up on the right-side, click on the blue Deploy button.

You should see progress of the release process. Copying of the contents of node_modules takes the longest time.

Once it completes successfully, you can request the web app in your browser.
  

Saturday, January 26, 2019

Node Express with TypeScript

Introduction
This walkthrough is intended to help you convert a standard Node Express application so that it uses TypeScript instead.

Preparation
Install TypeScript globally:

npm install typescript -g

Let us create a directory simply to play around and understand how TypeScript works:

mkdir tsprimer
cd tsprimer
code .

Create a file named greeter.ts and add to it the following code:

function greeter(person) {
    return "Hello, " + person;
}
let user = "Jane Bond";
console.log(greeter(user));

To trandspile the app, type:

tsc greeter.ts

This transpiles the app to greeter.js, which gets created in the same directory. Run the application with:

node greeter.js

Interfaces
Let us modify greeter.ts so that it uses strong type checking. Create a file named person.ts and add to it the following Person interface:

export interface Person {
    firstName: string;
    lastName: string;
}

Add a file named greeterPerson.ts that uses the Person interface with the following code:

import {Person} from './person';
function greeter(person: Person) : string{
    return "Hello, " + person.firstName + " " + person.lastName;
}
let person : Person = { firstName: "Jane", lastName: "Bond" };
console.log(greeter(person));

Transpile the app with tsc greeterPerson.ts and run it with:

node greeterPerson.js

Classes
Create a file named student.ts to hold a Student class. The code is:

export class Student {
    fullName: string;
    constructor(public firstName: string, public middleInitial: string, public lastName: string) {
        this.fullName = firstName + " " + middleInitial + " " + lastName;
    }
    public getFullName = () : string => {
        return this.fullName;
    };
}

Notice the instance variable fullName, constructor and method getFullName(). Create a greeter file named greeterStudent.ts that uses the Student class as shown below:

import {Student} from './student';
let student  = new Student("Jane","M.","Bond" );
console.log(student.getFullName());

Transpile & run the application.

TS with Node Express
Go to the parent directory with:

cd ..

create a new directory named tsexpress and go into that directory:

mkdir tsexpress
cd tsexpress

Let us initialize a node project in the current directory with:

npm init

Let’s now install the typescript package locally with:

npm install typescript --save-dev

Open the current directory in Visual Studio Code.

Inside our package.json, add a script called tsc:

"scripts": {
    "tsc": "tsc"
},

This modification allows us to call TypeScript functions from the command line in the project’s folder.

Run the following command to initialize the typescript project by creating the tsconfig.json file.

npm run tsc -- --init

Edit tsconfig.json, uncomment outDir setting so that it looks like this:

"outDir": "./build",

Also, make sure you have these additional settings in tsconfig.json:

    "target": "es5", 
    "module": "commonjs",
    "sourceMap": true, 
    "strict": true,
    "pretty": true,
    "moduleResolution": "node",
    "baseUrl": "./app",
    "esModuleInterop": true

Add this to the bottom of tsconfig.json:

  "include": [
    "app/**/*.ts"
  ],
  "exclude": [
      "node_modules"
  ]

Installing express.js

Run the following command:

npm install express --save

Express and Typescript packages are independent. The consequence of this is that Typescript does not “know” types of Express classes. Run this specific npm package for the Typescript to recognize the Express class types.

npm install @types/express --save

Let us add a very simple Hello World Node Express application file. Create a folder named app and inside the app directory create a file named app.ts with this content:

// app/app.ts
import express = require('express');

// Create a new express application instance
const app: express.Application = express();

app.get('/', function (req, res) {
  res.send('Hello World!');
});

app.listen(3000, function () {
  console.log('Example app listening on port 3000!');
});

To transpile your first TypeScript Node Express app, run the following command in the root directory of your application:

npm run tsc

This command automatically created the build folder and adds to it the transpiled app.js file.


 To run the application in build/app.js, type:

node build/app.js

Point your browser to http://localhost:3000. You should see the following:


Running TypeScript without transpiling
You can run TypeScript code directly with the ts-node package.

This package is recommended for development purposes only. To make the final deployment to production, always use the JavaScript version of your project.

The ts-node is already included as a dependency on another package, ts-node-dev. After installing ts-node-dev we can run commands that restarts the server whenever a project file changes. Install  ts-node-dev as follows:

npm install ts-node-dev --save-dev

Add the following two script lines into the package.json file:

"dev": "ts-node-dev --respawn --transpileOnly ./app/app.ts",
"prod": "tsc && node ./build/app.js"

To start the development environment:

npm run dev

 To run the server in production mode:

npm run prod

Pure TypeScript Classes
So far in our Node/Express sample application, we are not really using proper TypeScript syntax. Let’s start making use of the powerful TypeScript platform.

Create a file named server.ts in the app folder and add to it the following code:

// app/server.ts
import app from "./app";
const PORT = 3000;

app.listen(PORT, () => {
    console.log('Express server listening on port ' + PORT);
})

In package.json:

change app.js                 TO              server.js
change app.ts                 TO             server.ts

Create a folder named routes under app and add to it the following index.ts file:

// /app/routes/index.ts
import {Request, Response} from "express";
export class Routes { 
    public routes(app: any): void { 
        app.route('/')
            .get((req: Request, res: Response) => {            
                res.status(200).send('Hello World!');
        });    
    }
}

Replace code in app/app.ts with following code:

// app/app.ts
import express from "express";
import bodyParser from "body-parser";
import { Routes } from "./routes";

class App {
    public app: express.Application;
    public routePrv: Routes = new Routes();

    constructor() {
        this.app = express();
        this.config(); 
        this.routePrv.routes(this.app); 
    }

    private config(): void { 
        this.app.use(function(req, res, next) {
            res.header("Access-Control-Allow-Origin", "*");         
            res.header("Access-Control-Allow-Headers", "Origin, X-Requested-With, Content-Type, Accept");         
            res.setHeader('Access-Control-Allow-Methods', 'GET, POST, OPTIONS, PUT, PATCH, DELETE');
            next();
        });           

        // support application/json type post data
        this.app.use(bodyParser.json());
        //support application/x-www-form-urlencoded post data
        this.app.use(bodyParser.urlencoded({ extended: false }));
    }
}
export default new App().app;

Test the application in dev mode by running:

npm run dev 

Then point your browser to http://localhost:3000. You should see Hello World in the browser.

Test same as above in production mode by running:

npm run prod

Using mongoose

Mongoose is an Object Data Modeling (ODM) library for MongoDB and Node.js. In this section we will talk get our application to conntect with a MopngoDB database using the Mongoose driver. It is assumed that you have a MongoDB database running on your development computer and listening on port 27017.

Install these mongoose packages:

npm install mongoose –save
npm install @types/mongoose --save

Create a folder named models under app and add to it a file named student.ts with the following code:

//   /app/models/student.ts
import mongoose from 'mongoose'; 
const Schema = mongoose.Schema;
// create a schema
export const StudentSchema = new Schema({
    FirstName: {
        type: String,
        required: true
    },
    LastName: {
        type: String,
        required: true
    },
    School: {
        type: String,
        required: true
    },
    StartDate: {
        type: Date,
        required: true
    }
});

Create a folder called controllers under app and add to it a file named studentController.ts with this code:

//   /app/controllers/studentController.ts
import * as mongoose from 'mongoose';
import { StudentSchema } from '../models/student';
import { Request, Response } from 'express';

const StudentMongooseModel = mongoose.model('Student', StudentSchema);

export class StudentController { 

    public addNewStudent (req: Request, res: Response) {                
        let newStudent = new StudentMongooseModel(req.body);

        /*
        let newStudent = new StudentMongooseModel({
            "FirstName": "Tom",
            "LastName": "Baker",
            "School": "45 River Road",
            "StartDate": "2001-11-17T19:23:15.118Z"
        });
        */
    
       newStudent.save((err, data) => {
            if (err){
                res.send(err);
            }    
            res.json(data);
        });
    }

    public getStudents (req: Request, res: Response) {           
        StudentMongooseModel.find({}, (err, data) => {
            if (err){
                res.send(err);
            }
            res.json(data);
        });
    }

    public getStudentById (req: Request, res: Response) {           
        StudentMongooseModel.findById(req.params.studentId, (err, data) => {
            if (err){
                res.send(err);
            }
            res.json(data);
        });
    }

    public updateStudent (req: Request, res: Response) {           
        StudentMongooseModel.findOneAndUpdate({ _id: req.params.studentId }, req.body, { new: true }, 
            (err, data) => {
            if (err){
                res.send(err);
            }
            res.json(data);
        });
    }

    public deleteStudent (req: Request, res: Response) {           
        StudentMongooseModel.findOneAndRemove({ _id: req.params.studentId }, (err, data) => {
            if (err){
                res.send(err);
            }
            res.json({ message: 'Successfully deleted student!'});
        });
    }

    public generateDummyData (req: Request, res: Response) {     
        var data = [
            {
            "FirstName":"Sally",
            "LastName":"Baker",
            "School":"Mining",
            "StartDate": new Date("2012-02-20T08:30:00")
            },{
            "FirstName":"Jason",
            "LastName":"Plumber",
            "School":"Engineering",
            "StartDate": new Date("2018-03-17T17:32:00")
            },{
            "FirstName":"Sue",
            "LastName":"Gardner",
            "School":"Political Science",
            "StartDate": new Date("2014-06-20T08:30:00")
        },{
            "FirstName":"Linda",
            "LastName":"Farmer",
            "School":"Agriculture",
            "StartDate": new Date("2014-06-20T08:30:00")
            },{
            "FirstName":"Fred",
            "LastName":"Fisher",
            "School":"Environmental Sciences",
            "StartDate": new Date("2017-10-16T17:32:00")
            }
        ];
          
        StudentMongooseModel.collection.insert(data, function (err, docs) { 
            if (err){
                res.send(err);
            }
            res.json({ message: 'Successfully generated 5 sample documents!'});
        });
    }
}

Add this instance variable to the Routes class in routes/index.ts and resolve it by importing the appropriate module:

studentController: StudentController = new StudentController();

Add these routes to routes/index.ts:

        // Get all students
        app.route('/api/students')
            .get(this.studentController.getStudents);

        // Create a new student
        app.route('/api/students')
            .post(this.studentController.addNewStudent);

        // get a specific student
        app.route('/api/students/:studentId')
            .get(this.studentController.getStudentById);

        // update a specific student
        app.route('/api/students/:studentId')
            .put(this.studentController.updateStudent);
        
        // delete a specific student
        app.route('/api/students/:studentId')
            .delete(this.studentController.deleteStudent);
        
        // generate dummy data
        app.route('/api/dummy')
            .get(this.studentController.generateDummyData);

Notice that the last route, /api/dummy, which is for generating dummy data.
Back in /app/app.ts, import mongoose with:

import mongoose from "mongoose";

Add this method to /app/app.ts:

    private mongoSetup(): void{
        mongoose.connect('mongodb://localhost:27017/school', {})
        .then(() => console.log('connection successful'))
        .catch((err) => console.error(err));
    }

In the constructor of /app/app.ts, call the above method with:

this.mongoSetup();

Start the server with:

npm run dev

In your browser, point to http://localhost:3000. You should see Hello World.

Next, point your browser to http://localhost:3000/api/dummy. This should create sample data.

Use URL http://localhost:3000/api/students to see the sample data that was jiust created.