Showing posts with label Training. Show all posts

Thursday, August 13, 2020

Deploying an ASP.NET Core application that uses LocalDB to IIS on Windows 10

 LocalDB is intended as a light-weigh development version SQL Server and is not supposed to be used in production.  Similarly, it is not the best version of SQL Server to be used with a web app hosted on IIS. 

Having said that, there are circumstances when a developer may wish to run an ASP.NET Core web app that works with LocalDB on IIS. This post explains one way I got this to work. 

Assumptions: It is assumed the following is running on your Windows 10 computer:

  • git
  • Visual Studio 2019 (or later)
  • LocalDB
  • .NET Core 3.1
  •  dotnet-ef tool 
  • Internet Information Services (IIS)

In this tutorial we will deploy an ASP.NET 3.1 Web API application that uses LocalDB to IIS . As a starting point, you can clone a simple ASP.NET Core 3.1 web application from https://github.com/medhatelmasry/SchoolAPI-3.1.git.

To clone the above application, go to a suitable working directory in a terminal window and run the following command:

git clone https://github.com/medhatelmasry/SchoolAPI-3.1.git

You can then go into the newly created SchoolAPI-3.1 directory with:

cd SchoolAPI-3.1

Let us quickly test this application to make sure that it works. Type the following in a terminal window:

dotnet-ef database update

dotnet run

You should see the following when you point your browser to http://localhost:5000/api/students:

Hit CTRL C to stop the server.

There is a solution (.sln) file in the root directory of the web app. Open this solution in Visual Studio 2019. This can easily be done by typing the following in the terminal window:

SchoolAPI.sln

Once in Visual Studio, edit the appsettings.json file and have a peek at the connection string, which looks like this:

"DefaultConnection": "Server=(localdb)\\mssqllocaldb;Database=School;Trusted_Connection=True;MultipleActiveResultSets=true"

We will need to do a minor change to this connection string to make it work when our web app is hosted by IIS.

Since we are in Visual Studio 2019, let us run the web application by hitting CTRL F5. We should see the same result as we saw previously when we started the app from a terminal window. 

Install ASP.NET Core Hosting Bundle

For IIS to support ASP.NET Core, you will need to install the “ASP.NET Core Hosting Bundle”. Point your browser to https://dotnet.microsoft.com/download/dotnet-core/3.1. Click on the “Hosting Bundle” link.


A file named dotnet-hosting-3.1.6-win.exe gets downloaded to your computer. Go ahead and run this installer.

Publish web app to IIS

Let us now publish our application to IIS. Create a folder named SchoolAPI under c:\inetpub\wwwroot, which is the the root directory of IIS. 

Back in Visual Studio, right click on the SchoolAPI node in Solution Explorer and select Publish...

On the Publish dialog, select Folder, then click Next.

Use the Browse... button to select the c:\inetpub\wwwroot/SchoolAPI directory, then click on Finish.


Click on Publish.

Let us create a website in IIS. Start "Internet Information Services (IIS) Manager". Right-click on the Sites node then select "Add Website..."


Add a website as shown below.


Select the "Application Pools" node then double-click on the SchoolAPI pool in the center.

Select "No Managed Code" in the ".NET CLR version" selection list, then click OK.

Point your browser to http://localhost:8088/api/students. The web application will fail with an HTTP ERROR 500. Unfortunately, there is not enough information to tell us what the problem is. I will describe to you two simple ways of finding out what the problem is:

1) Start the Windows "Event Viewer". Select "Windows Logs" >> Application, then read the first couple of errors.


You will come across this error, which suggests that the app is unable to connect to SQL Server:

A network-related or instance-specific error occurred while establishing a connection to SQL Server. The server was not found or was not accessible. 

2) To see a more descriptive error message in your browser, you can also set the environment variable ASPNETCORE_ENVIRONMENT to Development. Add this to the C:\inetpub\wwwroot\SchoolAPI\web.config file inside the <aspNetCore … > section. Once you do so, your < aspNetCore…> block will look like this:

<aspNetCore processPath="dotnet" arguments=".\SchoolAPI.dll" 

  stdoutLogEnabled="false" stdoutLogFile=".\logs\stdout" hostingModel="inprocess" >

  <environmentVariables>

    <environmentVariable name="ASPNETCORE_ENVIRONMENT" value="Development" />

  </environmentVariables>

</aspNetCore>

Save the web.config file, then refresh the page in your browser. A more detailed error message will display.

One way to fix the database connectivity problem

I have one solution to this problem so that IIS can communicate with LocalDB. I welcome any other suggestions. 

From within a terminal window, execute the following commands:

sqllocaldb start MSSQLLocalDB
sqllocaldb info MSSQLLocalDB

You should experience output similar to the following:

C:\>sqllocaldb start MSSQLLocalDB
LocalDB instance "mssqllocaldb" started.

C:\>sqllocaldb info MSSQLLocalDB
Name:               mssqllocaldb
Version:            13.1.4001.0
Shared name:
Owner:              bingo
Auto-create:        Yes
State:              Running
Last start time:    2020-08-13 11:33:00 AM
Instance pipe name: np:\\.\pipe\LOCALDB#1961D8A7\tsql\query

We can use the "Instance pipe name" as the name of the server in the database connection string. Copy the value of the "Instance pipe name" without 'np:'. In the above example it would be '\\.\pipe\LOCALDB#1961D8A7\tsql\query'. Go to Visual Studio 2019, open appsettings.json and paste contents of your clipboard instead of '(localdb)\\mssqllocaldb' in the connection string. In my case, the connection string looked like this:

"DefaultConnection": "Server=\\\\.\\pipe\\LOCALDB#1961D8A7\\tsql\\query;Database=School;Trusted_Connection=True;MultipleActiveResultSets=true"

NOTE: When you pasted the name pipe, all \ are escaped to \\. This is OK and do not be alarmed.

If you run the web application in Visual Studio, it should be working as expected:

Now, let us do the same change to C:\inetpub\wwwroot\SchoolAPI\appsettings.json. You can simply replace the connection string in C:\inetpub\wwwroot\SchoolAPI\appsettings.json with the connection string from appsettings.json in Visual Studio 2019.

Thereafter, point your browser to http://localhost:8088/api/students. This time, we will get a different error:

SqlException: Login failed for user 'IIS APPPOOL\SchoolAPI'.

This error suggests that, although the database was found, IIS failed to login to the database using account 'IIS APPPOOL\SchoolAPI'. To fix this problem, we will get IIS to use a different account. Select the SchoolAPI application pool, then click on 'Advanced Settings..." on the right-side.


Click on the ... beside Identity.


Change the "Built-in account:" to LocalSystem, then click on OK followed by OK again.
By changing the account to LocalSystem, IIS will try and login to our database using a built-in account named 'NT AUTHORITY\SYSTEM'. We need to give this account access to our School database in LocalDB. 

Download and install SQL Server Management Studio (SSMS) from https://docs.microsoft.com/en-us/sql/ssms/download-sql-server-management-studio-ssms.

Start SSMS. Use "Windows Authentication" to login into server name "(localdb)\MSSQLLocalDB".


Right-click on Security >> Logins and select "New Login...".
Click on Search...

Enter 'system'.

Click on "Check Names". When the account is found, you will see SYSTEM in uppercase and underlined.

Click on OK. Next, select the "User Mapping" node on the left side, check the School database, then check db_owner at the bottom.


Click on OK to close the Login - New dialog.

Browser to http://localhost:8088/api/students. The page should display data as expected.

NOTE: If you receive an error suggesting that the database cannot be found, then run these command again in a terminal window and update the "Instance pipe name" in the appsettings.json connection string.

sqllocaldb start MSSQLLocalDB
sqllocaldb info MSSQLLocalDB
As I said before, this is really an academic exercise and that LocalDB should never be used in production. SQL Express is a much better option.

Monday, May 11, 2020

CI/CD pipelines with ASP.NET MVC 3.1, GitHub Actions and Docker Hub

Overview

In this post I will show you how easy it is to implement a CI/CD DevOps pipeline using GitHub Actions. The sample web application I will use is an ASP.NET Core 3.1 MVC application and I will deploy it to Docker Hub. 
Before proceeding, It is assumed that you have the following pre-requisites: 
  • You already have a Docker Hub account
  • You already have a GitHub account
  • You have .NET Core 3.1 (or later) installed on your computer

Creating a simple ASP.NET Core 3.1 application

In a working directory, execute the following command from within a terminal window:

dotnet new mvc -o GithubActions2DockerHub

Change directory to the newly created app:

cd GithubActions2DockerHub

Add a .gitignore file to the application:

dotnet new gitignore

Let us make the application our own by, perhaps, changing the title of the app and the background color.

1) Add the following CSS to wwwroot/css/site.css:
body {
   background-color: tomato;
}

2) In Views/Home/Index.cshtml, change the main heading from:

<h1 class="display-4">Welcome</h1>

TO

<h1 class="display-4">Welcome to our MVC Core 3.1 App</h1>

Let us now run the application and see what it looks like. In the terminal window run the following command:

dotnet run

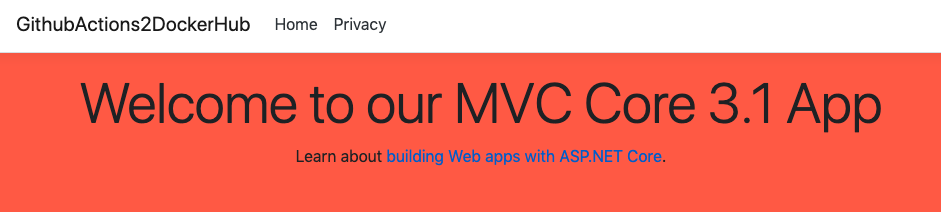
Point your browser to https://localhost:5001. You will see a strangely colored web page that looks like this:


Stop the server by hitting CTRL + C in the terminal window.

Dockerfile

In the root folder of your project, add a file named Dockerfile (no extension) with the following content:
FROM mcr.microsoft.com/dotnet/core/sdk:3.1 AS build-env
WORKDIR /app

# Copy csproj and restore as distinct layers
COPY *.csproj ./
RUN dotnet restore

# Copy everything else and build
COPY . ./
RUN dotnet publish -c Release -o out

# Build runtime image
FROM mcr.microsoft.com/dotnet/core/aspnet:3.1
WORKDIR /app
COPY --from=build-env /app/out .
ENTRYPOINT ["dotnet", "GithubActions2DockerHub.dll"]

Push your code to GitHub.

We are now ready to push this application to GitGub. Go to GitHub and create a repository. I created a repository named GithubActions2DockerHub. Copy the commands that are shown on the GitHub page, under “…or push an existing repository from the command line”, that looks like this:


Back in your application’s terminal window, type the following commands to initialize a git repo, add files to the repo and commit your changes:

git init
git add .
git commit -m "1st commit"

Next, we will push the code to GitHub. Paste the git commands that you copied from GitHub. This is what it looked like for me:

git remote add origin https://github.com/medhatelmasry/GithubActions2DockerHub.gitgit push -u origin master

If you refresh the GitHub page, you will see that your code is in GitHub. It looks like this:

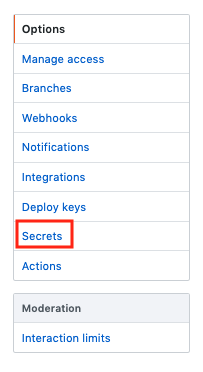
Click on Secrets on the left-side:

Build & Deploy using GitHub Actions

 Back it GitHub, click on the Settings tab of your application’s repo:
 
Click on Secrets on the left-side:
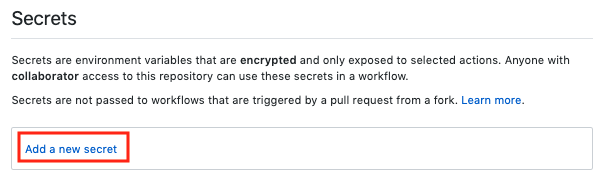
Click on “Add a new secret”:
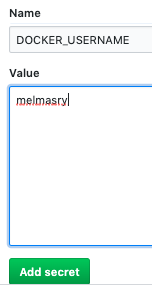
 You will enter your Docker Hub username and password as GitHub secrets. Enter secrets DOCKER_USERNAME & DOCKER_PASSWORD together with their respectivev values:
    
Click on Actions on the top navigation bar in GitHub:
You will see a multitude of templates for a multitude of technologies and programming languages. Scroll down to the “Continuous integration workflows” and select “Docker image”.
This will create a .github/Workflows folder in your application. Name the file deploy_to_docker_hub.yml. 
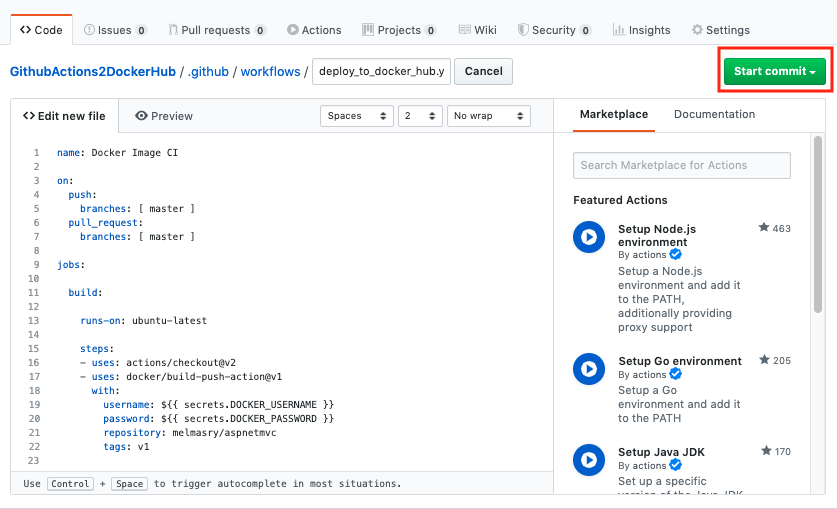
Your deploy_to_docker_hub.yml looks like this:
name: Docker Image CI

on:
  push:
    branches: [ master ]
  pull_request:
    branches: [ master ]

  jobs:

    build:

      runs-on: ubuntu-latest

    steps:
      - uses: actions/checkout@v2
      - name: Build the Docker image
        run: docker build . --file Dockerfile --tag my-image-name:$(date +%s)

Unfortunately, the above instructions only build the docker file but do not deploy to docker hub. We will replace the instructions (under steps:) with instructions that checkout, build and deploy.

Therefore delete the following lines at the bottom of the deploy_to_docker_hub.yml file:

- name: Build the Docker image
run: docker build . --file Dockerfile --tag my-image-name:$(date +%s)

Replace the above code with the following:

- uses: docker/build-push-action@v1
  with:
    username: ${{ secrets.DOCKER_USERNAME }}
    password: ${{ secrets.DOCKER_PASSWORD }}
    repository: melmasry/aspnetmvc
    tags: v1

The image will be named melmasry/aspnetmvc and the tag (version) will be v1.
Make sure tab the instructions in deploy_to_docker_hub.yml so that it is indented as shown below:

name: Docker Image CI

on:
  push:
    branches: [ master ]
  pull_request:
    branches: [ master ]

jobs:

  build:

    runs-on: ubuntu-latest

    steps:
    - uses: actions/checkout@v2
    - uses: docker/build-push-action@v1
      with:
        username: ${{ secrets.DOCKER_USERNAME }}
        password: ${{ secrets.DOCKER_PASSWORD }}
        repository: melmasry/aspnetmvc
        tags: latest

NOTE: replace melmasry with your Docker Hub username.

Click on the green “Start commit” button:
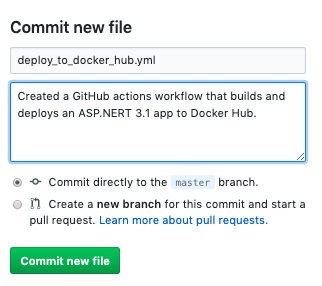
Enter a comment and description for the commit then click on the “Commit new file” button:
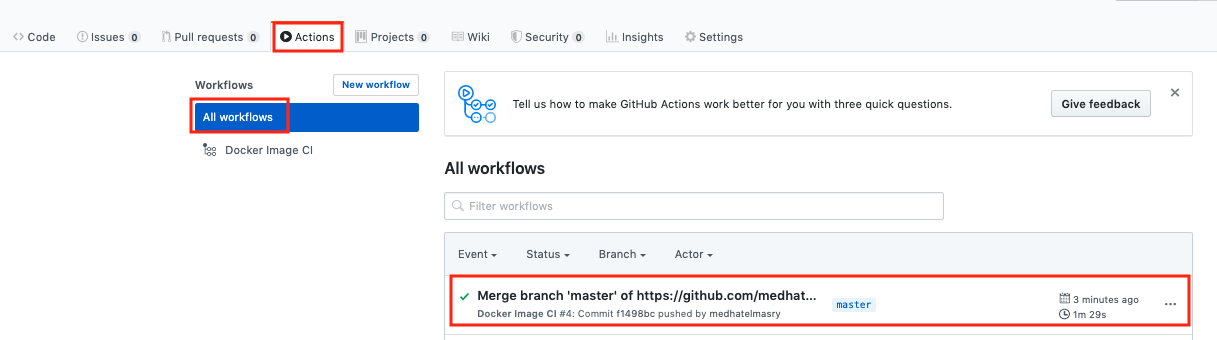
 Click on “Actions” >> “All Workflows” >> your workflow.  
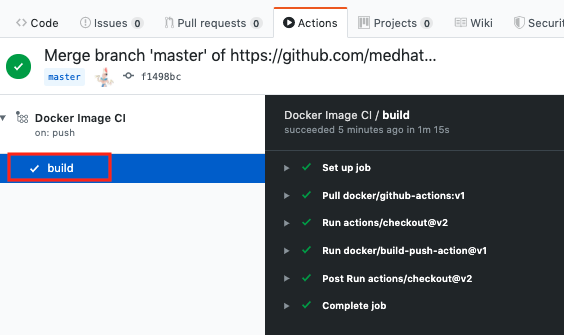
Then click on build:
The build and deploy should be succcessfully completed. The real test comes with pulling the image from DockerHub and running it locally on your computer. Run the following command from a terminal window on your computer:

docker run -d -p 8888:80 melmasry/aspnetmvc:latest

NOTE: replace melmasry with your Docker Hub username.
Point your browser to http://localhost:8888. You will see the same ugly tomato colored web page:
 
Happy coding!!