Overview
In this post I will show you how easy it is to implement a CI/CD DevOps pipeline using GitHub Actions. The sample web application I will use is an ASP.NET Core 3.1 MVC application and I will deploy it to Docker Hub.
Before proceeding, It is assumed that you have the following pre-requisites:
- You already have a Docker Hub account
- You already have a GitHub account
- You have .NET Core 3.1 (or later) installed on your computer
Creating a simple ASP.NET Core 3.1 application
In a working directory, execute the following command from within a terminal window:
dotnet new mvc -o GithubActions2DockerHub
Change directory to the newly created app:
cd GithubActions2DockerHub
Add a .gitignore file to the application:
dotnet new gitignore
Let us make the application our own by, perhaps, changing the title of the app and the background color.
1) Add the following CSS to wwwroot/css/site.css:
body {
background-color: tomato;
}
2) In Views/Home/Index.cshtml, change the main heading from:
<h1 class="display-4">Welcome</h1>
TO
<h1 class="display-4">Welcome to our MVC Core 3.1 App</h1>
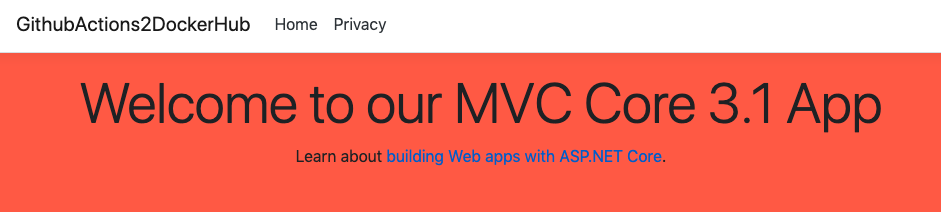
Let us now run the application and see what it looks like. In the terminal window run the following command:
dotnet run
Point your browser to https://localhost:5001. You will see a strangely colored web page that looks like this:
Stop the server by hitting CTRL + C in the terminal window.
Dockerfile
In the root folder of your project, add a file named Dockerfile (no extension) with the following content:
FROM mcr.microsoft.com/dotnet/core/sdk:3.1 AS build-env
WORKDIR /app
# Copy csproj and restore as distinct layers
COPY *.csproj ./
RUN dotnet restore
# Copy everything else and build
COPY . ./
RUN dotnet publish -c Release -o out
# Build runtime image
FROM mcr.microsoft.com/dotnet/core/aspnet:3.1
WORKDIR /app
COPY --from=build-env /app/out .
ENTRYPOINT ["dotnet", "GithubActions2DockerHub.dll"]
Push your code to GitHub.
We are now ready to push this application to GitGub. Go to GitHub and create a repository. I created a repository named GithubActions2DockerHub. Copy the commands that are shown on the GitHub page, under “…or push an existing repository from the command line”, that looks like this:

Back in your application’s terminal window, type the following commands to initialize a git repo, add files to the repo and commit your changes:
git init
git add .
git commit -m "1st commit"
Next, we will push the code to GitHub. Paste the git commands that you copied from GitHub. This is what it looked like for me:
git remote add origin https://github.com/medhatelmasry/GithubActions2DockerHub.gitgit push -u origin master
If you refresh the GitHub page, you will see that your code is in GitHub. It looks like this:

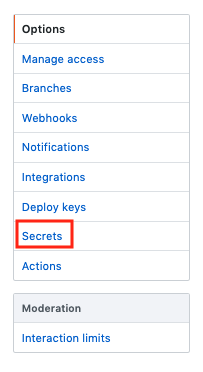
Click on Secrets on the left-side:
Build & Deploy using GitHub Actions
Back it GitHub, click on the Settings tab of your application’s repo:
Click on Secrets on the left-side:
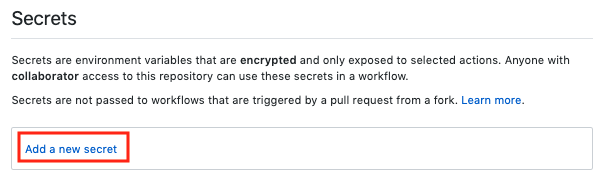
Click on “Add a new secret”:
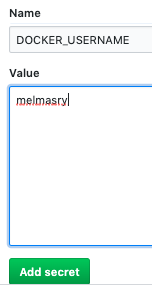
You will enter your Docker Hub username and password as GitHub secrets. Enter secrets DOCKER_USERNAME & DOCKER_PASSWORD together with their respectivev values:

Click on Actions on the top navigation bar in GitHub:
You will see a multitude of templates for a multitude of technologies and programming languages. Scroll down to the “Continuous integration workflows” and select “Docker image”.

This will create a .github/Workflows folder in your application. Name the file deploy_to_docker_hub.yml.
Your deploy_to_docker_hub.yml looks like this:
name: Docker Image CI
on:
push:
branches: [ master ]
pull_request:
branches: [ master ]
jobs:
build:
runs-on: ubuntu-latest
steps:
- uses: actions/checkout@v2
- name: Build the Docker image
run: docker build . --file Dockerfile --tag my-image-name:$(date +%s)
on:
push:
branches: [ master ]
pull_request:
branches: [ master ]
jobs:
build:
runs-on: ubuntu-latest
steps:
- uses: actions/checkout@v2
- name: Build the Docker image
run: docker build . --file Dockerfile --tag my-image-name:$(date +%s)
Unfortunately, the above instructions only build the docker file but do not deploy to docker hub. We will replace the instructions (under steps:) with instructions that checkout, build and deploy.
Therefore delete the following lines at the bottom of the deploy_to_docker_hub.yml file:
- name: Build the Docker image
run: docker build . --file Dockerfile --tag my-image-name:$(date +%s)
run: docker build . --file Dockerfile --tag my-image-name:$(date +%s)
Replace the above code with the following:
- uses: docker/build-push-action@v1
with:
username: ${{ secrets.DOCKER_USERNAME }}
password: ${{ secrets.DOCKER_PASSWORD }}
repository: melmasry/aspnetmvc
tags: v1
with:
username: ${{ secrets.DOCKER_USERNAME }}
password: ${{ secrets.DOCKER_PASSWORD }}
repository: melmasry/aspnetmvc
tags: v1
The image will be named melmasry/aspnetmvc and the tag (version) will be v1.
Make sure tab the instructions in deploy_to_docker_hub.yml so that it is indented as shown below:
name: Docker Image CI
on:
push:
branches: [ master ]
pull_request:
branches: [ master ]
jobs:
build:
runs-on: ubuntu-latest
steps:
- uses: actions/checkout@v2
- uses: docker/build-push-action@v1
with:
username: ${{ secrets.DOCKER_USERNAME }}
password: ${{ secrets.DOCKER_PASSWORD }}
on:
push:
branches: [ master ]
pull_request:
branches: [ master ]
jobs:
build:
runs-on: ubuntu-latest
steps:
- uses: actions/checkout@v2
- uses: docker/build-push-action@v1
with:
username: ${{ secrets.DOCKER_USERNAME }}
password: ${{ secrets.DOCKER_PASSWORD }}
repository: melmasry/aspnetmvc
tags: latest
tags: latest
NOTE: replace melmasry with your Docker Hub username.
Click on the green “Start commit” button:
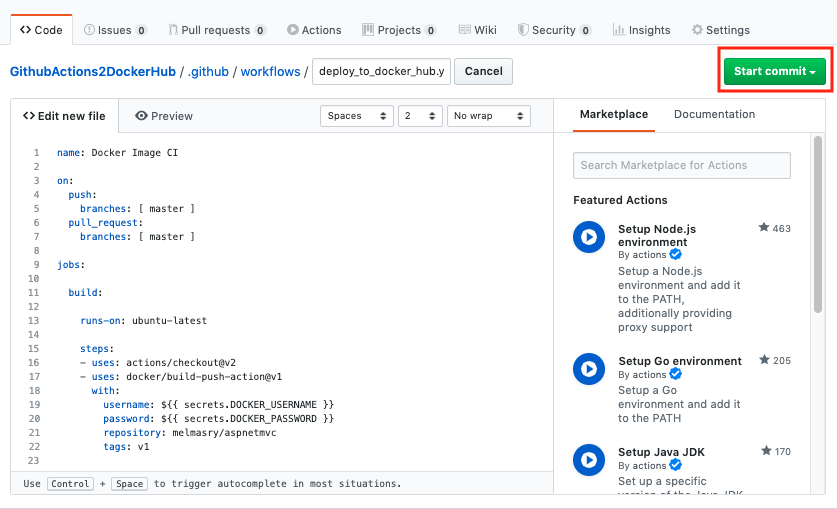
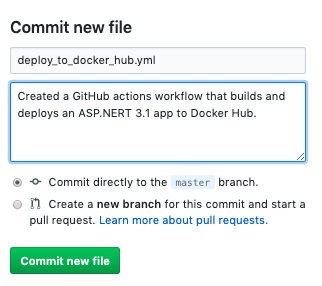
Enter a comment and description for the commit then click on the “Commit new file” button:
Click on “Actions” >> “All Workflows” >> your workflow.
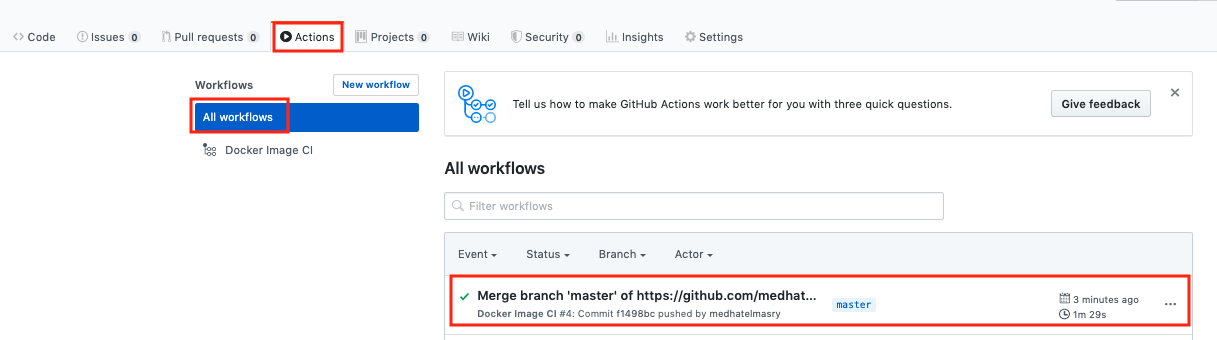
Then click on build:
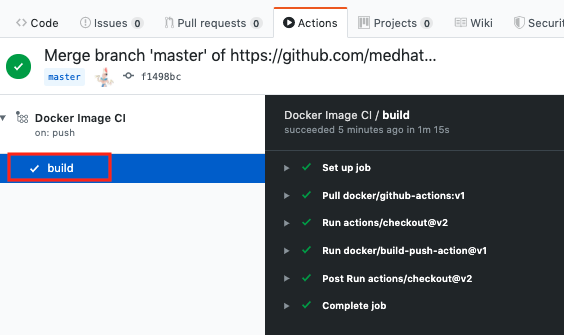
The build and deploy should be succcessfully completed. The real test comes with pulling the image from DockerHub and running it locally on your computer. Run the following command from a terminal window on your computer:
docker run -d -p 8888:80 melmasry/aspnetmvc:latest
NOTE: replace melmasry with your Docker Hub username.
Point your browser to http://localhost:8888. You will see the same ugly tomato colored web page:

Happy coding!!