Showing posts with label docker container. Show all posts

Thursday, April 25, 2024

.NET Aspire with VS Code, SQLite & SQL Server

In this Tutorial, we will explore .NET Aspire. At first, we will use it with SQLite. Thereafter, we will modify the solution so that it uses a SQL Server Docker image instead of SQLite. All this is done in a terminal window with the help of VS Code. The objective is to serve those who do not use the higher end Visual Studio 2022 IDE.

Start source code: https://github.com/medhatelmasry/SoccerFIFA
End source code: https://github.com/medhatelmasry/SoccerAspire
Companion video: https://youtu.be/FDF04Lner5k

Prerequisites

In order to continue with this tutorial, you will need the following:

  • .NET 9.0
  • dotnet-ef tool - If you do not have this tool, you can install it with the terminal window command "dotnet tool install --global dotnet-ef"
  • Visual Studio Code
  • C# Dev Kit extension for Visual Studio Code
  • Docker Desktop
  • Azure Data Studio

.NET Aspire Setup

In any terminal window folder, run the following command before you install .NET Aspire:

dotnet workload update 

To install the .NET Aspire workload from the .NET CLI, execute this command:

dotnet workload install aspire

Check your version of .NET Aspire, with this command:

dotnet workload list

Startup Application

We will start with a .NET 9.0 application that involves a Minimal API backend and a Blazor frontend. Clone the code from this GitHub site with:

git clone https://github.com/medhatelmasry/SoccerFIFA

To get a good sense of what the application does, follow these steps:

1) Inside the WebApiFIFA folder, run the following command in a terminal window:

dotnet watch


Try out the GET /api/games endpoint, you should see the following output:


2) Next, let us try the frontend. Inside a terminal window in the BlazorFIFA folder, run this command:

dotnet watch


We know that the application works. However, it is a pain to have to start both projects to get the solution to work. This is where .NET Aspire will come to the rescue.

Converting solution to .NET Aspire

Close both terminal windows by hitting CTRL C in each.

To add the basic .NET Aspire projects to our solution, run the following command inside the root SoccerFIFA folder:

dotnet new aspire --force

This adds these artifacts:

  • SoccerFIFA.sln file (this replaces the previous .sln file because of the --force switch)
  • SoccerFIFA.AppHost folder
  • SoccerFIFA.ServiceDefaults folder

We will add our previous API & Blazor projects to the newly created .sln file by executing the following commands inside the root SoccerFIFA folder:

dotnet sln add ./BlazorFIFA/BlazorFIFA.csproj
dotnet sln add ./WebApiFIFA/WebApiFIFA.csproj
dotnet sln add ./LibraryFIFA/LibraryFIFA.csproj

Our cloned projects use .NET 9.0. Unfortunately, at the time of writing this article, the new ASPIRE projects are created for .NET 8.0. We must unify all the projects so that they all use .NET 9.0. Therefore, update the .csproj files for SoccerFIFA.AppHost and SoccerFIFA.ServiceDefaults with package versions as follows:

SoccerFIFA.AppHost.csproj

change .net8.0 to .net 9.0

Package Version
Aspire.Hosting.AppHost 9.1.0

SoccerFIFA.ServiceDefaults

change .net8.0 to .net 9.0

Package Version
Microsoft.Extensions.Http.Resilience 9.2.0
Microsoft.Extensions.ServiceDiscovery 9.1.0
OpenTelemetry.Exporter.OpenTelemetryProtocol 1.11.1
OpenTelemetry.Extensions.Hosting 1.11.1
OpenTelemetry.Instrumentation.AspNetCore/td> 1.11.0
OpenTelemetry.Instrumentation.Http 1.11.0
OpenTelemetry.Instrumentation.Runtime 1.11.0

Next, we need to add references in the SoccerFIFA.AppHost project to the BlazorFIFA and WebApiFIFA projects with these commands:

dotnet add ./SoccerFIFA.AppHost/SoccerFIFA.AppHost.csproj reference ./BlazorFIFA/BlazorFIFA.csproj
dotnet add ./SoccerFIFA.AppHost/SoccerFIFA.AppHost.csproj reference ./WebApiFIFA/WebApiFIFA.csproj

Also, both BlazorFIFA and WebApiFIFA projects need to have references into SoccerFIFA.ServiceDefaults with:

dotnet add ./BlazorFIFA/BlazorFIFA.csproj reference ./SoccerFIFA.ServiceDefaults/SoccerFIFA.ServiceDefaults.csproj

dotnet add ./WebApiFIFA/WebApiFIFA.csproj reference ./SoccerFIFA.ServiceDefaults/SoccerFIFA.ServiceDefaults.csproj

Inside the SoccerFIFA root folder, start VS Code with:

code .

In the root folder, let us build to make sure everything works properly. Therefore, run this command:

dotnet build

You will receive an error message that suggests that you add the following markup to thje the .csproj file that belongs to 

<Sdk Name="Aspire.AppHost.Sdk" Version="9.0.0" />

Add the following code to SoccerFIFA.AppHost.csproj just under the opening <Project ... > tag. Thereafter, the solution should build without any errors.


Then, in the Program.cs files of both BlazorFIFA and WebApiFIFA, add this code before "var app = builder.Build();":

// Add service defaults & Aspire components.
builder.AddServiceDefaults();

In the Program.cs file in SoccerFIFA.AppHost, add this code right before “builder.Build().Run();”:

var api = builder.AddProject<Projects.WebApiFIFA>("backend");
builder.AddProject<Projects.BlazorFIFA>("frontend")
    .WithReference(api)
    
.WaitFor(api);

Now, the relative name for the API app is “backend”. Therefore, we can change the base address to http://backend. Change Program.cs file in BlazorFIFA to:

client.BaseAddress = new Uri("http://backend/");

Test .NET Aspire Solution

To test the solution, in the SoccerFIFA.AppHost folder, start the application with:

dotnet watch

NOTE: If you are asked to enter a token, copy and paste it from the value in your terminal window:


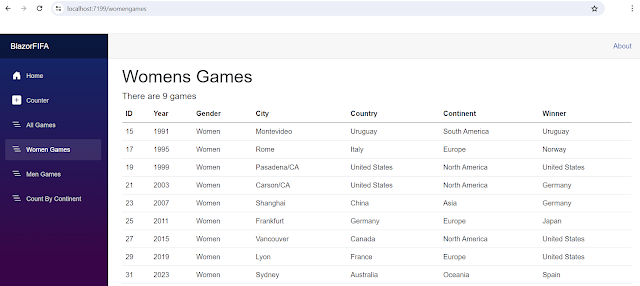
This is what you should see in your browser:


Click on the app represented by the frontend link on the second row. You should experience the Blazor app:


At this stage we get a sense of what .NET Aspire can do for us. It essentially orchestrates the connection between multiple projects and produces a single starting point in the Host project. Let us take this journey one step further by converting our backend API so it uses a SQL Server container instead of SQLite.

Using SQL Server instead of SQLite

Stop the running application by hitting CTRL C.

IMPORTANT: You will need to ensure that Docker Desktop is running on your computer because Aspire will start SQL Server in a container. Also, update your Docker Desktop to the  latest version.

Add this package to the WebApiFIFA project:

dotnet add package Aspire.Microsoft.EntityFrameworkCore.SqlServer

Also in WebApiFIFA project Program.cs file, comment out (or delete) this code:

var connectionString = builder.Configuration.GetConnectionString("DefaultConnection");
builder.Services.AddDbContext<ApplicationDbContext>(options =>
    options.UseSqlite(connectionString));

Place the below code just before builder.AddServiceDefaults():

builder.AddSqlServerDbContext<ApplicationDbContext>("sqldata");

Cleanup the backend API project (WebApiFIFA) from all traces of SQLite by doing the following:

  1. Delete SQLite files college.db, college.db-shm, and college.db-wal.
  2. In WebApiFIFA.csproj, delete: <PackageReference Include="Microsoft.EntityFrameworkCore.Sqlite" Version="9.0.2" />
  3. Delete the Data/Migrations folder.
  4. Delete the ConnectionStrings section in appsettings.json
We will create new migrations that work with SQL Server, instead of SQLite. Therefore, run the following command from within a terminal window inside folder WebApiFIFA.

dotnet ef migrations add M1 -o Data/Migrations

Configure AppHost to use SQL Server

The WebApiFIFA.AppHost project is the orchestrator for your app. It's responsible for connecting and configuring the different projects and services of your app. Add the .NET Aspire Entity Framework Core Sql Server library package to your SoccerFIFA.AppHost project with:

dotnet add package Aspire.Hosting.SqlServer

In the Program.cs file in SoccerFIFA.AppHost project comment out (or delete) the following code:

var api = builder.AddProject<Projects.WebApiFIFA>("backend");

Replace the above code with: 

var sql = builder.AddSqlServer("sql").AddDatabase("sqldata"); 

var api = builder.AddProject<Projects.WebApiFIFA>("backend")
    .WithReference(sql)
    .WaitFor(sql); 

The preceding code adds a SQL Server Container resource to your app and configures a connection to a database called sqldata. The Entity Framework classes you configured earlier will automatically use this connection when migrating and connecting to the database.

Run the solution

After ensuring that your Docker Desktop is running, execute this terminal window command inside the SoccerFIFA.AppHost folder:

dotnet watch

Your browser will look like this:


Click on the highlighted link above. Our application works just as it did before. The only difference is that this time we are using SQL Server running in a container:


I hope you found this useful and are able to see the possibilities of this new addition to .NET.

Sunday, December 13, 2020

EF Core Power Tools & .NET 5.0

The "EF Core Power Tools" is an open source project on GitHub started by Erik Ejlskov Jensen. It is an extension that you can add to Visual Studio 2019. In this post I will try and introduce you to this very useful tool. We will be using the SQL-Server Northwind database running in a container for sample data. 

Companion Video: 

Let's get started: https://youtu.be/FNXlsN3barQ

Running a docker container with SQL-Server Northwind sample database

I will use a docker image that contains the SQL-Server Northwind database. Credit goes to kcornwall for creating this docker image.

To pull & run the Northwind database in a docker container, run the following command in a terminal window:

docker run -d --name nw -p 1444:1433 kcornwall/sqlnorthwind

The above command does the following:

Docker image:  kcornwall/sqlnorthwind
Container Name
(--name):
 nw
Ports (-p):  Port 1433 in container is exposed as port 1444 on the host computer
Password:  The sa password is Passw0rd2018. This was determined from the Docker Hub page for the image.
-d:  Starts the container in detached mode

This is what I experienced after I ran the above command:

docker run
Let us make sure that the container is running. Execute this command to ensure that the container is running OK.

docker ps

The following confirmed to me that the container is indeed running:

docker ps

Install "EF Core Power Tools" extension into Visual Studio 2019

We will test "EF Core Power Tools" using a C# console application. Start Visual Studio and create a new project based on the "Console App (.NET Core) C#" template. You can name the app whatever you like.

Edit the .csproj file to make sure it is using the latest version of .NET Core. At the time of writing this post, my .csproj file looked like:

<Project Sdk="Microsoft.NET.Sdk">
  <PropertyGroup>
    <OutputType>Exe</OutputType>
    <TargetFramework>netcoreapp3.1</TargetFramework>
  </PropertyGroup>
</Project>

I changed TargetFramework netcoreapp3.1 to net5.0. The end result was:

<Project Sdk="Microsoft.NET.Sdk">
  <PropertyGroup>
    <OutputType>Exe</OutputType>
    <TargetFramework>net5.0</TargetFramework>
  </PropertyGroup>
</Project>

Rebuild your application to make sure all is OK.

In Visual Studio 2019, click on Extensions >> Manage Extensions.

Extensions
Enter "EF Core Power Tools" in the filter field. This causes the tool to be the first item in the list. Click on Download beside "EF Core Power Tools".
EF Core Power Tools

Exit Visual Studio 2019 for this extension to get installed. When you click Modify on the following dialog, the extension gets installed.
modify
Finally, click on the Close button.
close

Using EF Core Power Tools

Restart Visual Studio 2019 and open the console application that you had previously created. Now, when you right-click on the project node in "Solution Explorer", you will see "EF Core Power Tools".
EF Core Power Tools in Visual Studio 2019

Let us reverse engineer the Northwind database that is currently running in a docker container. Click on: EF Core Power Tools >> Reverse Engineer. Then, click on the first Add button.
choose database connection
On the next "Connection Properties" dialog, enter the following data:

Data source: Choose: Microsoft SQL Server (SqlClient)
Server name: localhost, 1444
User name: sa
Password: Passw0rd2018
Save my password: Checked
Select or enter a database name: Choose: Northwind

Connection properties

Click on OK. On the "Choose Database Connection" dialog, make sure you check "Use EF Core 5" before clicking on the OK button.
Use EF Core 5

All the artifacts in the database are shown in the next dialog. These include Tables, Views, and Stored Procedures. To keep it simple, choose only the Categories & Products tables.

SZelect Objects

After selecting Categories & Products tables, click on OK. The next dialog allows you to customize the way that the reverse-engineered code gets generated in your application. I set the following values:

Context name: NorthwindContext
Entity Types path: Models/NW
DbContext path Data The NorthwindContext.cs file will be placed in the Data folder
Pluralize or singularize generated object names (English) Checked Entity class names will be appropriately pluralized or singularized
Use DataAnnotation attributes to configure the model Checked Data Annotations will be used instead of Fluid APIs
Include connection string in generated code Checked Connection string will be hard-coded inside the NorthwindContext.cs. Of course, this is bad practice.
Install the EF Core provider package in the project Checked The package Microsoft.EntityFrameworkCore.SqlServer be automatically installed.

Generate EF Core Model

Click on OK. After the reverse engineering process is completed, you will see the following confirmation dialog:

Model generated successfully

Click OK. The files in Solution Explorer will look like this:

Solution explorer


As expected, The NorthwindContext.cs file is placed in the Data folder and the database model classes are placed in the Models folder. The efpt.config.json file contains the choices that were made while configuring the reverse-engineering process so that, if you do it again, it remembers what you did before.

Replace your Main() method in Program.cs with the following C# code:

using (NorthwindContext context = new NorthwindContext()) {
  var query = context.Products
      .Include(c => c.Category);

  foreach (var p in query) {
      Console.WriteLine($"{p.ProductId}\t{p.ProductName}\t{p.Category.CategoryName}");
  }
}

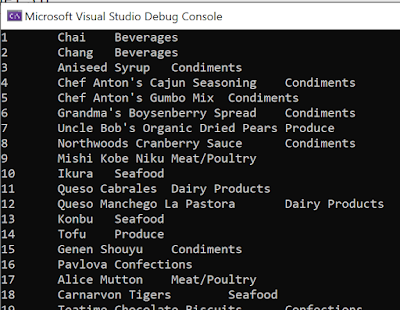
Run your application and you should see the following output:

EF Core 5.0 diagnostics

Entity Framework 5.0 is providing us with some diagnostics features.  I will let you know of two such features:

1) ToQueryString() - EF Core 5.0 comes with SQL-based brother to ToString() method for LINQ-queries. This method is called ToQueryString() and it returns provider-specific SQL without connecting to database server. Let's use ToQueryString() with our query object. Modify our code by adding a WriteLine() statement to inspect the query statement that is actually being sent to the database. Insert the statement in boldface below to the Main() method in Program.cs:

using (NorthwindContext context = new NorthwindContext()) {
  var query = context.Products
      .Include(c => c.Category);

  Console.WriteLine(query.ToQueryString());

  foreach (var p in query) {
      Console.WriteLine($"{p.ProductId}\t{p.ProductName}\t{p.Category.CategoryName}");
  }
}

Run your application and you will see the following output:

ToQueryString()

Note the raw query at the top. This is displayed before the query is sent to the database for processing.

2) LogTo() - Comment out the Console.WriteLine() code that we added earlier. Open the  the Data/NorthwindContext.cs file in the editor. Around line 31, add the option shown below in boldface to the optionsBuilder:

optionsBuilder
  .UseSqlServer("Data Source=localhost,1444;Initial Catalog=Northwind;Persist Security Info=True;User ID=sa;Password=Passw0rd2018")
  .LogTo(Console.WriteLine, Microsoft.Extensions.Logging.LogLevel.Information);

This causes logging to be sent to the console. Run your app and you should see the following diagnostics information:

LogTo()

.NET 5.0 Syntactic Sugar

We can simplify Program.cs using some of the new features in C# 9. Go ahead and delete the namespace, class and Main() method declarations so that Program.cs looks like this:

using Microsoft.EntityFrameworkCore;
using System;
using TestEFPowerTools.Data;

using (NorthwindContext context = new NorthwindContext()) {
    var query = context.Products
        .Include(c => c.Category);

    foreach (var p in query) {
        Console.WriteLine($"{p.ProductId}\t{p.ProductName}\t{p.Category.CategoryName}");
    }
}

The program runs just like before and it is much more simplified. I call this syntactic sugar.

Cleanup

Once you are done, you can stop and remove the Northwind docker container with the following command:

docker rm -f nw

Conclusion

I hope you found this article valuable and hope you join me again in future articles.