Showing posts with label console application. Show all posts

Saturday, January 15, 2022

Creating a MySQL Database with EF Core in .NET 6.0

In this tutorial I will show how to create a simple .NET 6 console application that interacts with data in MySQL version 8.0.0 using Entity Framework. I will be using the official Connector/NET for Entity Framework driver. The NuGet package is MySql.EntityFrameworkCore Nuget located at https://www.nuget.org/packages/MySql.EntityFrameworkCore/

Instead of installing and running a MySQL instance on my computer, I will run MySQL in a docker container for simplicity.

Source Code: https://github.com/medhatelmasry/MySqlOnFire

Companion Video: https://youtu.be/wGb2IWlZNl4

This article assumes the following:

  1. You have .NET 6.0 installed on your computer. 
  2. You have Docker installed on your computer. 

Setting up the MySQL 8.0.0 container

To download the MySQL version 8.0.0 image from Docker Hub and run it on your local computer, type the following command from within a terminal window:

docker run -p 3333:3306 --name db -e MYSQL_ROOT_PASSWORD=secret -d mysql:8.0.0

This starts a container named 'db' that listens on port 3333 on your local computer. The root password is 'secret'.

To ensure that the MySQL container is running, type the following from within a terminal window:

docker ps

You will see a message similar to the following:

CONTAINER ID   IMAGE         COMMAND                  CREATED        STATUS        PORTS                    NAMES

53e55f4991df   mysql:8.0.0   "docker-entrypoint.s…"   45 hours ago   Up 45 hours   0.0.0.0:3333->3306/tcp   db

Creating a console app

In a working directory, run the following command to create a console application named MySqlOnFire using .NET 6.0:

dotnet new console -f net6.0 -o MySqlOnFire 

Change directory to the newly created folder with:

cd MySqlOnFire

There is only one NuGet package that is needed to talk to MySQL. At the time of writing this article, the version of the MySql.EntityFrameworkCore package that supports .NET 6 is 6.0.0-preview3.1. Add the package by typing the following command from within a terminal window:

dotnet add package MySql.EntityFrameworkCore -v 6.0.0-preview3.1

Model Classes

We will be modeling the following Publisher & Book entities:

In .NET 6.0, we can create a global using file. This helps keep our code minimal. Let us take advantage of this feature. Add a file named GlobalUsings.cs and add to it the following code:

global using System.Text;
global using Microsoft.EntityFrameworkCore; 
global using System.ComponentModel.DataAnnotations.Schema;

Create a file named Publisher.cs and add to it the following class code:

public class Publisher {
    public int PublisherId { get; set; }
    public string? Name { get; set; }
    public virtual ICollection<Book>? Books { get; set; }

    public override string ToString() {
        var txt = new StringBuilder();
        txt.AppendLine($"ID: {PublisherId}");
        txt.AppendLine($"Publisher: {Name}");
        
        return txt.ToString();
    }
}

In the above code, we define the properties of the Publisher class and a ToString() method.

Create another class named Book.cs and add to it the following class code:

public class Book {
    public string? ISBN { get; set; }
    public string? Title { get; set; }
    public string? Author { get; set; }
    public string? Language { get; set; }
    public int Pages { get; set; }

    public int PublisherId { get; set; }

    [ForeignKey("PublisherId")]
    public virtual Publisher? Publisher { get; set; }

    public override string ToString() {
        var txt = new StringBuilder();
        txt.AppendLine($"ISBN: {ISBN}");
        txt.AppendLine($"Title: {Title}");
        txt.AppendLine($"Author: {Author}");
        txt.AppendLine($"Language: {Language}");
        txt.AppendLine($"Pages: {Pages}");
        txt.AppendLine($"Publisher: {Publisher!.Name}");

        return txt.ToString();
    }
}

In the above code, in addition to Book properties, PublisherId is clearly declared as the foreign key and a ToString() method is also defined.

The database context class

Entity Framework requires us to define a DbContext class that becomes the entry point into the database. Therefore, create a new file named LibraryContext.cs and add to it the following code:

public class LibraryContext : DbContext {
   public DbSet<Book>? Books { get; set; }
   public DbSet<Publisher>? Publishers { get; set; }
   protected override void OnConfiguring(DbContextOptionsBuilder optionsBuilder) {
     optionsBuilder.UseMySQL("server=localhost;database=library;user=root;port=3333;password=secret");
   }
   protected override void OnModelCreating(ModelBuilder modelBuilder) {
     base.OnModelCreating(modelBuilder);
     modelBuilder.Entity<Publisher>(entity => {
         entity.HasKey(e => e.PublisherId);
         entity.Property(e => e.Name).IsRequired();
     });
     modelBuilder.Entity<Book>(entity => {
         entity.HasKey(e => e.ISBN);
         entity.Property(e => e.Title).IsRequired();
         entity.HasOne(d => d.Publisher)
         .WithMany(p => p!.Books);
     });
     modelBuilder.Entity<Publisher>().HasData(
         new Publisher {
             PublisherId = 1,
             Name = "Mariner Books"
         },
         new Publisher {
             PublisherId = 2,
             Name = "Penguin Books"
         }
     );
     modelBuilder.Entity<Book>().HasData(
         new Book {
             ISBN = "978-0544003415",
             Title = "The Lord of the Rings",
             Author = "J.R.R. Tolkien",
             Language = "English",
             Pages = 1216,
             PublisherId = 1
         },
         new Book {
             ISBN = "978-0547247762",
             Title = "The Sealed Letter",
             Author = "Emma Donoghue",
             Language = "English",
             Pages = 416,
             PublisherId = 1
         },
         new Book {
             ISBN = "978-0143107569",
             Title = "Les Miserables",
             Author = "Victor Hugo",
             Language = "English",
             Pages = 1456,
             PublisherId = 2
         },
         new Book {
             ISBN = "978-0140449174",
             Title = "Anna Karenina",
             Author = "Leo Tolstoy",
             Language = "English",
             Pages = 880,
             PublisherId = 2
         }
     );
   }
}

What does the above code do?

  • Two DbSet objects are defined: Books & Publishers
  • The connection string to our MySQL database running in a docker container is:
server=localhost;database=library;user=root;port=3333;password=secret
  • The OnModelCreating() method establishes the following rules:
    • PublisherId is the primary key for the Publisher entity
    • Name is a required column in the Publisher entity
    • ISBN is the primary key in the Book entity
    • The Book entity has a foreign key into the Publisher entity
  • The OnModelCreating() method also inserts publishers & books seed data

Finally, let us add the code to create the database, seed data, and print data. Replace your Program.cs file with:

CreateDbSeedData();
PrintPublishers();
PrintBooks();
static void CreateDbSeedData() {
    using (var context = new LibraryContext()) {
        // Creates the database if not exists
        context.Database.EnsureCreated();
    }
}

static void PrintBooks() {
    // Gets and prints all books in database
    using (var context = new LibraryContext()) {
        var books = context.Books!
          .Include(p => p.Publisher);
        Console.WriteLine(new string('=', 30));
        foreach (var book in books!) {
            Console.WriteLine(book);
        }
    }
}

static void PrintPublishers() {
    // Gets and prints all books in database
    using (var context = new LibraryContext()) {
        var data = context.Publishers;
        Console.WriteLine(new string('=', 30));
        foreach (var item in data!) {
            Console.WriteLine(item);
        }
    }
}

What does the above code do:

  • The CreateDbSeedData() method creates the database and seeds sample data if it does not already exist.
  • The two print methods (PrintPublishers()PrintBooks()) are self-explanatory.
  • The following methods are called at the top of Program.cs:

CreateDbSeedData();
PrintPublishers();
PrintBooks();

The moment of truth is here. Let us run the application with:

dotnet run

The output should look like this:

==============================
ID: 1
Publisher: Mariner Books

ID: 2
Publisher: Penguin Books

==============================
ISBN: 978-0140449174
Title: Anna Karenina
Author: Leo Tolstoy
Language: English
Pages: 880
Publisher: Penguin Books

ISBN: 978-0143107569
Title: Les Miserables
Author: Victor Hugo
Language: English
Pages: 1456
Publisher: Penguin Books

ISBN: 978-0544003415
Title: The Lord of the Rings
Author: J.R.R. Tolkien
Language: English
Pages: 1216
Publisher: Mariner Books

ISBN: 978-0547247762
Title: The Sealed Letter
Author: Emma Donoghue
Language: English
Pages: 416
Publisher: Mariner Books


Peeking inside the MySQL database


You can peek into the MySQL database inside the container. To get into a bash session inside the container, enter the following command:

docker exec -it db bash

This takes you into a a bash session inside the container that looks like this:

root@53e55f4991df:/#

To get into the MySQL command interface, enter the following:

mysql -uroot -psecret

You can check existing databases with:

show databases;

The output will resemble this:

+--------------------+
| Database           |
+--------------------+
| information_schema |
| library            |
| mysql              |
| performance_schema |
| sys                |
+--------------------+
5 rows in set (0.00 sec)

To look into the contents of our library database, run the following MySQL commands:

use library;
show tables;
select * from Publishers;
select * from Books;

To exit from the container interactive session and return to the host operating system, type exit twice.

Cleanup the running MySQL container

You can do the following to stop & remove the MySQL container:

docker rm -f db

Conclusion

This gives you the option to use yet another relational database with your .NET apps. Of course, you can use MySQL with ASP.NET, Blazor, gRPC, desktop or any other types of .NET applications.

References:

Sunday, December 13, 2020

EF Core Power Tools & .NET 5.0

The "EF Core Power Tools" is an open source project on GitHub started by Erik Ejlskov Jensen. It is an extension that you can add to Visual Studio 2019. In this post I will try and introduce you to this very useful tool. We will be using the SQL-Server Northwind database running in a container for sample data. 

Companion Video: 

Let's get started: https://youtu.be/FNXlsN3barQ

Running a docker container with SQL-Server Northwind sample database

I will use a docker image that contains the SQL-Server Northwind database. Credit goes to kcornwall for creating this docker image.

To pull & run the Northwind database in a docker container, run the following command in a terminal window:

docker run -d --name nw -p 1444:1433 kcornwall/sqlnorthwind

The above command does the following:

Docker image:  kcornwall/sqlnorthwind
Container Name
(--name):
 nw
Ports (-p):  Port 1433 in container is exposed as port 1444 on the host computer
Password:  The sa password is Passw0rd2018. This was determined from the Docker Hub page for the image.
-d:  Starts the container in detached mode

This is what I experienced after I ran the above command:

docker run
Let us make sure that the container is running. Execute this command to ensure that the container is running OK.

docker ps

The following confirmed to me that the container is indeed running:

docker ps

Install "EF Core Power Tools" extension into Visual Studio 2019

We will test "EF Core Power Tools" using a C# console application. Start Visual Studio and create a new project based on the "Console App (.NET Core) C#" template. You can name the app whatever you like.

Edit the .csproj file to make sure it is using the latest version of .NET Core. At the time of writing this post, my .csproj file looked like:

<Project Sdk="Microsoft.NET.Sdk">
  <PropertyGroup>
    <OutputType>Exe</OutputType>
    <TargetFramework>netcoreapp3.1</TargetFramework>
  </PropertyGroup>
</Project>

I changed TargetFramework netcoreapp3.1 to net5.0. The end result was:

<Project Sdk="Microsoft.NET.Sdk">
  <PropertyGroup>
    <OutputType>Exe</OutputType>
    <TargetFramework>net5.0</TargetFramework>
  </PropertyGroup>
</Project>

Rebuild your application to make sure all is OK.

In Visual Studio 2019, click on Extensions >> Manage Extensions.

Extensions
Enter "EF Core Power Tools" in the filter field. This causes the tool to be the first item in the list. Click on Download beside "EF Core Power Tools".
EF Core Power Tools

Exit Visual Studio 2019 for this extension to get installed. When you click Modify on the following dialog, the extension gets installed.
modify
Finally, click on the Close button.
close

Using EF Core Power Tools

Restart Visual Studio 2019 and open the console application that you had previously created. Now, when you right-click on the project node in "Solution Explorer", you will see "EF Core Power Tools".
EF Core Power Tools in Visual Studio 2019

Let us reverse engineer the Northwind database that is currently running in a docker container. Click on: EF Core Power Tools >> Reverse Engineer. Then, click on the first Add button.
choose database connection
On the next "Connection Properties" dialog, enter the following data:

Data source: Choose: Microsoft SQL Server (SqlClient)
Server name: localhost, 1444
User name: sa
Password: Passw0rd2018
Save my password: Checked
Select or enter a database name: Choose: Northwind

Connection properties

Click on OK. On the "Choose Database Connection" dialog, make sure you check "Use EF Core 5" before clicking on the OK button.
Use EF Core 5

All the artifacts in the database are shown in the next dialog. These include Tables, Views, and Stored Procedures. To keep it simple, choose only the Categories & Products tables.

SZelect Objects

After selecting Categories & Products tables, click on OK. The next dialog allows you to customize the way that the reverse-engineered code gets generated in your application. I set the following values:

Context name: NorthwindContext
Entity Types path: Models/NW
DbContext path Data The NorthwindContext.cs file will be placed in the Data folder
Pluralize or singularize generated object names (English) Checked Entity class names will be appropriately pluralized or singularized
Use DataAnnotation attributes to configure the model Checked Data Annotations will be used instead of Fluid APIs
Include connection string in generated code Checked Connection string will be hard-coded inside the NorthwindContext.cs. Of course, this is bad practice.
Install the EF Core provider package in the project Checked The package Microsoft.EntityFrameworkCore.SqlServer be automatically installed.

Generate EF Core Model

Click on OK. After the reverse engineering process is completed, you will see the following confirmation dialog:

Model generated successfully

Click OK. The files in Solution Explorer will look like this:

Solution explorer


As expected, The NorthwindContext.cs file is placed in the Data folder and the database model classes are placed in the Models folder. The efpt.config.json file contains the choices that were made while configuring the reverse-engineering process so that, if you do it again, it remembers what you did before.

Replace your Main() method in Program.cs with the following C# code:

using (NorthwindContext context = new NorthwindContext()) {
  var query = context.Products
      .Include(c => c.Category);

  foreach (var p in query) {
      Console.WriteLine($"{p.ProductId}\t{p.ProductName}\t{p.Category.CategoryName}");
  }
}

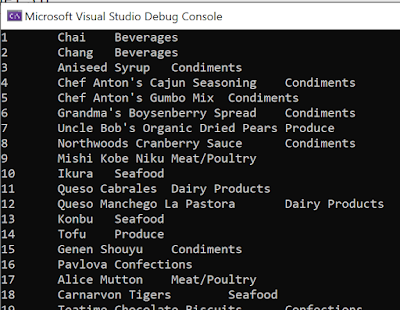
Run your application and you should see the following output:

EF Core 5.0 diagnostics

Entity Framework 5.0 is providing us with some diagnostics features.  I will let you know of two such features:

1) ToQueryString() - EF Core 5.0 comes with SQL-based brother to ToString() method for LINQ-queries. This method is called ToQueryString() and it returns provider-specific SQL without connecting to database server. Let's use ToQueryString() with our query object. Modify our code by adding a WriteLine() statement to inspect the query statement that is actually being sent to the database. Insert the statement in boldface below to the Main() method in Program.cs:

using (NorthwindContext context = new NorthwindContext()) {
  var query = context.Products
      .Include(c => c.Category);

  Console.WriteLine(query.ToQueryString());

  foreach (var p in query) {
      Console.WriteLine($"{p.ProductId}\t{p.ProductName}\t{p.Category.CategoryName}");
  }
}

Run your application and you will see the following output:

ToQueryString()

Note the raw query at the top. This is displayed before the query is sent to the database for processing.

2) LogTo() - Comment out the Console.WriteLine() code that we added earlier. Open the  the Data/NorthwindContext.cs file in the editor. Around line 31, add the option shown below in boldface to the optionsBuilder:

optionsBuilder
  .UseSqlServer("Data Source=localhost,1444;Initial Catalog=Northwind;Persist Security Info=True;User ID=sa;Password=Passw0rd2018")
  .LogTo(Console.WriteLine, Microsoft.Extensions.Logging.LogLevel.Information);

This causes logging to be sent to the console. Run your app and you should see the following diagnostics information:

LogTo()

.NET 5.0 Syntactic Sugar

We can simplify Program.cs using some of the new features in C# 9. Go ahead and delete the namespace, class and Main() method declarations so that Program.cs looks like this:

using Microsoft.EntityFrameworkCore;
using System;
using TestEFPowerTools.Data;

using (NorthwindContext context = new NorthwindContext()) {
    var query = context.Products
        .Include(c => c.Category);

    foreach (var p in query) {
        Console.WriteLine($"{p.ProductId}\t{p.ProductName}\t{p.Category.CategoryName}");
    }
}

The program runs just like before and it is much more simplified. I call this syntactic sugar.

Cleanup

Once you are done, you can stop and remove the Northwind docker container with the following command:

docker rm -f nw

Conclusion

I hope you found this article valuable and hope you join me again in future articles.

Sunday, March 19, 2017

Test Driven Development (TDD) with xunit and .NET Core 1.1

It is assumed that you have .NET Core 1.1 installed on your computer. If you do not already have it, you can obtain .NET Core 1.1 from https://www.microsoft.com/net/download/core.
We will create the test cases for a ET Core 1.1 application named FizzBuzz. Here’s how it goes. If a number is divisible by 3 then you will call out Fizz. If a number is divisible by 5 then you will call out Buzz. If a number is divisible by 3 and 5 then you will call out FizzBuzz. Otherwise, you will just call out the number itself.

Here are some examples:
2 12
4 1 2 Fizz 4
5 1 2 Fizz 4 Buzz
15 1 2 Fizz 4 Buzz Fizz 7 8 Fizz Fuzz 11 Fizz 13 14 FizzBuzz

The above table would represent our four test cases.

Directory & file structure

Create the following directory structure in your workspace directory:
image

Creating the business logic project

There are a number of built-in templates that are available to the developer. You con view these templates by typing the following in a terminal window:

dotnet new template --list

In a command line, while in the src/FizzBuzzLibrary directory, create the library project files by executing the following command:
dotnet new classlib
Similarly, in a command line while the test/FizzBuzzTests directory, create the test project files by executing the following command:
dotnet new xunit
If you open the root FizzBuzz folder in Visual Studio Code, your directories & files will look like this:
 
image

Rename the src/FizzBuzzLibrary/Class1.cs file to src/FizzBuzzLibrary/FizzBuzzMaster.cs. Open src/FizzBuzzLibrary/FizzBuzzMaster.cs in the editor and change the class name from Class1 to FizzBuzzMaster.

Similarly, rename test/FizzBuzzTests/UnitTest1.cs to test/FizzBuzzTests/FizzBuzzTestsMaster.cs. Open test/FizzBuzzTests/FizzBuzzTestsMaster.cs in the editor and change the class name from UnitTest1 to FizzBuzzTestsMaster.

Open the src/FizzBuzzLibrary/FizzBuzzMaster.cs file in the editor. Make sure the namespace is FizzBuzzLibrary and add the following method to the class:
public string GetResult(int nmbr) {  
  string result = "";
  return result;
}
You will notice that the above method is destined to fail. This is the fundamental principal of test driven development whereby methods are initially built to fail.

We should create our test cases. Open test/FizzBuzzTests/FizzBuzzTestsMaster.cs in the editor and replace the Test1() method with the following four test cases:
[Fact]
public void Given2Result12() {
  FizzBuzzMaster fbm = new FizzBuzzMaster();
  var expected = "1 2 ";
  var actual = fbm.GetResult(2);
  Assert.Equal(expected, actual);
}

[Fact]
public void Given4Result12fizz4() {
  FizzBuzzMaster fbm = new FizzBuzzMaster();
  var expected = "1 2 Fizz 4 ";
  var actual = fbm.GetResult(4);
  Assert.Equal(expected, actual);
}

[Fact]
public void Given5Result12fizz4buzz() {
  FizzBuzzMaster fbm = new FizzBuzzMaster();
  var expected = "1 2 Fizz 4 Buzz ";
  var actual = fbm.GetResult(5);
  Assert.Equal(expected, actual);
}

[Fact]
public void Given15Result12fizz4buzzfizz78fizzbuzz11fizzfizz1314fizzbuzz() {
  FizzBuzzMaster fbm = new FizzBuzzMaster();
  var expected = "1 2 Fizz 4 Buzz Fizz 7 8 Fizz Buzz 11 Fizz 13 14 FizzBuzz ";
  var actual = fbm.GetResult(15);
  Assert.Equal(expected, actual);
}


Import the following namespace at the top of the above file test/FizzBuzzTests/FizzBuzzTestsMaster.cs:

using FizzBuzzLibrary;

We need to make a reference to the Library project from the test project. This is done by adding the following reference to the test/FizzBuzzTests/FizzBuzzTests.csproj file inside the <ItemGroup> XML block:

<ProjectReference Include="..\..\src\FizzBuzzLibrary\FizzBuzzLibrary.csproj" />
The <ItemGroup> XML block in file test/FizzBuzzTests/FizzBuzzTests.csproj now looks like this:
<ItemGroup>
  <PackageReference Include="Microsoft.NET.Test.Sdk" Version="15.0.0" />
  <PackageReference Include="xunit" Version="2.2.0" />
  <PackageReference Include="xunit.runner.visualstudio" Version="2.2.0" />
  <ProjectReference Include="..\..\src\FizzBuzzLibrary\FizzBuzzLibrary.csproj" />
</ItemGroup>

Running our tests

We have built our preliminary business logic and test cases. In addition, we referenced our business logic application into our test cases application. Now let us test things out.

To restore and build our Library application, execute the following commands from within the root FizzBuzz directory:
dotnet restore src/FizzBuzzLibrary
dotnet build src/FizzBuzzLibrary
dotnet restore test/FizzBuzzTests
dotnet build test/FizzBuzzTests
It is now time to run the actual tests. This is done by executing the following command also from within the root FizzBuss directory:

dotnet test test/FizzBuzzTests/FizzBuzzTests.csproj

The test execution shows the following results:
Build started, please wait...
Build completed.

Test run for F:\4870\FizzBuzz\test\FizzBuzzTests\bin\Debug\netcoreapp1.1\FizzBuzzTests.dll(.NETCoreApp,Version=v1.1)
Microsoft (R) Test Execution Command Line Tool Version 15.0.0.0
Copyright (c) Microsoft Corporation.  All rights reserved.

Starting test execution, please wait...
[xUnit.net 00:00:00.5936585]   Discovering: FizzBuzzTests
[xUnit.net 00:00:00.7169039]   Discovered:  FizzBuzzTests
[xUnit.net 00:00:00.7640234]   Starting:    FizzBuzzTests
[xUnit.net 00:00:00.9084551]     FizzBuzzTests.FizzBuzzTestsMaster.Given4Result12fizz4 [FAIL]
[xUnit.net 00:00:00.9105612]       Assert.Equal() Failure
[xUnit.net 00:00:00.9107578]                 ↓ (pos 0)
[xUnit.net 00:00:00.9108391]       Expected: 1 2 Fizz 4
[xUnit.net 00:00:00.9109069]       Actual:  
[xUnit.net 00:00:00.9109578]                 ↑ (pos 0)
[xUnit.net 00:00:00.9125774]       Stack Trace:
[xUnit.net 00:00:00.9143555]         F:\4870\FizzBuzz\test\FizzBuzzTests\FizzBuzzTestsMaster.cs(22,0): at FizzBuzzTests.FizzBuzzTestsMaster.Given4Result12fizz4()
[xUnit.net 00:00:00.9308443]     FizzBuzzTests.FizzBuzzTestsMaster.Given2Result12 [FAIL]
[xUnit.net 00:00:00.9309901]       Assert.Equal() Failure
[xUnit.net 00:00:00.9310410]                 ↓ (pos 0)
[xUnit.net 00:00:00.9310890]       Expected: 1 2
[xUnit.net 00:00:00.9311260]       Actual:  
[xUnit.net 00:00:00.9312167]                 ↑ (pos 0)
[xUnit.net 00:00:00.9313206]       Stack Trace:
[xUnit.net 00:00:00.9314166]         F:\4870\FizzBuzz\test\FizzBuzzTests\FizzBuzzTestsMaster.cs(14,0): at FizzBuzzTests.FizzBuzzTestsMaster.Given2Result12()
[xUnit.net 00:00:00.9319873]     FizzBuzzTests.FizzBuzzTestsMaster.Given5Result12fizz4buzz [FAIL]
[xUnit.net 00:00:00.9321133]       Assert.Equal() Failure
[xUnit.net 00:00:00.9321913]                 ↓ (pos 0)
[xUnit.net 00:00:00.9322648]       Expected: 1 2 Fizz 4 Buzz
[xUnit.net 00:00:00.9323297]       Actual:  
[xUnit.net 00:00:00.9323876]                 ↑ (pos 0)
[xUnit.net 00:00:00.9324578]       Stack Trace:
[xUnit.net 00:00:00.9325473]         F:\4870\FizzBuzz\test\FizzBuzzTests\FizzBuzzTestsMaster.cs(30,0): at FizzBuzzTests.FizzBuzzTestsMaster.Given5Result12fizz4buzz()
[xUnit.net 00:00:00.9327846]     FizzBuzzTests.FizzBuzzTestsMaster.Given15Result12fizz4buzzfizz78fizzbuzz11fizzfizz1314fizzbuzz [FAIL]
[xUnit.net 00:00:00.9328761]       Assert.Equal() Failure
[xUnit.net 00:00:00.9329459]                 ↓ (pos 0)
[xUnit.net 00:00:00.9330050]       Expected: 1 2 Fizz 4 Buzz Fizz 7 8 Fizz Buzz 11 Fiz···
[xUnit.net 00:00:00.9331245]       Actual:  
[xUnit.net 00:00:00.9332037]                 ↑ (pos 0)
[xUnit.net 00:00:00.9332891]       Stack Trace:
[xUnit.net 00:00:00.9333733]         F:\4870\FizzBuzz\test\FizzBuzzTests\FizzBuzzTestsMaster.cs(38,0): at FizzBuzzTests.FizzBuzzTestsMaster.Given15Result12fizz4buzzfizz78fizzbuzz11fizzfizz1314fizzbuzz()
[xUnit.net 00:00:00.9356137]   Finished:    FizzBuzzTests
Failed   FizzBuzzTests.FizzBuzzTestsMaster.Given4Result12fizz4
Error Message:
Assert.Equal() Failure
          ↓ (pos 0)
Expected: 1 2 Fizz 4
Actual:  
          ↑ (pos 0)
Stack Trace:
   at FizzBuzzTests.FizzBuzzTestsMaster.Given4Result12fizz4() in F:\4870\FizzBuzz\test\FizzBuzzTests\FizzBuzzTestsMaster.cs:line 22
Failed   FizzBuzzTests.FizzBuzzTestsMaster.Given2Result12
Error Message:
Assert.Equal() Failure
          ↓ (pos 0)
Expected: 1 2
Actual:  
          ↑ (pos 0)
Stack Trace:
   at FizzBuzzTests.FizzBuzzTestsMaster.Given2Result12() in F:\4870\FizzBuzz\test\FizzBuzzTests\FizzBuzzTestsMaster.cs:line 14
Failed   FizzBuzzTests.FizzBuzzTestsMaster.Given5Result12fizz4buzz
Error Message:
Assert.Equal() Failure
          ↓ (pos 0)
Expected: 1 2 Fizz 4 Buzz
Actual:  
          ↑ (pos 0)
Stack Trace:
   at FizzBuzzTests.FizzBuzzTestsMaster.Given5Result12fizz4buzz() in F:\4870\FizzBuzz\test\FizzBuzzTests\FizzBuzzTestsMaster.cs:line 30
Failed   FizzBuzzTests.FizzBuzzTestsMaster.Given15Result12fizz4buzzfizz78fizzbuzz11fizzfizz1314fizzbuzz
Error Message:
Assert.Equal() Failure
          ↓ (pos 0)
Expected: 1 2 Fizz 4 Buzz Fizz 7 8 Fizz Buzz 11 Fiz···
Actual:  
          ↑ (pos 0)
Stack Trace:
   at FizzBuzzTests.FizzBuzzTestsMaster.Given15Result12fizz4buzzfizz78fizzbuzz11fizzfizz1314fizzbuzz() in F:\4870\FizzBuzz\test\FizzBuzzTests\FizzBuzzTestsMaster.cs:line 38

Total tests: 4. Passed: 0. Failed: 4. Skipped: 0.
Test Run Failed.
Test execution time: 2.1205 Seconds
Let’s fix all four failed tests by fixing our GetResult() method in src/FizzBuzzLibrary/FizzBuzzMaster.cs. Replace the GetResult() method with the following code:
public string GetResult(int nmbr) {  
    string result = "";

    for (int ndx=1; ndx<nmbr+1; ndx++) {
      if (ndx % 3 == 0 && ndx % 5 ==0) {
      result += "FizzBuzz ";
      } else if (ndx % 5 ==0 ) {
      result += "Buzz ";
      } else if (ndx % 3 ==0 ) {
      result += "Fizz ";                  
      }
      else
      result += ndx.ToString() + " ";
    }

    return result;
}
Build and run your tests again. This should be the outcome:
Build started, please wait...
Build completed.

Test run for F:\4870\FizzBuzz\test\FizzBuzzTests\bin\Debug\netcoreapp1.1\FizzBuzzTests.dll(.NETCoreApp,Version=v1.1)
Microsoft (R) Test Execution Command Line Tool Version 15.0.0.0
Copyright (c) Microsoft Corporation.  All rights reserved.

Starting test execution, please wait...
[xUnit.net 00:00:00.5944016]   Discovering: FizzBuzzTests
[xUnit.net 00:00:00.7260788]   Discovered:  FizzBuzzTests
[xUnit.net 00:00:00.7727980]   Starting:    FizzBuzzTests
[xUnit.net 00:00:00.9098086]   Finished:    FizzBuzzTests

Total tests: 4. Passed: 4. Failed: 0. Skipped: 0.
Test Run Successful.
Test execution time: 1.9927 Seconds
Rejoice that all our tests have successfully passed.

Thursday, January 19, 2017

Saturday, October 1, 2016

PostgreSQL DB and Code-First .NET Core console application

In previous posts I showed how to build console .NET Core applications that use the EF Code First model to connect with SQL Server (http://blog.medhat.ca/2016/09/codefirst-with-net-core-command-line.html) and SQLite (http://blog.medhat.ca/2016/10/codefirst-with-net-core-console.html). In this post we will look at building a simple console .NET Core application that works with database server PostgreSQL. The database is created using the Code First development paradigm.
This is taken from https://www.postgresql.org/about/:
PostgreSQL is a powerful, open source object-relational database system. It has more than 15 years of active development and a proven architecture that has earned it a strong reputation for reliability, data integrity, and correctness. It runs on all major operating systems, including Linux, UNIX (AIX, BSD, HP-UX, SGI IRIX, Mac OS X, Solaris, Tru64), and Windows. It is fully ACID compliant, has full support for foreign keys, joins, views, triggers, and stored procedures (in multiple languages). It includes most SQL:2008 data types, including INTEGER, NUMERIC, BOOLEAN, CHAR, VARCHAR, DATE, INTERVAL, and TIMESTAMP.
You can download PostgreSQL from https://www.postgresql.org/download/. Make sure you remember the password you entered because it belongs to the default super user named “postgres”.
After you download and install the software you can run the PostgreSQL management console by finding and launching “pgAdmin 4”.

image

When you double click on “PostgreSQL 9.6”, you will be prompted for the “postgres” password which you entered during installation. You can save the password if you enable the “Save Password” checkbox.

image

In the real world, you would not save the password in a production environment. I am saving the password for convenience as I am, essentially, in a test environment.

You can create a database named “test” and experiment with these SQL queries:
CREATE  TABLE employee (id SERIAL PRIMARY KEY, name VARCHAR(30) );
INSERT INTO employee (name) VALUES ('SAM');
SELECT * FROM employee;
This would create an employee table in the test database:

image

The command-line utility of PostgreSQL is psql. Find and launch SQL Shell (psql). Choose default values for Server [localhost], Database [postgres], Port [5432] and Username [postgres]. However, when prompted for “Password for user postgres:”, put the password you entered during installation.
To use the test database, enter “\c test;”. Remember to terminate all psql commands with the semicolon (;).

Next, let us view the contents of our employee table. Enter the following in the psql shell:
SELECT * FROM employee;
You should see the following:
id | name
----+------
  1 | SAM
(1 row)
To exit psql type “\q”.

Let is start building a simple console .NET Core app that uses the following Student entity:

image
1) Create a working directory named InstitutePostgreSQL.

2) From within a command prompt in that folder, type: dotnet new. This creates a Hello-World .NET Core console application.

3) Using Visual Studio Code, navigate to the InstitutePostgreSQL folder to open the project.

4) Open Program.cs and change the namespace to InstitutePostgreSQL then save the file.

5) To build the “Hello World” console app and run it, execute the following from the command prompt:
dotnet restore
dotnet build        (optional)
dotnet run
6) Since we will be accessing PostgreSQL using Entity Framework, we will need to add the following to the dependencies block of the project.json file:
"Microsoft.EntityFrameworkCore": "1.0.1",
"Npgsql.EntityFrameworkCore.PostgreSQL": "1.0.2",
"Microsoft.EntityFrameworkCore.Tools": "1.0.0-preview2-final",
"Microsoft.Extensions.Configuration": "1.0.0",
"Microsoft.Extensions.Configuration.Json": "1.0.0"
7) Add another tools section to the project.json file as follows:
"tools": {
    "Microsoft.EntityFrameworkCore.Tools": {
      "version": "1.0.0-preview2-final",
      "imports": [
        "portable-net45+win8+dnxcore50",
        "portable-net45+win8"
      ]
    }
  }
8) At this stage it is appropriate to restore all the new additional dependencies that we will be using. Therefore, execute the following at the command prompt:
dotnet restore
9) Add a folder named “Models” and add to it a C# class file named Student.cs. Add the following code to Student.cs:
using System;
using System.Collections.Generic;
namespace InstitutePostgreSQL.Models {
  public class Student {
    public int Id { get; set; }
    public string FirstName { get; set; }
    public string LastName { get; set; }
    public string Major { get; set; }
    public DateTime DateOfBirth { get; set; }

    public static List<Student> GetSampleStudents()   {
      List<Student> students = new List<Student>() {
        new Student {
          FirstName = "Ann",
          LastName = "Lee",
          Major = "Medicine",
          DateOfBirth = Convert.ToDateTime("2004/09/09")
        },
        new Student
        {
          FirstName = "Bob",
          LastName = "Doe",
          Major = "Engineering",
          DateOfBirth = Convert.ToDateTime("2005/09/09")
        },
        new Student {
          FirstName = "Sue",
          LastName = "Douglas",
          Major = "Pharmacy",
          DateOfBirth = Convert.ToDateTime("2006/01/01")
        },
        new Student {
          FirstName = "Tom",
          LastName = "Brown",
          Major = "Business",
          DateOfBirth = Convert.ToDateTime("2000/09/09")
        },
        new Student {
          FirstName = "Joe",
          LastName = "Mason",
          Major = "Health",
          DateOfBirth = Convert.ToDateTime("2001/01/01")
        }
      };
      return students;
    }
  }
}
The above code defines the properties of a Student class and adds a static method GetSampleStudents() that retrieves some sample data.

10) We will save the database connection string in a configuration JSON file. Create a file named appsettings.json in the root of your project with the following content:
{
  "ConnectionStrings": {
    "DefaultConnection": "User ID=postgres;Password=password;Host=localhost;Port=5432;Database=InstituteDB;Pooling=true;"
  }
}
Ensure that you enter the correct password for username postgres.

11) It is necessary to have a helper method that reads name/value pairs from the appsettings.json configuration file. To this end, we will create a class file named Utility.cs in the Models folder that fulfills this task. This file contains the following code:
using Microsoft.Extensions.Configuration;
namespace InstitutePostgreSQL.Models {
    public class Utility {
        public static string GetConnectionString(string key) {
            // Defines the sources of configuration information for the
            // application.
            var builder = new ConfigurationBuilder()
                .AddJsonFile("appsettings.json");

            // Create the configuration object that the application will
            // use to retrieve configuration information.
            var configuration = builder.Build();

            // Retrieve the configuration information.
            var configValue = configuration[key];

            return configValue;
        }
    }
}
12) Add another C# class file to the Models folder named InstituteContext.cs with the following code:
using Microsoft.EntityFrameworkCore;
namespace InstitutePostgreSQL.Models {
    public class InstituteContext : DbContext {
        public DbSet<Student> Students { get; set; }

        protected override void OnModelCreating(ModelBuilder builder) {
            builder.Entity<Student>().HasKey(m => m.Id);
            base.OnModelCreating(builder);
        }
        protected override void OnConfiguring(DbContextOptionsBuilder optionsBuilder)  {
            string constr = Utility.GetConnectionString("ConnectionStrings:DefaultConnection");

            optionsBuilder.UseNpgsql(constr);
        }
    }
}
13) When the application is built, the .dll file is created in a directory somewhere under the bin folder. We need to make sure that appsettings.json is also copied to the same directory as the dll file so that it can be read. This is accomplished by adding the following to the “buildOptions” section of the project.json file:
"copyToOutput": {
  "include": [ "appsettings.json" ]
}
14) It is time to build our application. At a command-prompt in the project folder, type the following:
dotnet build
15) We can now create the database using Entity Framework’s code-first paradigm. While in the command prompt, execute the following two EF commands:
dotnet ef migrations add FirstMigration
dotnet ef database update
Upon completion of the above EF commands, the database will have been created.

16) We are now in a position to add and retrieve data to and from the database. Add the following methods to your Program.cs file:
private static void addStudents() {
    using (var db = new InstituteContext()) {
        db.Students.AddRange(Student.GetSampleStudents());
        var count = db.SaveChanges();
        Console.WriteLine("{0} records saved to database", count);
    }
}
private static void displayStudents() {
    using (var db = new InstituteContext()) {
        Console.WriteLine();
        Console.WriteLine("All students in database:");
        foreach (var s in db.Students) {
            Console.WriteLine("{0}\t{1}\t{2}", s.Id, s.FirstName, s.LastName);
        }
    }
}
17) Resolve the namespace for the Student and InstituteContext classes.

18) Replace the Main() method in Program.cs with the following:
public static void Main(string[] args) {
    addStudents();
    displayStudents();
}
19) This final step is the most revealing. If you run the application, it should add data to the Students table in the database and retrieve its contents. Excited … lets do it. Execute the following from the command prompt:
dotnet build
dotnet run
20) If all goes well, you see the following results:
All students in database:
1       Ann     Lee
2       Bob     Doe
3       Sue     Douglas
4       Tom     Brown
5       Joe     Mason
Since we are using PostgreSQL with .NET Core, this application can run equally well on Windows, Linux and the Mac. This is also true of SQLite discussed in a previous post.

Related Posts:

SQLite DB and Code-First .NET Core console application
PostgreSQL DB and Code-First .NET Core console application

SQLite DB and Code-First .NET Core console application

In a previous post (http://blog.medhat.ca/2016/09/codefirst-with-net-core-command-line.html), I showed how to build a console .NET Core app that uses the EF Code First model with SQL Server. In this post we will use SQLite instead. The advantage of SQLite is that it is free, stable and runs on Windows, Linux, Mac, IoS, Android, etc…

A useful utility that comes in handy when working with the SQLite database is SQLiteStudio. Download SQLiteStudio from: http://sqlitestudio.pl/?act=download. Extract the ZIP file and place contents in a separate folder. Run SQLiteStudio.exe.

In this post we will look at building a simple console .NET Core application that works with SQLite. The database is created using the Code First development paradigm. We will build a simple console .NET Core app that uses the following Student entity:
image

1) Create a working directory named InstituteSQLite.

2) From within a command prompt in that folder, type: dotnet new. This creates a Hello-World .NET Core console application.

3) Using Visual Studio Code, navigate to the InstituteSQLite folder to open the project.

4) Open Program.cs and change the namespace to InstituteSQLite then save the file.

5) To build the “Hello World” console app and run it, execute the following from the command prompt:
dotnet restoredotnet build                 (optional)dotnet run
6) Since we will be accessing SQLite using Entity Framework, we will need to add the following to the dependencies block of the project.json file:
"Microsoft.EntityFrameworkCore": "1.0.1",
"Microsoft.EntityFrameworkCore.Sqlite": "1.0.1",
"Microsoft.EntityFrameworkCore.Tools": "1.0.0-preview2-final",
"Microsoft.Extensions.Configuration": "1.0.0",
"Microsoft.Extensions.Configuration.Json": "1.0.0"


7) Add another tools section to the project.json file as follows:
"tools": {
    "Microsoft.EntityFrameworkCore.Tools": {
      "version": "1.0.0-preview2-final",
      "imports": [
        "portable-net45+win8+dnxcore50",
        "portable-net45+win8"
      ]
    }
  }
8) At this stage it is appropriate to restore all the new additional dependencies that we will be using. Therefore, execute the following at the command prompt:
dotnet restore
9) Add a folder named “Models” and add to it a C# class file named Student.cs. with the following code:
using System;
using System.Collections.Generic;
namespace InstituteSQLite.Models {
  public class Student {
    public int Id { get; set; }
    public string FirstName { get; set; }
    public string LastName { get; set; }
    public string Major { get; set; }
    public DateTime DateOfBirth { get; set; }

    public static List<Student> GetSampleStudents()   {
      List<Student> students = new List<Student>() {
        new Student {
          FirstName = "Ann",
          LastName = "Lee",
          Major = "Medicine",
          DateOfBirth = Convert.ToDateTime("2004/09/09")
        },
        new Student
        {
          FirstName = "Bob",
          LastName = "Doe",
          Major = "Engineering",
          DateOfBirth = Convert.ToDateTime("2005/09/09")
        },
        new Student {
          FirstName = "Sue",
          LastName = "Douglas",
          Major = "Pharmacy",
          DateOfBirth = Convert.ToDateTime("2006/01/01")
        },
        new Student {
          FirstName = "Tom",
          LastName = "Brown",
          Major = "Business",
          DateOfBirth = Convert.ToDateTime("2000/09/09")
        },
        new Student {
          FirstName = "Joe",
          LastName = "Mason",
          Major = "Health",
          DateOfBirth = Convert.ToDateTime("2001/01/01")
        }
      };
      return students;
    }
  }
}
The above code defines the properties of a Student class and adds a static method GetSampleStudents() that retrieves some dummy data.

10) We will save the database connection string in a configuration JSON file. Create a file named appsettings.json in the root of your project with the following content:
{
  "ConnectionStrings": {
    "DefaultConnection": "Data Source=institute.sqlite"
  }
}
11) It is necessary to have a helper method that reads name/value pairs from the appsettings.json configuration file. To this end, we will create a class file named Utility.cs in the Models folder that fulfills this task. This file contains the following code:
using Microsoft.Extensions.Configuration;
namespace InstituteSQLite.Models {
    public class Utility {
        public static string GetConnectionString(string key) {
            // Defines the sources of configuration information for the
            // application.
            var builder = new ConfigurationBuilder()
                .AddJsonFile("appsettings.json");

            // Create the configuration object that the application will
            // use to retrieve configuration information.
            var configuration = builder.Build();

            // Retrieve the configuration information.
            var configValue = configuration[key];

            return configValue;
        }
    }
}
12) Add another C# class file to the Models folder named InstituteContext.cs with the following code:
using Microsoft.EntityFrameworkCore;
namespace InstituteSQLite.Models {
    public class InstituteContext : DbContext {
        public DbSet<Student> Students { get; set; }

        protected override void OnModelCreating(ModelBuilder builder) {
            builder.Entity<Student>().HasKey(m => m.Id);
            base.OnModelCreating(builder);
        }
        protected override void OnConfiguring(DbContextOptionsBuilder optionsBuilder)  {
            string constr = Utility.GetConnectionString("ConnectionStrings:DefaultConnection");
            string path = System.IO.Directory.GetCurrentDirectory();
            constr = constr.Replace("=", "=" + path + "\\");

            optionsBuilder.UseSqlite(constr);
        }
    }
}
13) When the application is built, the .dll file is created in a directory somewhere under the bin folder. We need to make sure that the appsettings.json file is also copied to the same directory as the dll file so that it can be read. This is accomplished by adding the following to the “buildOptions” section of the project.json file:
"copyToOutput": {
  "include": [ "appsettings.json" ]
}
14) It is time to build our application. At a command-prompt in the project folder, type the following:
dotnet build
15) We can now create the database using Entity Framework’s code-first paradigm. While in the command prompt, execute the following two EF commands:
dotnet ef migrations add FirstMigration
dotnet ef database update
Upon completion of the above EF commands, the database will have been created.

16) We can now add and retrieve data to and from the database. Add the following methods to your Program.cs file:
private static void addStudents() {
    using (var db = new InstituteContext()) {
        db.Students.AddRange(Student.GetSampleStudents());
        var count = db.SaveChanges();
        Console.WriteLine("{0} records saved to database", count);
    }
}
private static void displayStudents() {
    using (var db = new InstituteContext()) {
        Console.WriteLine();
        Console.WriteLine("All students in database:");
        foreach (var s in db.Students) {
            Console.WriteLine("{0}\t{1}\t{2}", s.Id, s.FirstName, s.LastName);
        }
    }
}
17) Resolve the namespace for the Student and InstituteContext classes.

18) Replace the Main() method in Program.cs with the following code:
public static void Main(string[] args) {
    addStudents();
    displayStudents();
}
19) This final step is the most exciting. If you run the application, it should add data to the Students table in the database and retrieve its contents. Can’t wait, lets do it. Execute the following from the command prompt:
dotnet build
dotnet run
20) If all goes well, you see the following results:
All students in database:
1       Ann     Lee
2       Bob     Doe
3       Sue     Douglas
4       Tom     Brown
5       Joe     Mason

Because we are using SQLite with .NET Core, this application will run equally well on Windows, Linux and Mac platforms.


Related Posts:

SQL Server LocalDB and Code-First .NET Core console application
PostgreSQL DB and Code-First .NET Core console application