Showing posts with label nginx. Show all posts

Saturday, March 26, 2022

Deploy DB driven Laravel web app to Azure App Service running on Linux NGINX web server through GitHub Actions

Laravel is an open-source PHP framework designed to make developing web apps mush easier and faster through built-in features. It is based on the MVC design pattern.

In this article, I will show you how to deploy a Laravel application to Azure App Services. The Azure web server is NGINX running on Linux version "Debian GNU/Linux 10 (buster)".

Assumptions

The following is assumed:

  • You have Git, PHP and Composer installed on your computer.
  • You have an Azure subscription
  • You have a GitHub account

Getting Started

We will start our journey with a very simple Laravel application that lists some data from a SQLite database. Go into a working directory on your computer and run the following command from a terminal window to clone a GitHub repo:

git clone https://github.com/medhatelmasry/laravel-azure.git

It is a good idea to delete the .git folder on your computer.

Once the application is cloned, change directory to the cloned app and start your app as shown below:

cd laravel-azure
composer install
php artisan serve --port=8888

The web server will start on your computer listening on port 8888.

Starting Laravel development server: http://127.0.0.1:8888
[Sat Mar 26 15:36:29 2022] PHP 8.1.2 Development Server (http://127.0.0.1:8888) started

Point your browser to http://localhost:8888/ and you will see the following page:


For demo purposes, data is pulled from a SQLite database file at database/autos.db

Disclaimer: It is normal practice that the .env file is excluded from being pushed to source control. If you look at the .gitignore file, the line pertaining to .env is commented out because there is really no confidential information in this file.

Create a repository in your GitHub account and push the source code to it.

Create Azure App Service

Login to your Azure account by visiting https://portal.azure.com. Enter "app services" in the filter field, then click on "App Services".


Click on "+ Create" on the top left-side.

On the "Create Web App Page", choose. your subscription then create new resource group.


Give your app a suitable host name that is unique.


Next, ensure these settings for Publish, Runtime stack and Operating System:


Choose suitable values for the remaining settings based on your individual preference then click on the blue "Review + create" button:


Click on Create button after you have reviewed your. choices.


Once your app service is successfully provisioned, you can click on the "Go to resource" button.


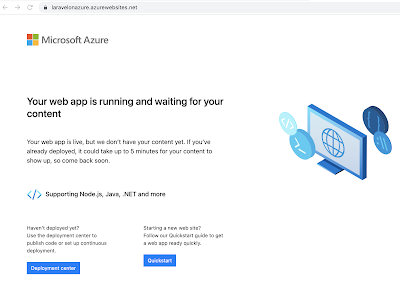
You can see a default web page to your web app be clicking on the URL link on the top right-side.


The default page looks like this.
\

CI/CD pipeline

Of course, we want to deploy our Laravel PHP site from our GitHub repo. An easy way to achieve this is to use Azure's "Deployment Center". Click on "Deployment Center" in the left-side navigation.

In the "Deployment Center" blade, select GitHub.


If this is your first time to connect Azure to your GitHub account, you will be asked to go through the GitHub authentication process. Thereafter, select the appropriate GitHub Organization, Repository and Branch. My experience was:


Once you click on Save, the deployment process commences.


To go to your GitHub repo, click on the main link under Branch.

To see the deployment in action, click on Actions in your GitHub repository.


Click on the workflow in progress.


The workflow will be going through a build and deploy process. 


Be patient as it takes about 15 minutes to complete. This is because during build the command "composer install" is executed. This produces a multitude of files under the vendors folder, which are thereafter sent to Azure. Once the workflow is completed, your GitHub workflow page will look like this:


The workflow files were automatically generated and placed a .yml file in the .github/workflows folder with your source code.


You can click on the .yml file to see what the file looks like.


At this point, it is worth going back to the code on your computer and doing a pull of your code so that you get a copy of the .yml file that was added to your source code.

Configuring app on Azure

Back on the Azure portal, if you refresh the default page of our web app, you will experience a "403 Forbidden" message, which typically means that the root directory has no welcome page.


This is understandable because the main index.php page in Laravel resides in the /public folder. THis means that we need to do some configuration work on Azure. 

In Azure, enter the term advanced in the search input field then click on "Advanced Tools".


Click "Go -->".


A page opens up in a new browser tab. Click on SSH on the top menu.


A Linux terminal window is open.


If you are interested to know what version of Linux this is, enter the following terminal command:

cat /etc/os-release

The value beside PRETTY_NAME is the Linux distribution and version.

PRETTY_NAME="Debian GNU/Linux 10 (buster)"
NAME="Debian GNU/Linux"
VERSION_ID="10"
VERSION="10 (buster)"
VERSION_CODENAME=buster
ID=debian
HOME_URL="https://www.debian.org/"
SUPPORT_URL="https://www.debian.org/support"
BUG_REPORT_URL="https://bugs.debian.org/"

We will make a copy of the existing nginx configuration and place the file inside the /home/site directory with the following command:

cp /etc/nginx/sites-available/default /home/site/default

Once copied, edit the /home/site/default file with nano or vi. I will use nano.

nano /home/site/default

Make the following changes:

FromToAround Line #
root /home/site/wwwrootroot /home/site/wwwroot/public6
location / {
   index  index.php index.html index.htm hostingstart.html;
}
      
location / {
   index  index.php index.html index.htm hostingstart.html;
   try_files $uri $uri/ /index.php?$query_string;
}
      
10


In nano, hit CTRL X to save, enter Y then hit return.

We need to create a bash script file that overrides the existing default file with our customized version, then restart the server. Change directory to the site folder.

cd site

Inside the site directory, using vi or nano, create a file named startup.sh. To create a file with nano, type "nano startup.sh". Otherwise,  to create a file with vi, type "vi startup.sh". Add the following content to startup.sh:

#!/bin/bash

cp /home/site/default /etc/nginx/sites-available/default
service nginx reload

We will make our bash script file executable with:

chmod u+x startup.sh

While in the terminal window on Azure, let's visit the folder that contains our Laravel application. Do this by going to the wwwroot folder.

cd wwwroot
ls -a

This reveals the existence of all the files that we had on GitHub plus files in the vendor folder.


Navigate back to your App Service via the Azure Portal. Select Configuration in the Settings section.


Click on the "General Settings" tab, enter "/home/site/startup.sh" for the "Startup Command", then click on Save.


Click on blue Continue button the the "Save changes" prompt.


Now, when you refresh the website, you should see that our web app is working as expected.

Conclusion

We have successfully deployed a database driven Laravel PHP application to Azure App Services through GitHub. I hope you use the principles you learned in this tutorial to deploy much more interesting Laravel applications.

Wednesday, December 16, 2020

Containerizing ASP.NET WebAPI & Client-side Blazor apps with nginx

This tutorial is about containerizing both an ASP.NET WebAPI and a client-side (Web Assembly) Blazor application. We will be using Visual Studio Code in this walkthrough. At the time of writing this post, the current .NET version is 5.0. Also, the client-side Blazor application will be hosted by the nginx web-server running inside a docker container.

Source code: https://github.com/medhatelmasry/BlazorWithAPI.git

Creating and running the applications

Start with creating a working directory named BlazorWithAPI and a solution file:

mkdir BlazorWithAPI
cd BlazorWithAPI
dotnet new sln

 Next, create a WebAPI project without HTTPS and it to the solution file.

dotnet new webapi --no-https -o WeatherAPI
dotnet sln add WeatherAPI/WeatherAPI.csproj

 Finally, create a client-side Blazor project without HTTPS and it to the same solution file.

dotnet new blazorwasm --no-https -o BlazorClient
dotnet sln add BlazorClient/BlazorClient.csproj

Let us run the WebAPI application.

cd WeatherAPI
dotnet run

If you point your browser to http://localhost:5000/Weatherforecast, you will see the default WeatherForecast service:

WeatherForecast service

Before we start working on our client-side Blazor application, that will consume the API service, we need to make two changes to our WeatherAPI application:

1) Let us change the default port number for the API from 5000 to 3000 so that it does not conflict with the Blazor app. 

2) Enable CORS in the WeatherAPI application

Go through these steps to accomplish the above two required changes:

- Stop the WeatherAPI application by hitting CTRL C in the terminal window

- Open the WeatherAPI project in VS Code.

- Edit Properties/launchSettings.json. Around line 25, change 5000 to 3000.

- Open Startup.cs in the editor.

- Add the following code to the ConfigureServices() method

// Add Cors
services.AddCors(o => o.AddPolicy("CorsPolicy", builder => {
  builder.AllowAnyOrigin().AllowAnyMethod().AllowAnyHeader();
}));

- Add the following code to the Configure() method in Startup.cs just before app.UseAuthorization():

app.UseCors(); 

Open Controllers/WeatherForecastController.cs in the editor and add the following annotation to the class declaration just under [ApiController]:

[EnableCors("CorsPolicy")]

- Restart the WeatherAPI application with 'dotnet run'.


You will see that the port number is now 3000.

We will next focus on consuming our WeatherAPI service from a client-side Blazor application. Open the BlazorClient project in VS Code. Edit Pages/FetchData.razor. Around line 42 . . .

CHANGE: 

forecasts = await Http.GetFromJsonAsync<WeatherForecast[]>("sample-data/weather.json");

TO: 

forecasts = await Http.GetFromJsonAsync<WeatherForecast[]>("http://localhost:3000/Weatherforecast");

We can start testing our client-side Blazor app to make sure that it is reading weather data from our service. Start the BlazorClient app by typing the following in a terminal window at the root of the project:

dotnet run

Note: The Blazor app listens on port 5000 and the API app listens on port 3000. 

Point your browser to http://localhost:5000. When the Blazor app loads in the browser, click on 'Fetch data" on the left-side navigation. You should see data being read from the API service:

fetch data

Docker-izing both applications

To docker-ize our applications, we will need to add a Dockerfile to each project. Let's start with the WeatherAPI project. 

Dockerizing WeatherAPI application

Create a Dockerfile at the root of the WeatherAPI project and add to it the following code:

FROM mcr.microsoft.com/dotnet/core/aspnet:5.0-bionic
COPY WeatherAPI/dist /app
WORKDIR /app
EXPOSE 80/tcp
EXPOSE 443/tcp
ENTRYPOINT ["dotnet", "WeatherAPI.dll"]

NOTE: Adjust the name WeatherAPI based on whatever you named your project.

 Dockerizing BlazorClient application

We will be using the nginx web server to host the static client-side Blazor artifacts inside the container. Therefore, we will be using an nginx based docker container.

At the root of the BlazorClient project, create two files: one named nginx.conf and the other named Dockerfile. 

This configuration file is used to set the nginx document root and also to enable the delivery of .wasm files. Add the following code to nginx.conf:

events { }
   http {
      include mime.types;
      types {
         application/wasm wasm;
       }
     server {
        listen 80;
        index index.html;
        location / {
           root /var/www/web;
           try_files $uri $uri/ /index.html =404;
        }
     }
}

Add the following code to Dockerfile:

FROM nginx:alpine 
WORKDIR /var/www/web
COPY BlazorClient/dist/wwwroot .
COPY BlazorClient/nginx.conf /etc/nginx/nginx.conf
EXPOSE 80

Make sure you stop all running applications.

Before we can containerize our applications, we must first publish the release version of each app separately. To facilitate this process, I created a batch file in the solution folder that publishes each application to a folder named dist. Therefore, inside the folder that contains the .sln file, create a file named pblsh.cmd in Windows. You can use the same ideas for other operating systems like macOS or Linux.

Content of pblsh.cmd on Windows

cd WeatherAPI
rmdir /Q /S dist
dotnet publish -o dist
cd ..
cd BlazorClient
rmdir /Q /S dist
dotnet publish -o dist
cd ..

Content of pblsh.sh on mac

cd WeatherAPI 

rm -rf dist

dotnet publish -o dist

cd ..

cd BlazorClient

rm -rf dist

dotnet publish -o dist

cd ..

NOTE: Adjust the project names WeatherAPI and BlazorClient to suit your own project names.

docker-compose.yml file

We can now orchestrate multi-container Docker applications with docker-compose.yml. In the same solution director, create a text file named docker-compose.yml and add to it the following content:

version: "3.4"
services:
  webapi:
    build:
      context: .
      dockerfile: WeatherAPI/Dockerfile
    ports:
      - "3000:80"
    restart: always
    environment:
      - ASPNETCORE_ENVIRONMENT=Development
  wasm:
    build:
      context: .
      dockerfile: BlazorClient/Dockerfile
    depends_on:
      - webapi
    ports:
      - 8888:80

Running pblsh.cmd & docker-compose-yml

At a terminal window inside the solution folder, run the following command to publish each application separately:

'pblsh.cmd' on Windows or 'bash ./pblst.sh' on mac

Next, run docker-compose by simply entering the following instruction in the same terminal window:

docker-compose up

Wait until the terminal window settles down. To view the containerized client-side Blazor application, point your browser to https://localhost:8888 then click on "Fetch data". You should see your container hosted app being displayed in your browser:

Containerized client-side blazor app

Cleanup

To cleanup your environment by stopping and removing the running containers, hit CTRL C in the terminal window. Thereafter, enter the following command:

docker-compose down

Conclusion

I hope you found what you are looking for in this short article about how to docker-ize a client-side Blazor application under the nginx web server.
