Thursday, December 31, 2020

Electron.NET with ASP.NET MVC & EF

In this tutorial I will show you how to develop a simple cross-platform Electron application that retrieves data from the Northwind database and renders results in a chart. The solution also allows you to do the following:
  • export data to a CSV file
  • setup the solution as a separate desktop application

What is Electron?

Electron is a framework that supports development of apps using web technologies such as Chromium rendering engine and Node.js runtime. The platform supports Windows, MacOS and Linux. Some very popular applications that run on Electron are Visual Studio Code, Discord, Skype, GitHub Desktop and many others. The official site for Electron is https://www.electronjs.org/.

What is Electron.NET?

Electron.NET is a wrapper around Electron that allows .NET web developers to invoke native Electron APIs using C#. To develop with Electron.NET, you need Node.js & Npm installed on your computer. In addition, you must have .NET Core 3.1 or later. The official site for Electron.NET open source project is https://github.com/electronnet/electron.net/.

Running a docker container with SQL-Server Northwind sample database

I will use a docker image that contains the SQL-Server Northwind database. Credit goes to kcornwall for creating this docker image.

To pull & run the Northwind database in a docker container, run the following command in a terminal window:

docker run -d --name nw -p 1444:1433 kcornwall/sqlnorthwind

The above command does the following:

Docker image: kcornwall/sqlnorthwind
Container Name
(--name):
 nw
Ports (-p): Port 1433 in container is exposed as port 1444 on the host computer
Password: The sa password is Passw0rd2018. This was determined from the Docker Hub page for the image.
-d: Starts the container in detached mode


This is what I experienced after I ran the above command:
docker run
Let us make sure that the container is running. Execute this command to ensure that the container is running OK.
docker ps

The following confirms that the container is indeed running:
docker ps

Setup our application

At the time of writing this article, I was using .NET version 5.0.101 on a Windows 10 computer running version 1909

Let us create an ASP.NET MVC app named ElectronEF with the following terminal window commands:

mkdir ElectronEf
cd ElectronEf
dotnet new mvc

We need three .NET tools. Run the following commands from within a terminal window to install ElectronNET.CLI , dotnet-aspnet-codegenerator and dotnet-ef.

dotnet tool install –g ElectronNET.CLI
dotnet tool install -g dotnet-aspnet-codegenerator
dotnet tool install –g dotnet-ef

Continue by adding these packages to your project:

dotnet add package Microsoft.VisualStudio.Web.CodeGeneration.Design
dotnet add package Microsoft.EntityFrameworkCore.Design
dotnet add package Microsoft.EntityFrameworkCore.SqlServer
dotnet add package ElectronNET.API
dotnet add package C1.AspNetCore.Mvc

ElectronNET.API is the Electron.NET package and C1.AspNetCore.Mvc is a package from a company named ComponentOne that provides  components that we will use (under a short trial license) for creating a visual chart.

Finally, let's open our project in VS Code. To do that, simply execute the following command from the same terminal window:

code .

Open Program.cs in the editor and add the following statements to the CreateHostBuilder() method right before webBuilder.UseStartup<Startup>()

webBuilder.UseElectron(args);
webBuilder.UseEnvironment("Development");

Next, open Startup.cs in the editor and add the following statement to the bottom of the Configure() method:

// Open the Electron-Window here
Task.Run (async () => {
  await Electron.WindowManager.CreateWindowAsync ();
});

That's it. Your ASP.NET application is now electron-ized. To see the fruits of your labor, type the following command in the terminal window:

electronize init
electronize start

electronize init is a one-time command that creates a manifest file named electron.manifest.json and adds it to your project. 

electronize start launches the Electron app. Note that it takes a little longer the first time and the content now appears in an application window, not a browser.


Note that you can still run your application as a web app by simply stopping the Electron app (with File >> Exit from the app's menu system) and running the web app with: dotnet run.

Interacting with the Northwind database

Let us reverse engineer the database with the following command so that it generates a DbContext class and classes representing the Category & Product database entities in a folder named NW:

dotnet-ef dbcontext scaffold "Data Source=localhost,1444;Initial Catalog=Northwind;Persist Security Info=True;User ID=sa;Password=Passw0rd2018" Microsoft.EntityFrameworkCore.SqlServer -c NorthwindContext -o NW --table Products --table Categories

Add the following connection string to the top of appsettings.json just before "Logging":

"ConnectionStrings": {
    "NW": "Data Source=localhost,1444;Initial Catalog=Northwind;Persist Security Info=True;User ID=sa;Password=Passw0rd2018"
},

Open NW/NorthwindContext.cs and delete the OnConfiguring() method so that we do not have confidential connection string information embedded in source code.

Add the following to ConfigureServices() method in Startup.cs:

services.AddDbContext<NorthwindContext>(options => options.UseSqlServer(Configuration.GetConnectionString("NW")));

Rendering a chart 

Add the following instance variable to Controllers/HomeController.cs:

private readonly NorthwindContext _context;

Replace the HomeController constructor with this code:

public HomeController(ILogger<HomeController> logger, NorthwindContext context) {
    _logger = logger;
    _context = context;
}

Add the following helper method named getProductsByCategory() that returns a count of products by category from the Northwind database:

private List<object> getProductsByCategory () {
  var query = _context.Products
    .Include (c => c.Category)
    .GroupBy (p => p.Category.CategoryName)
    .Select (g => new {
        Name = g.Key,
        Count = g.Count ()
    })
    .OrderByDescending (cp => cp.Count);

  return query.ToList<object> ();
}

Add a ProductsByCategory() action method to HomeController.cs:

public IActionResult Chart() {
  ViewBag.CategoryProduct = this.getProductsByCategory ();
  return View ();
} 

To make available the char control to all views, add the following to Views/_ViewImports.cshtml:

@addTagHelper *, C1.AspNetCore.Mvc

We need a view to render the chart. Therefore, execute the following command to create /Views/Home/Chart.cshtml:

dotnet aspnet-codegenerator view Chart Empty -outDir Views/Home –udl

Replace Views/Home/Chart.cshtml with following code:

@{
  ViewData["Title"] = "Number of products by category";
}
<br />
<h1>@ViewData["Title"]</h1>

<div>
  <c1-flex-chart binding-x="Name" chart-type="Bar" legend-position="None">
    <c1-items-source source-collection="@ViewBag.CategoryProduct"></c1-items-source>
    <c1-flex-chart-series binding="Count" name="Count" />
    <c1-flex-chart-axis c1-property="AxisX" position="None" />
    <c1-flex-chart-axis c1-property="AxisY" reversed="true" />
  </c1-flex-chart>
</div>

Add these styles to Views/Shared/_Layout.cshtml just before </head>:

<c1-styles />
<c1-scripts>
   <c1-basic-scripts />
</c1-scripts>

Also in _Layout.cshtml, add the following menu item  at around line 35:

<li class="nav-item">
  <a class="nav-link text-dark" asp-area="" asp-controller="Home"
    asp-action="Chart">Chart</a>
</li>

Run the application by typing the following command in the terminal window:

electronize start

You should see the following output:

Save data to file system as CSV file

Add an action method named SaveAs() to Controllers/HomeController.cs with the following code:

public async Task<IActionResult> SaveAs (string path) {
  System.IO.StringWriter writer = new System.IO.StringWriter ();
  writer.WriteLine ("Name,Count");

  var query = this.getProductsByCategory ();
  query.ForEach (item => {
    writer.Write (item.GetType ().GetProperty ("Name").GetValue (item));
    writer.Write (",");
    writer.WriteLine (item.GetType ().GetProperty ("Count").GetValue (item));
  });

  await System.IO.File.WriteAllTextAsync (path, writer.ToString ());
  return RedirectToAction ("Index");
}

Menu customization

Electron.NET provides a default application menu. Note that there are differences between macOS and other platforms. On macOS, applications have their own menu to the left of the standard File/Edit/View menus.

Add the following using statements at the top of Startup.cs:

using ElectronNET.API.Entities;
using System.Runtime.InteropServices;

Add this CreateMenu() method to Startup.cs:

private void CreateMenu () {
  bool isMac = RuntimeInformation.IsOSPlatform (OSPlatform.OSX);
  MenuItem[] menu = null;

  MenuItem[] appMenu = new MenuItem[] {
    new MenuItem { Role = MenuRole.about },
    new MenuItem { Type = MenuType.separator },
    new MenuItem { Role = MenuRole.services },
    new MenuItem { Type = MenuType.separator },
    new MenuItem { Role = MenuRole.hide },
    new MenuItem { Role = MenuRole.hideothers },
    new MenuItem { Role = MenuRole.unhide },
    new MenuItem { Type = MenuType.separator },
    new MenuItem { Role = MenuRole.quit }
  };

  MenuItem[] fileMenu = new MenuItem[] {
    new MenuItem {
      Label = "Save As...", Type = MenuType.normal, Click = async () => {
        var mainWindow = Electron.WindowManager.BrowserWindows.First ();
        var options = new SaveDialogOptions () {
          Filters = new FileFilter[] {
            new FileFilter { Name = "CSV Files", Extensions = new string[] { "csv" } }
          }
        };
        string result = await Electron.Dialog.ShowSaveDialogAsync (mainWindow, options);
        if (!string.IsNullOrEmpty (result)) {
          string url = $"http://localhost:{BridgeSettings.WebPort}/Home/SaveAs?path={result}";
          mainWindow.LoadURL (url);
        }
      }
    },
    new MenuItem { Type = MenuType.separator },
    new MenuItem { Role = isMac ? MenuRole.close : MenuRole.quit }
  };

  MenuItem[] viewMenu = new MenuItem[] {
    new MenuItem { Role = MenuRole.reload },
    new MenuItem { Role = MenuRole.forcereload },
    new MenuItem { Role = MenuRole.toggledevtools },
    new MenuItem { Type = MenuType.separator },
    new MenuItem { Role = MenuRole.resetzoom },
    new MenuItem { Role = MenuRole.zoomin },
    new MenuItem { Role = MenuRole.zoomout },
    new MenuItem { Type = MenuType.separator },
    new MenuItem { Role = MenuRole.togglefullscreen }
  };

  if (isMac) {
    menu = new MenuItem[] {
      new MenuItem { Label = "Electron", Type = MenuType.submenu, Submenu = appMenu },
      new MenuItem { Label = "File", Type = MenuType.submenu, Submenu = fileMenu },
      new MenuItem { Label = "View", Type = MenuType.submenu, Submenu = viewMenu }
    };
  } else {
    menu = new MenuItem[] {
      new MenuItem { Label = "File", Type = MenuType.submenu, Submenu = fileMenu },
      new MenuItem { Label = "View", Type = MenuType.submenu, Submenu = viewMenu }
    };
  }

  Electron.Menu.SetApplicationMenu (menu);
}

Add following statement in Configure() method of Startup.cs just before await Electron.WindowManager.CreateWindowAsync():

CreateMenu();

Test the save-as functionality by starting the Electron app with the following terminal-window command:

electronize start

Click on File >> Save As ...

Select a location and give the export file a name (like data), then click on save. The content of data.csv should look like this:

Build for specific platform:

You can produce a setup application for Windows, macOS & Linux. To generate the setup application for Windows, execute the following command from a terminal window:

electronize build /target win /PublishReadyToRun false 

The result is a setup application located in bin/Desktop that you can distribute. Be patient because it takes time to generate.


If you run the setup exe file, it will install a desktop application on your computer that you can easily uninstall.

I hope you found this article useful and hope you build great Electron.NET apps.

Reference:
    https://www.grapecity.com/blogs/building-cross-platform-desktop-apps-with-electron-dot-net


Wednesday, December 16, 2020

Containerizing ASP.NET WebAPI & Client-side Blazor apps with nginx

This tutorial is about containerizing both an ASP.NET WebAPI and a client-side (Web Assembly) Blazor application. We will be using Visual Studio Code in this walkthrough. At the time of writing this post, the current .NET version is 5.0. Also, the client-side Blazor application will be hosted by the nginx web-server running inside a docker container.

Source code: https://github.com/medhatelmasry/BlazorWithAPI.git

Creating and running the applications

Start with creating a working directory named BlazorWithAPI and a solution file:

mkdir BlazorWithAPI
cd BlazorWithAPI
dotnet new sln

 Next, create a WebAPI project without HTTPS and it to the solution file.

dotnet new webapi --no-https -o WeatherAPI
dotnet sln add WeatherAPI/WeatherAPI.csproj

 Finally, create a client-side Blazor project without HTTPS and it to the same solution file.

dotnet new blazorwasm --no-https -o BlazorClient
dotnet sln add BlazorClient/BlazorClient.csproj

Let us run the WebAPI application.

cd WeatherAPI
dotnet run

If you point your browser to http://localhost:5000/Weatherforecast, you will see the default WeatherForecast service:

WeatherForecast service

Before we start working on our client-side Blazor application, that will consume the API service, we need to make two changes to our WeatherAPI application:

1) Let us change the default port number for the API from 5000 to 3000 so that it does not conflict with the Blazor app. 

2) Enable CORS in the WeatherAPI application

Go through these steps to accomplish the above two required changes:

- Stop the WeatherAPI application by hitting CTRL C in the terminal window

- Open the WeatherAPI project in VS Code.

- Edit Properties/launchSettings.json. Around line 25, change 5000 to 3000.

- Open Startup.cs in the editor.

- Add the following code to the ConfigureServices() method

// Add Cors
services.AddCors(o => o.AddPolicy("CorsPolicy", builder => {
  builder.AllowAnyOrigin().AllowAnyMethod().AllowAnyHeader();
}));

- Add the following code to the Configure() method in Startup.cs just before app.UseAuthorization():

app.UseCors(); 

Open Controllers/WeatherForecastController.cs in the editor and add the following annotation to the class declaration just under [ApiController]:

[EnableCors("CorsPolicy")]

- Restart the WeatherAPI application with 'dotnet run'.


You will see that the port number is now 3000.

We will next focus on consuming our WeatherAPI service from a client-side Blazor application. Open the BlazorClient project in VS Code. Edit Pages/FetchData.razor. Around line 42 . . .

CHANGE: 

forecasts = await Http.GetFromJsonAsync<WeatherForecast[]>("sample-data/weather.json");

TO: 

forecasts = await Http.GetFromJsonAsync<WeatherForecast[]>("http://localhost:3000/Weatherforecast");

We can start testing our client-side Blazor app to make sure that it is reading weather data from our service. Start the BlazorClient app by typing the following in a terminal window at the root of the project:

dotnet run

Note: The Blazor app listens on port 5000 and the API app listens on port 3000. 

Point your browser to http://localhost:5000. When the Blazor app loads in the browser, click on 'Fetch data" on the left-side navigation. You should see data being read from the API service:

fetch data

Docker-izing both applications

To docker-ize our applications, we will need to add a Dockerfile to each project. Let's start with the WeatherAPI project. 

Dockerizing WeatherAPI application

Create a Dockerfile at the root of the WeatherAPI project and add to it the following code:

FROM mcr.microsoft.com/dotnet/core/aspnet:5.0-bionic
COPY WeatherAPI/dist /app
WORKDIR /app
EXPOSE 80/tcp
EXPOSE 443/tcp
ENTRYPOINT ["dotnet", "WeatherAPI.dll"]

NOTE: Adjust the name WeatherAPI based on whatever you named your project.

 Dockerizing BlazorClient application

We will be using the nginx web server to host the static client-side Blazor artifacts inside the container. Therefore, we will be using an nginx based docker container.

At the root of the BlazorClient project, create two files: one named nginx.conf and the other named Dockerfile. 

This configuration file is used to set the nginx document root and also to enable the delivery of .wasm files. Add the following code to nginx.conf:

events { }
   http {
      include mime.types;
      types {
         application/wasm wasm;
       }
     server {
        listen 80;
        index index.html;
        location / {
           root /var/www/web;
           try_files $uri $uri/ /index.html =404;
        }
     }
}

Add the following code to Dockerfile:

FROM nginx:alpine 
WORKDIR /var/www/web
COPY BlazorClient/dist/wwwroot .
COPY BlazorClient/nginx.conf /etc/nginx/nginx.conf
EXPOSE 80

Make sure you stop all running applications.

Before we can containerize our applications, we must first publish the release version of each app separately. To facilitate this process, I created a batch file in the solution folder that publishes each application to a folder named dist. Therefore, inside the folder that contains the .sln file, create a file named pblsh.cmd in Windows. You can use the same ideas for other operating systems like macOS or Linux.

Content of pblsh.cmd on Windows

cd WeatherAPI
rmdir /Q /S dist
dotnet publish -o dist
cd ..
cd BlazorClient
rmdir /Q /S dist
dotnet publish -o dist
cd ..

Content of pblsh.sh on mac

cd WeatherAPI 

rm -rf dist

dotnet publish -o dist

cd ..

cd BlazorClient

rm -rf dist

dotnet publish -o dist

cd ..

NOTE: Adjust the project names WeatherAPI and BlazorClient to suit your own project names.

docker-compose.yml file

We can now orchestrate multi-container Docker applications with docker-compose.yml. In the same solution director, create a text file named docker-compose.yml and add to it the following content:

version: "3.4"
services:
  webapi:
    build:
      context: .
      dockerfile: WeatherAPI/Dockerfile
    ports:
      - "3000:80"
    restart: always
    environment:
      - ASPNETCORE_ENVIRONMENT=Development
  wasm:
    build:
      context: .
      dockerfile: BlazorClient/Dockerfile
    depends_on:
      - webapi
    ports:
      - 8888:80

Running pblsh.cmd & docker-compose-yml

At a terminal window inside the solution folder, run the following command to publish each application separately:

'pblsh.cmd' on Windows or 'bash ./pblst.sh' on mac

Next, run docker-compose by simply entering the following instruction in the same terminal window:

docker-compose up

Wait until the terminal window settles down. To view the containerized client-side Blazor application, point your browser to https://localhost:8888 then click on "Fetch data". You should see your container hosted app being displayed in your browser:

Containerized client-side blazor app

Cleanup

To cleanup your environment by stopping and removing the running containers, hit CTRL C in the terminal window. Thereafter, enter the following command:

docker-compose down

Conclusion

I hope you found what you are looking for in this short article about how to docker-ize a client-side Blazor application under the nginx web server.


Sunday, December 13, 2020

EF Core Power Tools & .NET 5.0

The "EF Core Power Tools" is an open source project on GitHub started by Erik Ejlskov Jensen. It is an extension that you can add to Visual Studio 2019. In this post I will try and introduce you to this very useful tool. We will be using the SQL-Server Northwind database running in a container for sample data. 

Companion Video: 

Let's get started: https://youtu.be/FNXlsN3barQ

Running a docker container with SQL-Server Northwind sample database

I will use a docker image that contains the SQL-Server Northwind database. Credit goes to kcornwall for creating this docker image.

To pull & run the Northwind database in a docker container, run the following command in a terminal window:

docker run -d --name nw -p 1444:1433 kcornwall/sqlnorthwind

The above command does the following:

Docker image:  kcornwall/sqlnorthwind
Container Name
(--name):
 nw
Ports (-p):  Port 1433 in container is exposed as port 1444 on the host computer
Password:  The sa password is Passw0rd2018. This was determined from the Docker Hub page for the image.
-d:  Starts the container in detached mode

This is what I experienced after I ran the above command:

docker run
Let us make sure that the container is running. Execute this command to ensure that the container is running OK.

docker ps

The following confirmed to me that the container is indeed running:

docker ps

Install "EF Core Power Tools" extension into Visual Studio 2019

We will test "EF Core Power Tools" using a C# console application. Start Visual Studio and create a new project based on the "Console App (.NET Core) C#" template. You can name the app whatever you like.

Edit the .csproj file to make sure it is using the latest version of .NET Core. At the time of writing this post, my .csproj file looked like:

<Project Sdk="Microsoft.NET.Sdk">
  <PropertyGroup>
    <OutputType>Exe</OutputType>
    <TargetFramework>netcoreapp3.1</TargetFramework>
  </PropertyGroup>
</Project>

I changed TargetFramework netcoreapp3.1 to net5.0. The end result was:

<Project Sdk="Microsoft.NET.Sdk">
  <PropertyGroup>
    <OutputType>Exe</OutputType>
    <TargetFramework>net5.0</TargetFramework>
  </PropertyGroup>
</Project>

Rebuild your application to make sure all is OK.

In Visual Studio 2019, click on Extensions >> Manage Extensions.

Extensions
Enter "EF Core Power Tools" in the filter field. This causes the tool to be the first item in the list. Click on Download beside "EF Core Power Tools".
EF Core Power Tools

Exit Visual Studio 2019 for this extension to get installed. When you click Modify on the following dialog, the extension gets installed.
modify
Finally, click on the Close button.
close

Using EF Core Power Tools

Restart Visual Studio 2019 and open the console application that you had previously created. Now, when you right-click on the project node in "Solution Explorer", you will see "EF Core Power Tools".
EF Core Power Tools in Visual Studio 2019

Let us reverse engineer the Northwind database that is currently running in a docker container. Click on: EF Core Power Tools >> Reverse Engineer. Then, click on the first Add button.
choose database connection
On the next "Connection Properties" dialog, enter the following data:

Data source: Choose: Microsoft SQL Server (SqlClient)
Server name: localhost, 1444
User name: sa
Password: Passw0rd2018
Save my password: Checked
Select or enter a database name: Choose: Northwind

Connection properties

Click on OK. On the "Choose Database Connection" dialog, make sure you check "Use EF Core 5" before clicking on the OK button.
Use EF Core 5

All the artifacts in the database are shown in the next dialog. These include Tables, Views, and Stored Procedures. To keep it simple, choose only the Categories & Products tables.

SZelect Objects

After selecting Categories & Products tables, click on OK. The next dialog allows you to customize the way that the reverse-engineered code gets generated in your application. I set the following values:

Context name: NorthwindContext
Entity Types path: Models/NW
DbContext path Data The NorthwindContext.cs file will be placed in the Data folder
Pluralize or singularize generated object names (English) Checked Entity class names will be appropriately pluralized or singularized
Use DataAnnotation attributes to configure the model Checked Data Annotations will be used instead of Fluid APIs
Include connection string in generated code Checked Connection string will be hard-coded inside the NorthwindContext.cs. Of course, this is bad practice.
Install the EF Core provider package in the project Checked The package Microsoft.EntityFrameworkCore.SqlServer be automatically installed.

Generate EF Core Model

Click on OK. After the reverse engineering process is completed, you will see the following confirmation dialog:

Model generated successfully

Click OK. The files in Solution Explorer will look like this:

Solution explorer


As expected, The NorthwindContext.cs file is placed in the Data folder and the database model classes are placed in the Models folder. The efpt.config.json file contains the choices that were made while configuring the reverse-engineering process so that, if you do it again, it remembers what you did before.

Replace your Main() method in Program.cs with the following C# code:

using (NorthwindContext context = new NorthwindContext()) {
  var query = context.Products
      .Include(c => c.Category);

  foreach (var p in query) {
      Console.WriteLine($"{p.ProductId}\t{p.ProductName}\t{p.Category.CategoryName}");
  }
}

Run your application and you should see the following output:

EF Core 5.0 diagnostics

Entity Framework 5.0 is providing us with some diagnostics features.  I will let you know of two such features:

1) ToQueryString() - EF Core 5.0 comes with SQL-based brother to ToString() method for LINQ-queries. This method is called ToQueryString() and it returns provider-specific SQL without connecting to database server. Let's use ToQueryString() with our query object. Modify our code by adding a WriteLine() statement to inspect the query statement that is actually being sent to the database. Insert the statement in boldface below to the Main() method in Program.cs:

using (NorthwindContext context = new NorthwindContext()) {
  var query = context.Products
      .Include(c => c.Category);

  Console.WriteLine(query.ToQueryString());

  foreach (var p in query) {
      Console.WriteLine($"{p.ProductId}\t{p.ProductName}\t{p.Category.CategoryName}");
  }
}

Run your application and you will see the following output:

ToQueryString()

Note the raw query at the top. This is displayed before the query is sent to the database for processing.

2) LogTo() - Comment out the Console.WriteLine() code that we added earlier. Open the  the Data/NorthwindContext.cs file in the editor. Around line 31, add the option shown below in boldface to the optionsBuilder:

optionsBuilder
  .UseSqlServer("Data Source=localhost,1444;Initial Catalog=Northwind;Persist Security Info=True;User ID=sa;Password=Passw0rd2018")
  .LogTo(Console.WriteLine, Microsoft.Extensions.Logging.LogLevel.Information);

This causes logging to be sent to the console. Run your app and you should see the following diagnostics information:

LogTo()

.NET 5.0 Syntactic Sugar

We can simplify Program.cs using some of the new features in C# 9. Go ahead and delete the namespace, class and Main() method declarations so that Program.cs looks like this:

using Microsoft.EntityFrameworkCore;
using System;
using TestEFPowerTools.Data;

using (NorthwindContext context = new NorthwindContext()) {
    var query = context.Products
        .Include(c => c.Category);

    foreach (var p in query) {
        Console.WriteLine($"{p.ProductId}\t{p.ProductName}\t{p.Category.CategoryName}");
    }
}

The program runs just like before and it is much more simplified. I call this syntactic sugar.

Cleanup

Once you are done, you can stop and remove the Northwind docker container with the following command:

docker rm -f nw

Conclusion

I hope you found this article valuable and hope you join me again in future articles.

Saturday, December 12, 2020

Exploring GitHub Codespaces

In this tutorial I will introduce you to GitHub Codespaces. We will first create an ASP.NET Core MVC application on your local computer. We will then push the application to GitHub. Once the application source code is on GitHub, we will use Visual Studio Code in GitHub Codespaces to modify the app and test it out - all in the cloud.

Companion video: https://youtu.be/DsGNAx_kJ3g

What is GitHub codespaces?

GitHub codespaces is an online development environment, hosted by GitHub and powered by Visual Studio Code. It allows you to develop entirely in the cloud. Codespaces is currently in limited public beta and subject to change.

You can signup for access to GitHub Codespaces at: https://github.com/features/codespaces/signup

Let's get started.

1) Create a repository in GitHub. I named mine MvcOnCodespaces.

2) Create an ASP.NET Core MVC application on your local computer. These are the commands I used to create the application named MvcOnCodespaces.

Create a directory for your application

mkdir MvcOnCodespaces

Change to the directory you just created.

cd MvcOnCodespaces

At the moment, the default version of .NET Core that is available on GitHub Codespaces is version 3.1. Therefore, to ensure that we create an application that uses .NET Core 3.1, we will create a global.json file specifying .NET Core version as follows:

dotnet new globaljson --sdk-version 3.1.401

NOTE: Find out the version of .NET Core 3.1 that exists on your computer using command:

dotnet --list-sdks 

Use the appropriate version in the 'dotnet new globaljson ..." command.

This was necessary for me to do because the default version of .NET Core on my computer was 5.0 at the time of writing this post. 

Now we can create an ASP.NET Core MVC 3.1 app with:

dotnet new mvc

If you inspect your .csproj file, you will find that it, indeed, targets .NET Core 3.1 (netcoreapp3.1).

netcoreapp3.1
At this point, you can go ahead and delete global.json because it served its purpose and we do not need it anymore.

3) Before we push our ASP.NET Core MVC application to GitHub, we need to have a .gitignore file. To create an appropriate .gitignore file, enter the following command in a terminal window:

dotnet new gitignore

Thereafter, create a local git repository, add all your source code files to it and commit your changes with these commands:

git init
git add .
git commit -m "1st commit"

4) Push your source-code to GitHub with the instructions on your repository for pushing existing code:
an existing repository from the command line

4) Create a Codespace. In your GitHub repository, click on Code followed by "Open with Codespaces".

Open with Codespaces

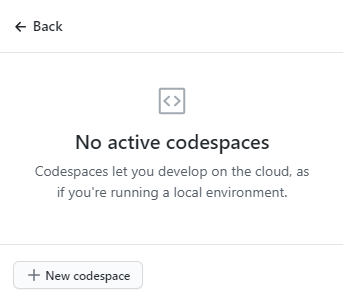
On the next dialog, click on the "+ New codespace" button.

+ New codespace

At the top right side you will see a progress bar that indicates that a Codespace is being prepared for you.

preparing your codespace
Click on Yes when you see this dialog:
required assets to build and debug
You will find yourself in familiar territory with VS Code running in your browser. Wait until all the activity in the lower pane settles down and you see a Finished statement.
Online VS Code

Querying the .NET environment in your Codespace

Let us query the .NET Core environment in a terminal window. Click on the TERMINAL tab.
Terminal
In the terminal window, type:
dotnet --list-sdks
The list of SDKs at the time of writing this article were as shown below:

dotnet --list-sdks

Build & run your web app

You can also go ahead and build with: dotnet build
dotnet build
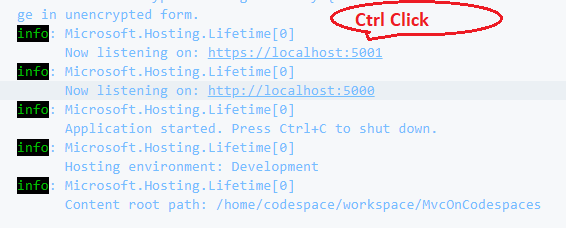
To run your application, hit CTRL F5. In the "DEBUG CONSOLE" pane, do a "CTRL Click" on the https://localhost:5001 link.
Ctrl Click
Port forwarding happens and the web app opens in a separate tab in your browser.
Port forwarding in codespaces

Let's make a change to our application. Edit Views/Shared/_Layout.cshtml in the Codespace. Around line 32, add the following style to the main <div> tag to change the background color to gold:

style="background-color: gold;"

css style

Stop and restart the application. This is done by clicking on the stop button first.
Stop application
Thereafter, hit CTRL F5. After the application restarts, go to the other tab that has theweb app and refresh the page. You will see the style change that we made.

CSS style change

Syncing source code

Git reminds us that there are three changes that happened to our code.

Git changes

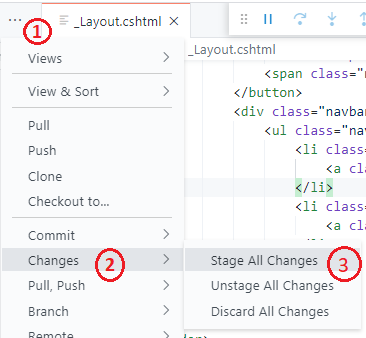
Stage changes with the following:
Stage all changes

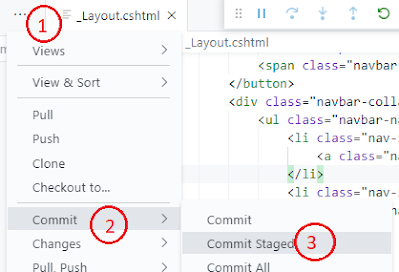
Next, let us commit staged changes:
Commit stages

Enter a message:
git commit message
Finally, push the changes:
git push

Debugging

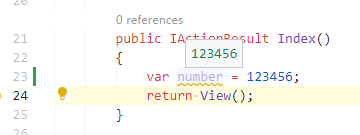
Let us see if we can debug the application in GitHub Codespaces. Stop the application. Open Controllers/HomeController.cs in the online VS Code editor. Add some code to the Index() action method as follows:

breakpoint
Add a breakpoint on the line with statement 'return View()'.

Run your application in Debug mode by hitting F5. If you refresh the web app in the other tab, the app will stop at the breakpoint, as expected.

stop at breakpoint

You can use the debug controls to: Continue, Step Over, Step Into, Step Out, Restart and Stop

debug controls

Cleanup

Delete the codespace you created once you determine that you do not need it anymore. Click on the Codespaces tab, click the ... (three dots) on the right side of the codepace,  then choose delete.

delete github codespace

Conclusion

I hope this journey through the world of GitHub Codespaces gave you a good understanding of what is possible with this new cloud service.